

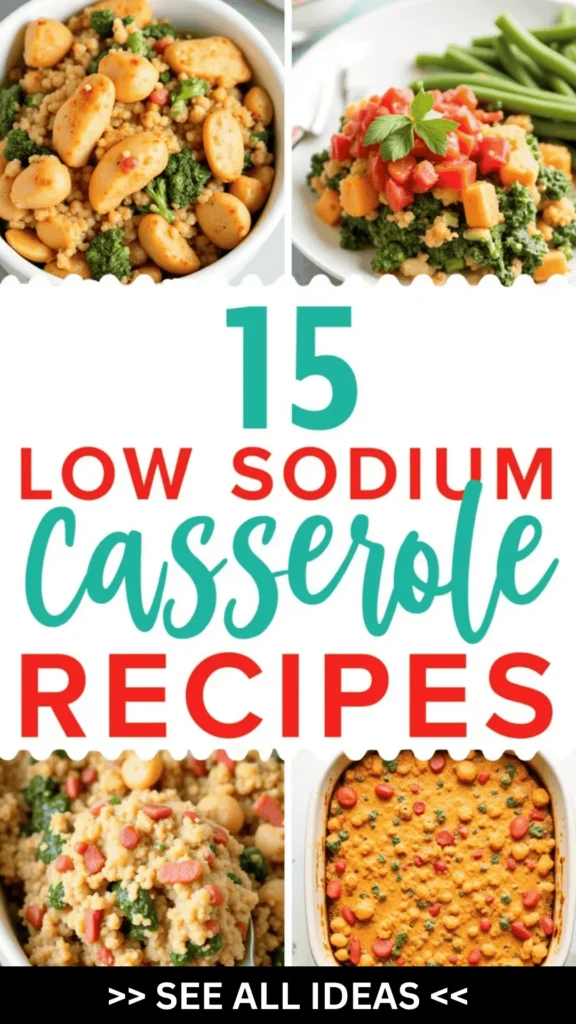
I’m so excited to share some of my favorite low sodium casserole recipes with you!
These dishes are not only heart-healthy but also bursting with flavor.
From creamy chicken and vibrant broccoli to a delightful tuna noodle bake, there’s something for everyone.
Each recipe is crafted to satisfy your cravings while keeping your health in mind.
Let’s get cooking and discover how delicious healthy eating can be!
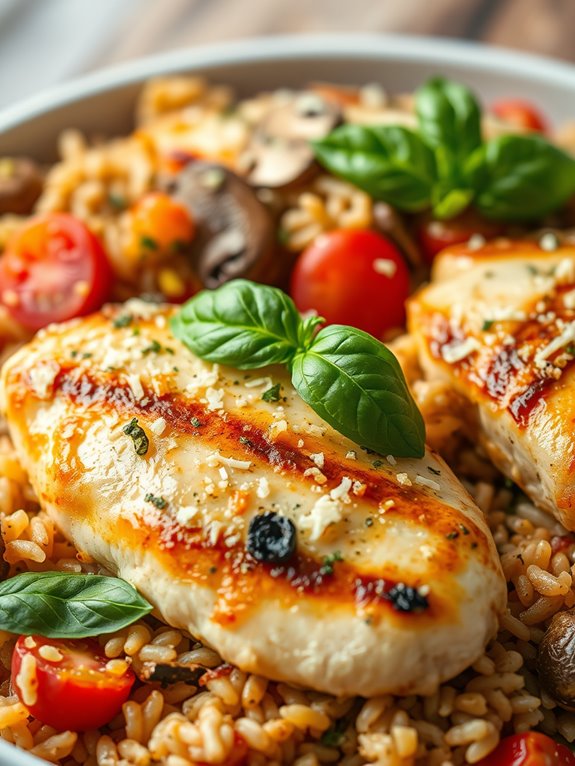
Creamy Chicken and Broccoli Casserole
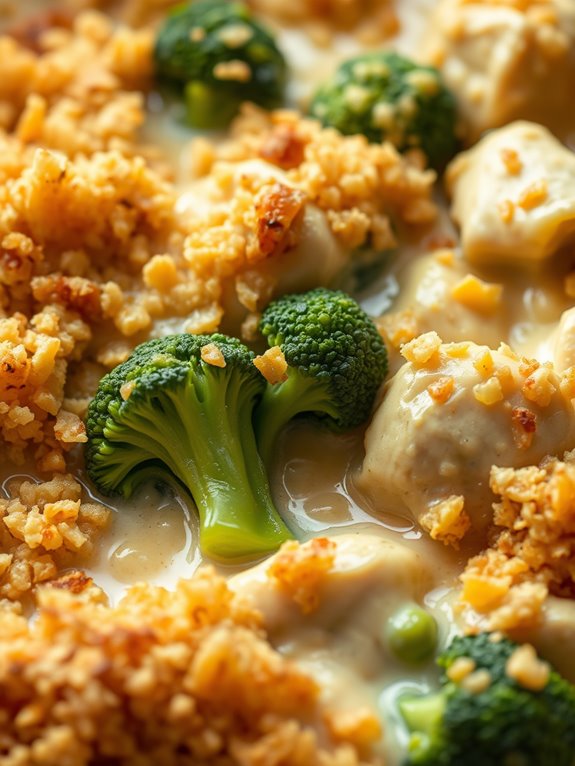
The Creamy Chicken and Broccoli Casserole is a delicious and nutritious dish that’s perfect for those looking to reduce their sodium intake without sacrificing flavor. This casserole combines tender pieces of chicken with fresh broccoli, enveloped in a creamy, savory sauce.
It’s a comforting meal that’s easy to prepare and is sure to be a hit with the whole family. With a few simple substitutions, you can enjoy this low sodium version that’s as delightful as any traditional casserole.
This recipe serves 4-6 people and is perfect for a family dinner or a gathering with friends. The combination of lean chicken breast and nutrient-rich broccoli makes it a healthy choice, while the creamy sauce ties it all together for a satisfying meal.
The use of low sodium ingredients guarantees that you can enjoy this dish without worrying about your daily salt intake.
Ingredients:
- 1 pound boneless, skinless chicken breasts, cut into bite-sized pieces
- 4 cups fresh broccoli florets
- 1 cup low sodium chicken broth
- 1 cup plain Greek yogurt
- 1 cup shredded low sodium cheddar cheese
- 1 tablespoon olive oil
- 1 teaspoon garlic powder
- 1 teaspoon onion powder
- 1/2 teaspoon black pepper
- 1/2 teaspoon paprika
- 1/4 cup grated Parmesan cheese
- 1/2 cup whole grain bread crumbs
Cooking Instructions:
- Preheat and Prepare: Preheat your oven to 350°F (175°C). Grease a 9×13 inch baking dish with a small amount of olive oil to prevent sticking.
- Cook the Chicken: In a large skillet, heat the olive oil over medium heat. Add the chicken pieces and cook for 5-7 minutes, or until they’re golden brown and cooked through. Remove from the heat and set aside.
- Steam the Broccoli: Bring a pot of water to a boil and add the broccoli florets. Steam them for about 3-4 minutes until they’re bright green and slightly tender. Drain and set aside.
- Make the Creamy Sauce: In a large bowl, combine the low sodium chicken broth, Greek yogurt, garlic powder, onion powder, black pepper, and paprika. Mix until smooth. Stir in the shredded cheddar cheese until well combined.
- Assemble the Casserole: In the prepared baking dish, evenly spread the cooked chicken and steamed broccoli. Pour the creamy sauce over the chicken and broccoli, and gently mix to confirm everything is well coated.
- Add Toppings: In a small bowl, mix the grated Parmesan cheese with the whole grain bread crumbs. Sprinkle this mixture evenly over the top of the casserole.
- Bake: Place the casserole in the preheated oven and bake for 25-30 minutes, or until the top is golden brown and the casserole is bubbly.
- Serve: Remove from the oven and let it cool for a few minutes before serving. Enjoy your low sodium creamy chicken and broccoli casserole!
Extra Tips: When preparing this dish, feel free to add other vegetables such as sliced mushrooms or bell peppers for additional flavor and nutrition.
If you prefer a spicier kick, a dash of cayenne pepper can be a great addition to the sauce. Always taste your sauce before baking to verify it’s seasoned to your liking, keeping in mind the reduced sodium content.
This casserole can be made ahead of time and stored in the refrigerator for up to two days before baking, making it a convenient option for busy weeknights.
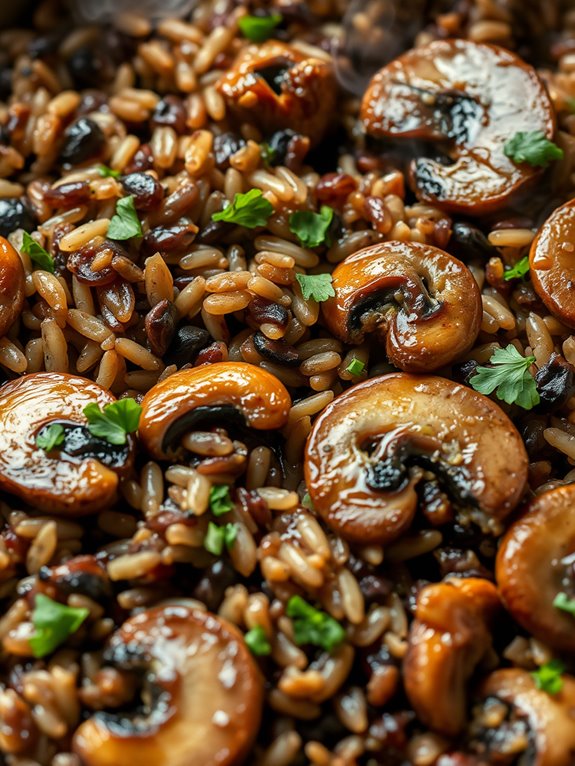
Mushroom and Spinach Quinoa Bake
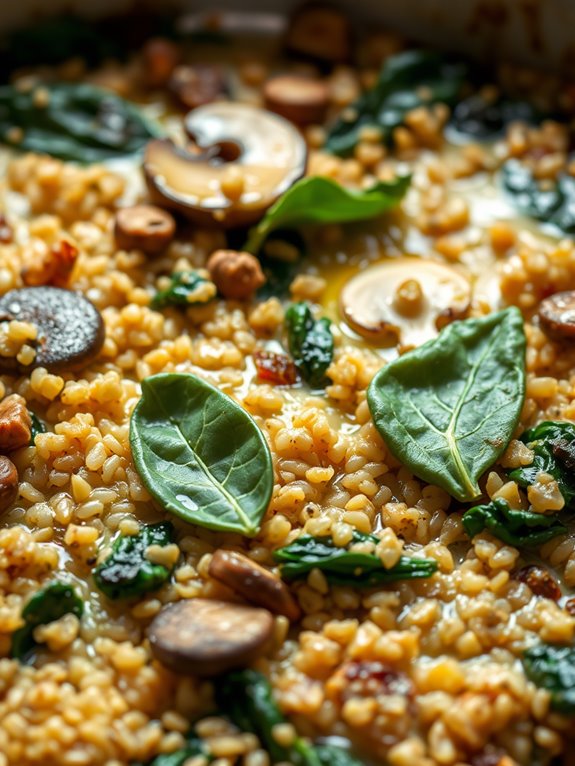
Mushroom and Spinach Quinoa Bake is a delicious and nutritious low sodium casserole that’s perfect for those looking to maintain a heart-healthy diet without sacrificing flavor. This recipe combines wholesome ingredients like quinoa, fresh spinach, and earthy mushrooms, resulting in a savory dish that’s both satisfying and nourishing. The natural flavors of the vegetables are enhanced by a hint of garlic and herbs, making this a perfect main or side dish for family dinners or gatherings.
Quinoa serves as a protein-rich base that’s gluten-free and full of fiber, while mushrooms add a meaty texture and depth of flavor. Spinach not only boosts the nutritional value of the dish with vitamins and minerals, but also adds vibrant color. This casserole isn’t only easy to prepare, but it’s also a great way to enjoy a filling meal without the need for added salts that can raise sodium levels.
Ingredients (Serves 4-6):
- 1 cup quinoa, rinsed
- 2 cups vegetable broth (low sodium)
- 1 tablespoon olive oil
- 1 medium onion, diced
- 3 cloves garlic, minced
- 8 ounces mushrooms, sliced
- 5 ounces fresh spinach
- 1 teaspoon dried thyme
- 1 teaspoon dried oregano
- 1/4 teaspoon black pepper
- 1/2 cup shredded mozzarella cheese (optional, low sodium)
- Cooking spray
Instructions:
- Preheat the Oven: Start by preheating your oven to 375°F (190°C). This guarantees it will be hot and ready once your casserole is assembled.
- Cook Quinoa: In a medium saucepan, combine the rinsed quinoa with the vegetable broth. Bring it to a boil, then reduce the heat to a simmer, cover the saucepan, and let it cook for about 15 minutes or until the quinoa has absorbed all the liquid and is fluffy.
- Sauté the Vegetables: While the quinoa is cooking, heat olive oil in a large skillet over medium heat. Add the diced onion and cook until translucent, about 5 minutes. Stir in the minced garlic and cook for another 1-2 minutes until fragrant.
- Add Mushrooms and Spinach: Add the sliced mushrooms to the skillet and cook until they’re tender and have released their juices, about 5-7 minutes. Add the fresh spinach to the skillet and cook until wilted, about 3 minutes.
- Combine Ingredients: In a large mixing bowl, combine the cooked quinoa, sautéed vegetables, dried thyme, dried oregano, and black pepper. Mix everything thoroughly.
- Assemble the Casserole: Lightly spray a baking dish with cooking spray. Transfer the quinoa and vegetable mixture into the prepared baking dish, spreading it out evenly. Sprinkle the top with shredded mozzarella cheese if using.
- Bake: Place the casserole in the preheated oven and bake for 20-25 minutes, or until the top is golden and the cheese, if added, is melted and bubbly.
- Serve: Once done, remove from the oven and let it cool slightly before serving. Enjoy your Mushroom and Spinach Quinoa Bake warm.
Extra Tips:
To enhance the flavor while keeping the sodium low, consider adding a dash of lemon juice or a sprinkle of nutritional yeast to the sautéed vegetables. If you prefer a bit of spice, a pinch of red pepper flakes can add a mild heat.
For those who are vegan, simply omit the cheese or use a dairy-free alternative. This dish can also be prepared ahead of time and refrigerated before baking, making it a convenient option for meal prep or busy weeknights.
Low Sodium Tuna Noodle Casserole
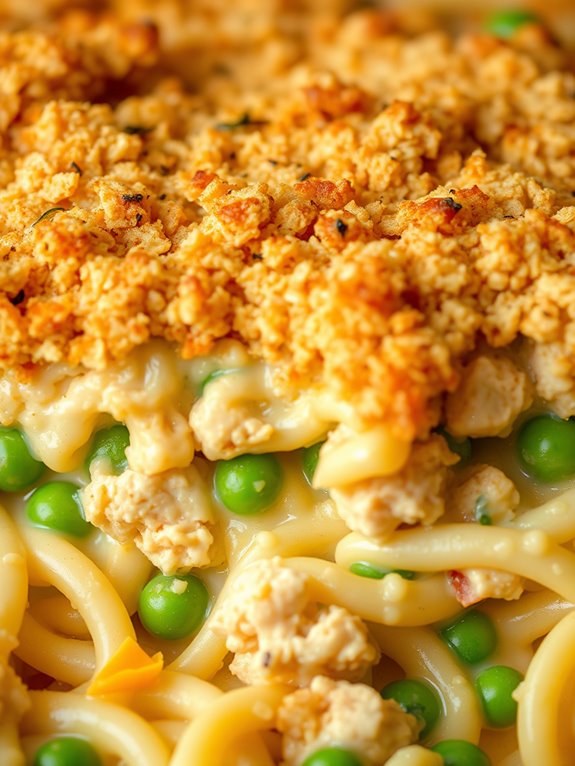
Low Sodium Tuna Noodle Casserole is a comforting and delicious dish that provides a healthy twist on a classic favorite. By reducing the sodium content, this casserole becomes a heart-friendly option without sacrificing flavor. This recipe combines tender noodles, hearty tuna, and a creamy sauce, all baked to perfection with a crispy topping.
Ideal for a family dinner, this low sodium version guarantees everyone can enjoy a scrumptious meal without the worry of excessive salt intake. This dish is perfect for feeding a group of 4-6 people, making it an excellent choice for a cozy family dinner or a small gathering.
By using fresh vegetables, low-sodium products, and aromatic herbs, this casserole becomes flavorful and satisfying. The preparation is straightforward, guaranteeing a stress-free cooking experience that results in a delightful meal everyone will appreciate.
Ingredients:
- 8 oz wide egg noodles
- 2 cups cooked, unsalted tuna (canned in water, drained)
- 1 cup unsalted frozen peas
- 1 small onion, diced
- 2 cloves garlic, minced
- 1 cup low-sodium cream of mushroom soup
- 1 cup low-sodium chicken broth
- 1 cup plain Greek yogurt
- 1 cup shredded low-sodium cheddar cheese
- 1 tablespoon olive oil
- 1 teaspoon dried thyme
- 1/2 teaspoon black pepper
- 1 cup whole wheat breadcrumbs
- Cooking spray
Cooking Instructions:
- Preheat the Oven: Begin by preheating your oven to 375°F (190°C).
- Cook the Noodles: In a large pot, bring water to a boil and cook the egg noodles according to package instructions until al dente. Drain and set aside.
- Sauté Aromatics: In a large skillet, heat olive oil over medium heat. Add the diced onion and minced garlic, sautéing until the onion becomes translucent, about 3-4 minutes.
- Combine Ingredients: In a large mixing bowl, combine the cooked noodles, sautéed onion and garlic, drained tuna, unsalted peas, low-sodium cream of mushroom soup, low-sodium chicken broth, Greek yogurt, shredded cheddar cheese, dried thyme, and black pepper. Mix well to guarantee all ingredients are evenly distributed.
- Prepare the Baking Dish: Lightly coat a 9×13 inch baking dish with cooking spray.
- Assemble the Casserole: Pour the noodle mixture into the prepared baking dish, spreading it out evenly.
- Add Topping: Sprinkle the whole wheat breadcrumbs evenly over the top of the casserole to create a crispy crust.
- Bake the Casserole: Place the dish in the preheated oven and bake for 25-30 minutes, or until the top is golden brown and the casserole is heated through.
- Cool and Serve: Allow the casserole to cool for a few minutes before serving, letting the flavors meld together.
Extra Tips:
To enhance the flavor of this Low Sodium Tuna Noodle Casserole, consider adding a variety of fresh herbs such as parsley or dill for added freshness. For those who enjoy a bit of heat, a pinch of red pepper flakes can add a subtle kick.
If desired, you can substitute the whole wheat breadcrumbs with crushed, unsalted crackers for a different texture. Always taste the casserole before serving to guarantee the seasoning meets your preference, keeping in mind the low sodium approach.
Southwest Black Bean and Rice Casserole
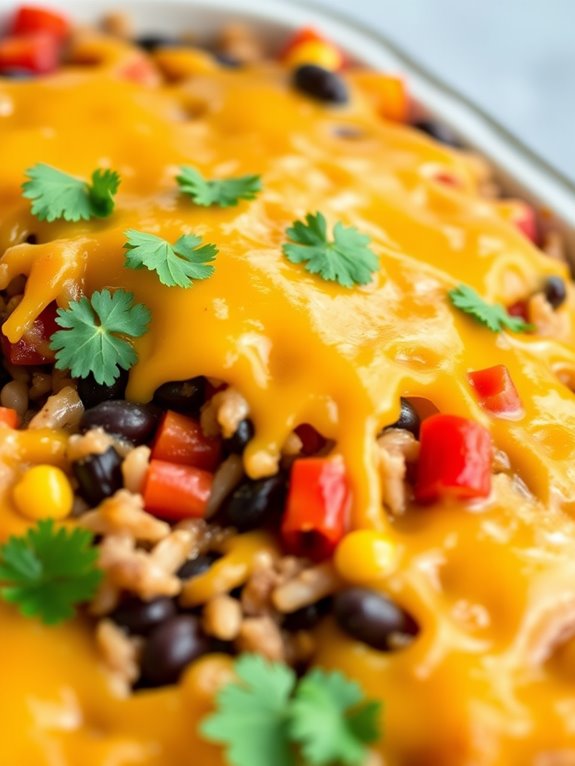
Southwest Black Bean and Rice Casserole is a delightful dish that combines the robust flavors of the Southwest into a comforting, hearty meal. This casserole is perfect for those looking to enjoy a savory dinner without the excess sodium typically found in traditional casseroles. By using fresh ingredients and spices, you can create a flavorful dish that isn’t only delicious but also heart-healthy.
This recipe is perfect for a family dinner or a gathering, serving 4-6 people with ease. The Southwest Black Bean and Rice Casserole features black beans, brown rice, and a medley of vegetables, all seasoned with a blend of southwest spices. It’s a satisfying dish that’s sure to please both vegetarians and meat-eaters alike.
The casserole is topped with a light sprinkle of cheese, which adds a creamy texture without overwhelming the dish with salt. By preparing this recipe, you’ll have a wholesome meal that’s both nutritious and delicious, perfect for any occasion.
Ingredients:
- 1 cup brown rice, uncooked
- 2 cups low-sodium vegetable broth
- 1 tablespoon olive oil
- 1 medium onion, diced
- 2 cloves garlic, minced
- 1 red bell pepper, diced
- 1 green bell pepper, diced
- 1 can (15 oz) low-sodium black beans, drained and rinsed
- 1 cup corn kernels, fresh or frozen
- 1 teaspoon cumin
- 1 teaspoon chili powder
- 1 teaspoon paprika
- 1/2 teaspoon black pepper
- 1/4 teaspoon cayenne pepper (optional)
- 1 cup shredded low-sodium cheddar cheese
- 1/4 cup fresh cilantro, chopped
- 1 lime, cut into wedges (for serving)
Instructions:
- Preheat and Prepare Rice: Preheat your oven to 375°F (190°C). Cook the brown rice according to package instructions, using the low-sodium vegetable broth instead of water to infuse more flavor.
- Sauté Vegetables: In a large skillet over medium heat, add olive oil. Once heated, add the diced onion and garlic. Sauté for about 2-3 minutes until the onion becomes translucent and fragrant.
- Add Peppers and Spices: Add the red and green bell peppers to the skillet. Cook for another 5 minutes until the peppers are softened. Stir in the cumin, chili powder, paprika, black pepper, and cayenne pepper (if using), and cook for another minute to let the spices bloom.
- Combine Ingredients: In a large mixing bowl, combine the cooked rice, sautéed vegetables, black beans, and corn. Mix well to confirm all ingredients are evenly distributed.
- Assemble Casserole: Transfer the rice and vegetable mixture into a lightly greased 9×13 inch casserole dish. Spread it evenly and sprinkle the shredded cheese over the top.
- Bake: Cover the casserole with aluminum foil and bake in the preheated oven for 20 minutes. Remove the foil and bake for an additional 10 minutes, or until the cheese is melted and bubbly.
- Garnish and Serve: Remove the casserole from the oven and let it cool for a few minutes. Garnish with fresh cilantro and serve with lime wedges on the side.
Extra Tips: For added flavor, consider adding a can of diced tomatoes (drained) or a few chopped jalapeños for a spicier kick. If you prefer a richer cheese flavor, you can mix in a bit of pepper jack cheese with the cheddar.
To make the dish even more filling, you could add cooked ground turkey or chicken, though be mindful to use low-sodium options to keep the dish heart-healthy.
Cheesy Cauliflower and Ham Bake

Cheesy Cauliflower and Ham Bake is a delicious and comforting dish that combines the creamy goodness of cheese with the savory flavors of ham, all enveloped within tender cauliflower. This dish is perfect for those seeking a low sodium meal without sacrificing taste. The natural flavors of the ingredients shine through, making it a satisfying option for family dinners or gatherings.
The creamy cheese sauce, made from low sodium cheese, melds beautifully with the cauliflower and ham, creating a perfectly balanced dish that’s both hearty and nutritious.
This casserole isn’t only easy to prepare but also versatile, as you can easily adjust the ingredients to suit your dietary needs or preferences. You can add more vegetables, use different types of cheese, or even substitute the ham for another protein.
Whether you’re looking to enjoy a cozy night in or impress your guests with a delicious homemade meal, Cheesy Cauliflower and Ham Bake is a fantastic choice. Serve it alongside a simple green salad or some crusty bread for a complete meal that will leave everyone satisfied.
Ingredients (Serves 4-6):
- 1 large head of cauliflower, cut into florets
- 2 cups cooked ham, diced
- 1 cup low sodium cheddar cheese, shredded
- 1 cup low sodium mozzarella cheese, shredded
- 1 cup unsweetened almond milk (or milk of choice)
- 2 tablespoons unsalted butter
- 2 tablespoons all-purpose flour
- 1 teaspoon garlic powder
- 1 teaspoon onion powder
- 1 teaspoon dried thyme
- 1/4 teaspoon black pepper
- Non-stick cooking spray
Cooking Instructions:
- Preheat and Prepare: Preheat your oven to 375°F (190°C). Lightly spray a 9×13-inch baking dish with non-stick cooking spray and set aside.
- Cook the Cauliflower: In a large pot, bring water to a boil and add the cauliflower florets. Cook for 5-6 minutes until they’re just tender but not mushy. Drain and set aside.
- Make the Cheese Sauce: In a medium saucepan, melt the butter over medium heat. Stir in the flour, garlic powder, onion powder, thyme, and black pepper, and cook for about 1 minute until the mixture is bubbly and slightly golden.
- Add Milk: Gradually whisk in the almond milk, guaranteeing no lumps form. Continue to whisk until the sauce thickens, about 3-4 minutes.
- Add Cheese: Reduce the heat to low and stir in the cheddar and mozzarella cheese until melted and smooth. Remove from heat.
- Combine Ingredients: In the prepared baking dish, combine the cooked cauliflower and diced ham. Pour the cheese sauce over the mixture, stirring gently to confirm everything is evenly coated.
- Bake: Transfer the baking dish to the preheated oven and bake for 20-25 minutes, or until the top is golden and bubbly.
- Serve: Remove from the oven and allow to cool slightly before serving.
Extra Tips:
For a crispier topping, consider sprinkling some whole wheat breadcrumbs over the casserole before baking. You can also add extra vegetables such as broccoli or bell peppers for added nutrition and flavor.
If you prefer a spicier dish, a pinch of cayenne pepper or red pepper flakes can be added to the cheese sauce. Remember to taste and adjust the seasoning if needed, keeping in mind that low sodium recipes may require more herbs and spices to enhance flavor.
Vegetable and Lentil Shepherd’s Pie
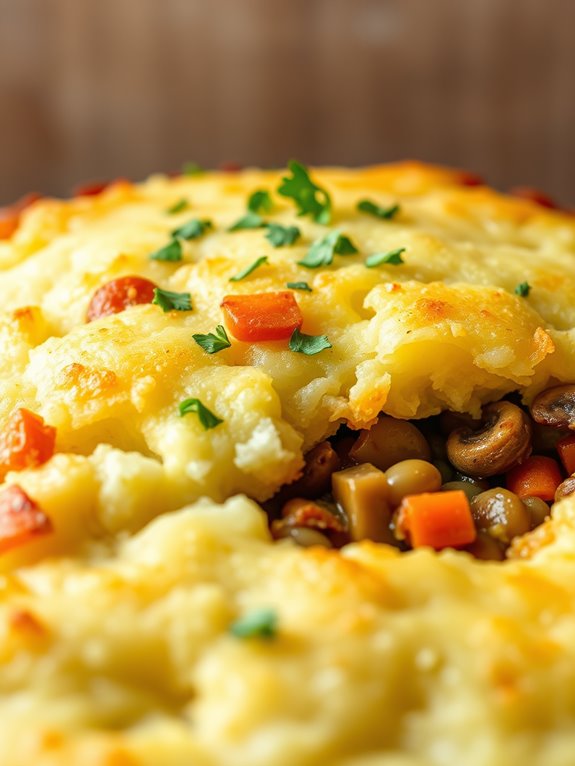
Vegetable and Lentil Shepherd’s Pie is a delightful, hearty dish that offers a healthier twist on the classic comfort food. This version is perfect for those looking to cut down on sodium without sacrificing flavor. Packed with a medley of fresh vegetables and protein-rich lentils, the pie is topped with creamy, mashed potatoes that are lightly seasoned to bring out their natural taste. It’s a nutritious, satisfying meal that’s sure to become a family favorite.
The recipe focuses on using natural ingredients to create a rich and savory flavor profile. The lentils provide a meaty texture, while the assortment of vegetables adds layers of flavor and nutrition. The mashed potatoes are made smooth and creamy using low-sodium broth instead of butter or cream, allowing the natural flavors to shine through. This dish is ideal for serving 4-6 people, making it perfect for a family dinner or a gathering with friends.
Ingredients:
- 1 cup green or brown lentils, rinsed and drained
- 3 cups low-sodium vegetable broth
- 2 tablespoons olive oil
- 1 large onion, diced
- 2 cloves garlic, minced
- 2 carrots, diced
- 2 stalks celery, diced
- 1 cup mushrooms, chopped
- 1 zucchini, diced
- 1 teaspoon dried thyme
- 1 teaspoon dried rosemary
- 2 tablespoons tomato paste
- 1 tablespoon balsamic vinegar
- 4 large potatoes, peeled and chopped
- 1/4 cup unsweetened almond milk
- Salt and pepper to taste (optional)
- Fresh parsley, chopped for garnish
Instructions:
- Cook the Lentils: Place the lentils and vegetable broth in a saucepan over medium heat. Bring to a boil, then reduce the heat and simmer for about 20-25 minutes, or until the lentils are tender and most of the liquid is absorbed. Drain any excess liquid if necessary.
- Prepare the Vegetable Filling: In a large skillet, heat the olive oil over medium heat. Add the onion and garlic, sautéing until the onion is translucent. Add the carrots, celery, mushrooms, and zucchini, cooking until the vegetables are tender, about 10 minutes.
- Season the Filling: Stir in the thyme, rosemary, tomato paste, and balsamic vinegar, mixing well. Add the cooked lentils to the skillet, combining all ingredients thoroughly. Cook for another 5 minutes to let the flavors meld together.
- Make the Mashed Potatoes: While the vegetable filling is cooking, place the potatoes in a large pot and cover with water. Bring to a boil and cook until tender, about 15-20 minutes. Drain the potatoes and return them to the pot. Add the almond milk and mash until smooth. Season with salt and pepper if desired.
- Assemble the Shepherd’s Pie: Preheat your oven to 400°F (200°C). Spread the lentil and vegetable filling evenly in a baking dish. Top with the mashed potatoes, spreading them smoothly over the filling.
- Bake the Pie: Place the dish in the preheated oven and bake for 20-25 minutes, or until the top is golden brown and the filling is bubbling. Remove from the oven and let it cool slightly before serving.
Extra Tips:
- For added flavor, consider adding a splash of low-sodium soy sauce or a sprinkle of nutritional yeast to the vegetable filling.
- If you prefer a creamier texture, you can add a tablespoon of olive oil or a splash more almond milk to the mashed potatoes.
- Feel free to experiment with additional vegetables such as peas or corn to suit your taste preferences.
- This dish can easily be prepared ahead of time and stored in the refrigerator for up to two days before baking.
Savory Sweet Potato and Turkey Casserole

Savory Sweet Potato and Turkey Casserole is a delicious and healthy dish that combines the earthy sweetness of sweet potatoes with the lean protein of turkey, all brought together in a comforting casserole that’s perfect for any occasion.
This low sodium version retains all the flavor without compromising on health, making it an ideal dish for those managing their sodium intake. The combination of fresh herbs and spices enhances the natural taste of the ingredients, creating a dish that’s both satisfying and nutritious.
This casserole isn’t only low in sodium but also rich in vitamins and minerals, making it a balanced meal option. The sweetness of the potatoes complements the savory turkey, while a mix of vegetables adds texture and flavor.
This dish is easy to prepare and can be assembled in advance, making it a convenient choice for busy weeknights or for serving at family gatherings. With this recipe, you can enjoy a comforting meal that’s both heart-healthy and full of flavor.
Ingredients for 4-6 servings:
- 2 large sweet potatoes, peeled and cubed
- 1 pound ground turkey
- 1 onion, diced
- 3 cloves garlic, minced
- 1 cup low sodium chicken broth
- 1 cup frozen peas
- 1 cup carrots, diced
- 1 teaspoon dried thyme
- 1 teaspoon dried rosemary
- 1/2 teaspoon black pepper
- 1/4 teaspoon ground nutmeg
- 1 tablespoon olive oil
- 1/2 cup plain Greek yogurt
- 1/4 cup chopped fresh parsley
- Optional: 1/4 cup shredded low-fat cheddar cheese
Cooking Instructions:
- Preheat oven: Begin by preheating your oven to 375°F (190°C) to guarantee it’s ready for baking the casserole.
- Cook sweet potatoes: In a large pot, add the cubed sweet potatoes and cover them with water. Bring to a boil and cook for about 10-15 minutes, or until they’re fork-tender. Drain and set aside.
- Sauté aromatics: In a large skillet, heat the olive oil over medium heat. Add the diced onion and minced garlic, sautéing for about 3-4 minutes until the onion is translucent and fragrant.
- Brown the turkey: Add the ground turkey to the skillet with the onions and garlic. Cook until the turkey is browned and cooked through, breaking it up with a spoon as it cooks.
- Add vegetables and spices: Stir in the diced carrots, frozen peas, dried thyme, rosemary, black pepper, and nutmeg. Cook for an additional 5 minutes, allowing the vegetables to soften slightly.
- Mix in broth: Pour in the low sodium chicken broth and let the mixture simmer for 5-7 minutes, allowing the flavors to meld together.
- Mash sweet potatoes: In a separate bowl, mash the cooked sweet potatoes with the Greek yogurt until smooth and creamy. Season with a pinch of black pepper if desired.
- Assemble the casserole: Spread the turkey and vegetable mixture evenly in a 9×13-inch baking dish. Top with the mashed sweet potatoes, spreading them out evenly over the turkey mixture.
- Bake: Place the casserole in the preheated oven and bake for 20-25 minutes. If using, sprinkle the shredded low-fat cheddar cheese on top during the last 5 minutes of baking for a cheesy crust.
- Garnish and serve: Once baked, remove the casserole from the oven and let it cool for a few minutes. Garnish with fresh parsley before serving.
Extra Tips:
When preparing this Savory Sweet Potato and Turkey Casserole, consider making it a day in advance. This allows the flavors to develop even further, creating a more robust taste.
You can also customize the vegetable mix based on what’s in season or available, such as adding bell peppers or zucchini. For a creamier texture, you can substitute part of the Greek yogurt with low-fat cream cheese.
If you prefer a bit more heat, a pinch of cayenne pepper can add a subtle kick. Remember to taste as you cook, adjusting the seasoning to your preference while keeping it low in sodium.
Zucchini and Ground Beef Skillet Bake
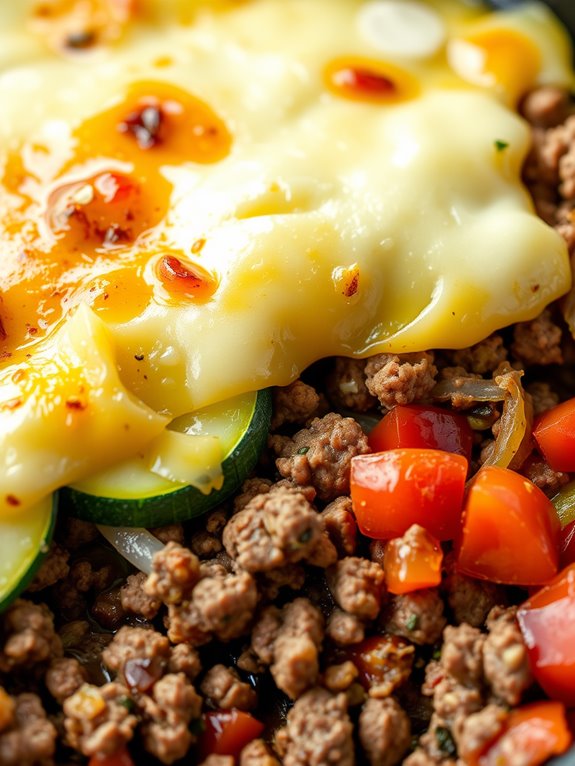
Zucchini and Ground Beef Skillet Bake is a delightful low-sodium casserole that merges the rich flavors of seasoned ground beef with the delicate taste of fresh zucchini. This dish is a perfect choice for those looking to enjoy a hearty meal without the excess salt, making it suitable for individuals monitoring their sodium intake.
This recipe brings together a blend of aromatic herbs and spices that compensate for the reduced salt, guaranteeing that every bite is as flavorful as it’s nourishing. Ideal for a family dinner or a gathering with friends, this casserole isn’t only easy to prepare but also requires minimal clean-up, as it’s cooked in a single skillet.
The combination of textures from the ground beef and tender zucchini, topped with a creamy cheese layer, creates a satisfying meal that’s both healthy and delicious. This recipe serves 4-6 people, making it perfect for sharing.
Ingredients:
- 1 pound ground beef
- 2 medium zucchinis, sliced
- 1 cup chopped onion
- 2 cloves garlic, minced
- 1 can (14.5 ounces) no-salt-added diced tomatoes
- 1 cup shredded low-sodium mozzarella cheese
- 1 teaspoon dried oregano
- 1 teaspoon dried basil
- 1/2 teaspoon black pepper
- 1 tablespoon olive oil
Cooking Instructions:
- Preheat and Prepare: Begin by preheating your oven to 375°F (190°C). This will guarantee it’s hot and ready for the final baking step.
- Cook the Beef: In a large skillet over medium heat, add the olive oil and swirl to coat the bottom. Add the ground beef, breaking it up with a wooden spoon, and cook until browned. This should take about 5-7 minutes. Drain any excess fat from the skillet.
- Add Vegetables: Add the chopped onion and minced garlic to the skillet with the beef. Sauté until the onion becomes translucent and the garlic is fragrant, about 3 minutes.
- Incorporate Tomatoes and Zucchini: Stir in the no-salt-added diced tomatoes, dried oregano, dried basil, and black pepper. Mix well to combine. Add the sliced zucchini to the skillet and gently fold to guarantee they’re well-coated with the tomato mixture.
- Simmer: Let the mixture simmer for about 10 minutes, allowing the zucchini to become tender and the flavors to meld together.
- Transfer and Bake: Transfer the skillet contents to a casserole dish if your skillet isn’t oven-proof. Sprinkle the shredded low-sodium mozzarella cheese evenly over the top of the mixture.
- Bake: Place the casserole in the preheated oven and bake for 15-20 minutes, or until the cheese is melted and bubbly.
- Serve: Once baked, remove the casserole from the oven and let it sit for a few minutes before serving. This allows the flavors to settle and makes it easier to portion.
Extra Tips: When cooking Zucchini and Ground Beef Skillet Bake, it’s important to choose zucchinis that are firm and free of blemishes, which guarantees the best texture in the dish.
If you prefer a bit more spice, consider adding a pinch of red pepper flakes during the simmering step. To make this dish even more nutritious, you can add other vegetables such as bell peppers or mushrooms.
For an added layer of flavor, try using a mix of mozzarella and cheddar cheese. Remember, the key to a successful low-sodium dish is a balance of fresh ingredients and aromatic herbs, which help enhance the natural flavors.
Italian Herb Chicken and Rice Casserole
Italian Herb Chicken and Rice Casserole is a delightful dish that combines the savory flavors of Italian herbs with tender chicken and fluffy rice, all while being mindful of sodium intake. This dish is perfect for those who are looking to enjoy a comforting meal without the added salt. By incorporating a blend of aromatic herbs and fresh ingredients, you can create a flavorful casserole that satisfies both taste and health needs.
This recipe is ideal for family dinners or gatherings, as it serves 4-6 people and can be prepared in advance for convenience.
The key to this Low Sodium Italian Herb Chicken and Rice Casserole is the use of fresh and dried herbs which add depth and richness to the dish. By substituting high-sodium ingredients with low-sodium alternatives, this casserole maintains its deliciousness while being heart-friendly.
The combination of lean chicken breasts, nutrient-dense vegetables, and brown rice not only makes this dish nutritious but also incredibly satisfying. Let’s explore the ingredients and steps needed to bring this tasty and healthy meal to your table.
Ingredients:
- 4 boneless, skinless chicken breasts
- 2 cups uncooked brown rice
- 1 tablespoon olive oil
- 1 medium onion, diced
- 3 cloves garlic, minced
- 1 red bell pepper, diced
- 1 cup mushrooms, sliced
- 1 teaspoon dried oregano
- 1 teaspoon dried basil
- 1 teaspoon dried thyme
- 1 teaspoon dried rosemary
- 2 cups low-sodium chicken broth
- 1 cup water
- 1 cup cherry tomatoes, halved
- 1/2 cup grated Parmesan cheese
- Fresh basil leaves for garnish
- Black pepper to taste
Cooking Instructions:
- Preheat the Oven: Start by preheating your oven to 375°F (190°C). This guarantees your casserole will cook evenly once all ingredients are combined.
- Prepare the Chicken: Season the chicken breasts with black pepper. In a large skillet over medium heat, add the olive oil and sear the chicken breasts on both sides until golden brown, about 5 minutes per side. Remove from the skillet and set aside.
- Sauté Vegetables: In the same skillet, add the diced onion, minced garlic, red bell pepper, and mushrooms. Sauté for 5-7 minutes, or until the vegetables are softened and fragrant.
- Combine Ingredients: In a large mixing bowl, combine the sautéed vegetables with uncooked brown rice, oregano, basil, thyme, rosemary, low-sodium chicken broth, and water. Mix well to combine.
- Assemble the Casserole: Transfer the rice and vegetable mixture into a greased 9×13-inch baking dish. Place the seared chicken breasts on top. Scatter the halved cherry tomatoes over the mixture and gently press them in.
- Bake the Casserole: Cover the baking dish with aluminum foil and bake in the preheated oven for 45 minutes. After 45 minutes, remove the foil, sprinkle the grated Parmesan cheese over the top, and return to the oven for an additional 10-15 minutes, or until the cheese is melted and bubbly.
- Garnish and Serve: Once cooked, remove the casserole from the oven and let it cool for a few minutes. Garnish with fresh basil leaves before serving. Enjoy your flavorful and healthy Italian Herb Chicken and Rice Casserole!
Extra Tips:
To enhance the flavors of this casserole, consider marinating the chicken in a mixture of olive oil, lemon juice, and Italian herbs for a few hours before cooking. This will infuse the chicken with extra flavor.
Additionally, feel free to substitute brown rice with quinoa or wild rice for a different texture and nutritional profile. When choosing canned tomatoes or broth, always opt for low-sodium versions to keep the dish heart-healthy.
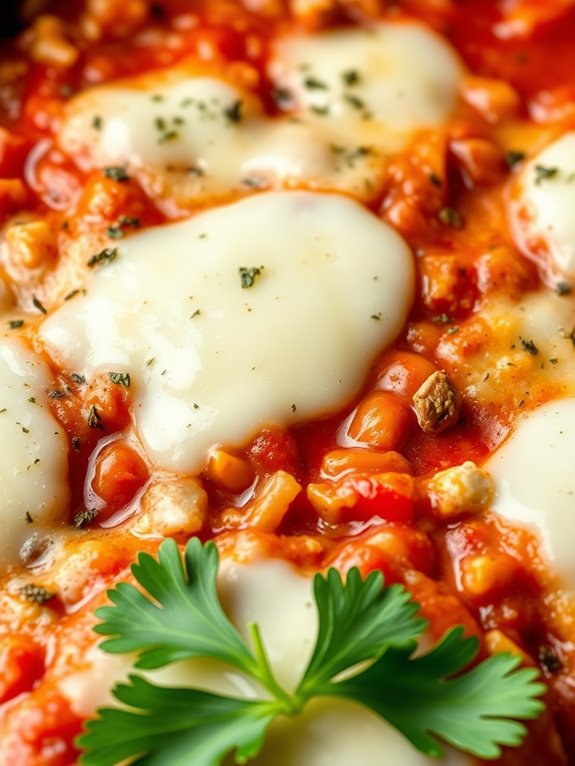
Eggplant and Tomato Parmesan Casserole
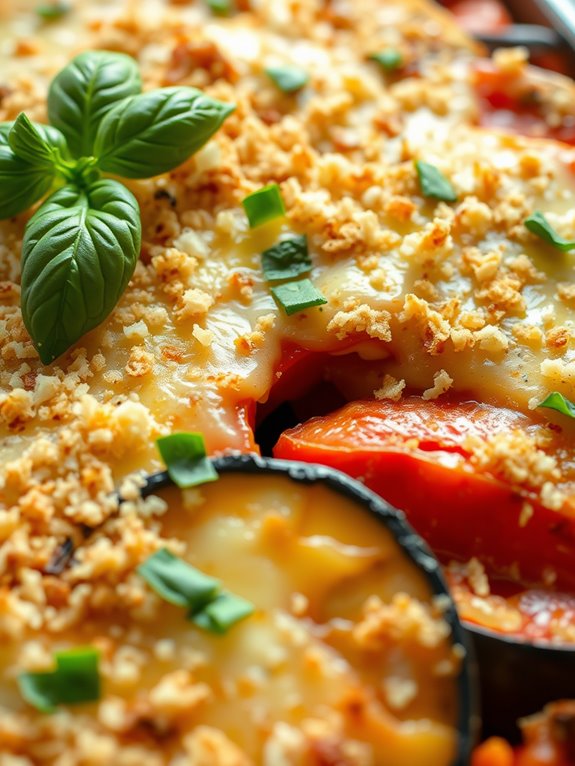
Eggplant and Tomato Parmesan Casserole is a delightful dish that combines the rich flavors of fresh eggplant and ripe tomatoes with a cheesy, comforting texture. This low sodium version guarantees that you can enjoy the classic taste without the extra salt, making it a heart-healthy choice for those who are mindful of their sodium intake.
The casserole is layered with thinly sliced eggplant, juicy tomato slices, and a blend of low-sodium cheeses, providing a satisfying and nutritious meal for the whole family. This dish is perfect for a family dinner or a potluck gathering, as it serves 4-6 people.
The preparation is straightforward, requiring simple ingredients and minimal prep work. By using fresh produce and herbs, you can enhance the natural flavors of the vegetables, making it a delicious and wholesome option for any occasion. With just a few steps, you’ll have a mouthwatering casserole that’s sure to please even the pickiest of eaters.
Ingredients:
- 2 medium eggplants, sliced into 1/4-inch rounds
- 4 large tomatoes, sliced into 1/4-inch rounds
- 1 cup shredded low-sodium mozzarella cheese
- 1/2 cup grated Parmesan cheese
- 1 cup whole wheat breadcrumbs
- 2 tablespoons olive oil
- 3 cloves garlic, minced
- 1 teaspoon dried oregano
- 1 teaspoon dried basil
- 1/4 teaspoon freshly ground black pepper
- 1/4 cup fresh basil leaves, chopped (for garnish)
Instructions:
- Preheat the Oven: Start by preheating your oven to 375°F (190°C). This guarantees that the casserole cooks evenly and the cheese melts perfectly.
- Prepare the Eggplant: Place the eggplant slices on a baking sheet lined with paper towels. Sprinkle them lightly with salt and let them sit for about 20 minutes to draw out excess moisture. Rinse the slices and pat them dry with a clean towel.
- Sauté the Garlic: In a small skillet, heat the olive oil over medium heat. Add the minced garlic and sauté for about 1-2 minutes until fragrant but not browned. Remove from heat and set aside.
- Assemble the Casserole: In a 9×13-inch baking dish, start by layering half of the eggplant slices. Top with half of the tomato slices. Drizzle half of the garlic-infused olive oil over the vegetables. Sprinkle with half of the oregano, basil, and black pepper. Add half of the mozzarella and Parmesan cheeses.
- Repeat Layers: Repeat the layering process with the remaining eggplant, tomato slices, garlic oil, herbs, and cheeses, finishing with the mozzarella and Parmesan on top.
- Add Breadcrumbs: Evenly sprinkle the breadcrumbs over the top layer of cheese. This will create a golden, crispy topping as it bakes.
- Bake the Casserole: Place the baking dish in the preheated oven and bake for 30-35 minutes, or until the casserole is bubbly and the top is golden brown.
- Garnish and Serve: Remove the casserole from the oven and let it cool for a few minutes. Garnish with fresh basil leaves before serving.
Extra Tips:
For a more robust flavor, consider roasting the eggplant slices in the oven for about 10 minutes before assembling the casserole. This will enhance their texture and add a slight caramelized taste.
If you want to add a bit of spice, you can include a pinch of crushed red pepper flakes in the seasoning mix. Additionally, using a mix of fresh and dried herbs can bring out different flavor notes, providing a more complex taste profile.
Low Sodium Macaroni and Cheese With Veggies
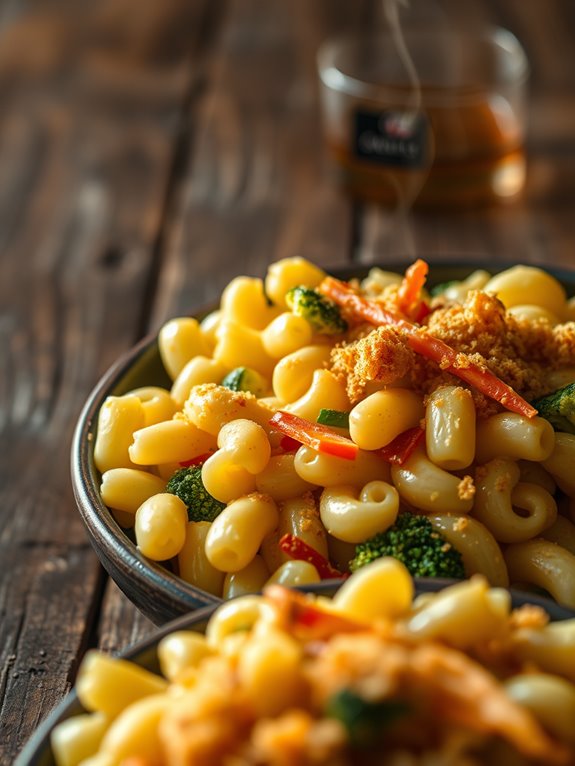
Low Sodium Macaroni and Cheese With Veggies is a delightful twist on the classic comfort food, providing a healthier option without sacrificing flavor. This dish combines creamy macaroni and cheese with a variety of fresh vegetables, making it a wholesome meal that’s perfect for any occasion.
By using low sodium ingredients, you’ll relish the rich taste of traditional mac and cheese while keeping your sodium intake in check.
This recipe is designed to serve 4-6 people, making it an ideal choice for family dinners or small gatherings. The combination of whole grain pasta, a blend of cheeses, and a colorful array of vegetables guarantees that each bite is both nutritious and satisfying.
With just a few simple steps, you can create a delicious meal that everyone will love, whether they’re following a low sodium diet or simply seeking a healthier alternative.
Ingredients:
- 12 ounces whole grain macaroni
- 2 tablespoons unsalted butter
- 2 tablespoons all-purpose flour
- 2 cups low sodium milk
- 1 cup reduced-fat cheddar cheese, shredded
- 1/2 cup mozzarella cheese, shredded
- 1 cup broccoli florets
- 1 cup bell peppers, diced
- 1 cup carrots, thinly sliced
- 1 teaspoon garlic powder
- 1 teaspoon onion powder
- 1/2 teaspoon ground mustard
- Freshly ground black pepper, to taste
- 1/2 cup bread crumbs (optional)
Cooking Instructions:
- Cook the Pasta: Bring a large pot of water to a boil. Add the whole grain macaroni and cook according to the package directions until al dente. Drain and set aside.
- Prepare the Cheese Sauce: In a large saucepan, melt the unsalted butter over medium heat. Stir in the flour, whisking continuously for about 1 minute until it forms a smooth paste.
- Add Milk and Seasonings: Gradually whisk in the low sodium milk, making certain there are no lumps. Continue to whisk until the mixture thickens, about 5-7 minutes. Stir in the garlic powder, onion powder, ground mustard, and black pepper.
- Incorporate the Cheese: Reduce the heat to low and slowly add the shredded cheddar and mozzarella cheeses, stirring until the cheese has completely melted and the sauce is smooth.
- Combine Pasta and Vegetables: Add the cooked macaroni, broccoli florets, diced bell peppers, and sliced carrots to the cheese sauce. Stir well to confirm everything is evenly coated.
- Transfer to Baking Dish (Optional): If desired, transfer the macaroni and cheese mixture to a greased baking dish. Sprinkle the bread crumbs over the top for added texture.
- Bake (Optional): Preheat the oven to 350°F (175°C). Bake the dish for 15-20 minutes, or until the top is golden brown. If you prefer a non-baked version, simply skip this step.
- Serve: Remove from the oven and let it cool slightly before serving. Enjoy your Low Sodium Macaroni and Cheese With Veggies hot.
Extra Tips:
Feel free to customize the vegetable selection based on your preferences or what you have on hand. Zucchini, peas, or spinach can be great additions.
If you’re looking to add some protein, consider mixing in cooked chicken breast or chickpeas. For a creamier sauce, you can substitute some of the milk with low sodium chicken broth.
Baked Ratatouille With Mozzarella
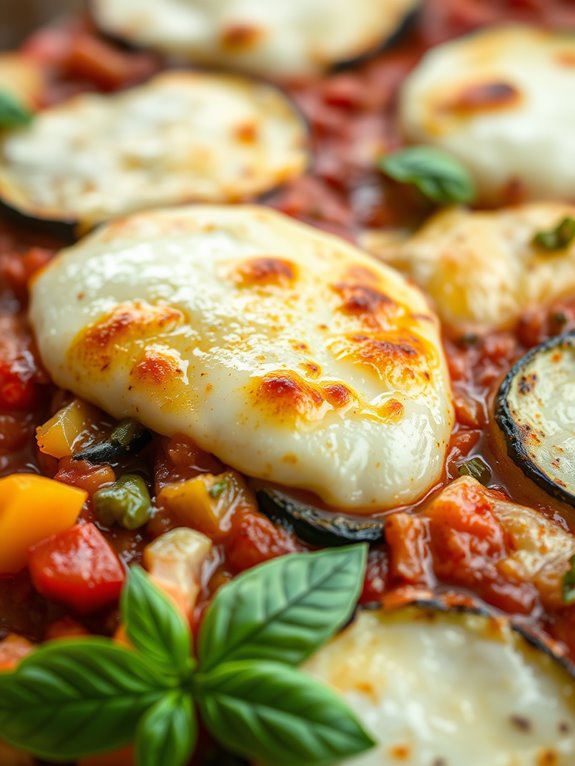
Baked Ratatouille With Mozzarella is a delightful dish that combines the classic flavors of traditional ratatouille with the creamy goodness of melted mozzarella. This low sodium casserole is perfect for those who are looking to enjoy a healthy and hearty meal without compromising on taste.
The dish features a medley of fresh vegetables, including zucchini, eggplant, and bell peppers, which are layered with a rich tomato sauce and topped with mozzarella cheese. Baking the ratatouille not only enhances the flavors but also gives the cheese a golden, bubbly finish that’s simply irresistible.
This recipe is designed to serve 4-6 people, making it an excellent choice for family dinners or small gatherings. The key to success with this dish is to use fresh, high-quality vegetables and mozzarella to guarantee maximum flavor and texture.
The low sodium aspect is achieved by using naturally low-sodium ingredients and avoiding processed foods. By following this recipe, you can create a nutritious and delicious meal that everyone will love.
Ingredients:
- 2 medium zucchinis, sliced
- 1 medium eggplant, sliced
- 2 red bell peppers, chopped
- 1 yellow onion, chopped
- 4 cloves garlic, minced
- 4 tomatoes, chopped
- 1 cup low-sodium vegetable broth
- 2 tablespoons olive oil
- 1 teaspoon dried oregano
- 1 teaspoon dried thyme
- 1/2 teaspoon black pepper
- 1 cup shredded mozzarella cheese
- Fresh basil leaves, for garnish (optional)
Instructions:
- Preheat the oven: Begin by preheating your oven to 375°F (190°C). This guarantees that the oven is at the right temperature when you’re ready to bake the casserole.
- Prepare the vegetables: In a large skillet, heat the olive oil over medium heat. Add the chopped onion and garlic, and sauté until the onion becomes translucent, about 5 minutes.
- Cook the vegetables: Add the sliced zucchini, eggplant, and chopped bell peppers to the skillet. Cook for another 5-7 minutes, stirring occasionally, until the vegetables are slightly tender.
- Add tomatoes and seasoning: Stir in the chopped tomatoes, dried oregano, dried thyme, and black pepper. Pour in the low-sodium vegetable broth and bring the mixture to a simmer. Allow it to cook for 10 minutes, stirring occasionally, until the sauce thickens slightly.
- Assemble the casserole: Transfer the vegetable mixture to a large baking dish. Spread it evenly across the bottom. Sprinkle the shredded mozzarella cheese over the top of the vegetables.
- Bake the ratatouille: Place the baking dish in the oven and bake for 20-25 minutes, or until the cheese is melted and bubbly with a golden-brown color.
- Garnish and serve: Once baked, remove the casserole from the oven and let it cool for a few minutes. Garnish with fresh basil leaves if desired, and serve the Baked Ratatouille With Mozzarella warm.
Extra Tips:
For the best results, try to slice the vegetables uniformly to guarantee even cooking. Feel free to add or substitute vegetables based on personal preference or seasonal availability.
If you prefer a bit more spice, consider adding a pinch of cayenne pepper to the seasoning mix. To make the dish even lower in sodium, opt for a homemade vegetable broth with no added salt.
Remember that the mozzarella cheese will add a touch of saltiness, so adjust the seasoning accordingly. Enjoy this flavorful and healthy casserole with a side salad or a slice of crusty whole-grain bread for a complete meal.
Wild Rice and Mushroom Pilaf Casserole
Indulge in the hearty flavors of our Wild Rice and Mushroom Pilaf Casserole while keeping your sodium intake in check. This dish combines the nutty taste of wild rice with the earthy richness of mushrooms, creating a satisfying and nutritious meal.
Perfect for a family dinner or a cozy gathering with friends, this casserole promises to delight your taste buds without compromising on health. The blend of fresh herbs and spices enhances the natural flavors, making it a delightful addition to your low-sodium recipe collection.
Our recipe serves 4-6 people, providing generous portions for everyone at the table. With simple ingredients and straightforward preparation, this casserole is a breeze to make, even for those new to cooking.
Whether you’re following a low-sodium diet or simply looking to try something new, our Wild Rice and Mushroom Pilaf Casserole is sure to become a household favorite.
Ingredients:
- 1 cup wild rice
- 2 cups low-sodium vegetable broth
- 1 tablespoon olive oil
- 1 medium onion, finely chopped
- 2 cloves garlic, minced
- 1 pound mushrooms, sliced
- 1 teaspoon dried thyme
- 1 teaspoon dried rosemary
- 1/2 teaspoon black pepper
- 1/4 cup chopped fresh parsley
- 1/4 cup grated Parmesan cheese (optional)
Cooking Instructions:
1. Preheat your oven: Start by preheating your oven to 350°F (175°C). This will guarantee the casserole cooks evenly once it’s assembled.
2. Cook the wild rice: In a medium saucepan, combine the wild rice and low-sodium vegetable broth. Bring to a boil over medium-high heat, then reduce the heat to low. Cover and simmer for about 45 minutes, or until the rice is tender and the liquid is absorbed. Fluff the rice with a fork and set aside.
3. Sauté the vegetables: Heat olive oil in a large skillet over medium heat. Add the chopped onion and garlic, sautéing until the onion becomes translucent.
Next, add the sliced mushrooms, thyme, rosemary, and black pepper. Cook for about 5-7 minutes, or until the mushrooms are soft and any liquid they release has evaporated.
4. Combine ingredients: In a large mixing bowl, combine the cooked wild rice, sautéed vegetables, and fresh parsley. If you’re using Parmesan cheese, fold it into the mixture for added flavor.
5. Bake the casserole: Transfer the rice and mushroom mixture into a greased casserole dish. Spread it evenly and cover with aluminum foil. Bake in the preheated oven for 25-30 minutes, or until heated through.
6. Serve and enjoy: Remove the casserole from the oven, let it sit for a few minutes before serving to allow the flavors to meld. Garnish with additional fresh parsley if desired.
Extra Tips:
For added texture and flavor, consider including some chopped nuts such as walnuts or pecans. They provide a pleasant crunch and enhance the earthy flavor of the dish.
If you or your guests prefer a bit of tanginess, a squeeze of fresh lemon juice over the casserole just before serving can brighten the flavors.
Lemon Herb Baked Fish Casserole
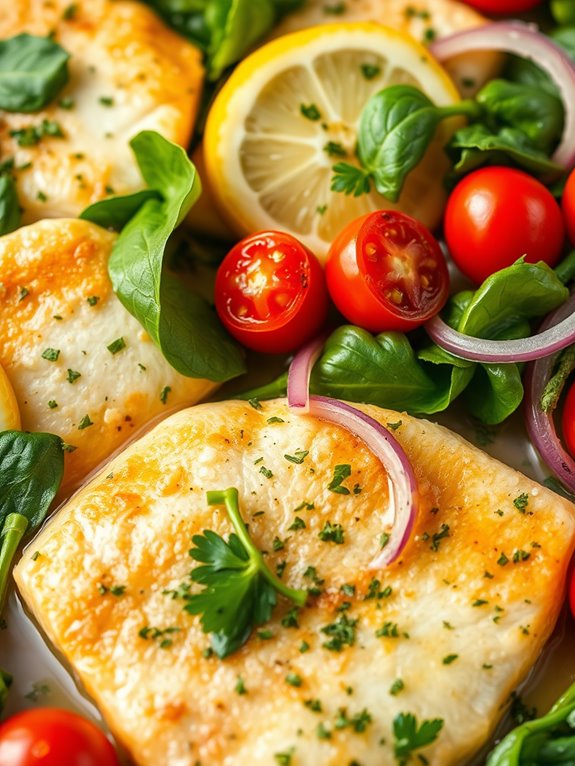
Lemon Herb Baked Fish Casserole is a delightful, low sodium dish that combines the fresh flavors of lemon and herbs with tender, flaky fish. It’s a perfect meal for those looking to reduce their sodium intake without compromising on flavor.
This casserole isn’t only delicious but also nutritious, offering a healthy dose of protein and omega-3 fatty acids from the fish, making it an excellent choice for a balanced diet. Ideal for family dinners or gatherings, this recipe serves 4-6 people and is easy to prepare, making it a go-to option for busy weeknights.
The combination of fresh herbs, lemon juice, and a few other simple ingredients creates a flavorful marinade that infuses the fish with a bright and citrusy taste. The end result is a beautifully baked casserole that’s both satisfying and healthy.
Ingredients (Serves 4-6):
- 2 pounds white fish fillets (such as cod or tilapia)
- 1/4 cup fresh lemon juice
- 2 tablespoons olive oil
- 2 teaspoons lemon zest
- 2 cloves garlic, minced
- 1 tablespoon fresh dill, chopped
- 1 tablespoon fresh parsley, chopped
- 1 teaspoon dried thyme
- 1/2 teaspoon black pepper
- 2 cups baby spinach
- 1/2 cup cherry tomatoes, halved
- 1/2 red onion, thinly sliced
- 1/2 cup low-sodium chicken broth
- 1 cup cooked quinoa (optional)
Cooking Instructions:
- Preheat and Prepare: Preheat your oven to 375°F (190°C). Lightly grease a 9×13-inch baking dish with a small amount of olive oil to prevent sticking.
- Create the Marinade: In a small bowl, combine the lemon juice, olive oil, lemon zest, minced garlic, dill, parsley, thyme, and black pepper. Mix well to form a marinade.
- Marinate the Fish: Place the fish fillets in a shallow dish and pour the marinade over them. Make sure each piece is well-coated. Cover and let it marinate in the refrigerator for at least 20 minutes to allow the flavors to penetrate the fish.
- Assemble the Casserole: Arrange the marinated fish fillets in the prepared baking dish. Scatter the baby spinach, cherry tomatoes, and red onion slices around the fish. Pour the low-sodium chicken broth evenly over the entire dish.
- Bake: Cover the baking dish with aluminum foil and bake in the preheated oven for 25-30 minutes or until the fish is cooked through and flakes easily with a fork.
- Optional: If desired, serve the baked fish casserole over a bed of cooked quinoa for a heartier meal.
Extra Tips:
When selecting fish, opt for fresh or flash-frozen fillets to guarantee the best taste and texture. If using frozen fish, be sure to thaw it completely and pat it dry with paper towels to remove excess moisture before marinating.
For added flavor, you can experiment with other herbs such as basil or chives, depending on your personal preferences. Remember to taste and adjust the seasoning before serving, as everyone’s palate is different, and a touch more black pepper might enhance the dish for some.
Stuffed Bell Pepper Casserole
Stuffed Bell Pepper Casserole is a delightful twist on the classic stuffed peppers, combining all the flavors into a hearty and convenient one-pan dish. It’s perfect for those seeking a comforting meal without the hassle of individually stuffing each pepper. This casserole version isn’t only quicker to prepare but also allows the flavors to meld beautifully.
Plus, it’s a great way to enjoy a flavorful meal while keeping your sodium intake in check, as it relies on fresh ingredients and herbs for seasoning. This casserole is perfect for a family meal and can easily be adapted to suit different tastes by incorporating various vegetables or using different types of rice.
The base of this dish is made from lean ground beef, flavorful bell peppers, and brown rice, with a tomato base that ties everything together. By opting for low-sodium tomato products and seasoning with herbs instead of salt, you can enjoy a delicious and heart-healthy meal.
Ingredients (Serves 4-6):
- 1 pound lean ground beef
- 1 cup brown rice, uncooked
- 3 large bell peppers, diced
- 1 medium onion, chopped
- 2 cloves garlic, minced
- 1 can (15 ounces) low-sodium diced tomatoes
- 1 can (15 ounces) low-sodium tomato sauce
- 1 cup low-sodium beef broth
- 1 teaspoon dried oregano
- 1 teaspoon dried basil
- 1 teaspoon paprika
- 1/2 teaspoon black pepper
- 1 cup shredded low-fat mozzarella cheese
- Fresh parsley for garnish (optional)
Cooking Instructions:
- Preheat the Oven: Start by preheating your oven to 375°F (190°C) to make certain it’s ready for baking the casserole.
- Cook the Rice: In a medium-sized pot, cook the brown rice according to package instructions. This typically involves combining the rice with water, bringing it to a boil, then simmering for about 40-45 minutes until tender.
- Prepare the Beef Mixture: While the rice is cooking, in a large skillet over medium heat, brown the ground beef until it’s fully cooked. Drain any excess fat to reduce the fat content of the dish.
- Sauté the Vegetables: Add the chopped onion and minced garlic to the skillet with the beef. Sauté for about 3-4 minutes until the onion becomes translucent. Then, add the diced bell peppers and continue to cook for an additional 5 minutes, allowing the peppers to soften.
- Combine Ingredients: Once the vegetables are tender, stir in the cooked brown rice, low-sodium diced tomatoes, tomato sauce, and beef broth. Season the mixture with oregano, basil, paprika, and black pepper. Stir everything well to combine, making sure the flavors are evenly distributed.
- Assemble the Casserole: Transfer the entire beef and rice mixture into a large casserole dish. Spread it out evenly, then top with shredded mozzarella cheese.
- Bake: Place the casserole in the preheated oven and bake for about 25-30 minutes, or until the cheese is melted and bubbly.
- Garnish and Serve: Once baked, remove the casserole from the oven and let it cool slightly. Garnish with fresh parsley if desired before serving.
Extra Tips: For a vegetarian version, substitute the ground beef with a plant-based meat alternative or beans. Feel free to experiment with different herbs or add a touch of heat with red pepper flakes if you enjoy a spicier dish.
Additionally, if you have any leftovers, this casserole stores well in the refrigerator for up to 3 days, making it a great option for meal prep. When reheating, add a splash of water or broth to maintain moisture.