

As the holiday season draws near, I often find myself needing quick and delightful treats without turning on the oven. These 10 no-bake Christmas recipes are perfect for those last-minute sweet tooth cravings. From the decadent no-bake gingerbread cheesecake to the classic charm of peppermint bark, each recipe is a festive delight. These treats are stress-free and easy to prepare, making them ideal for anyone looking to add a touch of sweetness to their holiday festivities. Ready to explore these easy holiday treats together?
Chocolate Peppermint Bark
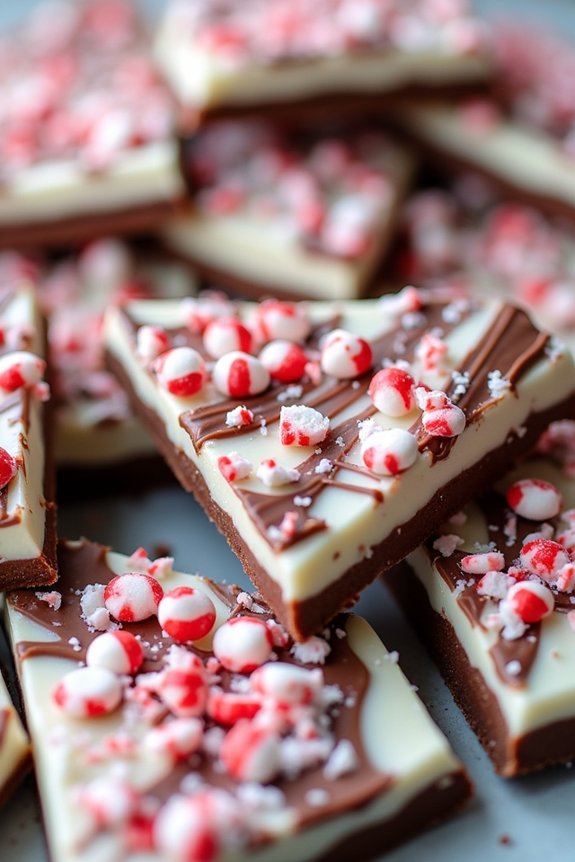
Chocolate Peppermint Bark is a delightful holiday treat that’s incredibly easy to make and requires no baking. It’s a perfect combination of rich, creamy chocolate and invigorating peppermint, offering a sweet and minty flavor that captures the essence of the festive season. This treat isn’t only delicious but also visually appealing with its contrasting layers, making it an ideal addition to your Christmas dessert table or as a homemade gift for friends and family.
The process of making Chocolate Peppermint Bark is straightforward, involving only a few ingredients and minimal kitchen equipment. You’ll start by preparing a base layer of smooth, melted chocolate, which is then topped with crushed peppermint candies for a lovely crunch and a burst of peppermint flavor. The result is a beautifully marbled confection that’s as pleasing to the eye as it’s to the palate.
Best of all, this recipe yields enough to serve 4-6 people, making it a convenient choice for small gatherings or family treats.
Ingredients (Serves 4-6):
- 8 ounces semi-sweet chocolate
- 8 ounces white chocolate
- 1 teaspoon peppermint extract
- 1/2 cup crushed peppermint candies
Instructions:
- Prepare the Baking Sheet: Line a baking sheet with parchment paper or a silicone baking mat to prevent the chocolate from sticking.
- Melt the Semi-Sweet Chocolate: In a microwave-safe bowl, melt the semi-sweet chocolate in 30-second intervals, stirring in between, until smooth. Alternatively, you can melt it over a double boiler.
- Spread the Chocolate: Pour the melted semi-sweet chocolate onto the prepared baking sheet and use a spatula to spread it into an even layer, approximately 1/4 inch thick. Let it set slightly at room temperature.
- Melt the White Chocolate: In a separate microwave-safe bowl, melt the white chocolate using the same method as the semi-sweet chocolate. Once melted, stir in the peppermint extract.
- Layer the White Chocolate: Pour the white chocolate over the semi-sweet chocolate layer, spreading it evenly with a spatula.
- Add Crushed Peppermint: While the white chocolate is still soft, sprinkle the crushed peppermint candies evenly over the top. Press them gently into the chocolate to guarantee they adhere.
- Chill the Bark: Place the baking sheet in the refrigerator for about 1-2 hours, or until the chocolate is completely set and firm.
- Break into Pieces: Once set, remove the bark from the refrigerator and break it into pieces of your desired size.
Extra Tips:
When making Chocolate Peppermint Bark, verify that the chocolate is completely set before breaking it into pieces to avoid any mess. If you prefer a darker, richer flavor, you can use dark chocolate instead of semi-sweet.
For a more festive touch, consider adding a sprinkle of edible glitter or colored sugar on top of the peppermint candies. Also, be cautious when melting chocolate; overheating can cause it to seize. Use gentle heat and stir frequently to achieve a smooth consistency.
Store any leftovers in an airtight container at room temperature to maintain their texture and flavor.
No-Bake Gingerbread Cheesecake
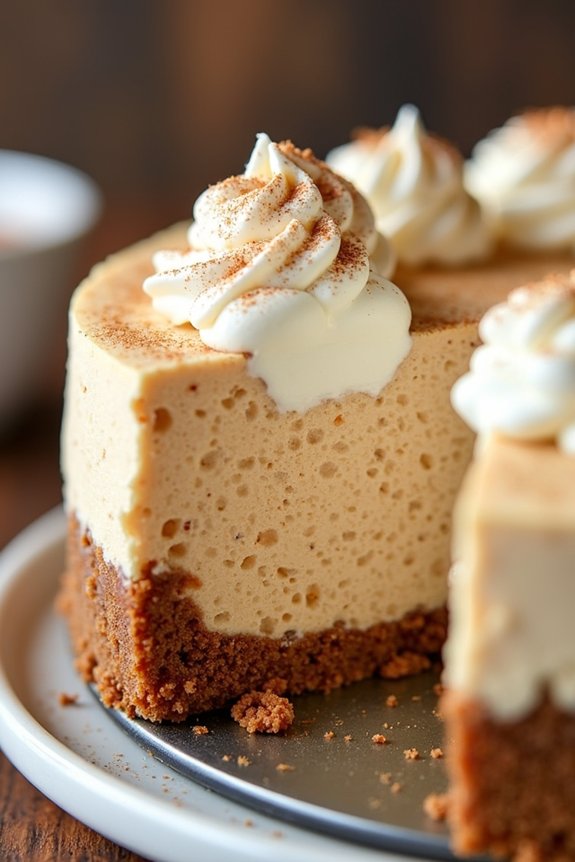
No-Bake Gingerbread Cheesecake is a delightful holiday treat that combines the rich, creamy texture of cheesecake with the warm, spiced flavors of gingerbread. This no-bake version is perfect for those who want a festive dessert without the hassle of baking, making it an easy yet impressive addition to your Christmas table.
With a spiced gingerbread crust and a smooth, tangy filling, this cheesecake is sure to become a holiday favorite for everyone who tries it. The beauty of a no-bake cheesecake lies in its simplicity and ease, as it allows you to prepare a delicious dessert without the worry of oven timings and temperatures.
The gingerbread crust is made with crushed ginger snap cookies, adding a crunchy base that complements the creamy filling. The cheesecake mixture is infused with ginger, cinnamon, and nutmeg, creating a harmonious blend of flavors that capture the essence of Christmas. This recipe serves 4-6 people, making it ideal for small gatherings or family celebrations.
Ingredients:
- 1 1/2 cups of ginger snap cookie crumbs
- 1/4 cup of melted butter
- 2 tablespoons of granulated sugar
- 1 teaspoon of ground cinnamon
- 1/2 teaspoon of ground ginger
- 1/4 teaspoon of ground nutmeg
- 16 ounces of cream cheese, softened
- 1 cup of powdered sugar
- 1 teaspoon of vanilla extract
- 1 cup of heavy whipping cream
- 1 tablespoon of molasses
Instructions:
- Prepare the Crust: In a medium bowl, combine the ginger snap cookie crumbs, melted butter, granulated sugar, 1/2 teaspoon of cinnamon, 1/4 teaspoon of ginger, and a pinch of nutmeg. Mix until the crumbs are evenly coated with the butter. Press the mixture evenly into the bottom of a 9-inch springform pan to form the crust. Chill in the refrigerator for 20 minutes to set.
- Make the Filling: In a large mixing bowl, beat the softened cream cheese with an electric mixer until it’s smooth and creamy. Gradually add the powdered sugar and continue to mix until fully incorporated. Add the vanilla extract, remaining cinnamon, ginger, nutmeg, and molasses to the cream cheese mixture, and beat until everything is well combined.
- Whip the Cream: In a separate bowl, whip the heavy cream with an electric mixer until it forms stiff peaks. Gently fold the whipped cream into the cream cheese mixture, being careful not to deflate the whipped cream.
- Assemble the Cheesecake: Remove the crust from the refrigerator. Spread the cream cheese filling evenly over the prepared crust. Smooth the top with a spatula. Cover with plastic wrap and refrigerate for at least 4 hours, or until the cheesecake is firm.
- Serve: Once set, remove the cheesecake from the springform pan and transfer it to a serving plate. Slice and serve chilled, optionally garnished with whipped cream, a sprinkle of cinnamon, or gingerbread cookie pieces.
Extra Tips:
To enhance the flavors of your No-Bake Gingerbread Cheesecake, consider preparing it a day ahead of serving. This allows the spices to fully develop and meld with the cream cheese, resulting in a richer taste.
When pressing the crust into the pan, use the bottom of a glass or a flat measuring cup to ascertain it’s compact and even. For a decorative touch, you can pipe whipped cream around the edges or top with mini gingerbread men cookies.
If you don’t have a springform pan, a regular pie dish can be used, but you’ll need to serve it directly from the dish as it may be harder to remove.
Festive Rice Krispie Treats
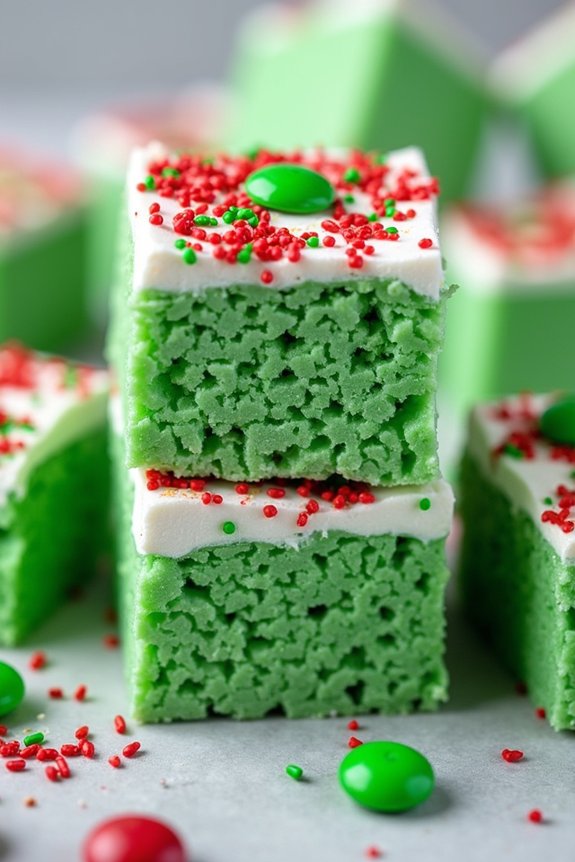
Festive Rice Krispie Treats are a delightful and easy-to-make addition to your Christmas dessert table. These no-bake treats combine the classic crunch of Rice Krispies cereal with the gooey sweetness of marshmallows, all dressed up in festive colors. Perfect for holiday celebrations, these treats can be shaped into Christmas trees, wreaths, or left as simple squares. They aren’t only fun to make but also a great activity to involve kids in the kitchen.
This recipe yields 12-16 servings, making it ideal for a small gathering or to share with family and friends. The use of colored sprinkles and candies adds a festive touch, making these treats visually appealing and perfect for any Christmas occasion. With just a few ingredients and no baking required, you can whip up a batch of Festive Rice Krispie Treats in no time, leaving you more time to enjoy the holiday festivities.
Ingredients (for 4-6 people):
- 6 cups Rice Krispies cereal
- 4 tablespoons unsalted butter
- 10 ounces mini marshmallows
- 1 teaspoon vanilla extract
- Green food coloring
- Red and green sprinkles
- Mini M&M candies or colored chocolate candies
Instructions:
- Prepare the Pan: Line a 9×13 inch baking pan with parchment paper, allowing some to hang over the sides for easy removal. Set aside.
- Melt the Butter: In a large saucepan, melt the butter over low heat. Stir continuously to prevent it from browning.
- Add Marshmallows: Once the butter has melted, add the mini marshmallows to the saucepan. Stir constantly until they’re fully melted and smooth.
- Add Vanilla and Coloring: Remove the saucepan from heat and quickly stir in the vanilla extract and a few drops of green food coloring. Mix until the color is evenly distributed. Add more food coloring if a deeper green is desired.
- Mix in Cereal: Gradually add the Rice Krispies cereal to the marshmallow mixture. Stir gently with a spatula until the cereal is well-coated.
- Transfer to Pan: Pour the mixture into the prepared baking pan. Use a lightly greased spatula or hands to press the mixture evenly into the pan.
- Decorate: Immediately sprinkle red and green sprinkles over the top and press lightly to confirm they stick. Add mini M&M candies or colored chocolate candies as desired.
- Set and Serve: Allow the treats to cool and set for at least 30 minutes. Once set, lift the treats from the pan using the parchment paper and cut into squares or desired shapes.
Extra Tips:
For best results, use fresh marshmallows as older ones may not melt as smoothly. When pressing the mixture into the pan, avoid packing it too tightly to keep the treats light and chewy. If you want to make different shapes, use cookie cutters while the mixture is still soft. Store these treats in an airtight container at room temperature for up to a week to maintain freshness.
Eggnog Panna Cotta

Eggnog Panna Cotta is a delightful no-bake dessert that captures the essence of the holiday season with its rich, creamy texture and the aromatic flavors of traditional eggnog. This festive treat is perfect for those who want to enjoy a sophisticated, yet simple dessert without the need for an oven.
Its smooth and silky consistency, combined with the warmth of nutmeg and cinnamon, makes it a perfect ending to any holiday meal. This recipe is designed to serve 4-6 people, making it ideal for small gatherings or family dinners. The preparation time is minimal, and the panna cotta can be made ahead of time, freeing you up to focus on other holiday preparations.
Whether you’re a seasoned chef or a novice in the kitchen, this Eggnog Panna Cotta is sure to impress your guests with its elegance and flavor.
Ingredients:
- 2 cups eggnog
- 1 cup heavy cream
- 1/4 cup granulated sugar
- 2 teaspoons vanilla extract
- 1/2 teaspoon ground nutmeg
- 1/2 teaspoon ground cinnamon
- 1 packet (about 2 1/4 teaspoons) unflavored gelatin
- 3 tablespoons cold water
Instructions:
- Prepare the Gelatin: In a small bowl, sprinkle the gelatin over the cold water and let it stand for about 5 minutes. This will allow the gelatin to soften and bloom, guaranteeing it dissolves evenly in the panna cotta mixture.
- Heat the Mixture: In a medium saucepan, combine the eggnog, heavy cream, sugar, vanilla extract, nutmeg, and cinnamon. Heat over medium heat, stirring occasionally, until the mixture is hot but not boiling. This should take about 5-7 minutes.
- Dissolve the Gelatin: Once the eggnog mixture is hot, remove it from the heat and whisk in the bloomed gelatin until completely dissolved. Make sure there are no lumps and the mixture is smooth.
- Pour into Molds: Carefully pour the mixture into individual serving glasses or ramekins. Allow the panna cotta to cool at room temperature for about 15 minutes.
- Chill: Cover the glasses or ramekins with plastic wrap and refrigerate for at least 4 hours, or until the panna cotta is set and firm to the touch. For best results, chill overnight.
- Serve: Once the panna cotta is set, serve it straight from the molds, or gently run a knife around the edges and invert onto serving plates. Garnish with a sprinkle of nutmeg or a cinnamon stick for an extra festive touch.
Extra Tips:
For a more intense flavor, consider adding a splash of rum or brandy to the eggnog mixture. This will enhance the traditional eggnog taste and add a subtle warmth to the dessert.
If you prefer a lighter texture, you can substitute half of the heavy cream with milk. Additionally, if you don’t have nutmeg or cinnamon on hand, try garnishing with a dash of ground ginger or allspice for a different holiday twist.
Be sure to allow enough time for the panna cotta to set properly in the refrigerator, as this will guarantee the best texture and presentation.
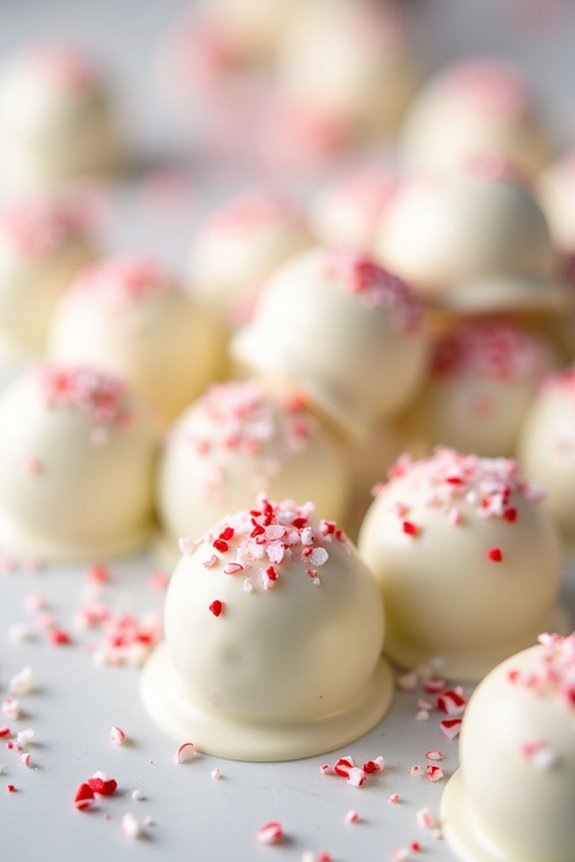
Raspberry White Chocolate Truffles

Raspberry White Chocolate Truffles are a delightful addition to any holiday dessert spread. These truffles are rich, creamy, and bursting with the tart sweetness of raspberries, perfectly complemented by the smooth, sweet flavor of white chocolate. The best part? They require no baking, making them an ideal treat for busy holiday schedules.
Whether you’re hosting a festive gathering or preparing a thoughtful homemade gift, these truffles are sure to impress with their elegant appearance and decadent taste. This no-bake recipe is quick and easy, guaranteeing that you can spend more time enjoying the holiday season rather than fussing over complicated desserts.
The combination of raspberries with white chocolate creates a beautiful pink hue, making these truffles as visually appealing as they’re delicious. With just a few simple ingredients and minimal effort, you can create a batch of these indulgent treats that will have your guests coming back for more.
Ingredients (serving size 4-6 people):
- 1 cup freeze-dried raspberries
- 8 ounces white chocolate chips
- 1/4 cup heavy cream
- 1 teaspoon vanilla extract
- 1/2 cup unsalted butter, softened
- 1/4 cup powdered sugar
- Pinch of salt
- 1/2 cup finely crushed biscuits or cookies (optional for coating)
Instructions:
- Prepare the Raspberries: Begin by placing the freeze-dried raspberries in a food processor. Pulse until they’re finely ground into a powder. Set aside a tablespoon of the raspberry powder for coating the truffles later.
- Melt the White Chocolate: In a microwave-safe bowl, combine the white chocolate chips and heavy cream. Microwave in 30-second intervals, stirring between each, until the chocolate is completely melted and smooth. Be careful not to overheat the chocolate.
- Combine Ingredients: In a large mixing bowl, beat the softened butter until creamy. Add the melted white chocolate mixture and vanilla extract, and continue to beat until well combined. Gradually add the raspberry powder, powdered sugar, and a pinch of salt, mixing until all ingredients are fully incorporated and the mixture is smooth.
- Chill the Mixture: Cover the bowl with plastic wrap and refrigerate for about 1-2 hours, or until the mixture is firm enough to handle.
- Shape the Truffles: Once the mixture is sufficiently chilled, use a small cookie scoop or your hands to shape the mixture into small balls, approximately 1 inch in diameter.
- Coat the Truffles: Roll each truffle in the reserved raspberry powder. For an extra touch, you can also roll some truffles in finely crushed biscuits or cookies for added texture.
- Chill Before Serving: Place the coated truffles on a baking sheet lined with parchment paper. Refrigerate the truffles for at least 30 minutes to allow them to set before serving.
Extra Tips:
For best results, make sure that all ingredients are at room temperature before you begin, as this will help them combine more smoothly. If you prefer a less sweet truffle, you can reduce the amount of powdered sugar or add a bit more salt to balance the flavors.
Additionally, feel free to experiment with different coatings, such as coconut flakes or chopped nuts, to create a variety of textures and flavors. These truffles can be stored in an airtight container in the refrigerator for up to a week, making them a convenient make-ahead option for holiday entertaining.
Coconut Snowball Cookies
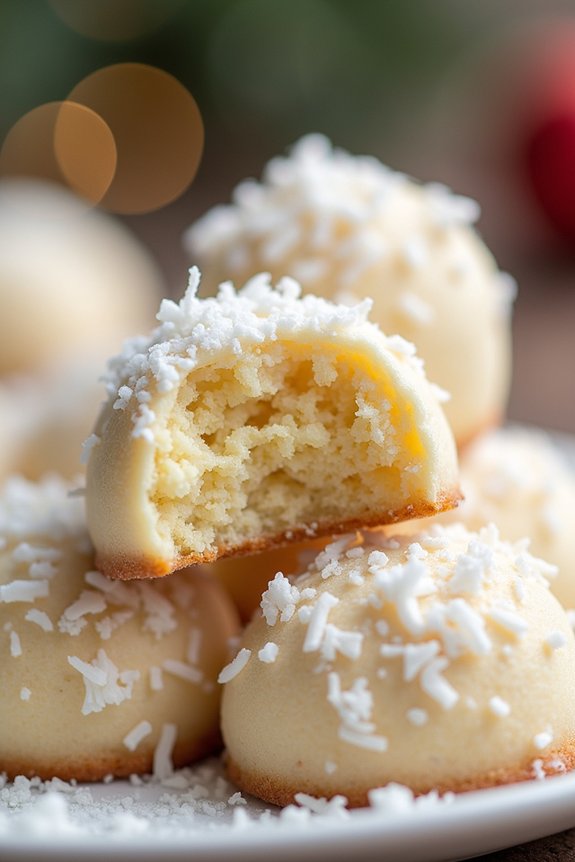
Coconut Snowball Cookies are a delightful treat that can easily become a favorite in your holiday dessert repertoire. These no-bake confections aren’t only simple to make but also capture the essence of winter with their snowball-like appearance. Soft and chewy on the inside with a sweet coconut coating on the outside, these cookies are perfect for sharing with family and friends during the festive season.
Whether you’re an experienced baker or just starting out, this recipe is sure to add a touch of holiday magic to your dessert table without the need for an oven.
The beauty of Coconut Snowball Cookies lies in their simplicity and the fact that they require minimal ingredients while delivering maximum flavor. The combination of sweetened condensed milk and shredded coconut creates a rich, indulgent base, while the addition of vanilla and almond extracts adds a subtle yet irresistible aroma.
These cookies can be made in advance and stored, making them an ideal choice for busy holiday schedules. In just a few easy steps, you can whip up a batch of these delightful treats and enjoy the compliments they’re sure to bring.
Ingredients (Serves 4-6):
- 1 cup sweetened condensed milk
- 1 teaspoon vanilla extract
- 1/2 teaspoon almond extract
- 3 cups sweetened shredded coconut
- 1/2 cup powdered sugar
- Additional shredded coconut for rolling (about 1 cup)
Cooking Instructions:
- Prepare the Mixture: In a large mixing bowl, combine the sweetened condensed milk, vanilla extract, and almond extract. Stir well until the extracts are thoroughly mixed into the milk.
- Add Coconut: Gradually add the 3 cups of shredded coconut to the milk mixture, stirring continuously with a spatula or spoon. Confirm that the coconut is evenly coated and the mixture becomes thick and sticky.
- Form the Cookies: With clean hands, scoop out small portions of the coconut mixture (about 1 tablespoon each) and roll them into balls. The mixture should yield approximately 20-24 balls, depending on the size you choose.
- Coat with Coconut: Pour the additional shredded coconut into a shallow dish. Roll each ball in the shredded coconut until fully coated, giving them their characteristic snowball appearance.
- Chill the Cookies: Place the coated balls on a baking sheet lined with parchment paper. Refrigerate the cookies for at least 1 hour to allow them to firm up. This step is essential for guaranteeing the cookies hold their shape when served.
Extra Tips:
For an extra festive touch, you can add a few drops of food coloring to the additional shredded coconut before rolling the balls to create colorful variations.
If you prefer a less sweet version, use unsweetened shredded coconut for the coating. When forming the balls, lightly dampen your hands with water to prevent the mixture from sticking.
Store the cookies in an airtight container in the refrigerator for up to a week; they can also be frozen for longer storage. Enjoy your Coconut Snowball Cookies with a warm cup of cocoa or a glass of milk for the ultimate holiday treat.
Candy Cane Oreo Balls
Candy Cane Oreo Balls are a delightful and festive treat perfect for the holiday season. These no-bake bites combine the rich, creamy goodness of Oreo cookies with the invigorating minty flavor of crushed candy canes. Not only are they incredibly easy to make, but they also make for a stunning addition to your holiday dessert table. With their eye-catching appearance and irresistible taste, these treats are sure to be a hit among kids and adults alike.
The best part about Candy Cane Oreo Balls is that they require minimal ingredients and no oven time, making them an ideal choice for a quick and easy holiday dessert. Whether you’re hosting a Christmas party or looking for a fun treat to make with the family, these Oreo balls are a crowd-pleaser. The combination of crushed Oreos, cream cheese, and peppermint candy creates a harmonious balance of flavors that’s both indulgent and invigorating.
Ingredients (Serving Size: 4-6 people):
- 1 package (14.3 oz) Oreo cookies
- 8 oz cream cheese, softened
- 1 cup crushed candy canes
- 12 oz white chocolate or almond bark
- 1 teaspoon vanilla extract (optional)
Instructions:
- Prepare the Oreos: Begin by placing the Oreo cookies in a food processor. Pulse until they’re finely crushed, with no large chunks remaining. This will be the base for your Oreo balls.
- Mix with Cream Cheese: In a large mixing bowl, combine the crushed Oreos with the softened cream cheese. Use a spatula or an electric mixer on low speed to blend until the mixture is well combined and smooth. If you like, add a teaspoon of vanilla extract for extra flavor.
- Form the Balls: Line a baking sheet with parchment paper. Using a tablespoon or a small cookie scoop, scoop out portions of the Oreo mixture and roll them into balls about 1 inch in diameter. Place the formed balls onto the prepared baking sheet.
- Chill the Balls: Place the tray of Oreo balls in the refrigerator for at least 20 minutes. This will help them firm up and hold their shape when coated with chocolate.
- Melt the Chocolate: While the Oreo balls are chilling, melt the white chocolate or almond bark in a microwave-safe bowl. Heat in 30-second intervals, stirring after each, until fully melted and smooth.
- Coat with Chocolate: Remove the chilled Oreo balls from the refrigerator. Using a fork or a toothpick, dip each ball into the melted chocolate, ensuring it’s fully coated. Let the excess chocolate drip off before placing it back onto the parchment-lined sheet.
- Decorate with Candy Canes: Before the chocolate sets, sprinkle the tops of the coated Oreo balls with crushed candy canes. This adds a festive look and enhances the peppermint flavor.
- Let Set: Allow the coated Oreo balls to set at room temperature or place them in the refrigerator until the chocolate is firm.
Extra Tips:
For best results, make sure your cream cheese is fully softened before mixing with the Oreos. This will ensure a smoother texture for the Oreo balls. If you find the mixture too sticky to handle, lightly dust your hands with powdered sugar or cocoa powder when rolling the balls.
Additionally, for a richer flavor, you can try using dark chocolate instead of white chocolate for the coating. When crushing candy canes, use a rolling pin or a food processor to achieve a fine consistency, which will adhere better to the chocolate. Enjoy your Candy Cane Oreo Balls with a warm cup of cocoa or as a standalone treat!
No-Bake Christmas Fudge
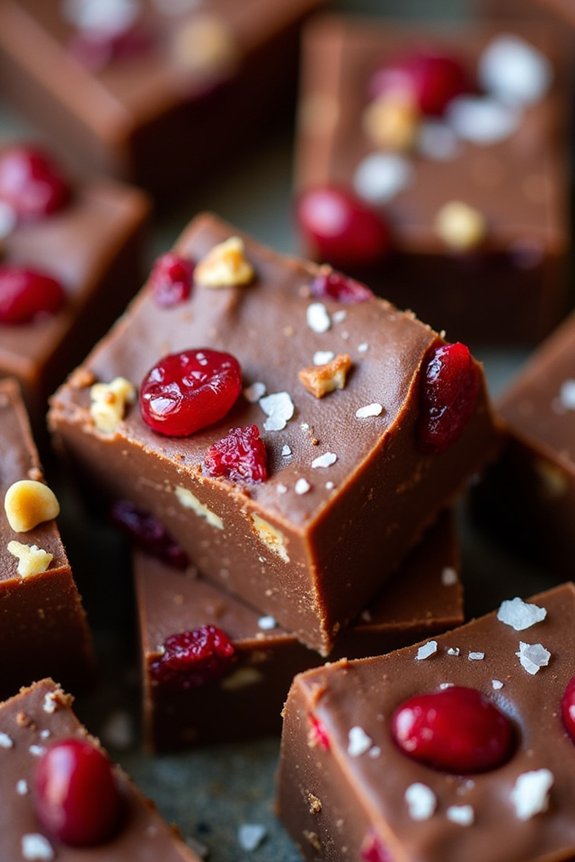
During the festive season, one of the easiest and most delightful treats you can whip up is No-Bake Christmas Fudge. This deliciously rich and creamy fudge is perfect for holiday gatherings, gift-giving, or simply indulging in some seasonal cheer. The best part? It requires no oven time, making it a hassle-free option that even beginner cooks can master.
With just a few simple ingredients, you can create a sweet treat that captures the essence of Christmas with its smooth texture and delightful flavor. The No-Bake Christmas Fudge is perfect for a serving size of 4-6 people, making it an ideal choice for small family gatherings or as a part of a larger dessert spread.
This recipe is incredibly versatile, allowing you to customize it with your favorite festive flavors or add-ins, such as nuts, dried fruits, or even a sprinkle of sea salt for that perfect balance of sweet and savory. Gather your ingredients, and let’s get started on creating a fudge that will surely become a holiday tradition.
Ingredients:
- 2 cups semisweet chocolate chips
- 1 (14-ounce) can sweetened condensed milk
- 1 teaspoon vanilla extract
- 1/4 cup unsalted butter
- 1/2 cup chopped nuts (optional)
- 1/2 cup dried cranberries (optional)
- Pinch of sea salt (optional)
Instructions:
- Prepare Your Pan: Line an 8×8 inch square baking pan with aluminum foil or parchment paper. Make sure to leave some overhang on the sides to easily lift the fudge out once it’s set. This will prevent the fudge from sticking to the pan.
- Melt the Ingredients: In a medium saucepan over low heat, combine the semisweet chocolate chips, sweetened condensed milk, and unsalted butter. Stir continuously until the chocolate chips are completely melted and the mixture is smooth. This should take about 5-7 minutes. Be sure not to let the mixture boil.
- Add Flavorings: Once the chocolate mixture is smooth, remove it from the heat. Stir in the vanilla extract until well combined. If you’re using nuts or dried cranberries, gently fold them into the chocolate mixture at this stage.
- Transfer to Pan: Pour the fudge mixture into the prepared baking pan. Use a spatula to spread it evenly. If desired, sprinkle a pinch of sea salt evenly over the top for an added flavor dimension.
- Chill and Set: Place the pan in the refrigerator and allow the fudge to set for at least 2 hours, or until firm. For best results, let it chill overnight.
- Cut and Serve: Once the fudge is set, use the overhanging foil or parchment to lift it out of the pan. Place it on a cutting board and use a sharp knife to cut into small squares. Serve and enjoy!
Extra Tips:
When preparing your No-Bake Christmas Fudge, make certain that you melt the chocolate mixture over low heat to prevent scorching. Continuous stirring is key to achieving a smooth consistency.
For variation, try experimenting with different types of chocolate, such as dark or white chocolate, to suit your personal preference. If you’re planning to store the fudge, keep it in an airtight container in the refrigerator for up to two weeks. This will maintain its freshness and prevent it from drying out.
Enjoy your festive creation with a warm mug of cocoa or as a sweet end to your holiday meal!
Peanut Butter Pretzel Bites

Peanut Butter Pretzel Bites are a delightful treat that combines the perfect balance of sweet and salty flavors, making them an ideal addition to your no-bake Christmas recipes.
These bite-sized goodies are simple to make and require no oven time, allowing you to focus on enjoying the holiday festivities. Perfect for sharing with family and friends, these pretzel bites are sure to be a hit at any holiday gathering.
The combination of creamy peanut butter, crunchy pretzels, and a smooth chocolate coating creates a texture and taste sensation that’s both satisfying and addictive. Whether you’re looking for an easy holiday snack or a homemade gift, these Peanut Butter Pretzel Bites offer a delicious and festive option.
Plus, the recipe can be easily adjusted to make larger batches if necessary.
Ingredients for 4-6 servings:
- 1 cup creamy peanut butter
- 2 tablespoons unsalted butter, softened
- 1 cup powdered sugar
- 1 cup crushed pretzels
- 1 teaspoon vanilla extract
- 1 ½ cups semi-sweet chocolate chips
- 1 tablespoon vegetable oil
- 48 small pretzel twists (for sandwiching)
Instructions:
- Prepare the Peanut Butter Mixture: In a medium mixing bowl, combine the creamy peanut butter, softened unsalted butter, powdered sugar, crushed pretzels, and vanilla extract. Mix until well combined and a dough-like consistency forms. If the mixture is too sticky, add a little more powdered sugar until it reaches the desired texture.
- Shape the Bites: Roll the peanut butter mixture into small balls, approximately 1 inch in diameter. You should end up with about 24 balls. Flatten each ball slightly into a disk shape that will fit between two pretzels.
- Assemble the Pretzel Bites: Place one peanut butter disk between two pretzel twists, gently pressing them together to form a sandwich. Repeat this process until all the peanut butter disks are used.
- Melt the Chocolate: In a microwave-safe bowl, combine the semi-sweet chocolate chips and vegetable oil. Microwave in 30-second intervals, stirring in between, until the chocolate is fully melted and smooth.
- Coat the Pretzel Bites: Using a fork or dipping tool, dip each pretzel sandwich into the melted chocolate, coating it completely. Allow any excess chocolate to drip off before placing the coated pretzel bites onto a baking sheet lined with parchment paper.
- Set the Chocolate: Once all the pretzel bites are coated, place the baking sheet in the refrigerator for about 30 minutes, or until the chocolate has hardened.
Extra Tips:
To guarantee your Peanut Butter Pretzel Bites have the best texture and flavor, make sure the peanut butter mixture isn’t too sticky or too dry before assembling. Adjust the consistency with powdered sugar if necessary.
Additionally, if you prefer a sweeter treat, consider using milk chocolate chips instead of semi-sweet. For an added touch, you can sprinkle some sea salt on top of the chocolate coating before it sets for a gourmet finish.
Enjoy these delicious treats as part of your holiday celebrations!
Holiday Chocolate-Covered Pretzels
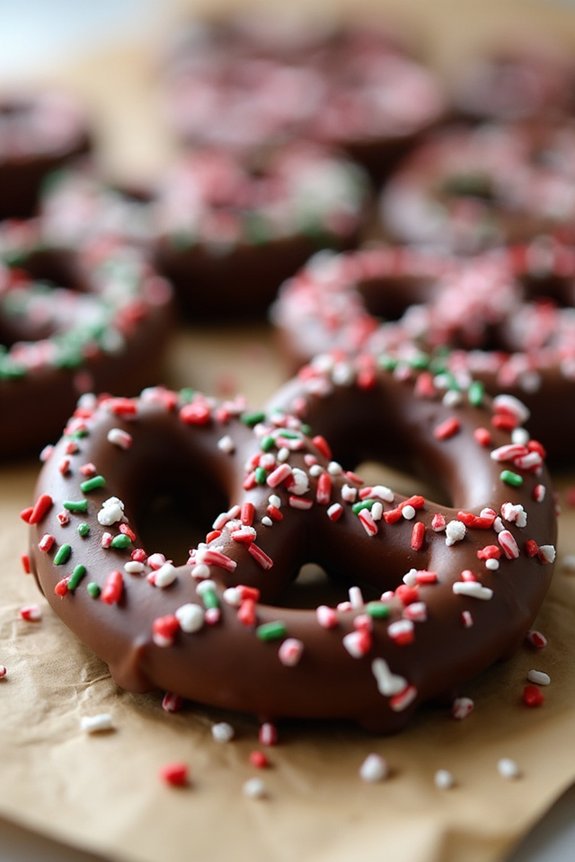
Holiday Chocolate-Covered Pretzels are a delightful treat that perfectly combines the salty crunch of pretzels with the rich sweetness of chocolate, making them an irresistible addition to any Christmas celebration.
These no-bake treats aren’t only simple to make but also offer the flexibility to let your creativity shine through with a variety of festive toppings. Ideal for those last-minute holiday gatherings or as a fun family activity, these pretzels are sure to become a favorite tradition.
This recipe is designed to serve 4-6 people, making it perfect for small get-togethers or as a charming addition to a larger dessert spread. With just a few ingredients and minimal preparation time, you can create a batch of these sweet and salty treats that everyone will love.
Whether you choose to embellish them with colorful sprinkles, crushed candy canes, or a drizzle of white chocolate, each pretzel is a little piece of holiday joy.
Ingredients:
- 1 bag (about 12 ounces) of mini pretzel twists
- 2 cups of semi-sweet chocolate chips
- 1 tablespoon vegetable oil
- 1/2 cup white chocolate chips (optional for drizzling)
- Assorted holiday sprinkles
- Crushed candy canes (optional)
- Parchment paper
Instructions:
- Prepare the Work Area: Line a baking sheet with parchment paper. This will be where you place the dipped pretzels to cool and set.
- Melt the Chocolate: In a microwave-safe bowl, combine the semi-sweet chocolate chips and vegetable oil. Microwave in 30-second intervals, stirring after each interval, until the chocolate is completely melted and smooth.
- Dip the Pretzels: Using a fork, dip each mini pretzel twist into the melted chocolate, ensuring it’s fully coated. Tap the fork gently on the edge of the bowl to remove any excess chocolate.
- Apply Toppings: Place the chocolate-covered pretzels onto the prepared baking sheet. While the chocolate is still wet, sprinkle with holiday sprinkles or crushed candy canes as desired.
- Optional Drizzle: If using, melt the white chocolate chips in a separate microwave-safe bowl using the same method. Once melted, use a spoon to drizzle the white chocolate over the coated pretzels for an added decorative touch.
- Set the Pretzels: Allow the chocolate-covered pretzels to sit at room temperature until fully set. For quicker results, you can place the baking sheet in the refrigerator for about 15-20 minutes.
Extra Tips:
When making Holiday Chocolate-Covered Pretzels, the key to success is keeping the chocolate at the right consistency. If it starts to thicken while you’re dipping, simply reheat it in the microwave for a few seconds.
Additionally, be sure to work in small batches when applying toppings to prevent the chocolate from setting before you can decorate. Feel free to experiment with different types of chocolate or toppings to suit your personal taste and make the recipe your own.