

There’s nothing quite like the aroma of cinnamon and sugar filling the air during the holidays.
Grandma’s kitchen was always a haven of warmth, joy, and delicious traditions.
From buttery sugar cookies to spiced gingerbread men, these recipes were more than just desserts—they were memories in the making.
If you’re looking to bring that nostalgic holiday magic into your own home, these cherished recipes are a must-try.
Curious about what’s next?
Grandma’s Classic Sugar Cookies
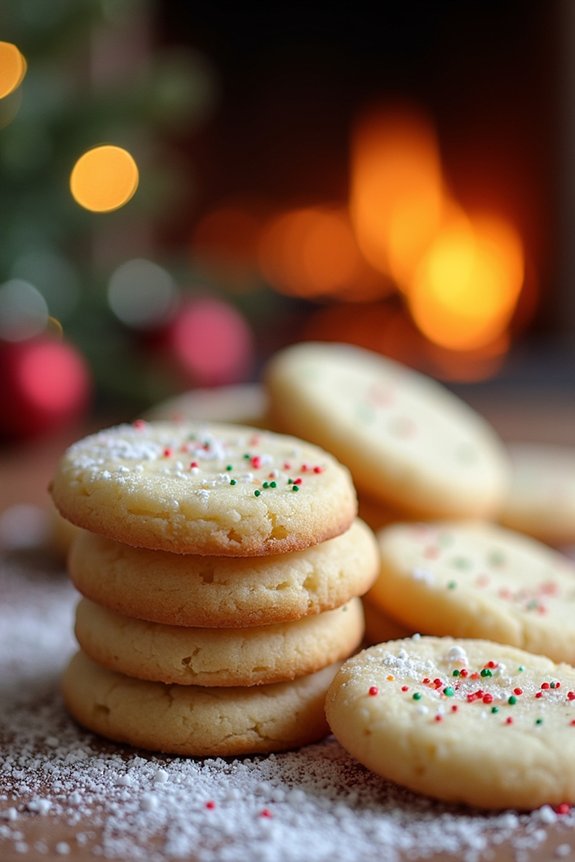
There’s something magical about the smell of freshly baked sugar cookies wafting through the house during the holiday season. Grandma’s Classic Sugar Cookies are a timeless treat that brings warmth and joy to any Christmas celebration.
These cookies are known for their buttery goodness and delicate sweetness, making them the perfect canvas for festive decorations or simply enjoying them as they are. Passed down through generations, this recipe has been a staple in our family holiday traditions, and now it’s time to share it with you.
The beauty of these sugar cookies lies in their simplicity and versatility. Whether you’re a seasoned baker or trying your hand at baking for the first time, this recipe is easy to follow and yields delightful results every time.
With just a few basic ingredients, you can create a batch of cookies that will rival those from any bakery. So, gather your loved ones, roll up your sleeves, and let’s begin a baking adventure with Grandma’s Classic Sugar Cookies.
Ingredients (for 4-6 people):
- 2 ¾ cups all-purpose flour
- 1 teaspoon baking powder
- ½ teaspoon baking soda
- 1 cup unsalted butter, softened
- 1 ½ cups granulated sugar
- 1 large egg
- 1 teaspoon vanilla extract
- ¼ teaspoon almond extract (optional)
- 3 tablespoons milk
- Colored sugar or sprinkles for decoration (optional)
Cooking Instructions:
- Preheat and Prepare: Preheat your oven to 375°F (190°C). Line two baking sheets with parchment paper or silicone baking mats to prevent sticking.
- Mix Dry Ingredients: In a medium-sized bowl, whisk together the all-purpose flour, baking powder, and baking soda. This guarantees the leavening agents are evenly distributed throughout the flour.
- Cream Butter and Sugar: In a large mixing bowl, cream together the softened butter and granulated sugar until the mixture is light and fluffy. This should take about 3-4 minutes with an electric mixer on medium speed.
- Add Wet Ingredients: Beat in the egg, vanilla extract, and almond extract (if using) into the butter and sugar mixture. Mix until everything is well combined.
- Combine Dry and Wet Ingredients: Gradually add the dry ingredient mixture to the wet ingredients, mixing on low speed. Add the milk and continue to mix until you have a smooth dough. Be careful not to overmix.
- Shape the Cookies: Using a rounded tablespoon or cookie scoop, scoop the dough and roll it into balls. Place them on the prepared baking sheets, leaving about 2 inches between each cookie.
- Decorate (Optional): If desired, sprinkle the tops of the cookie dough balls with colored sugar or sprinkles for a festive touch.
- Bake: Bake the cookies in the preheated oven for 8-10 minutes, or until the edges are lightly golden. The centers will look slightly underbaked, but they’ll set as they cool.
- Cool: Remove from the oven and allow the cookies to cool on the baking sheets for 5 minutes before transferring them to a wire rack to cool completely.
Extra Tips:
For the best results, make sure your butter is at room temperature before you begin. This will help it cream more easily with the sugar, resulting in a smoother dough.
If you prefer a softer cookie, be cautious not to overbake them; they should be just set at the edges. To add a personal touch, consider using cookie cutters to create different shapes, or experiment with various decorations like icing or edible glitter.
Enjoy your homemade classic sugar cookies with a glass of milk or a warm cup of tea for a cozy holiday treat.
Traditional Gingerbread Men
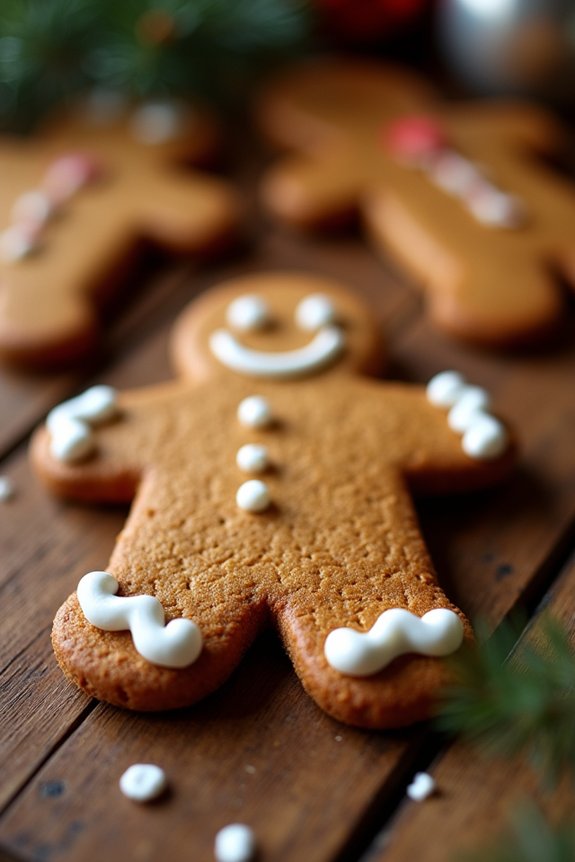
Gingerbread men are a quintessential treat during the Christmas season, providing both a delightful aroma and a touch of nostalgia. These spiced cookies have been enjoyed for centuries, with their origins tracing back to the holiday traditions of Europe. Making traditional gingerbread men isn’t only a culinary craft but also a fun activity that brings families together in the kitchen.
The combination of warm spices like ginger, cinnamon, and cloves, along with molasses, results in a cookie that’s rich in flavor and perfect for the holiday spirit. This recipe for traditional gingerbread men is designed to serve 4-6 people, ideal for a family gathering or as part of a festive cookie exchange.
The dough is easy to work with, allowing bakers of all ages to participate in cutting and decorating the cookies. Once baked, these gingerbread men can be decorated with royal icing for a personalized touch, making them as appealing to the eyes as they’re to the taste buds.
Ingredients (Serves 4-6 people)
- 3 1/4 cups all-purpose flour
- 3/4 teaspoon baking soda
- 1 tablespoon ground ginger
- 1 tablespoon ground cinnamon
- 1/2 teaspoon ground cloves
- 1/2 teaspoon ground nutmeg
- 1/4 teaspoon salt
- 3/4 cup (1 1/2 sticks) unsalted butter, softened
- 1/2 cup packed dark-brown sugar
- 1 large egg
- 1/2 cup unsulfured molasses
- 2 teaspoons vanilla extract
- Royal icing for decoration (optional)
Instructions
- Prepare the Dry Ingredients: In a large bowl, whisk together the flour, baking soda, ginger, cinnamon, cloves, nutmeg, and salt. This guarantees that the spices are evenly distributed throughout the dough.
- Cream the Butter and Sugar: In a separate bowl, using an electric mixer, beat the softened butter and brown sugar on medium speed until the mixture is fluffy and light, about 2 minutes. This step is essential for creating a light texture in the cookies.
- Add the Wet Ingredients: Beat in the egg, molasses, and vanilla extract until well combined. The molasses will give the gingerbread its characteristic flavor and color.
- Combine Wet and Dry Ingredients: Gradually add the dry ingredients to the butter mixture, mixing on low speed until the dough comes together. Be careful not to overmix, which can lead to tough cookies.
- Chill the Dough: Divide the dough into two discs, wrap each in plastic wrap, and refrigerate for at least 1 hour. This chilling helps the dough firm up, making it easier to roll and cut.
- Preheat and Roll Out: Preheat your oven to 350°F (175°C). On a floured surface, roll out one portion of dough to about 1/4-inch thickness. Keep the other portion refrigerated until ready to use.
- Cut and Bake: Use gingerbread men cookie cutters to cut shapes from the dough. Place them on a parchment-lined baking sheet about 1 inch apart. Bake for 8-10 minutes, or until the edges are set and the cookies are crisp.
- Cool and Decorate: Allow the cookies to cool on the baking sheet for 5 minutes before transferring them to a wire rack to cool completely. Once cool, decorate with royal icing as desired.
Extra Tips
To prevent the dough from sticking when rolling, lightly flour the surface and the rolling pin. If the dough becomes too soft while working, pop it back in the fridge for a few minutes.
For an extra festive touch, decorate your gingerbread men with raisins, chocolate chips, or small candies before baking. Be sure to store your gingerbread men in an airtight container to maintain their crispness and flavor throughout the holiday season.
Old-Fashioned Shortbread
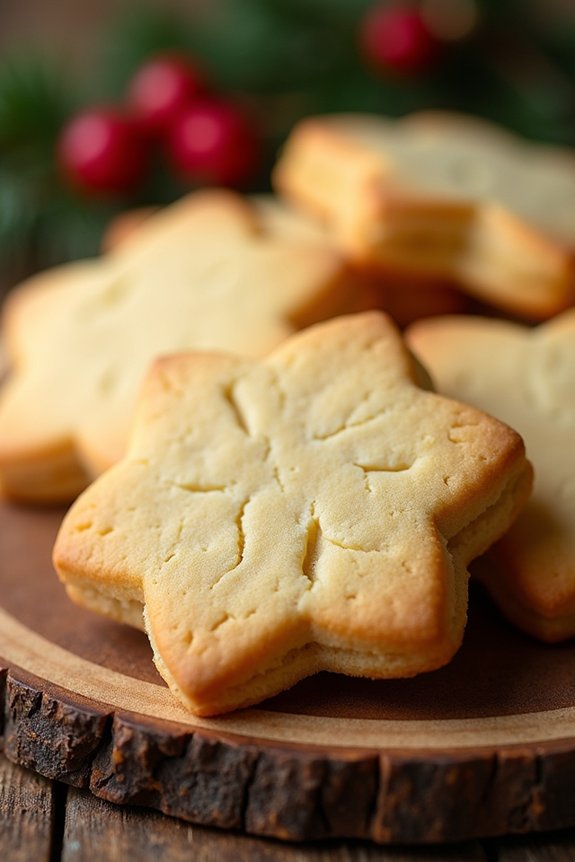
Old-Fashioned Shortbread is a timeless classic that brings warmth and comfort to your holiday baking. With its buttery, crumbly texture and subtly sweet flavor, this shortbread is perfect for enjoying with a cup of tea or as a delightful treat to share with family and friends during the Christmas season.
Its simple ingredients and straightforward preparation make it an ideal choice for bakers of all skill levels, guaranteeing that you can create a delicious homemade delicacy without any fuss.
This recipe yields a serving size of 4-6 people and takes only a few steps to prepare. The key to achieving the perfect Old-Fashioned Shortbread lies in the quality of the butter and the right balance of sugar and flour. With the right technique, you’ll be rewarded with a batch of perfectly golden, melt-in-your-mouth cookies that are sure to become a holiday favorite in your household.
Ingredients (for 4-6 people):
- 1 cup (2 sticks) unsalted butter, softened
- 1/2 cup granulated sugar
- 2 cups all-purpose flour
- 1/4 teaspoon salt
- 1 teaspoon vanilla extract (optional)
Cooking Instructions:
- Preheat the Oven: Preheat your oven to 325°F (165°C). This gentle temperature guarantees the shortbread bakes evenly without browning too much.
- Cream Butter and Sugar: In a large mixing bowl, use an electric mixer to cream the softened butter and granulated sugar together until light and fluffy. This should take about 3-5 minutes. The mixture should be pale and smooth.
- Add Flour and Salt: Gradually add the all-purpose flour and salt to the creamed mixture. Mix on low speed until the dough starts to come together. Be careful not to overmix, as this can lead to tough shortbread.
- Incorporate Vanilla: If using, add the vanilla extract and mix until just combined.
- Shape the Dough: Turn the dough out onto a lightly floured surface and gently knead it a few times to guarantee it’s smooth. Form the dough into a disk or rectangle, about 1/2 inch thick.
- Cut Into Shapes: Use a sharp knife or a cookie cutter to cut the dough into your desired shapes. Traditional shortbread is often shaped into rectangles or rounds.
- Transfer to Baking Sheet: Place the cut shapes onto a baking sheet lined with parchment paper, leaving a little space between each piece.
- Bake: Bake in the preheated oven for 18-20 minutes or until the edges are just beginning to turn golden. Keep a close eye on them to avoid overbaking.
- Cool: Allow the shortbread to cool on the baking sheet for a few minutes before transferring them to a wire rack to cool completely.
Extra Tips:
When making Old-Fashioned Shortbread, guarantee that your butter is at room temperature for easy creaming with the sugar.
If the dough feels too crumbly and won’t hold together, add a teaspoon of cold water or milk to help bind it. For an added festive touch, consider sprinkling a little granulated sugar over the top of the shortbread before baking, or drizzle with melted chocolate once cooled.
Timeless Cinnamon Roll Recipe
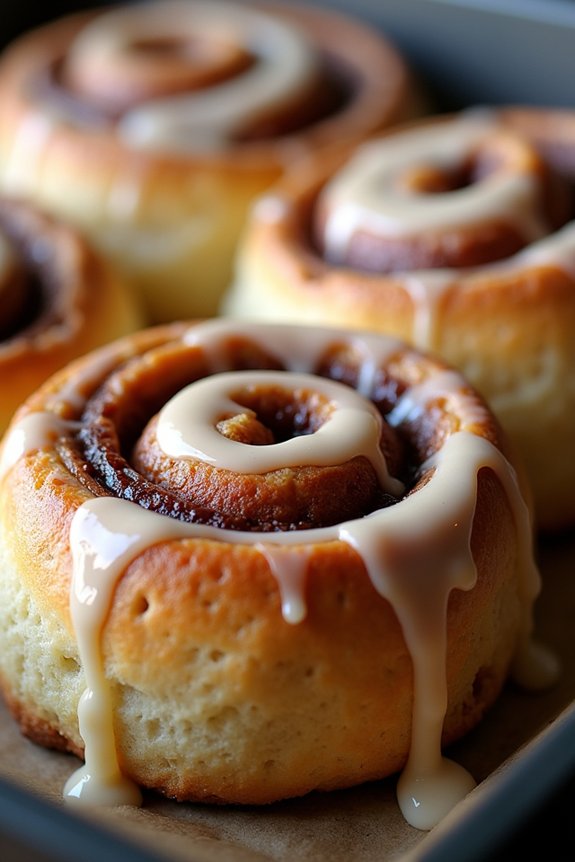
There’s something magical about the scent of freshly baked cinnamon rolls wafting through the house, especially during the holiday season. These timeless cinnamon rolls are the perfect treat for a cozy Christmas morning or any festive gathering. With their soft, fluffy dough and rich, gooey filling, these rolls are sure to become a family favorite. This recipe is designed to serve 4-6 people, making it ideal for a small family or intimate gathering.
The key to making these cinnamon rolls extraordinary is in the details: a perfectly balanced dough, a generous cinnamon-sugar filling, and a luscious cream cheese glaze. While the process may seem a bit lengthy, each step is straightforward and well worth the effort. Make sure to give yourself plenty of time, as the dough needs to rise twice for the best texture.
Ingredients:
- 3/4 cup whole milk
- 1 packet (2 1/4 teaspoons) active dry yeast
- 1/4 cup granulated sugar
- 1/4 cup unsalted butter, melted
- 1 large egg
- 3 1/2 cups all-purpose flour
- 1/2 teaspoon salt
For the filling:
- 1/2 cup unsalted butter, softened
- 1 cup packed brown sugar
- 2 tablespoons ground cinnamon
For the glaze:
- 4 ounces cream cheese, softened
- 1/4 cup unsalted butter, softened
- 1 cup powdered sugar
- 1/2 teaspoon vanilla extract
- 2 tablespoons milk
Cooking Instructions:
- Prepare the Dough: Begin by warming the milk in a small saucepan until it reaches a lukewarm temperature. Transfer the milk to a large mixing bowl and sprinkle the active dry yeast over the top. Let it sit for about 5 minutes until it becomes foamy.
- Mix the Dough: Add the granulated sugar, melted butter, and egg to the yeast mixture. Stir in the flour and salt, mixing until a dough begins to form. Transfer the dough to a floured surface and knead for about 5-7 minutes until it becomes smooth and elastic.
- Allow the Dough to Rise: Place the dough in a greased bowl, cover it with a damp cloth, and let it rise in a warm place for about 1-1.5 hours, or until it doubles in size.
- Prepare the Filling: In a small bowl, mix together the softened butter, brown sugar, and ground cinnamon until you have a smooth, spreadable paste.
- Roll Out the Dough: Once the dough has risen, punch it down and roll it out on a floured surface into a 15×9 inch rectangle. Spread the cinnamon filling evenly over the dough, leaving a small border around the edges.
- Shape the Rolls: Starting from the longer side, carefully roll the dough into a tight log. Cut the log into 12 equal slices and place them in a greased 9×13 inch baking dish.
- Second Rise: Cover the rolls with a cloth and let them rise again for about 30-45 minutes until they’ve doubled in size.
- Bake the Rolls: Preheat your oven to 350°F (175°C). Bake the rolls for 25-30 minutes until they’re golden brown and cooked through.
- Make the Glaze: While the rolls are baking, prepare the glaze by beating together the softened cream cheese and butter in a medium bowl. Gradually add the powdered sugar, vanilla extract, and milk, mixing until smooth.
- Glaze and Serve: Once the rolls are out of the oven, let them cool slightly before drizzling the cream cheese glaze over the top. Serve warm and enjoy!
Extra Tips:
For the best results, make sure all your ingredients are at room temperature before you start baking. This helps the dough rise evenly and results in a lighter texture.
If you want to prepare the rolls ahead of time, you can refrigerate the rolled and cut dough overnight and let them come to room temperature for the second rise in the morning before baking.
For an extra festive touch, try adding a sprinkle of chopped nuts or raisins to the filling. Enjoy your timeless cinnamon rolls with a hot cup of coffee or cocoa for the ultimate holiday indulgence.
Classic Fruitcake
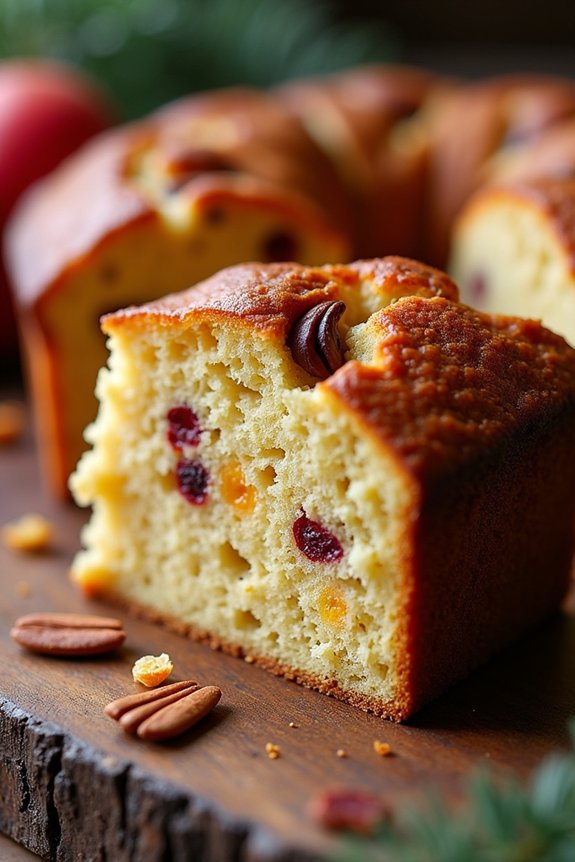
Fruitcake is a timeless holiday tradition that evokes the warmth and festive spirit of Christmas. This classic fruitcake recipe is a delightful blend of dried fruits, nuts, and spices, all soaked in a hint of brandy for that traditional holiday flavor. Perfect for gifting or enjoying with your loved ones, this recipe yields a moist and rich cake that can be enjoyed on its own or with a cup of tea.
Making a classic fruitcake might seem like an intimidating task, but it’s quite straightforward. The key is to prepare your ingredients ahead of time and to allow the flavors to meld together. With this recipe, you’ll create a fruitcake that has the perfect balance of sweetness and spice, with a tender crumb that melts in your mouth. This recipe serves 4-6 people, guaranteeing that everyone gets a hearty slice of this festive treat.
Ingredients (Serves 4-6):
- 1 cup mixed dried fruits (such as raisins, currants, and sultanas)
- 1/4 cup candied citrus peel
- 1/4 cup chopped nuts (such as walnuts or almonds)
- 1/2 cup brandy or orange juice
- 1/2 cup unsalted butter, softened
- 1/2 cup brown sugar
- 2 large eggs
- 1 cup all-purpose flour
- 1/2 teaspoon baking powder
- 1/2 teaspoon ground cinnamon
- 1/4 teaspoon ground nutmeg
- 1/4 teaspoon salt
- 1 teaspoon vanilla extract
- Zest of 1 orange
- Zest of 1 lemon
Cooking Instructions:
- Soak the Fruits: In a medium bowl, combine the mixed dried fruits, candied citrus peel, and chopped nuts. Pour the brandy or orange juice over the mixture, stirring well to guarantee all the fruits are coated. Cover the bowl with plastic wrap and let it sit at room temperature for at least 2 hours, or overnight for deeper flavor.
- Prepare the Batter: Preheat your oven to 325°F (160°C). Grease and line a 9×5-inch loaf pan with parchment paper. In a large mixing bowl, cream together the softened butter and brown sugar until light and fluffy. Add the eggs one at a time, beating well after each addition. Stir in the vanilla extract, orange zest, and lemon zest.
- Combine Dry Ingredients: In a separate bowl, sift together the flour, baking powder, cinnamon, nutmeg, and salt. Gradually add the dry ingredients to the wet mixture, stirring until just combined.
- Mix in the Fruits: Drain any excess liquid from the soaked fruit mixture, then fold the fruits and nuts into the batter, guaranteeing an even distribution.
- Bake the Cake: Pour the batter into the prepared loaf pan, smoothing the top with a spatula. Bake in the preheated oven for 60-70 minutes, or until a toothpick inserted into the center comes out clean. If the top begins to brown too quickly, cover with aluminum foil during the last 20 minutes of baking.
- Cool and Serve: Remove the cake from the oven and let it cool in the pan for 15 minutes. Then, transfer it to a wire rack to cool completely. For best results, wrap the cooled cake in plastic wrap and allow it to rest for at least 24 hours before serving to enhance the flavors.
Extra Tips: To make your fruitcake extra moist and flavorful, consider basting it with a bit of brandy every few days if you’re storing it for a longer period. This not only preserves the cake but also deepens its flavors.
Feel free to customize the mix of dried fruits and nuts to suit your personal preferences. Remember, the longer the fruitcake sits, the better it tastes, so plan ahead if you’re making it for a special occasion!
Homemade Pecan Pie
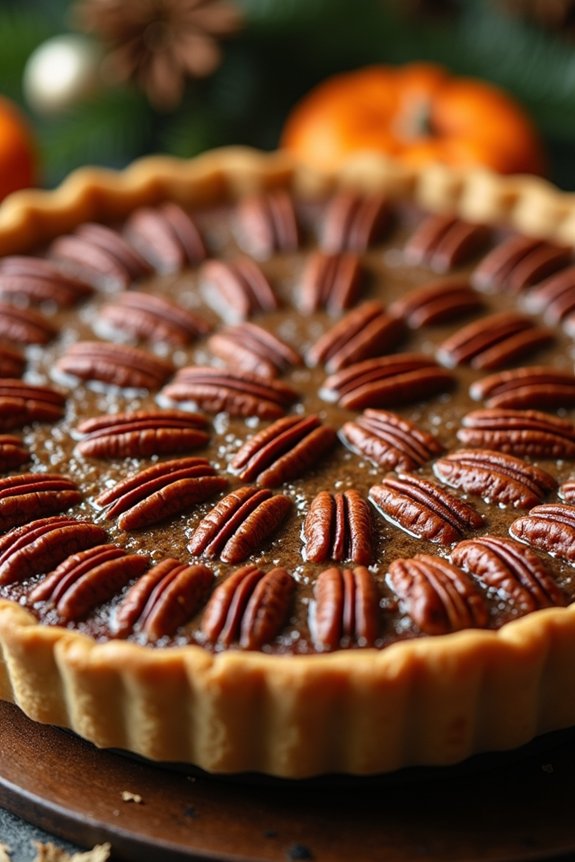
Homemade Pecan Pie is a classic dessert that embodies the warmth and coziness of the holiday season. With its rich, nutty filling and perfectly flaky crust, it’s a staple at many festive gatherings. This pie combines a smooth, buttery filling with the crunch of pecans, creating a delightful contrast that pleases both the palate and the senses.
Whether you’re a seasoned baker or a novice in the kitchen, this recipe is straightforward and rewarding to make. Pecan pie is often associated with celebrations and family gatherings, making it a perfect choice for Christmas baking. This recipe provides a step-by-step guide to creating a pecan pie that serves 4-6 people, ensuring everyone gets a generous slice.
From making the homemade pie crust to preparing the sweet filling, every aspect of this dish is designed to bring joy and satisfaction to your holiday table. Gather your ingredients and follow these instructions to create a pecan pie that will be the star of your dessert spread.
Ingredients (Serves 4-6):
- 1 9-inch pie crust (store-bought or homemade)
- 1 cup light corn syrup
- 1 cup granulated sugar
- 3 large eggs
- 1/4 cup unsalted butter, melted
- 1 teaspoon vanilla extract
- 1 1/2 cups pecan halves
- 1/4 teaspoon salt
Cooking Instructions:
- Prepare the Pie Crust: If using a homemade crust, roll out the dough on a lightly floured surface and fit it into a 9-inch pie pan. Trim any excess dough, leaving about a half-inch overhang. Fold the overhang under and crimp the edges with your fingers or a fork. Pre-bake the crust for 10 minutes at 350°F (175°C) to prevent it from getting soggy later.
- Make the Filling: In a large mixing bowl, whisk together the light corn syrup, granulated sugar, and eggs until well combined. Add the melted butter, vanilla extract, and salt, mixing until smooth. Stir in the pecan halves, ensuring they’re evenly coated with the mixture.
- Assemble the Pie: Pour the pecan filling into the pre-baked pie crust, spreading the pecans evenly. Arrange a few pecan halves on top for decoration if desired.
- Bake the Pie: Preheat your oven to 350°F (175°C) if it isn’t already heated. Place the pie on a baking sheet to catch any spills and bake in the preheated oven for 50-60 minutes. The pie is done when the filling is set and just slightly jiggles in the center. If the crust starts to brown too quickly, cover the edges with aluminum foil to prevent burning.
- Cool the Pie: Once baked, remove the pie from the oven and let it cool on a wire rack. Allow it to cool completely before serving, as this will help the filling to firm up.
Extra Tips:
When making pecan pie, it’s crucial to monitor the baking time closely, as overbaking can cause the filling to crack. If you prefer a deeper flavor, consider toasting the pecans lightly in the oven before adding them to the filling.
Additionally, for those who prefer a less sweet pie, reduce the sugar slightly or balance it with a splash of bourbon for an extra layer of flavor. Serve your homemade pecan pie with whipped cream or vanilla ice cream for a truly decadent holiday treat.
Traditional Yule Log
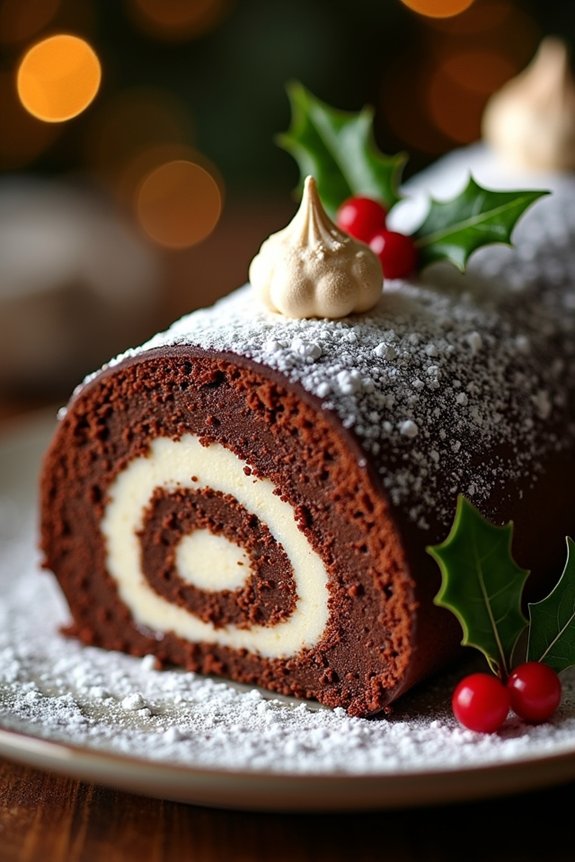
The Traditional Yule Log, or Bûche de Noël, is a classic holiday dessert that brings the warmth and charm of Christmas into your home. This delightful cake is shaped to resemble a wooden log, complete with chocolate frosting that mimics bark, creating a visually stunning centerpiece for your holiday table.
The Yule Log isn’t only delicious, but it also carries the rich tradition of a ritualistic burning of logs in the hearth to celebrate the winter solstice, making it a meaningful addition to your Christmas baking repertoire.
This dessert consists of a light, airy sponge cake rolled with a rich and creamy filling, typically flavored with chocolate or coffee. The log is then generously coated with chocolate ganache or buttercream to create the bark-like appearance.
Often adorned with festive decorations such as meringue mushrooms, powdered sugar to resemble snow, and sprigs of holly or berries, the Traditional Yule Log is as much about presentation as it’s about flavor. This recipe will guide you through creating a Yule Log that serves 4-6 people, perfect for a cozy holiday gathering.
Ingredients for 4-6 servings:
- 3 large eggs
- 1/2 cup granulated sugar
- 1/3 cup all-purpose flour
- 1/4 cup cocoa powder
- 1 teaspoon vanilla extract
- 1/4 teaspoon salt
- 1/2 teaspoon baking powder
- 1 cup heavy cream
- 2 tablespoons powdered sugar
- 1 teaspoon instant coffee granules (optional)
- 1/2 teaspoon vanilla extract (for filling)
- 1 cup dark chocolate, chopped
- 1/2 cup heavy cream (for ganache)
- Powdered sugar for dusting
- Decorative elements (e.g., meringue mushrooms, holly leaves)
Cooking Instructions:
- Preheat and Prepare Baking Sheet: Preheat your oven to 350°F (175°C). Line a 15×10-inch jelly roll pan with parchment paper, ensuring it covers the sides to prevent sticking.
- Mix Cake Batter: In a large bowl, beat the eggs with an electric mixer on high speed until thick and pale. Gradually add the granulated sugar and continue beating until the mixture is light and fluffy. Gently fold in the flour, cocoa powder, vanilla extract, salt, and baking powder until just combined.
- Bake the Cake: Pour the batter into the prepared pan, spreading it evenly. Bake for 10-12 minutes, or until the cake springs back when lightly touched. Avoid overbaking to prevent cracking.
- Roll the Cake: While the cake is still warm, place a clean kitchen towel on the counter and dust it with powdered sugar. Carefully invert the cake onto the towel, peel off the parchment paper, and roll the cake up with the towel from the short end. Let it cool completely.
- Prepare the Filling: In a medium bowl, whip the heavy cream, powdered sugar, instant coffee granules (if using), and vanilla extract until stiff peaks form.
- Fill and Roll the Cake: Unroll the cooled cake and spread the whipped cream filling evenly over the surface. Roll the cake back up tightly without the towel.
- Make Chocolate Ganache: In a small saucepan, heat the heavy cream until just boiling. Pour over the chopped dark chocolate in a bowl and let it sit for 2 minutes. Stir until smooth and let it cool slightly.
- Frost the Log: Spread the chocolate ganache over the rolled cake, using a fork to create bark-like textures. Trim the ends for a neat appearance.
- Decorate: Dust with powdered sugar and decorate with meringue mushrooms, holly leaves, or other festive elements.
Extra Tips:
When making a Traditional Yule Log, patience is key. Be sure to roll the cake while it’s warm to prevent cracking, and allow it to cool completely before filling.
If cracks do occur, don’t worry too much; the ganache will cover minor imperfections beautifully. Additionally, feel free to get creative with the decorations—adding personal touches like edible glitter or fresh berries can make your Yule Log truly unique and festive.
Spiced Nutmeg Cookies
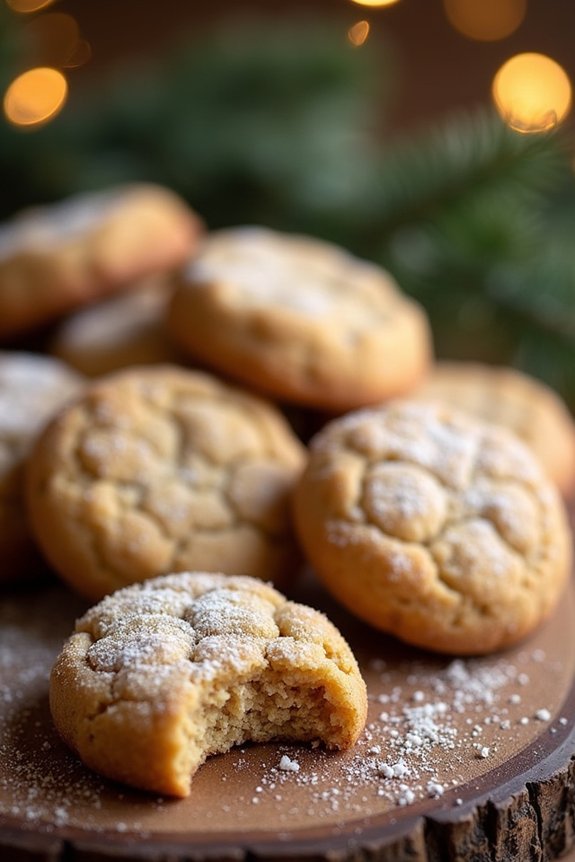
Celebrate the holiday season with these delightful Spiced Nutmeg Cookies, a perfect blend of warm spices and sweet flavors.
These cookies are an excellent addition to your Christmas baking repertoire, offering a comforting aroma that fills your kitchen with festive cheer. Whether you enjoy them with a cup of hot cocoa by the fire or share them with friends and family as a thoughtful homemade gift, these cookies are sure to become a holiday favorite.
The recipe combines the aromatic essence of nutmeg with other spices to create a cookie that’s both nostalgic and exciting. The dough is easy to work with, allowing you to shape the cookies into any festive form you desire.
The result is a batch of cookies that are crisp on the outside and tender on the inside, making them a delightful treat for all ages. Let’s plunge into making these Spiced Nutmeg Cookies, serving 4-6 people.
Ingredients:
- 2 1/2 cups all-purpose flour
- 1 cup unsalted butter, softened
- 1 cup granulated sugar
- 1/2 cup packed brown sugar
- 2 large eggs
- 1 teaspoon vanilla extract
- 1 1/2 teaspoons ground nutmeg
- 1 teaspoon ground cinnamon
- 1/2 teaspoon ground cloves
- 1/2 teaspoon baking soda
- 1/4 teaspoon salt
Cooking Instructions:
1. Preheat the Oven:
Preheat your oven to 350°F (175°C) and line two baking sheets with parchment paper. This guarantees even baking and prevents the cookies from sticking.
2. Mix Dry Ingredients:
In a medium bowl, whisk together the all-purpose flour, ground nutmeg, ground cinnamon, ground cloves, baking soda, and salt. Set aside, as this will be gradually incorporated into the wet ingredients.
3. Cream Butter and Sugars:
In a large mixing bowl, cream together the softened butter, granulated sugar, and brown sugar using an electric mixer on medium speed until the mixture is light and fluffy, about 3 minutes.
4. Add Eggs and Vanilla:
Beat in the eggs one at a time, making sure each is fully incorporated before adding the next. Then mix in the vanilla extract until well combined.
5. Combine Ingredients:
Gradually add the dry ingredients to the wet mixture, mixing on low speed until just combined. Be careful not to overmix, as this can lead to tough cookies.
6. Shape Cookies:
Using a tablespoon, scoop the dough and roll it into balls. Place them on the prepared baking sheets, leaving about 2 inches of space between each cookie.
7. Bake Cookies:
Bake in the preheated oven for 10-12 minutes, or until the edges are lightly golden and the centers are set. Remove from the oven and let them cool on the baking sheets for 5 minutes before transferring them to a wire rack to cool completely.
8. Serve:
Once cooled, serve your Spiced Nutmeg Cookies with your favorite holiday beverage. Enjoy the festive flavors!
Extra Tips:
For an extra layer of flavor, consider adding a pinch of ground ginger to the spice mix.
If you prefer a softer cookie, slightly underbake them by a minute or two, as they’ll continue to firm up while cooling on the baking sheet.
You can also experiment with different shapes using cookie cutters, and for an added festive touch, sprinkle a little confectioners’ sugar on top of the cooled cookies.
Store any leftovers in an airtight container to keep them fresh throughout the holiday season.
Classic Christmas Pudding
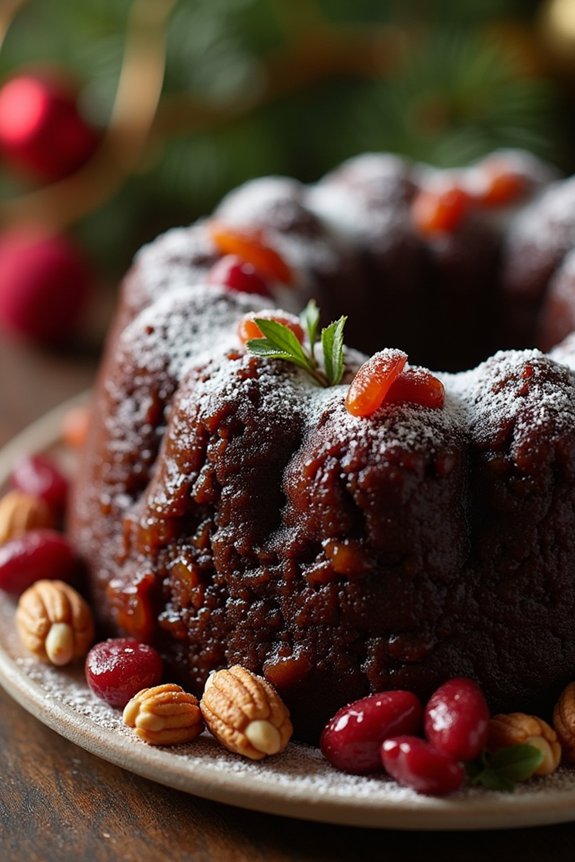
Christmas Pudding is a quintessential holiday dessert that has been a part of festive traditions for centuries. This rich, moist pudding is filled with dried fruits, spices, and a splash of brandy, creating a delightful blend of flavors that evoke the warmth and joy of the Christmas season.
Traditionally steamed and often made weeks in advance, this classic dessert allows the flavors to mature and meld together, making it an enthusiastic anticipated treat at Christmas gatherings.
Serving a Classic Christmas Pudding is a ceremonial affair, often topped with a sprig of holly and flambéed with brandy for a dramatic presentation. While the preparation might seem intimidating, this step-by-step recipe breaks down the process, guaranteeing you achieve a perfect pudding that serves 4-6 people.
Gather your ingredients, and let’s commence on a delightful journey of creating this festive masterpiece!
Ingredients (serving size: 4-6 people):
- 100g suet or butter
- 100g brown sugar
- 100g breadcrumbs
- 100g plain flour
- 1 teaspoon mixed spice
- 1 teaspoon ground cinnamon
- 1 teaspoon ground nutmeg
- 100g raisins
- 100g currants
- 100g sultanas
- 50g chopped almonds
- 50g mixed peel
- Zest of 1 lemon
- Zest of 1 orange
- 2 large eggs
- 100ml milk
- 75ml brandy or dark rum
- 1 apple, peeled and grated
- Butter for greasing
Cooking Instructions:
- Prepare the Pudding Basin: Begin by greasing a 1-liter pudding basin with butter. This will guarantee the pudding doesn’t stick and will slide out easily once cooked.
- Mix the Dry Ingredients: In a large mixing bowl, combine the suet or butter, brown sugar, breadcrumbs, plain flour, mixed spice, cinnamon, and nutmeg. Mix until well combined.
- Add the Fruits and Nuts: Stir in the raisins, currants, sultanas, chopped almonds, and mixed peel. Add in the lemon and orange zest and mix thoroughly to guarantee the fruit and nuts are evenly distributed.
- Combine Wet Ingredients: In a separate bowl, beat the eggs and then add the milk, brandy or dark rum, and grated apple. Mix these ingredients together until well combined.
- Combine Wet and Dry Mixtures: Gradually add the wet ingredients to the dry mixture, stirring continuously until the mixture is well combined and has a dropping consistency.
- Fill the Basin: Spoon the mixture into the greased pudding basin, pressing down gently to guarantee there are no air pockets.
- Prepare for Steaming: Cover the basin with a layer of parchment paper and a layer of foil, pleated in the middle to allow for expansion. Secure with string around the rim of the basin.
- Steam the Pudding: Place the pudding basin in a steamer over simmering water or in a large saucepan with a trivet, guaranteeing the water reaches halfway up the sides of the basin. Cover and steam for about 4-5 hours, checking occasionally to top up with boiling water if necessary.
- Cool and Store: Once steamed, remove the pudding from the heat and allow it to cool. Replace the parchment and foil with fresh ones, then store the pudding in a cool, dry place until Christmas Day.
- Reheat and Serve: On the day of serving, steam the pudding again for 1-2 hours until heated through. Turn out onto a serving plate, flambé with additional brandy if desired, and serve with brandy butter or cream.
Extra Tips:
For the best results, prepare your Christmas Pudding at least a month in advance to allow the flavors to mature. If you prefer a non-alcoholic version, replace the brandy with cold tea or apple juice.
Additionally, when flambéing the pudding, guarantee you use a long match or lighter to ignite the brandy safely. Remember to serve this dessert with a dollop of brandy butter, cream, or custard for an extra indulgent treat.
Enjoy the festive aroma and flavors of this classic pudding as a delightful end to your holiday meal.
Grandma’s Famous Apple Pie
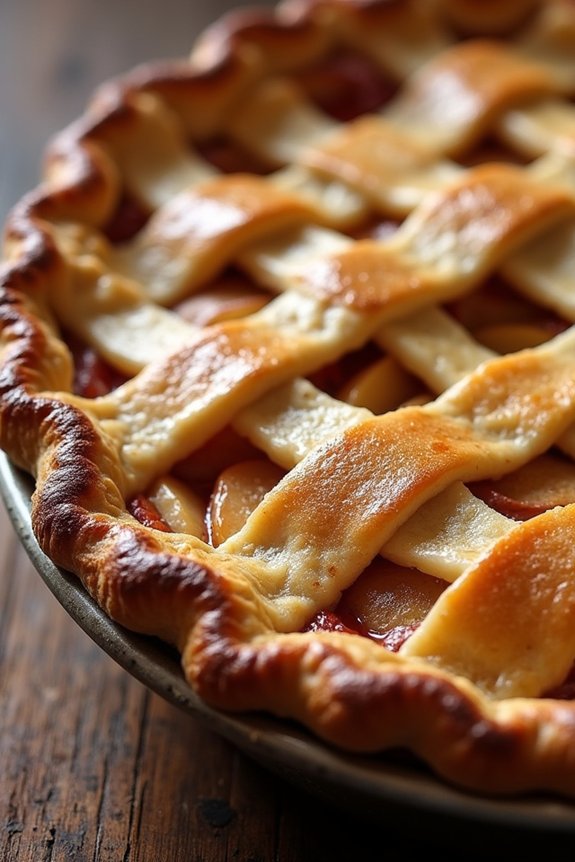
Grandma’s Famous Apple Pie is a cherished family recipe that has been passed down through generations. This classic dessert is perfect for the holiday season, bringing warmth and nostalgia to your table. The combination of tender apples, a hint of cinnamon, and a buttery, flaky crust makes this pie an all-time favorite. Its aroma will fill your home with the comforting scent of Christmas, making it the perfect treat to share with loved ones.
Making Grandma’s Famous Apple Pie is a delightful experience that combines simplicity with rich flavors. The secret to this pie’s success lies in choosing the right apples, which should be firm and slightly tart, allowing them to hold their shape while providing a pleasant contrast to the sweetness of the filling. This recipe makes enough to serve 4-6 people, ensuring everyone gets to enjoy a generous slice of this delicious pie.
Ingredients:
- 2 1/2 cups all-purpose flour
- 1 teaspoon salt
- 1 tablespoon sugar
- 1 cup unsalted butter, chilled and diced
- 6 to 8 tablespoons ice water
- 6 tart apples, peeled, cored, and sliced
- 3/4 cup granulated sugar
- 2 tablespoons all-purpose flour
- 1 teaspoon ground cinnamon
- 1/4 teaspoon ground nutmeg
- 1 tablespoon lemon juice
- 1 tablespoon unsalted butter, cut into small pieces
- 1 egg yolk
- 1 tablespoon milk
Instructions:
1. Prepare the Pie Crust: In a large bowl, combine 2 1/2 cups of flour, 1 teaspoon of salt, and 1 tablespoon of sugar. Add the diced, chilled butter and mix until the mixture resembles coarse crumbs. Gradually stir in ice water, a tablespoon at a time, until the dough begins to hold together.
Divide the dough in half, shape into discs, wrap in plastic, and refrigerate for at least 30 minutes.
2. Prepare the Apple Filling**: In another bowl, mix the sliced apples with 3/4 cup sugar, 2 tablespoons of flour, 1 teaspoon of cinnamon, 1/4 teaspoon of nutmeg, and 1 tablespoon of lemon juice**. Toss until the apples are evenly coated with the mixture.
3. Roll Out the Dough: Preheat the oven to 425°F (220°C). Roll out one dough disc on a lightly floured surface to fit a 9-inch pie plate. Place the bottom crust in the pie plate, and gently press to line the dish.
4. Assemble the Pie: Spoon the apple mixture into the prepared crust, mounding it slightly in the center. Dot the top with small pieces of butter. Roll out the second dough disc and place it over the filling. Trim the excess dough and crimp the edges to seal.
5. Prepare for Baking: In a small bowl, whisk the egg yolk and milk together. Brush this mixture over the top crust for a golden finish. Cut several slits in the top crust to allow steam to escape during baking.
6. Bake the Pie: Place the pie on a baking sheet and bake in the preheated oven for 15 minutes. Reduce the temperature to 350°F (175°C) and continue baking for 35 to 40 minutes, or until the apples are tender and the crust is golden brown.
7. Cool and Serve: Allow the pie to cool on a wire rack for at least 30 minutes before slicing. Serve warm or at room temperature with a scoop of vanilla ice cream or a dollop of whipped cream, if desired.
Extra Tips: To enhance the flavor of Grandma’s Famous Apple Pie, consider using a mix of apple varieties for a balance of sweetness and tartness. Be sure to chill the dough adequately to prevent it from shrinking while baking.
If you notice the edges of the crust browning too quickly, cover them with aluminum foil strips to prevent burning. Remember that letting the pie cool properly is essential for the filling to set, making slicing easier and ensuring a perfect presentation.