

As the holiday season approaches, I can’t wait to share some of my favorite Oreo Christmas desserts that are sure to impress your guests. The combination of Oreo’s delightful crunch with festive flavors like peppermint, chocolate, and creamy cheesecake is simply irresistible. Each dessert is easy to make and visually stunning, adding a touch of magic to your celebrations. Curious about which treats will steal the spotlight at your holiday gathering? Let’s explore these instant crowd-pleasers together!
Oreo Peppermint Bark
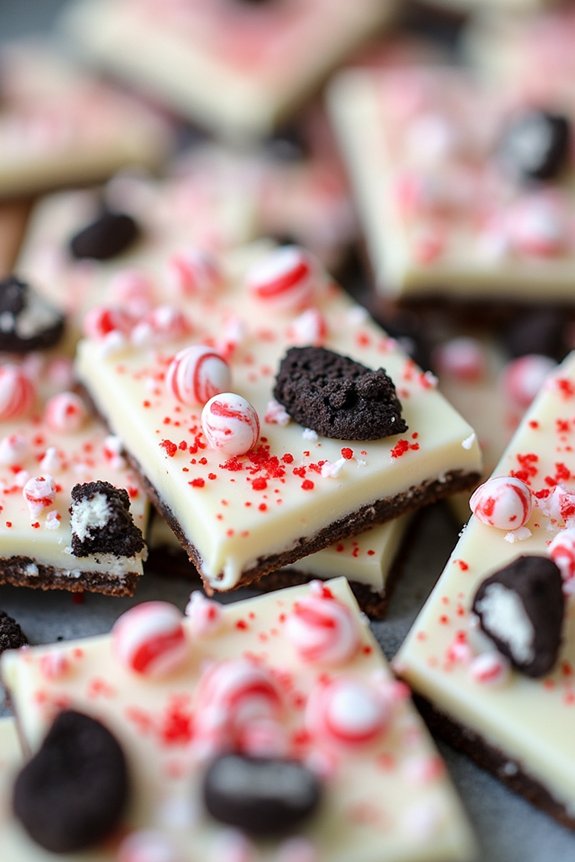
Oreo Peppermint Bark is a delightful holiday treat that combines the classic taste of Oreos with the invigorating zing of peppermint. It’s the perfect dessert to bring to Christmas gatherings or to enjoy while cozying up by the fireplace with family and friends.
The layers of creamy white chocolate, crushed Oreos, and peppermint candy create a beautiful and festive presentation that’s as pleasing to the eye as it’s to the palate. This dish is remarkably easy to make, requiring only a few ingredients and minimal preparation time, making it ideal for the busy holiday season.
In this recipe, you’ll learn how to create a batch of Oreo Peppermint Bark that serves 4-6 people. The process involves melting chocolate, crushing Oreos, and sprinkling peppermint candies to form a deliciously addictive treat.
Whether you’re an experienced home baker or a novice in the kitchen, this recipe is straightforward and accessible, allowing you to whip up a batch of festive goodness in no time. Gather your ingredients and let the holiday baking begin!
Ingredients (Serves 4-6):
- 12 Oreo cookies
- 12 oz (340g) white chocolate chips or white chocolate bars
- 1/2 teaspoon peppermint extract
- 1/2 cup crushed peppermint candies or candy canes
- 1 tablespoon of vegetable oil (optional)
Instructions:
- Prepare the Baking Sheet: Line a baking sheet with parchment paper or a silicone baking mat. This will prevent the bark from sticking and make it easier to remove once set.
- Crush the Oreos: Place the Oreo cookies in a sealed plastic bag and use a rolling pin to crush them into small chunks. You want a variety of sizes, from small pieces to larger chunks, for texture.
- Melt the White Chocolate: In a microwave-safe bowl, combine the white chocolate chips and vegetable oil. Microwave in 30-second intervals, stirring between each, until the chocolate is completely melted and smooth. If using a double boiler, melt the chocolate over simmering water, stirring constantly.
- Add Peppermint Extract: Once the chocolate is melted, stir in the peppermint extract until well incorporated. The extract enhances the peppermint flavor without overpowering the chocolate.
- Combine with Oreos: Add the crushed Oreos to the melted chocolate and mix until the cookies are evenly distributed throughout the chocolate.
- Spread the Mixture: Pour the Oreo and chocolate mixture onto the prepared baking sheet. Use a spatula to spread it into an even layer, about 1/4 inch thick.
- Sprinkle with Peppermint Candies: Immediately sprinkle the crushed peppermint candies or candy canes over the top of the bark while the chocolate is still warm. Press down lightly to affirm they adhere.
- Set the Bark: Allow the bark to cool at room temperature until it sets, or refrigerate it for about 20-30 minutes to speed up the process.
- Break into Pieces: Once the bark is fully hardened, lift it from the baking sheet and break it into irregular pieces of your desired size.
Extra Tips:
When melting the chocolate, be careful not to overheat it, as this can cause the chocolate to seize and become unusable.
If you’re using candy canes for the peppermint topping, consider placing them in a plastic bag and crushing them with a rolling pin to achieve a mix of fine and coarse pieces. This will give a satisfying crunch and visual appeal to the bark.
Additionally, if you want to add a bit more color, consider drizzling some melted dark chocolate over the finished bark for a decorative touch. Store any leftovers in an airtight container to keep them fresh and crisp for up to a week.
Oreo Cheesecake Bars
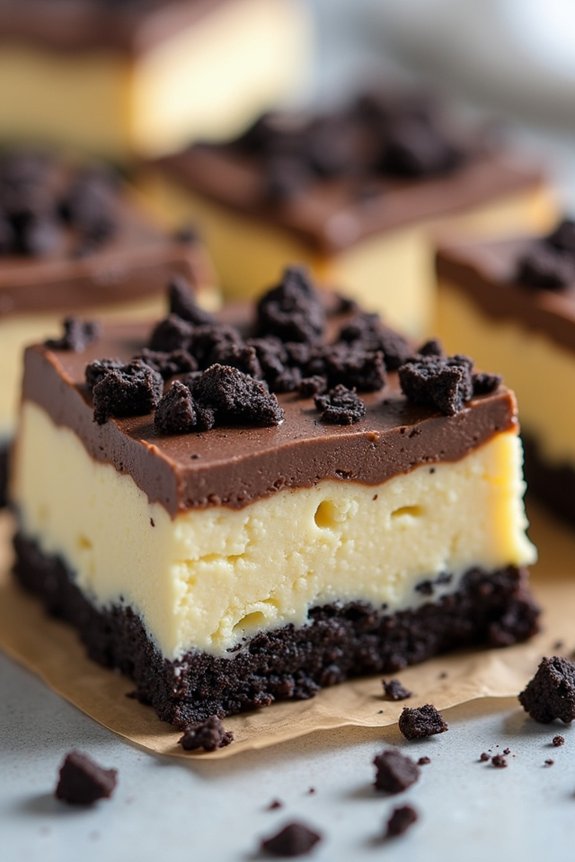
Oreo Cheesecake Bars are a delightful and festive treat perfect for Christmas celebrations. Combining the rich flavors of classic Oreo cookies with the creamy texture of cheesecake, these bars are sure to become a holiday favorite.
Whether you’re hosting a Christmas party or simply want to enjoy a sweet treat with family, these bars offer a perfect blend of indulgence and festivity. The Oreo crust serves as a delectable base, while the cheesecake filling provides a smooth and luscious contrast, topped off with a sprinkling of crushed Oreos for added texture and flavor.
Preparing Oreo Cheesecake Bars is a straightforward process that yields impressive results. The key to achieving the perfect consistency lies in the balance between the crust and the cheesecake filling. With a few simple steps, you can create a dessert that’s both visually appealing and irresistibly tasty.
This recipe is designed to serve 4-6 people, making it ideal for a small gathering or as part of a larger dessert spread. So, let’s explore the ingredients and steps you need to make these scrumptious Oreo Cheesecake Bars.
Ingredients (Serves 4-6):
- 24 Oreo cookies
- 1/4 cup unsalted butter, melted
- 16 oz cream cheese, softened
- 1/2 cup granulated sugar
- 1 teaspoon vanilla extract
- 2 large eggs
- 1/2 cup sour cream
- 1/4 teaspoon salt
Instructions:
1. Prepare the Oven and Pan:
Preheat your oven to 325°F (163°C). Line an 8×8 inch baking pan with parchment paper, leaving some overhang on the sides for easy removal of the bars later.
2. Make the Oreo Crust:
Place 18 Oreo cookies in a food processor and pulse until finely crushed. Mix the crushed cookies with the melted butter until well combined. Press the mixture evenly into the bottom of the prepared baking pan to form the crust.
3. Create the Cheesecake Filling:
In a large mixing bowl, beat the softened cream cheese until smooth. Add in the granulated sugar and vanilla extract, mixing until well incorporated.
Beat in the eggs one at a time, making sure each is fully mixed before adding the next. Add the sour cream and salt, blending until the mixture is smooth and creamy.
4. Assemble the Bars:
Pour the cheesecake mixture over the prepared crust, spreading it evenly with a spatula. Crush the remaining 6 Oreo cookies and sprinkle them over the top of the cheesecake layer for added texture and flavor.
5. Bake the Bars:
Place the baking pan in the preheated oven and bake for 35-40 minutes, or until the edges are set and the center is slightly jiggly. Remove from the oven and allow to cool at room temperature for about an hour.
6. Chill and Serve:
Once cooled, place the baking pan in the refrigerator for at least 2-3 hours, or until fully chilled and set. Using the parchment paper overhang, lift the cheesecake from the pan and onto a cutting board. Cut into bars and serve.
Extra Tips:
For best results, make sure all your ingredients, especially the cream cheese and eggs, are at room temperature before starting. This will promote a smoother cheesecake filling.
Additionally, when cutting the bars, use a sharp knife and wipe it clean after each cut to achieve neat edges. If you want to add an extra festive touch, consider drizzling melted white chocolate over the top of the bars before serving.
Enjoy your Oreo Cheesecake Bars with a glass of milk or a cup of hot cocoa for a truly delightful holiday treat.
Holiday Oreo Truffles

Holiday Oreo Truffles are a delightful and festive treat perfect for the Christmas season. These truffles are a no-bake dessert that combines the classic taste of Oreos with a creamy filling, all coated in a rich layer of chocolate. The simplicity of the recipe makes it an ideal project for family gatherings, allowing even the youngest members to participate in the fun.
With their festive appearance and irresistible taste, these truffles are bound to be a hit at any holiday party or gathering.
The beauty of Holiday Oreo Truffles lies in their versatility; you can easily customize them with different toppings or coatings to suit your holiday theme. Whether you choose to drizzle them with white chocolate, sprinkle them with crushed peppermint, or add a touch of edible glitter, these truffles are assured to shine on your dessert table.
Perfect for a serving size of 4-6 people, this recipe guarantees that everyone gets a taste of these delightful confections.
Ingredients:
- 36 Oreo cookies
- 8 oz cream cheese, softened
- 16 oz semi-sweet chocolate chips or candy melts
- 1 teaspoon vanilla extract
- Sprinkles or crushed candy canes for decoration (optional)
Instructions:
- Prepare the Oreo Mixture: Begin by crushing the Oreo cookies. You can do this by placing them in a food processor and pulsing until you achieve a fine crumb. Alternatively, place the cookies in a ziplock bag and crush them with a rolling pin. Transfer the crushed Oreos to a large mixing bowl.
- Mix with Cream Cheese: Add the softened cream cheese and vanilla extract to the bowl with the crushed Oreos. Use a hand mixer or a spatula to blend the mixture until it’s well combined and smooth. The mixture should be thick and sticky.
- Form the Truffles: Using your hands or a small cookie scoop, shape the Oreo mixture into small balls, approximately 1 inch in diameter. Place the balls on a baking sheet lined with parchment paper. Once all the truffles are formed, chill them in the refrigerator for about 30 minutes to firm up.
- Melt the Chocolate: While the truffles are chilling, melt the chocolate chips or candy melts in a microwave-safe bowl. Heat in 30-second intervals, stirring in between, until the chocolate is fully melted and smooth.
- Coat the Truffles: Remove the chilled truffles from the refrigerator. Using a fork, dip each truffle into the melted chocolate, ensuring it’s completely coated. Allow any excess chocolate to drip off before placing the truffle back on the parchment-lined baking sheet.
- Decorate: While the chocolate coating is still wet, sprinkle the truffles with your choice of decorations, such as sprinkles or crushed candy canes. Allow the chocolate to set completely, either at room temperature or in the refrigerator.
- Serve and Enjoy: Once the chocolate is firm, the truffles are ready to be served. Arrange them on a festive platter and enjoy these sweet treats with family and friends.
Extra Tips: For best results, make sure the cream cheese is at room temperature before mixing, as this will help achieve a smoother consistency. If you find the truffle mixture too sticky to handle, refrigerate it for a short time before shaping.
Consider experimenting with different cookie flavors or chocolate coatings to add variety to your truffles. Additionally, if you’re preparing these in advance, store them in an airtight container in the refrigerator for up to a week.
Oreo Hot Chocolate Bombs

Oreo Hot Chocolate Bombs are a delightful and festive treat that combines the rich flavors of chocolate with the beloved taste of Oreo cookies. These bombs are perfect for Christmas gatherings or cozy nights in by the fireplace.
The concept is simple yet magical: a chocolate shell filled with hot cocoa mix and crushed Oreos that melts into a warm, creamy beverage when added to hot milk. It’s a fun and interactive way to enjoy hot chocolate, making them a hit with both kids and adults alike.
Whether you’re serving them at a holiday party or gifting them to loved ones, Oreo Hot Chocolate Bombs are guaranteed to spread holiday cheer.
Making these treats at home is both enjoyable and rewarding, as you can customize them to your liking. The process involves creating a chocolate sphere, filling it with your chosen ingredients, and sealing it up to form a perfect bomb.
When added to hot milk, the chocolate melts away, releasing the hidden treasures within. This recipe serves 4-6 people, allowing you to share the joy with family and friends. With a little patience and creativity, you can make these delightful bombs that aren’t only delicious but also visually appealing.
Ingredients (serving size: 4-6 people)
- 18 ounces of semi-sweet chocolate chips
- 6 tablespoons of hot cocoa mix
- 12 Oreo cookies, crushed
- 1 cup of mini marshmallows
- 1 tablespoon of crushed peppermint candies (optional for garnish)
- Edible glitter or sprinkles (optional for decoration)
Cooking Instructions
1. Prepare the Molds: Begin by melting the semi-sweet chocolate chips in a microwave-safe bowl, heating in 30-second increments and stirring in between until smooth. Use a spoon or brush to evenly coat the insides of the silicone molds with the melted chocolate. Make certain to cover all areas to form a sturdy shell.
Place the molds in the refrigerator for about 10 minutes to allow the chocolate to set.
2. Fill the Bombs: Once the chocolate shells have hardened, carefully remove them from the molds. Fill half of the shells with 1 tablespoon of hot cocoa mix, 2 crushed Oreo cookies, and a few mini marshmallows for each bomb.
3. Seal the Bombs: To seal the bombs, slightly melt the edges of an empty chocolate shell by placing it on a warm plate for a few seconds. Quickly press it onto a filled shell to create a sphere. Gently press the edges together to make sure they’re sealed.
Repeat this process with the remaining shells.
4. Decorate the Bombs: If desired, melt a small amount of chocolate and use it as “glue” to attach crushed peppermint candies or edible glitter to the tops of the bombs. This adds a festive touch and extra flavor.
5. Serve: To serve, place one Oreo Hot Chocolate Bomb in a mug and pour 8 ounces of hot milk over it. Stir until the bomb is completely dissolved, and enjoy your delicious, creamy Oreo hot chocolate.
Extra Tips
When making Oreo Hot Chocolate Bombs, it’s important to confirm the chocolate shells are thick enough to hold the fillings. If the shells are too thin, they may break when you try to seal them.
Additionally, using high-quality chocolate will enhance the flavor and texture of the bombs. If you’re gifting them, consider wrapping each bomb individually in cellophane bags tied with a festive ribbon for a charming presentation.
Finally, get creative with decorations – sprinkles or a drizzle of white chocolate can add a delightful touch to your homemade hot chocolate bombs.
Oreo-Stuffed Chocolate Chip Cookies
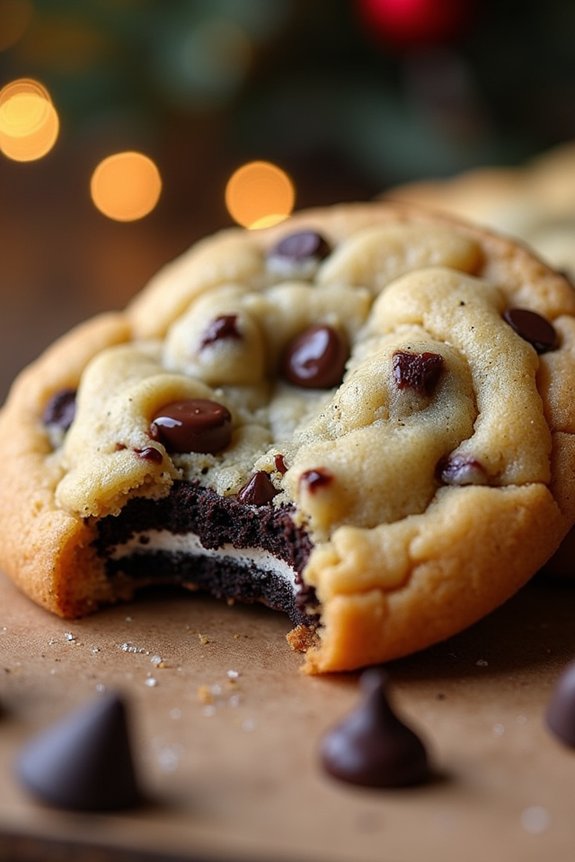
Delight your family and friends this holiday season with Oreo-Stuffed Chocolate Chip Cookies, a decadent twist on a classic favorite. Imagine biting into a warm, gooey chocolate chip cookie only to discover a creamy Oreo surprise inside.
These cookies are perfect for any festive gathering, offering a delightful blend of textures and flavors that will leave everyone craving more. The combination of crispy cookies and creamy filling makes for an indulgent treat that captures the magic of the holiday spirit.
These cookies aren’t only delicious but also quite easy to make, making them an ideal choice for holiday baking. You don’t need to be a professional baker to achieve the perfect Oreo-Stuffed Chocolate Chip Cookie. With a few simple ingredients and some basic baking skills, you can create a scrumptious treat that will impress your guests.
The recipe yields enough for 4-6 people, making it a wonderful addition to any holiday dessert table.
Ingredients (for 4-6 servings):
- 1 cup unsalted butter, softened
- 1 cup granulated sugar
- 1 cup packed brown sugar
- 2 large eggs
- 1 tablespoon vanilla extract
- 3 cups all-purpose flour
- 1 teaspoon baking soda
- 1/2 teaspoon baking powder
- 1/2 teaspoon salt
- 2 cups semi-sweet chocolate chips
- 24 Oreos
Instructions:
- Preheat the Oven: Start by preheating your oven to 350°F (175°C). Line a baking sheet with parchment paper to guarantee your cookies don’t stick.
- Mix Wet Ingredients: In a large bowl, cream together the softened butter, granulated sugar, and brown sugar until the mixture is light and fluffy. This should take about 2-3 minutes using an electric mixer. Add in the eggs, one at a time, beating well after each addition. Stir in the vanilla extract until well combined.
- Combine Dry Ingredients: In a separate bowl, whisk together the flour, baking soda, baking powder, and salt. Gradually add the dry mixture to the wet mixture, mixing until just combined. Be careful not to overmix the dough.
- Add Chocolate Chips: Fold in the chocolate chips gently using a spatula or wooden spoon. Confirm that the chocolate chips are evenly distributed throughout the dough.
- Assemble the Cookies: Take a small scoop of cookie dough and flatten it slightly in your palm. Place an Oreo on top and cover it with another scoop of dough. Seal the edges by pressing the dough around the Oreo, forming a ball. Make sure the Oreo is completely encased in the cookie dough.
- Bake the Cookies: Place the dough balls onto the prepared baking sheet, leaving enough space between each to allow for spreading. Bake in the preheated oven for 12-15 minutes, or until the cookies are golden brown around the edges. Remove from the oven and let them cool on the baking sheet for 5 minutes before transferring to a wire rack to cool completely.
- Serve and Enjoy: Once cooled, serve these delightful cookies with a glass of milk or your favorite holiday beverage. Enjoy the surprise and delight on your guests’ faces as they discover the Oreo hidden inside!
Extra Tips: For best results, use room temperature ingredients to guarantee even mixing and better texture. Make sure not to overbake the cookies; they should be slightly gooey in the center when you take them out of the oven as they’ll continue to cook slightly while cooling.
If you want to add a festive touch, consider using holiday-themed Oreos or sprinkling crushed candy canes on top of the cookies before baking. These cookies are best enjoyed fresh but can be stored in an airtight container for up to a week.
Oreo Christmas Tree Cupcakes

Oreo Christmas Tree Cupcakes are a delightful and festive treat perfect for the holiday season. These cupcakes combine the classic flavors of chocolate and vanilla with a fun, decorative twist that resembles a Christmas tree. The base is a moist chocolate cupcake with a hidden Oreo surprise, topped with a swirl of vibrant green frosting to mimic a tree, and adorned with colorful candies to represent ornaments.
These cupcakes aren’t only delicious but also make for an eye-catching centerpiece on your dessert table. The preparation is straightforward, making it a fun activity for the whole family or a great addition to any holiday gathering. Whether you’re baking these cupcakes for a Christmas party or just to enjoy at home, they promise a burst of holiday cheer in every bite. The combination of the smooth cream filling, chocolatey goodness, and decorative flair will surely impress your guests and leave them wanting more.
Ingredients for 4-6 servings:
- 12 Oreo cookies
- 1 cup all-purpose flour
- 1/2 cup cocoa powder
- 1 teaspoon baking powder
- 1/2 teaspoon baking soda
- 1/4 teaspoon salt
- 1/2 cup unsalted butter, softened
- 1 cup granulated sugar
- 2 large eggs
- 1 teaspoon vanilla extract
- 1/2 cup buttermilk
- Green food coloring
- 1 cup vanilla frosting
- Assorted candy decorations (mini M&M’s, sprinkles, etc.)
- 12 pretzel sticks
Instructions:
- Prepare the Oven and Muffin Tin: Preheat your oven to 350°F (175°C). Line a muffin tin with cupcake liners, and place an Oreo cookie at the bottom of each liner.
- Mix Dry Ingredients: In a medium bowl, sift together the flour, cocoa powder, baking powder, baking soda, and salt. Set aside for later use.
- Cream Butter and Sugar: In a large mixing bowl, beat the softened butter and granulated sugar together until light and fluffy. This should take about 3-4 minutes.
- Add Eggs and Vanilla: Add the eggs one at a time, beating well after each addition. Stir in the vanilla extract until just combined.
- Combine Wet and Dry Ingredients: Gradually add the dry ingredients to the butter mixture, alternating with the buttermilk. Begin and end with the dry ingredients. Mix until just combined, being careful not to overmix.
- Fill the Muffin Tin: Evenly distribute the batter over the Oreo cookies in the cupcake liners, filling each about two-thirds full.
- Bake: Place the muffin tin in the preheated oven and bake for 18-20 minutes, or until a toothpick inserted into the center comes out clean. Allow the cupcakes to cool completely on a wire rack.
- Prepare the Frosting: In a small bowl, mix the vanilla frosting with a few drops of green food coloring until you achieve the desired shade of green. Transfer the frosting to a piping bag fitted with a star tip.
- Decorate: Pipe the green frosting onto each cooled cupcake in a swirling motion to create a tree shape. Stick a pretzel stick into the top of each cupcake as the “tree trunk.”
- Add Ornaments: Decorate the frosting with assorted candy decorations to resemble Christmas tree ornaments.
Extra Tips:
For the best results, verify that the cupcakes are completely cool before you begin frosting them to prevent the frosting from melting. If you want to make these cupcakes even more festive, consider adding a drop of peppermint extract to the batter for a minty twist.
You can also adjust the green shade of the frosting by adding more or less food coloring to match your desired hue. Finally, store any leftovers in an airtight container to keep them fresh and delicious.
White Chocolate Oreo Fudge
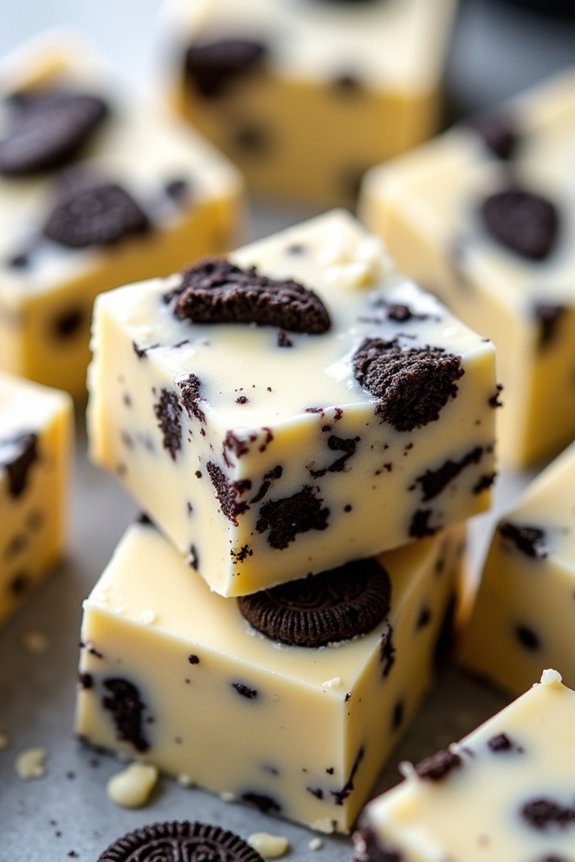
White Chocolate Oreo Fudge is a delightful holiday treat that combines the rich sweetness of white chocolate with the crunchy goodness of Oreo cookies. This indulgent dessert is perfect for Christmas celebrations, offering a festive twist on traditional fudge. Its creamy texture and bursts of cookie bits make it a crowd-pleaser, certain to impress family and friends alike.
Whether served at a holiday party or given as a homemade gift, this fudge is a simple yet decadent addition to your holiday dessert lineup.
Making White Chocolate Oreo Fudge is surprisingly easy, requiring just a handful of ingredients and minimal preparation time. The key to this recipe is to use high-quality white chocolate, which provides a smooth and creamy base for the fudge. The addition of crushed Oreo cookies adds a delightful crunch and a hint of chocolate flavor, perfectly complementing the sweetness of the fudge.
To guarantee a perfect set, it’s essential to allow the fudge to cool completely before cutting into squares. Follow these simple steps to create a batch of White Chocolate Oreo Fudge that will surely become a holiday favorite.
Ingredients for White Chocolate Oreo Fudge (Serves 4-6):
- 2 cups white chocolate chips
- 1 can (14 ounces) sweetened condensed milk
- 1 teaspoon vanilla extract
- 12 Oreo cookies, roughly crushed
- 1 tablespoon unsalted butter
Cooking Instructions:
1. Prepare the Ingredients:
Begin by gathering all your ingredients and preparing your workspace. Crush the Oreo cookies into rough pieces, making sure you have a mix of larger chunks and smaller crumbs for texture. Set aside.
2. Melt the Chocolate:
In a medium saucepan, combine the white chocolate chips, sweetened condensed milk, and butter. Place the saucepan over low heat, stirring continuously until the chocolate chips have completely melted and the mixture is smooth and creamy.
3. Add Vanilla and Oreos:
Once the chocolate mixture is fully melted and smooth, remove the saucepan from the heat. Stir in the vanilla extract until well incorporated. Gently fold in the crushed Oreo cookies, mixing until they’re evenly distributed throughout the fudge mixture.
4. Prepare the Pan:
Line an 8×8 inch square baking pan with parchment paper, leaving some excess paper hanging over the sides for easy removal later. Pour the fudge mixture into the prepared pan, spreading it evenly with a spatula.
5. Chill the Fudge:
Place the baking pan in the refrigerator and allow the fudge to set for at least 2 hours, or until it’s firm to the touch. For best results, let it chill overnight.
6. Cut and Serve:
Once the fudge has set, lift it out of the pan using the parchment paper overhang. Use a sharp knife to cut the fudge into squares.
Extra Tips:
For an extra festive touch, consider adding a sprinkle of crushed peppermint candies on top of the fudge before chilling. This adds a delightful minty flavor that pairs beautifully with the white chocolate and Oreo cookies.
If you prefer a thicker fudge, simply double the recipe and use a 9×9 inch pan. Remember, patience is key—allowing the fudge ample time to chill will guarantee clean, smooth cuts and a perfect texture.
Enjoy your White Chocolate Oreo Fudge as a sweet ending to your holiday meals or as a delightful treat throughout the festive season.
Gingerbread Oreo Icebox Cake
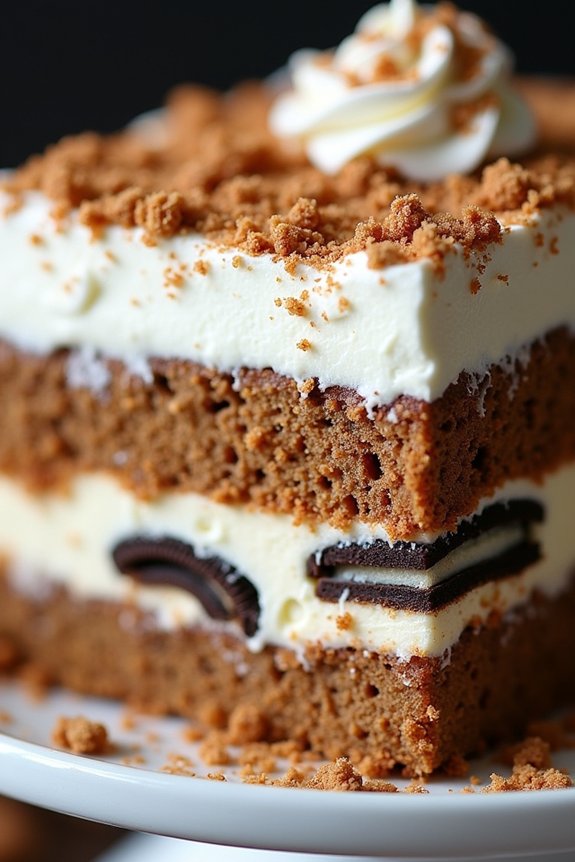
Create a festive and delightful dessert with this Gingerbread Oreo Icebox Cake, perfect for any holiday gathering. This no-bake treat combines the classic flavors of gingerbread and creamy Oreos for a whimsical twist on a traditional icebox cake. Ideal for serving 4-6 people, this dessert is both easy to assemble and a joy to indulge in. The rich layers of gingerbread Oreos and luscious cream cheese filling will leave your guests coming back for more.
This Gingerbread Oreo Icebox Cake isn’t only a visual delight but also a burst of flavors with every bite. The combination of spiced gingerbread Oreos with the sweet, smooth cream filling creates a harmonious balance that’s certain to satisfy any sweet tooth. With no baking required, this dish is a convenient and quick option for any holiday celebration. Follow the steps below to assemble this scrumptious dessert, and get ready to impress your family and friends with your culinary skills.
Ingredients (serves 4-6):
- 2 boxes of Gingerbread Oreos
- 16 oz cream cheese, softened
- 1 cup powdered sugar
- 2 teaspoons vanilla extract
- 2 cups heavy whipping cream
- 1 teaspoon ground cinnamon
- 1/2 teaspoon ground nutmeg
- 1/4 cup molasses
- Crushed gingerbread cookies for garnish (optional)
- Whipped cream for topping (optional)
Instructions:
- Prepare the Cream Filling: In a large mixing bowl, beat the softened cream cheese with the powdered sugar until smooth and creamy. Add in the vanilla extract, ground cinnamon, and nutmeg, and continue to mix until well combined.
- Whip the Cream: In a separate bowl, whip the heavy cream using an electric mixer until soft peaks form. Gently fold the whipped cream into the cream cheese mixture, making sure everything is well incorporated. This will create a light and fluffy filling for your cake.
- Layer the Cake: Spread a thin layer of the cream filling on the bottom of your serving dish to prevent sticking. Begin layering the Gingerbread Oreos in a single layer across the bottom, breaking cookies if necessary to fit.
- Build the Layers: Spread a generous layer of the cream filling over the Oreos, then drizzle a thin layer of molasses over the cream. Repeat the layering process with more Oreos and cream filling until you reach the top of the dish, finishing with a layer of cream.
- Chill: Cover the dish with plastic wrap or foil and refrigerate for at least 4 hours, preferably overnight, to allow the flavors to meld and the cookies to soften.
- Garnish and Serve: Just before serving, garnish the top of the cake with crushed gingerbread cookies and a dollop of whipped cream if desired. This will add an extra touch of festive flair and texture to the dessert.
Extra Tips: For best results, verify the cream cheese is fully softened before mixing to achieve a smooth filling. You can customize the spice level by adjusting the amount of cinnamon and nutmeg to suit your taste. Additionally, if Gingerbread Oreos are unavailable, regular Oreos with a touch of ground ginger in the cream filling can be a wonderful substitute. Remember to chill the cake well to confirm the cookies have softened and the flavors have melded beautifully before serving.
Oreo Snowman Pops
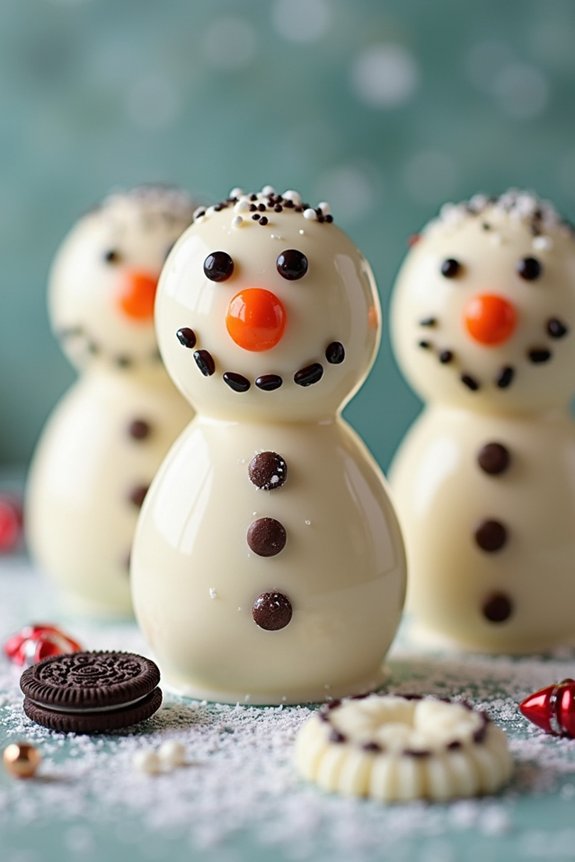
Oreo Snowman Pops are a delightful treat perfect for adding a whimsical touch to your holiday dessert table. These fun, no-bake treats are easy to make and loved by both kids and adults. The combination of creamy white chocolate, crunchy Oreos, and colorful decorations make these snowman pops a festive addition to any holiday gathering.
Whether you’re hosting a Christmas party or looking for a fun activity to do with the family, Oreo Snowman Pops are sure to bring smiles and joy.
The process of making Oreo Snowman Pops is straightforward and requires only a few ingredients. Once you’ve assembled your snowmen, you can get creative with decorating them using a variety of edible decorations. From mini chocolate chips for eyes to orange candy-coated chocolates for noses, you can customize each snowman to have its own personality.
These charming pops not only taste delicious but also serve as a delightful centerpiece for your holiday dessert spread.
Ingredients (Serves 4-6):
- 12 Oreo cookies
- 1 cup white chocolate chips
- 12 lollipop sticks
- Mini chocolate chips (for eyes and buttons)
- Orange candy-coated chocolates or jelly beans (for noses)
- Black decorating gel or icing (for mouth)
- Sprinkles (optional, for hats or scarves)
- Wax paper
Cooking Instructions:
- Prepare the Workstation: Line a baking sheet with wax paper to prevent the snowman pops from sticking and to make clean-up easier.
- Melt the Chocolate: In a microwave-safe bowl, melt the white chocolate chips in 15-second intervals, stirring in between, until completely smooth and melted. Be careful not to overheat.
- Assemble the Pops: Carefully twist apart the Oreo cookies, keeping the cream filling on one side. Dip the tip of a lollipop stick into the melted chocolate and press it into the cream filling of one half of an Oreo. Place the other half of the cookie on top, gently pressing down to secure the stick. Allow the chocolate to set for a few minutes.
- Coat the Oreos: Dip each Oreo pop into the melted white chocolate, ensuring it’s fully coated. Let any excess chocolate drip off before placing the pop on the prepared baking sheet.
- Decorate the Snowmen: While the chocolate is still wet, press mini chocolate chips onto the Oreos to create eyes and buttons. Add an orange candy-coated chocolate or jelly bean for the nose. Use black decorating gel to draw a mouth. If desired, add sprinkles for hats or scarves.
- Set the Pops: Allow the decorated Oreo Snowman Pops to set at room temperature or place them in the refrigerator for faster setting. Once the chocolate has hardened, they’re ready to serve.
Extra Tips:
For a smoother coating, consider adding a teaspoon of vegetable oil to the white chocolate before melting. This will help achieve a shinier finish.
If the chocolate begins to harden while you’re decorating, simply reheat it in the microwave for a few seconds to restore its consistency. These pops can be made a day in advance and stored in an airtight container at room temperature.
Feel free to let your creativity shine by using different colored gels and candies to personalize each snowman. Enjoy making and sharing these delightful treats with your loved ones!
Oreo Candy Cane Brownies
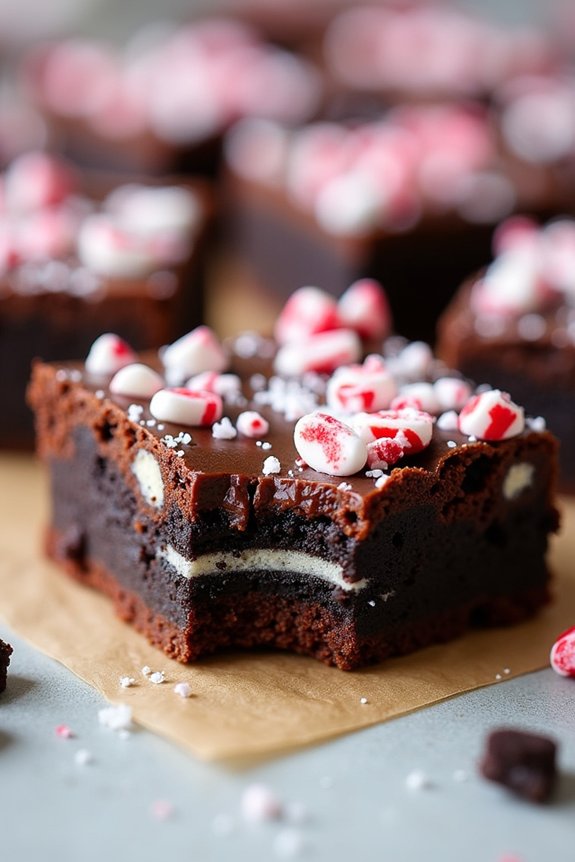
The combination of rich chocolate brownie, crushed Oreo cookies, and peppermint candy canes creates a harmonious blend of flavors. The brownies are moist and dense, while the Oreo pieces add a delightful crunch. The candy cane pieces, both in the batter and on top, infuse a rejuvenating minty aroma that perfectly complements the chocolate. The result is a dessert that not only tastes amazing but also looks festive with its speckled red and white candy cane pieces. This recipe serves 4-6 people, making it ideal for a small gathering or a special family treat during the holiday season.
Ingredients for Oreo Candy Cane Brownies:
- 1 cup all-purpose flour
- 1 cup granulated sugar
- 1/2 cup unsweetened cocoa powder
- 1/2 teaspoon baking powder
- 1/4 teaspoon salt
- 1/2 cup unsalted butter, melted
- 2 large eggs
- 1 teaspoon vanilla extract
- 12 Oreo cookies, coarsely chopped
- 1/2 cup crushed candy canes, divided
Instructions:
- Preheat and Prepare Baking Dish: Preheat your oven to 350°F (175°C). Grease a 9×9-inch baking pan or line it with parchment paper, leaving a slight overhang for easy removal later.
- Mix Dry Ingredients: In a medium-sized bowl, whisk together the flour, sugar, cocoa powder, baking powder, and salt until well combined. This will guarantee that the dry ingredients are evenly distributed throughout the brownie batter.
- Combine Wet Ingredients: In a separate large bowl, whisk the melted butter, eggs, and vanilla extract until smooth. The melted butter should be cooled slightly to avoid cooking the eggs.
- Create the Batter: Gradually add the dry ingredients to the wet ingredients, stirring until just combined. Be careful not to over-mix, as this can lead to tough brownies.
- Incorporate Oreos and Candy Canes: Fold in the chopped Oreo cookies and half of the crushed candy canes. This will distribute the Oreo and candy cane pieces throughout the batter, assuring each bite is packed with flavor.
- Transfer to Pan: Pour the brownie batter into the prepared pan, spreading it evenly with a spatula. Confirm the batter reaches all corners for even baking.
- Add Toppings: Sprinkle the remaining crushed candy canes over the top of the batter. This adds a decorative and flavorful touch to the finished brownies.
- Bake: Place the pan in the preheated oven and bake for 25-30 minutes, or until a toothpick inserted into the center comes out with a few moist crumbs. The baking time may vary slightly based on your oven.
- Cool and Serve: Remove the brownies from the oven and let them cool completely in the pan on a wire rack. Once cooled, lift them out using the parchment overhang, cut into squares, and serve.
Extra Tips:
For an extra layer of flavor, consider adding a handful of chocolate chips or white chocolate chips to the batter. This will enhance the chocolatey richness of the brownies.
If you find that the candy canes tend to sink to the bottom, try gently pressing them into the batter before baking.
Remember, the key to a perfect brownie texture isn’t overbaking; they should be just set in the center to retain their fudgy goodness.
Store any leftovers in an airtight container at room temperature for up to three days, or freeze them for a longer shelf life.
Oreo Yule Log Cake
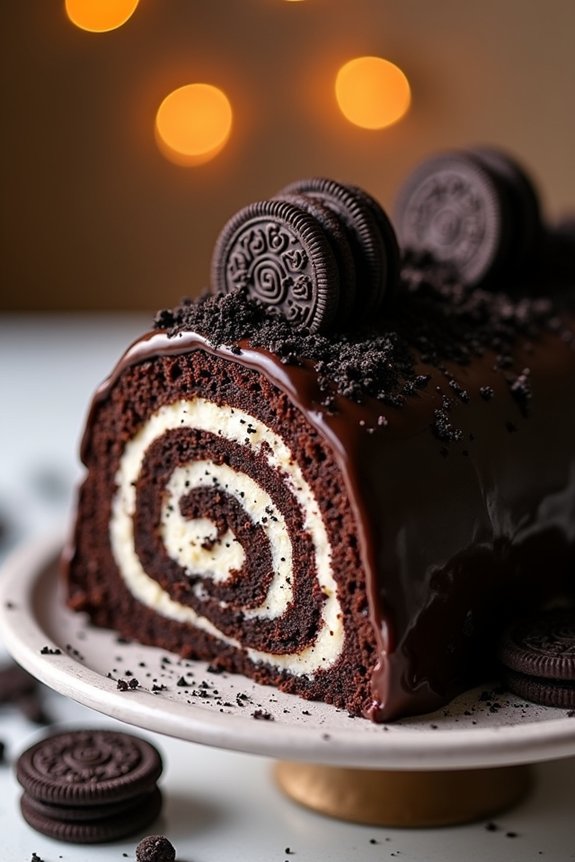
Transform the classic Yule log into an Oreo lover’s dream with this festive Oreo Yule Log Cake. This dessert combines the rich, chocolaty flavors of Oreo cookies with the traditional elements of a holiday yule log. Perfect for a Christmas gathering, this cake is as impressive as it’s delicious, featuring a moist chocolate sponge rolled with an Oreo-infused cream filling and topped with a luscious chocolate ganache.
Whether you’re hosting a holiday party or looking for a show-stopping dessert to bring to a family gathering, this Oreo Yule Log Cake is sure to be a hit.
Making this cake requires a bit of patience and attention to detail, but the end result is well worth the effort. By following these steps, you’ll create a stunning and tasty centerpiece for your dessert table. The instructions provided will yield a cake that serves 4 to 6 people, ensuring everyone gets a delightful taste of this festive dessert.
Ingredients (Serves 4-6):
- 4 large eggs
- 1/2 cup granulated sugar
- 1/4 cup all-purpose flour
- 1/4 cup cocoa powder
- 1 teaspoon vanilla extract
- 1/2 teaspoon baking powder
- 1/4 teaspoon salt
- 1 cup heavy cream
- 1/2 cup powdered sugar
- 8 Oreo cookies, crushed
- 1/2 cup semi-sweet chocolate chips
- 1/4 cup heavy cream (for ganache)
- Extra crushed Oreos for garnish (optional)
Cooking Instructions:
- Prepare the Sponge Cake: Preheat your oven to 350°F (175°C). Line a 10×15 inch jelly roll pan with parchment paper. In a large bowl, beat the eggs and granulated sugar together until thick and light in color, about 5 minutes. Add the vanilla extract and mix well.
- Combine Dry Ingredients: In a separate bowl, sift together the flour, cocoa powder, baking powder, and salt. Gradually fold the dry ingredients into the egg mixture, being careful not to deflate the batter.
- Bake the Cake: Pour the batter into the prepared pan and spread it evenly. Bake for 10-12 minutes or until the cake springs back when lightly touched. Lay a clean kitchen towel on a flat surface and dust it with powdered sugar.
- Roll the Cake: Once baked, immediately invert the cake onto the sugared towel and peel off the parchment paper. Starting from one short end, roll the cake up with the towel and let it cool completely.
- Prepare the Filling: In a medium bowl, whip 1 cup of heavy cream with 1/2 cup powdered sugar until stiff peaks form. Gently fold in the crushed Oreos.
- Fill and Roll the Cake: Carefully unroll the cooled cake and spread the Oreo cream filling evenly over the surface. Re-roll the cake (without the towel) and place it seam-side down on a serving platter.
- Make the Ganache: Heat 1/4 cup of heavy cream until it just begins to simmer. Pour over the chocolate chips and let sit for 1-2 minutes. Stir until smooth and glossy.
- Frost the Cake: Spread the chocolate ganache over the entire surface of the rolled cake. Optionally, sprinkle extra crushed Oreos over the top for decoration.
- Chill and Serve: Refrigerate the cake for at least 1 hour before serving to allow the flavors to meld and the ganache to set.
Extra Tips: When rolling the cake, make sure it’s still warm to prevent cracking. Using a towel dusted with powdered sugar helps prevent sticking and aids in rolling. Patience is key when folding the dry ingredients into the egg mixture; use a gentle hand to keep the batter light and airy.
For an added touch, consider decorating with festive sprinkles or a light dusting of powdered sugar just before serving. Enjoy your Oreo Yule Log Cake with a glass of milk or a cup of hot cocoa for the ultimate holiday treat.
Double Chocolate Oreo Pudding Parfaits
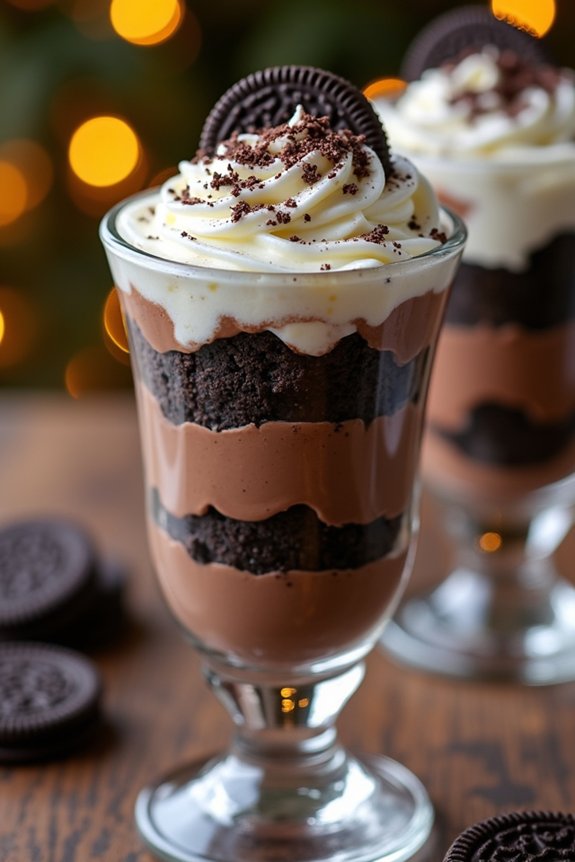
Double Chocolate Oreo Pudding Parfaits are a delightful treat that combines the crunchy, creamy, and chocolaty flavors of Oreos with the smoothness of chocolate pudding. This dessert is perfect for the holiday season, offering a festive and indulgent experience that’s sure to impress your family and friends.
The layers of Oreo crumbs and rich chocolate pudding create a visually appealing and delectable dessert that looks as good as it tastes. Ideal for gatherings or as a special treat after Christmas dinner, Double Chocolate Oreo Pudding Parfaits are relatively easy to make and require minimal preparation time.
The combination of textures from the crunchy Oreo pieces and the creamy pudding makes each bite a delightful surprise. Additionally, the use of whipped cream adds an extra layer of indulgence, while a topping of chocolate shavings elevates the dish to a new level of decadence.
Ingredients (Serves 4-6 people):
- 2 cups cold milk
- 1 (3.9 oz) package instant chocolate pudding mix
- 1 (14.3 oz) package Oreo cookies
- 1 cup heavy whipping cream
- 2 tablespoons powdered sugar
- 1 teaspoon vanilla extract
- Chocolate shavings (optional, for garnish)
Cooking Instructions:
- Prepare the Pudding: In a medium-sized bowl, whisk together the cold milk and instant chocolate pudding mix until well combined. Allow the mixture to set in the refrigerator for about 5 minutes, until it thickens.
- Crush the Oreos: Place Oreo cookies in a large ziplock bag, leaving a few aside for garnish if desired. Use a rolling pin to crush the cookies into small crumbs. Alternatively, use a food processor for finer crumbs.
- Make the Whipped Cream: In a separate bowl, beat the heavy whipping cream, powdered sugar, and vanilla extract with an electric mixer on medium-high speed until soft peaks form. This will take about 3-4 minutes.
- Assemble the Parfaits: Start by placing a layer of Oreo crumbs at the bottom of each serving glass or dish. Follow with a layer of chocolate pudding, then a layer of whipped cream. Repeat the layers until the glasses are full, ending with a whipped cream layer.
- Garnish: Top the parfaits with reserved Oreo cookie pieces or chocolate shavings for an extra festive touch. You can also add a drizzle of chocolate syrup if desired.
- Chill: Place the parfaits in the refrigerator for at least 30 minutes before serving to allow the flavors to meld together and the dessert to set properly.
Extra Tips: To save time, you can prepare the pudding and whipped cream ahead of time and store them in the refrigerator until you’re ready to assemble the parfaits.
For a more intense chocolate flavor, consider adding a spoonful of cocoa powder to the pudding mix. Additionally, if you want to experiment with flavors, try using flavored Oreo cookies such as mint or peanut butter for a unique twist.