

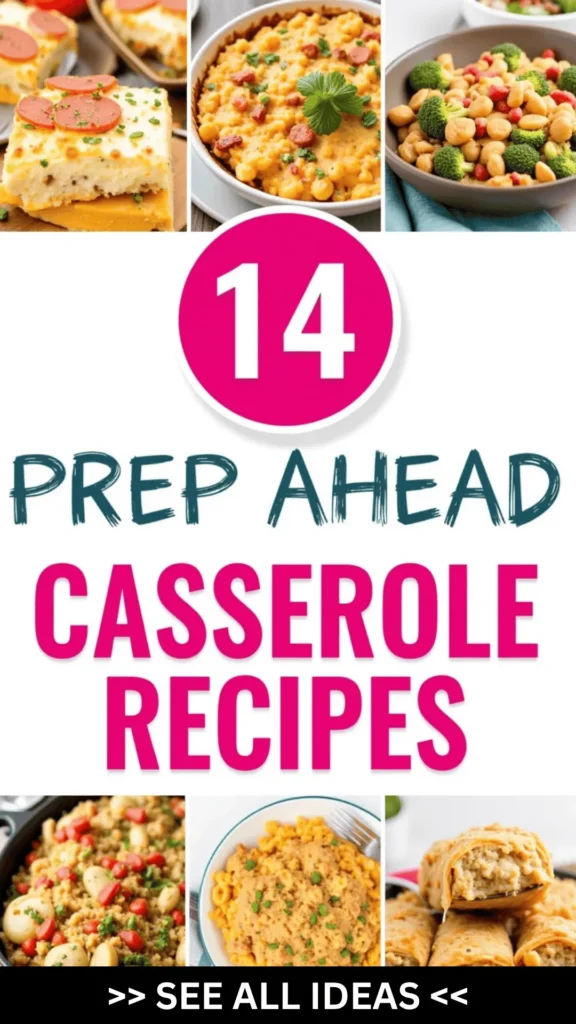
There’s nothing quite like having a collection of prep-ahead casseroles ready to go.
These dishes turn chaotic weeknight dinners into something special and stress-free.
Just picture returning home to the mouthwatering smell of Beef Lasagna or a delightful Cheesy Chicken and Broccoli Casserole.
If you’re on the lookout for easy yet delicious meals that save time without skimping on flavor, you’re in the right place.
Let’s explore these fantastic casserole recipes that will become your new go-tos!
Classic Beef Lasagna
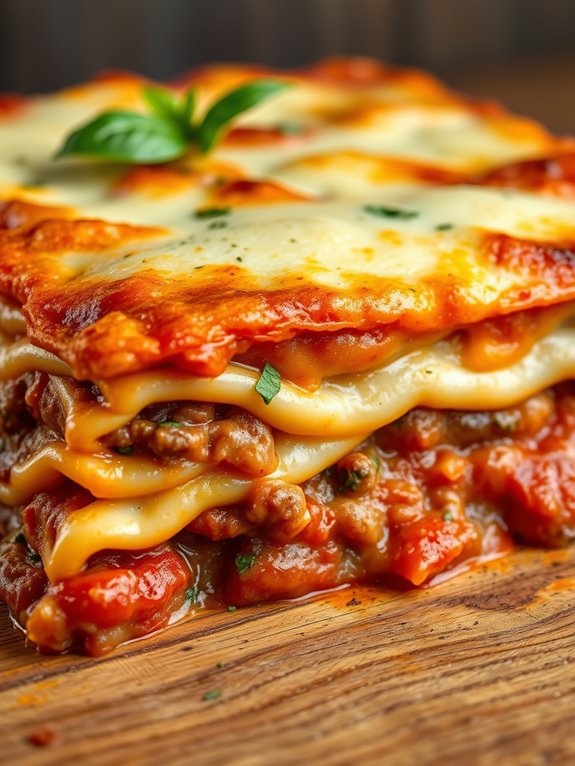
Classic Beef Lasagna is a timeless comfort food that brings warmth and satisfaction to any dining table. This dish layers rich, savory beef sauce with creamy cheese, perfectly cooked pasta, and a hint of herbs to create a deliciously hearty meal. Ideal for family dinners or gatherings, this lasagna recipe combines all the essential flavors of Italian cuisine into one delectable casserole.
With a perfect balance of textures and taste, it’s sure to become a favorite in your household. Lasagna is a versatile dish that allows for creativity, but this classic version sticks to traditional ingredients to maintain its authentic charm. The key to a great lasagna is in its layers, each one blending into the next to create a harmonious and mouthwatering experience.
This recipe serves 4-6 people, making it perfect for a family meal or small gathering. Prepare for a delightful dining experience as you serve this cheesy, meaty, and satisfying classic beef lasagna.
Ingredients (serves 4-6):
- 9 lasagna noodles
- 1 pound ground beef
- 1 small onion, chopped
- 2 cloves garlic, minced
- 24 ounces marinara sauce
- 1 tablespoon olive oil
- 1 teaspoon dried basil
- 1 teaspoon dried oregano
- 1/2 teaspoon salt
- 1/4 teaspoon black pepper
- 15 ounces ricotta cheese
- 1 egg
- 2 cups shredded mozzarella cheese
- 1/2 cup grated Parmesan cheese
Cooking Instructions:
1. Preheat and Prepare: Preheat your oven to 375°F (190°C). Cook the lasagna noodles according to the package instructions until al dente. Drain and set aside.
2. Cook the Beef Mixture: In a large skillet, heat olive oil over medium heat. Add chopped onion and minced garlic, sautéing until translucent. Add the ground beef and cook until browned, breaking it apart as it cooks. Stir in marinara sauce, basil, oregano, salt, and pepper. Let it simmer for about 10 minutes, allowing the flavors to meld.
3. Mix the Ricotta Layer: In a medium bowl, combine ricotta cheese and egg, mixing well until smooth and creamy.
4. Assemble the Lasagna: In a 9×13-inch baking dish, spread a thin layer of the meat sauce. Place three lasagna noodles over the sauce. Spread half of the ricotta mixture over the noodles, followed by a layer of the meat sauce and a sprinkle of mozzarella cheese.
Repeat the layers, finishing with a final layer of noodles and the remaining meat sauce. Sprinkle the top with mozzarella and Parmesan cheese.
5. Bake: Cover the dish with foil and bake in the preheated oven for 25 minutes. Remove the foil and bake for an additional 15 minutes, or until the cheese is bubbly and golden brown.
6. Rest and Serve: Allow the lasagna to rest for 10 minutes before slicing. This resting period helps the layers set and makes serving easier.
Extra Tips:
For a richer flavor, consider adding a splash of red wine to the meat sauce while it simmers. If you prefer a vegetarian option, you can substitute the ground beef with a variety of vegetables such as mushrooms, zucchini, and spinach. Make sure to drain excess moisture from the vegetables before adding them to the sauce.
Additionally, for a creamier texture, use whole milk ricotta cheese. Finally, feel free to experiment with different cheese blends to suit your taste preferences.
Cheesy Chicken and Broccoli Casserole

Cheesy Chicken and Broccoli Casserole is a comforting and delicious dish that brings together tender chicken, fresh broccoli, and a creamy, cheesy sauce. This casserole is perfect for a family dinner or a gathering with friends, providing a well-balanced meal that satisfies both children and adults.
The cheesy topping adds a golden, crispy layer that complements the creamy interior, making every bite a delightful experience. This dish isn’t only flavorful but also simple to prepare, making it an excellent choice for busy weeknights.
With minimal preparation time and ingredients that are commonly found in most kitchens, this casserole can quickly become a household favorite. The combination of chicken, broccoli, and cheese is both hearty and nutritious, creating a meal that’s both filling and wholesome.
Ingredients (Serves 4-6)
- 2 cups cooked chicken, shredded
- 4 cups broccoli florets
- 1 cup cheddar cheese, shredded
- 1 cup mozzarella cheese, shredded
- 1 can (10.5 oz) cream of chicken soup
- 1/2 cup mayonnaise
- 1/2 cup milk
- 1 teaspoon garlic powder
- 1/2 teaspoon onion powder
- Salt and pepper to taste
- 1 cup breadcrumbs
- 2 tablespoons butter, melted
Cooking Instructions
- Preheat the Oven: Set your oven to 375°F (190°C) to make sure it’s hot and ready for baking the casserole.
- Cook the Broccoli: Steam the broccoli florets for about 5 minutes until they’re tender but still vibrant in color. Drain and set aside.
- Prepare the Sauce: In a large bowl, mix the cream of chicken soup, mayonnaise, milk, garlic powder, onion powder, salt, and pepper until smooth and well combined.
- Combine Ingredients: Add the cooked chicken and steamed broccoli to the sauce mixture, stirring until everything is evenly coated.
- Layer the Casserole: In a greased 9×13 inch baking dish, spread the chicken and broccoli mixture evenly. Sprinkle the shredded cheddar and mozzarella cheeses over the top.
- Prepare the Topping: In a small bowl, combine breadcrumbs and melted butter. Spread this mixture evenly over the cheese layer to create a crunchy topping.
- Bake the Casserole: Place the casserole in the preheated oven and bake for 25-30 minutes, or until the cheese is bubbly and the topping is golden brown.
- Rest and Serve: Remove the casserole from the oven and let it rest for 5 minutes before serving. This will allow the flavors to meld and make it easier to serve.
Extra Tips
For a healthier version, consider using Greek yogurt instead of mayonnaise to reduce fat content while maintaining creaminess. You can also add a variety of vegetables like cauliflower or carrots to increase the nutritional value.
If you prefer a spicier dish, add a pinch of red pepper flakes to the sauce mixture. Finally, using freshly grated cheese instead of pre-shredded will enhance the flavor and melt better, creating a more cohesive casserole.
Spinach and Ricotta Stuffed Shells

Spinach and Ricotta Stuffed Shells is a delightful and creamy casserole dish that’s perfect for a comforting family dinner. This Italian-inspired recipe combines tender pasta shells filled with a rich spinach and ricotta mixture, all baked in a savory marinara sauce with a generous topping of melted cheese.
It’s a dish that’s sure to please both vegetarians and meat-lovers alike, offering a satisfying blend of flavors and textures in every bite. This dish isn’t only delicious but also incredibly easy to prepare, making it a great option for busy weeknights or a special weekend meal.
It can be assembled ahead of time, allowing the flavors to meld together, and then baked just before serving. With a serving size of 4-6 people, it’s perfect for feeding a family or a small gathering of friends.
Ingredients:
- 20 jumbo pasta shells
- 2 cups ricotta cheese
- 1 cup cooked spinach (drained and chopped)
- 1 cup parmesan cheese (grated)
- 1 egg
- 2 cups marinara sauce
- 1 ½ cups mozzarella cheese (shredded)
- 2 cloves garlic (minced)
- 1 tablespoon olive oil
- 1 teaspoon salt
- ½ teaspoon black pepper
- Fresh basil leaves for garnish
Cooking Instructions:
- Preheat the Oven: Start by preheating your oven to 375°F (190°C).
- Cook the Pasta Shells: Bring a large pot of salted water to a boil. Add the jumbo pasta shells and cook until al dente, according to package instructions. Drain and set aside to cool slightly.
- Prepare the Filling: In a large mixing bowl, combine the ricotta cheese, cooked spinach, parmesan cheese, egg, minced garlic, salt, and pepper. Mix until well combined.
- Stuff the Shells: Gently fill each cooked pasta shell with the ricotta and spinach mixture using a spoon, being careful not to tear the shells.
- Assemble the Casserole: In a baking dish, spread half of the marinara sauce evenly on the bottom. Place the stuffed shells into the baking dish, then cover with the remaining marinara sauce.
- Add the Cheese: Sprinkle the shredded mozzarella cheese over the top of the shells.
- Bake the Dish: Cover the baking dish with foil and bake in the preheated oven for 25 minutes. Remove the foil and bake for an additional 10-15 minutes, or until the cheese is bubbly and golden brown.
- Serve: Remove from the oven and let it cool slightly before serving. Garnish with fresh basil leaves.
Extra Tips:
For a more robust flavor, consider adding a pinch of nutmeg to the ricotta and spinach filling. If you prefer a bit of spice, sprinkle some red pepper flakes over the marinara sauce before baking.
To make this dish ahead of time, you can assemble it and store it in the refrigerator for up to 24 hours before baking. Additionally, feel free to substitute whole wheat pasta shells for a healthier option.
Mexican Beef Enchilada Bake
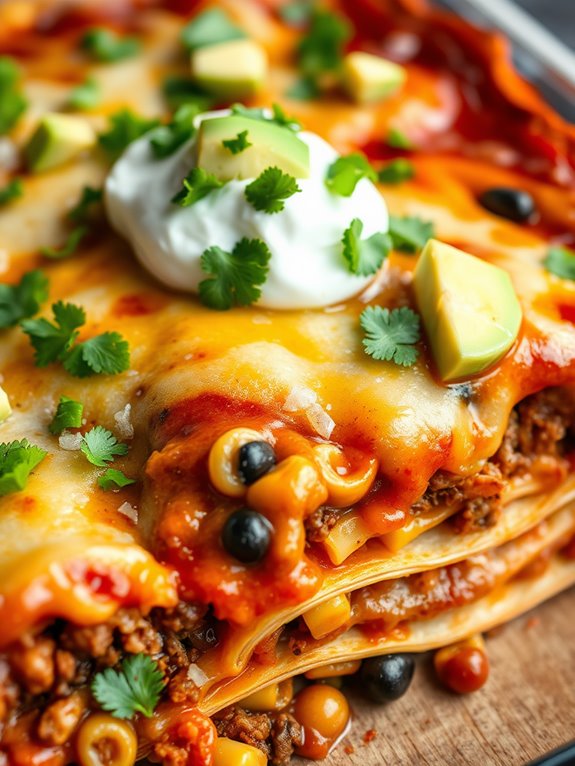
Mexican Beef Enchilada Bake is a flavorful and hearty dish that brings the authentic taste of Mexican cuisine to your dinner table. This casserole combines seasoned ground beef, zesty enchilada sauce, and gooey melted cheese, all layered with soft tortillas. Perfect for a family dinner or a gathering with friends, this dish is sure to become a favorite. The recipe is designed to serve 4-6 people, making it an ideal choice for a satisfying meal.
The preparation of this Mexican Beef Enchilada Bake is both straightforward and rewarding. By using simple ingredients that can be easily found in most kitchens or local grocery stores, you can create a delicious, comforting, and fulfilling meal. With a few steps and a little bit of time, you’ll have a delicious casserole that’s bursting with flavor and sure to please everyone at the table.
Ingredients (serves 4-6):
- 1 pound ground beef
- 1 medium onion, chopped
- 2 cloves garlic, minced
- 1 tablespoon olive oil
- 1 teaspoon ground cumin
- 1 teaspoon chili powder
- Salt and pepper to taste
- 2 cups red enchilada sauce
- 8 corn tortillas, cut in half
- 2 cups shredded Mexican cheese blend
- 1 can (15 oz) black beans, drained and rinsed
- 1 can (4 oz) diced green chilies
- 1 cup frozen corn kernels
- 1/4 cup chopped fresh cilantro
- Sour cream and diced avocado for topping (optional)
Cooking Instructions:
- Preheat the Oven: Preheat your oven to 375°F (190°C) to guarantee it reaches the right temperature while you prepare the other ingredients.
- Cook the Beef Mixture: In a large skillet, heat the olive oil over medium heat. Add the chopped onion and minced garlic, cooking until the onion becomes translucent. Add the ground beef, cooking until browned and fully cooked. Drain any excess fat.
- Season the Beef: Stir in the cumin, chili powder, salt, and pepper. Mix thoroughly to coat the beef with the spices.
- Prepare the Filling: Add the black beans, green chilies, and corn to the beef mixture. Stir well to combine all the ingredients. Allow it to cook for an additional 5 minutes.
- Assemble the Casserole: In a 9×13 inch baking dish, spread a thin layer of enchilada sauce on the bottom. Place a layer of tortilla halves over the sauce, followed by half of the beef mixture, a sprinkle of cilantro, and a layer of cheese. Repeat the layers, finishing with tortillas, enchilada sauce, and the remaining cheese on top.
- Bake: Cover the dish with aluminum foil and bake in the preheated oven for 20 minutes. Remove the foil and bake for an additional 10 minutes, or until the cheese is bubbly and golden.
- Serve: Let the casserole cool for a few minutes before slicing. Serve warm, topped with sour cream, diced avocado, and additional cilantro if desired.
Extra Tips:
For the best results, use freshly grated cheese rather than pre-shredded, as it melts more smoothly. Feel free to customize the recipe by adding other ingredients like sliced olives or jalapeños for extra heat.
If you prefer a spicier dish, consider using hot enchilada sauce or adding a pinch of cayenne pepper to the beef mixture. Finally, if you’re short on time, this dish can be prepared ahead of time and stored in the refrigerator for up to 24 hours before baking. Enjoy your Mexican Beef Enchilada Bake!
Creamy Tuna Noodle Casserole
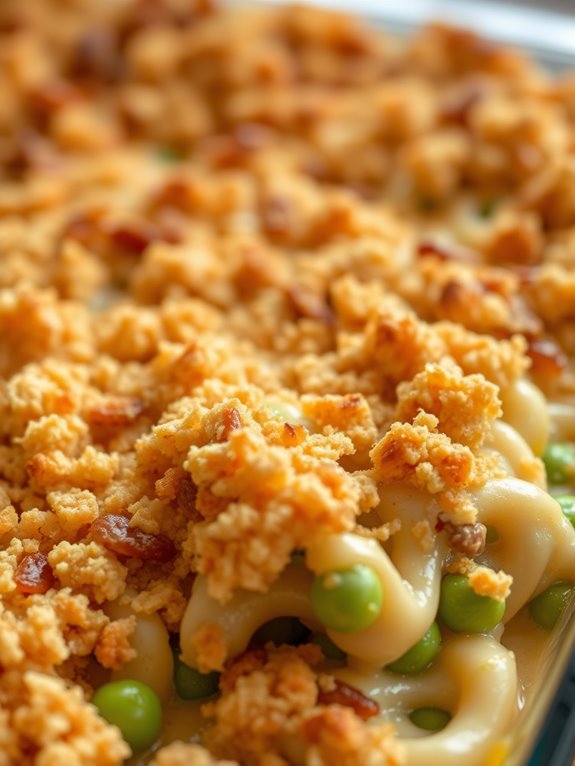
Creamy Tuna Noodle Casserole is a comforting, classic dish perfect for busy weeknights or cozy family gatherings. The rich and creamy texture of the casserole, combined with the savory taste of tuna, creates a delightful meal that’s both satisfying and delicious. This dish isn’t only easy to make but also a great way to use pantry staples to create a meal that everyone will love.
The combination of tender egg noodles, flaky tuna, and a creamy sauce, topped with crunchy breadcrumbs, makes this casserole irresistible. It’s a versatile dish that can be customized with your favorite vegetables or seasonings. Whether you’re making it for a quick dinner or preparing it ahead of time for a potluck, Creamy Tuna Noodle Casserole is sure to be a hit with family and friends.
Ingredients for 4-6 servings:
- 12 ounces egg noodles
- 2 cans (5 ounces each) tuna in water, drained
- 1 can (10.5 ounces) cream of mushroom soup
- 1 cup milk
- 1 cup frozen peas
- 1 cup shredded cheddar cheese
- 1/2 cup chopped onion
- 1/4 cup chopped celery
- 2 tablespoons butter
- 1 teaspoon garlic powder
- Salt and pepper to taste
- 1 cup breadcrumbs
- 2 tablespoons melted butter
- 2 tablespoons chopped fresh parsley (optional)
Instructions:
- Preheat and Prepare: Preheat your oven to 350°F (175°C). Grease a 9×13-inch baking dish with cooking spray or butter.
- Cook the Noodles: In a large pot, bring salted water to a boil. Add the egg noodles and cook according to package instructions until al dente. Drain the noodles and set aside.
- Sauté Vegetables: In a large skillet over medium heat, melt 2 tablespoons of butter. Add the chopped onion and celery, and sauté until they’re soft and translucent, about 5 minutes.
- Make the Creamy Sauce: In a large mixing bowl, combine the cream of mushroom soup, milk, and garlic powder. Stir in the sautéed onions and celery, then add salt and pepper to taste.
- Combine Ingredients: Add the drained tuna, cooked noodles, frozen peas, and shredded cheddar cheese to the bowl with the sauce. Gently stir to combine all ingredients thoroughly.
- Transfer to Baking Dish: Pour the mixture into the prepared baking dish and spread it evenly.
- Prepare Topping: In a small bowl, mix the breadcrumbs with 2 tablespoons of melted butter. Sprinkle the breadcrumb mixture evenly over the casserole.
- Bake: Place the casserole in the preheated oven and bake for 25-30 minutes, or until the top is golden brown and the casserole is bubbly.
- Garnish and Serve: Remove from the oven and let it cool for a few minutes. Garnish with chopped fresh parsley, if desired, before serving.
Extra Tips:
For a more flavorful casserole, consider adding a dash of Worcestershire sauce or a sprinkle of Parmesan cheese to the sauce mixture. You can also experiment by adding other vegetables such as mushrooms or bell peppers for added texture and flavor.
If you prefer a crunchier topping, try mixing in crushed potato chips or fried onions with the breadcrumbs. This casserole can be made ahead of time and stored in the refrigerator for up to 24 hours before baking, making it a convenient dish for meal prep.
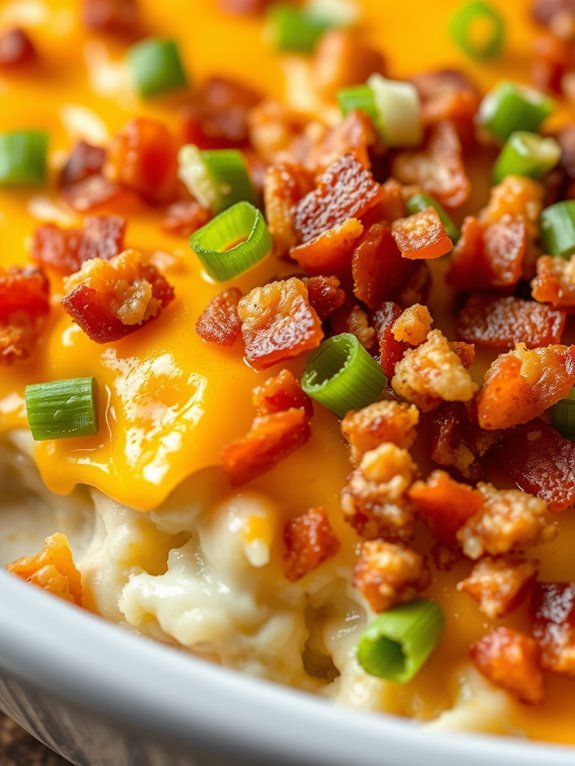
Loaded Baked Potato Casserole
Loaded Baked Potato Casserole is a comforting and indulgent dish that combines all of the flavors of a classic loaded baked potato into a creamy and cheesy casserole. Perfect for gatherings, family dinners, or potlucks, this dish is bound to be a hit with everyone.
The combination of tender potatoes, crispy bacon, sharp cheddar cheese, and fresh green onions creates a delightful harmony of textures and flavors. Ideal for serving 4-6 people, this casserole is both filling and satisfying, making it a perfect main dish or a hearty side.
To create this delicious casserole, you’ll start by preparing the potatoes, which are the base of the dish. Once cooked to perfection, the potatoes are mixed with sour cream, butter, and cheese, and then topped with more cheese, bacon, and green onions.
When baked, the cheese melts beautifully, creating a luscious and gooey topping that complements the creaminess of the potatoes. This dish isn’t only easy to make but also customizable, allowing you to adjust the ingredients to suit your taste preferences.
Ingredients (Serves 4-6):
- 6 medium russet potatoes, peeled and cubed
- 1 cup sour cream
- 1/2 cup milk
- 1/2 cup unsalted butter, melted
- 2 cups shredded sharp cheddar cheese, divided
- 6 slices of bacon, cooked and crumbled
- 2 green onions, sliced
- Salt and pepper to taste
Instructions:
- Preheat the Oven: Start by preheating your oven to 350°F (175°C) to make certain it’s ready for baking once the casserole is assembled.
- Prepare the Potatoes: Place the cubed potatoes into a large pot and cover them with cold water. Add a pinch of salt and bring to a boil over medium-high heat. Once boiling, reduce the heat and let the potatoes simmer until they’re fork-tender, about 15-20 minutes.
- Mash the Potatoes: Drain the cooked potatoes and return them to the pot. Mash the potatoes using a potato masher or electric mixer until they’re smooth and creamy.
- Combine Ingredients: Add sour cream, milk, melted butter, 1 cup of shredded cheddar cheese, salt, and pepper to the mashed potatoes. Stir until all ingredients are well combined and the mixture is smooth.
- Assemble the Casserole: Transfer the potato mixture into a greased 9×13 inch baking dish. Spread it evenly with a spatula.
- Add Toppings: Sprinkle the remaining 1 cup of cheddar cheese evenly over the top of the potatoes. Then, sprinkle the crumbled bacon and sliced green onions on top of the cheese.
- Bake the Casserole: Place the baking dish in the preheated oven and bake for 25-30 minutes, or until the cheese is melted and bubbly.
- Serve: Remove the casserole from the oven and let it cool slightly before serving. Enjoy your delicious Loaded Baked Potato Casserole!
Extra Tips: For added flavor, consider mixing in some garlic powder or onion powder with the mashed potatoes. If you prefer a spicier kick, add a pinch of cayenne pepper or a few dashes of hot sauce.
You can also substitute different types of cheese such as Monterey Jack or Colby for a slightly different taste. To make the casserole even more indulgent, try adding a layer of caramelized onions or a sprinkle of chopped chives on top.
Italian Sausage and Zucchini Casserole
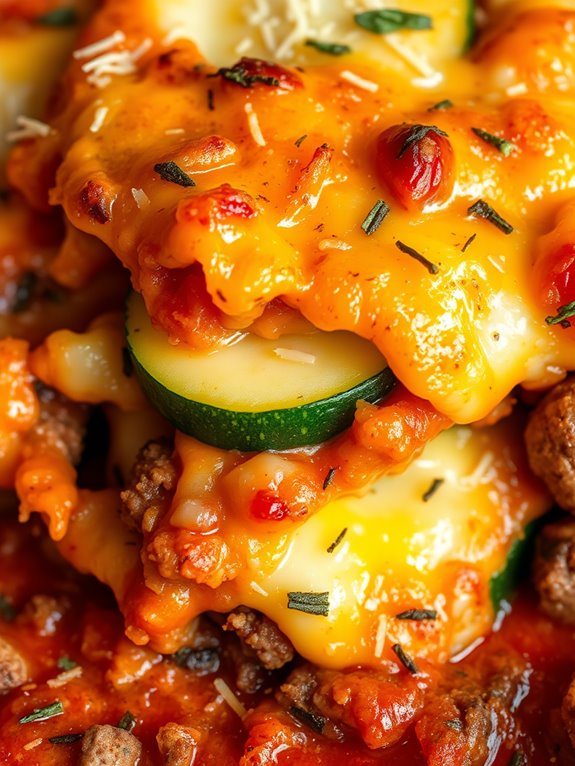
Italian Sausage and Zucchini Casserole is a flavorful and hearty dish that combines the savory flavor of Italian sausage with the fresh taste of zucchini. This casserole is perfect for a family dinner or a gathering with friends, as it serves a crowd and is easy to prepare. The combination of melted cheese, rich tomato sauce, and aromatic herbs makes this dish truly irresistible, while the zucchini adds a nutritious touch.
Whether it’s a busy weeknight or a relaxed weekend, this casserole is sure to satisfy your cravings.
This casserole isn’t only delicious but also versatile, allowing you to modify the ingredients to suit your taste preferences. You can choose mild or spicy Italian sausage, depending on your desired level of heat, and add other vegetables such as bell peppers or mushrooms for extra flavor.
The dish is designed to serve 4-6 people, making it an ideal choice for entertaining or meal prep. With minimal prep time and a straightforward cooking process, this Italian Sausage and Zucchini Casserole is a delightful addition to any meal plan.
Ingredients (Serves 4-6):
- 1 pound Italian sausage, casings removed
- 2 medium zucchinis, sliced
- 1 onion, chopped
- 2 cloves garlic, minced
- 1 cup marinara sauce
- 1 cup shredded mozzarella cheese
- 1/2 cup grated Parmesan cheese
- 1 teaspoon dried oregano
- 1 teaspoon dried basil
- Salt and pepper to taste
- 2 tablespoons olive oil
Cooking Instructions:
- Preheat the Oven: Preheat your oven to 375°F (190°C) to prepare for baking the casserole.
- Cook the Sausage: In a large skillet, heat 1 tablespoon of olive oil over medium heat. Add the Italian sausage, breaking it up with a spoon, and cook until browned and cooked through, about 5-7 minutes. Remove the sausage from the skillet and set aside.
- Sauté Vegetables: In the same skillet, add the remaining tablespoon of olive oil. Sauté the chopped onion and minced garlic until the onion becomes translucent, about 3-4 minutes. Add the sliced zucchini and cook for an additional 3-4 minutes until the zucchini is slightly tender.
- Combine Ingredients: Return the cooked sausage to the skillet with the vegetables. Add the marinara sauce, dried oregano, dried basil, salt, and pepper. Stir to combine all the ingredients well.
- Assemble the Casserole: Pour the sausage and vegetable mixture into a 9×13 inch baking dish. Spread it out evenly. Top with shredded mozzarella cheese and grated Parmesan cheese.
- Bake: Place the baking dish in the preheated oven and bake for 20-25 minutes, or until the cheese is melted and bubbly and the top is golden brown.
- Serve: Remove the casserole from the oven and let it cool for a few minutes before serving. Enjoy your Italian Sausage and Zucchini Casserole with a side of crusty bread or a fresh salad.
Extra Tips:
For added flavor, consider using a combination of cheeses such as provolone or fontina in addition to mozzarella. If you prefer a spicier dish, opt for hot Italian sausage or add a pinch of red pepper flakes to the sauce.
This casserole can be made ahead of time and refrigerated; simply reheat it in the oven before serving. To make it more substantial, you can add a layer of cooked pasta or rice at the bottom of the baking dish.
Vegetarian Southwest Quinoa Bake
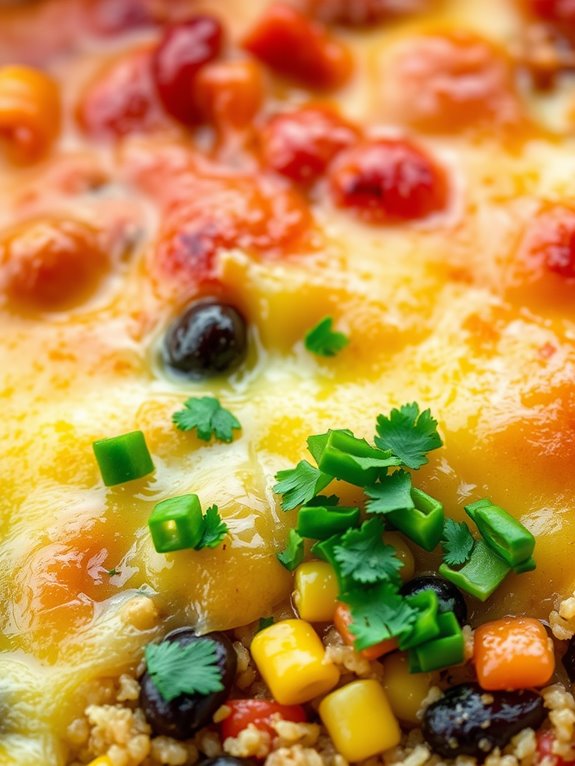
Vegetarian Southwest Quinoa Bake is a flavorful and hearty dish that combines the earthy flavors of quinoa with the vibrant and zesty tastes of the Southwest. Packed with colorful vegetables, black beans, and a medley of spices, this casserole isn’t only nutritious but also satisfying.
It’s perfect for a family dinner or a potluck with friends, offering a delightful combination of textures and tastes that will please vegetarians and non-vegetarians alike. This dish isn’t only easy to prepare but also versatile, allowing you to customize it with your favorite vegetables or add a bit of heat with extra spices or jalapeños.
The quinoa provides a protein-rich base that absorbs the bold flavors of cumin, chili powder, and lime, making it a wholesome meal on its own. Topped with melted cheese and a sprinkle of fresh cilantro, the Vegetarian Southwest Quinoa Bake is a delightful dish that can be served as a main course or a side.
Ingredients for 4-6 servings:
- 1 cup quinoa, rinsed
- 2 cups vegetable broth or water
- 1 tablespoon olive oil
- 1 medium onion, chopped
- 2 cloves garlic, minced
- 1 red bell pepper, chopped
- 1 yellow bell pepper, chopped
- 1 can (15 oz) black beans, drained and rinsed
- 1 can (15 oz) diced tomatoes, drained
- 1 cup corn kernels, fresh or frozen
- 1 tablespoon chili powder
- 1 teaspoon ground cumin
- 1 teaspoon smoked paprika
- 1 teaspoon salt
- 1/2 teaspoon black pepper
- 1 cup shredded cheddar cheese
- Juice of 1 lime
- 1/4 cup fresh cilantro, chopped
Cooking Instructions:
- Preheat the Oven: Begin by preheating your oven to 375°F (190°C), which will guarantee it’s at the right temperature by the time you’re ready to bake the casserole.
- Cook the Quinoa: In a medium saucepan, bring the vegetable broth or water to a boil. Add the rinsed quinoa, reduce the heat to low, cover, and let it simmer for about 15 minutes or until the quinoa is cooked and has absorbed all the liquid. Fluff with a fork and set aside.
- Sauté Vegetables: In a large skillet, heat the olive oil over medium heat. Add the chopped onion and garlic, sautéing for about 2-3 minutes until they’re soft and fragrant. Then, add the bell peppers and continue to cook for another 4-5 minutes until they’re tender.
- Combine Ingredients: In a large mixing bowl, combine the cooked quinoa, sautéed vegetables, black beans, diced tomatoes, and corn. Add the chili powder, cumin, smoked paprika, salt, and pepper, mixing everything well to guarantee the spices are evenly distributed.
- Transfer and Bake: Transfer the quinoa mixture into a lightly greased 9×13-inch baking dish. Spread it evenly and sprinkle the shredded cheddar cheese on top. Cover the dish with foil and bake in the preheated oven for 20 minutes.
- Finish Baking: After 20 minutes, remove the foil and continue to bake for an additional 10 minutes, or until the cheese is melted and bubbly. Remove from the oven and let it cool slightly.
- Garnish and Serve: Squeeze the lime juice over the casserole and sprinkle with chopped fresh cilantro just before serving. Enjoy the vibrant flavors of your Vegetarian Southwest Quinoa Bake!
Extra Tips:
When preparing the Vegetarian Southwest Quinoa Bake, feel free to add extra vegetables like zucchini or spinach for even more nutrition. If you prefer a spicier dish, consider adding a chopped jalapeño or a pinch of cayenne pepper to the mix.
You can also substitute the cheddar cheese with a vegan cheese alternative for a completely plant-based version. Finally, this dish can be prepared a day in advance and stored in the refrigerator, making it a convenient option for busy weeknights. Just reheat in the oven before serving.

Shepherd’s Pie With Mashed Potato Topping

Shepherd’s Pie with Mashed Potato Topping is a classic comfort dish that’s perfect for feeding a hungry family or serving at a gathering. This hearty casserole features a savory meat filling topped with creamy mashed potatoes, all baked to perfection. The rich flavors of the meat mixture contrast beautifully with the smooth, buttery potato topping, making it a favorite for both adults and kids alike.
This version of Shepherd’s Pie is made with a traditional lamb filling, but you can easily substitute beef if you prefer. The dish is both satisfying and versatile, allowing you to add your favorite vegetables or adjust seasonings to suit your taste. The following recipe will guide you through making a Shepherd’s Pie that serves 4-6 people, ensuring everyone leaves the table full and happy.
Ingredients (Serves 4-6)
- 1 tablespoon olive oil
- 1 onion, finely chopped
- 2 carrots, diced
- 2 cloves garlic, minced
- 1 pound ground lamb (or beef)
- 2 tablespoons tomato paste
- 1 cup beef broth
- 1 tablespoon Worcestershire sauce
- 1 teaspoon fresh thyme leaves
- 1 cup frozen peas
- Salt and pepper to taste
- 2 pounds potatoes, peeled and quartered
- 4 tablespoons butter
- 1/2 cup milk
- Salt and pepper to taste
Cooking Instructions
- Prepare the Mashed Potatoes: Start by boiling the potatoes in a large pot of salted water until they’re tender, which should take about 15-20 minutes. Drain the potatoes and return them to the pot. Add the butter and milk, then mash until smooth. Season with salt and pepper to taste, and set aside.
- Cook the Filling: In a large skillet, heat the olive oil over medium heat. Add the onion and carrots, cooking until the vegetables are soft, about 5 minutes. Stir in the garlic and cook for another minute until fragrant.
- Brown the Meat: Add the ground lamb (or beef) to the skillet, breaking it up with a spoon, and cook until browned. Drain any excess fat if necessary.
- Add the Flavors: Stir in the tomato paste, beef broth, Worcestershire sauce, and thyme. Bring the mixture to a simmer and let it cook for about 10 minutes until the sauce has thickened. Add the frozen peas and season the mixture with salt and pepper to taste.
- Assemble the Pie: Preheat your oven to 400°F (200°C). Transfer the meat mixture to a baking dish and spread it out evenly. Spoon the mashed potatoes over the meat, smoothing the surface with a spatula. Use a fork to create a pattern on the top, which will help it brown nicely.
- Bake: Place the baking dish in the preheated oven and bake for 25-30 minutes, or until the mashed potato topping is golden brown and crisp around the edges.
Extra Tips
For a richer flavor, consider adding a splash of red wine to the meat mixture while it simmers. If you prefer a bit of a crust on your mashed potatoes, you can sprinkle some grated cheese on top before baking.
Additionally, make sure to let the Shepherd’s Pie rest for a few minutes after baking; this will make it easier to serve without falling apart. Enjoy this comforting dish with a side salad or some crusty bread for a complete meal.
Buffalo Chicken and Rice Casserole
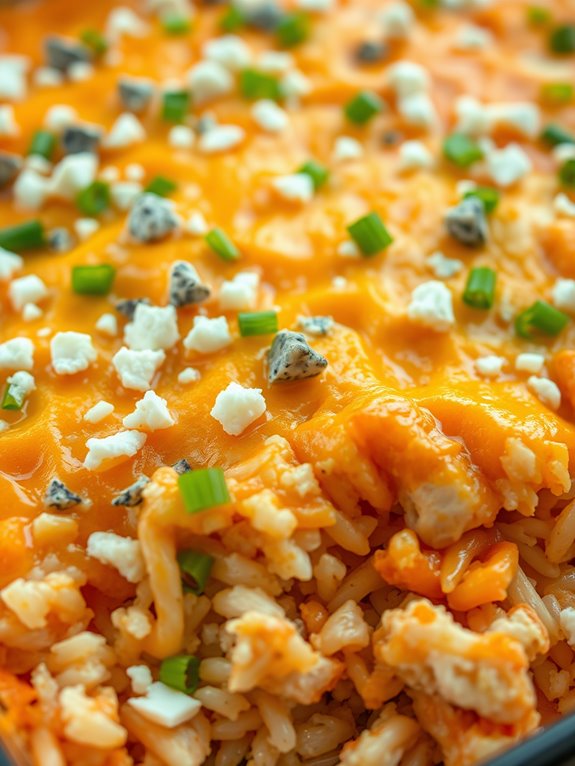
Buffalo Chicken and Rice Casserole is a delicious and hearty dish that combines the bold flavors of buffalo sauce with tender chicken and comforting rice. This casserole is perfect for those who love a bit of spice and crave a meal that’s both satisfying and easy to prepare.
It’s ideal for family dinners or gatherings, as it can be prepared ahead of time and baked just before serving. The creamy texture of the rice and cheese balances out the heat from the buffalo sauce, creating a well-rounded dish that everyone will enjoy.
This recipe serves 4-6 people and can be adjusted to suit smaller or larger groups by simply changing the quantities of the ingredients. The casserole isn’t only delicious but also versatile, allowing you to add or substitute ingredients to suit your taste preferences or dietary requirements.
For instance, you can use brown rice instead of white rice for a healthier option or add vegetables like broccoli or bell peppers for extra nutrition and color. Now, let’s explore the recipe and see how you can make this tasty Buffalo Chicken and Rice Casserole at home.
Ingredients for 4-6 servings:
- 2 cups cooked white rice
- 2 cups shredded cooked chicken
- 1 cup buffalo wing sauce
- 1 cup ranch dressing
- 1 cup shredded cheddar cheese
- 1/2 cup crumbled blue cheese
- 1/4 cup chopped green onions
- 1 cup diced celery
- 1 tablespoon olive oil
- Salt and pepper to taste
Cooking Instructions:
- Prepare the Ingredients: Start by cooking your rice according to the package instructions. While the rice is cooking, shred the cooked chicken and set it aside. Preheat your oven to 350°F (175°C).
- Sauté the Celery: In a large skillet, heat the olive oil over medium heat. Add the diced celery and sauté for about 5 minutes until it becomes tender. Remove from heat and set aside.
- Mix the Sauce: In a large bowl, combine the buffalo wing sauce and ranch dressing. Mix well to confirm the flavors are evenly distributed.
- Assemble the Casserole: In a large mixing bowl, combine the cooked rice, shredded chicken, sautéed celery, and the buffalo-ranch sauce mixture. Stir until everything is well coated.
- Layer the Casserole: Spread the rice and chicken mixture evenly in a greased 9×13-inch baking dish. Sprinkle the shredded cheddar cheese and crumbled blue cheese evenly over the top.
- Bake the Casserole: Place the baking dish in the preheated oven and bake for 20-25 minutes, or until the cheese is melted and bubbly.
- Garnish and Serve: Once baked, remove the casserole from the oven and let it cool for a few minutes. Sprinkle the chopped green onions on top before serving.
Extra Tips:
When preparing Buffalo Chicken and Rice Casserole, consider using rotisserie chicken for convenience and added flavor. If you prefer a milder dish, reduce the amount of buffalo sauce or choose a mild version.
Experiment with different cheeses like Monterey Jack for a different taste profile. Leftovers can be stored in an airtight container in the refrigerator for up to 3 days and reheated in the oven or microwave.
Adjust the spiciness by adding more or less buffalo sauce, or serve with extra ranch or blue cheese dressing on the side to cool down the heat.
Baked Ziti With Sausage and Peppers
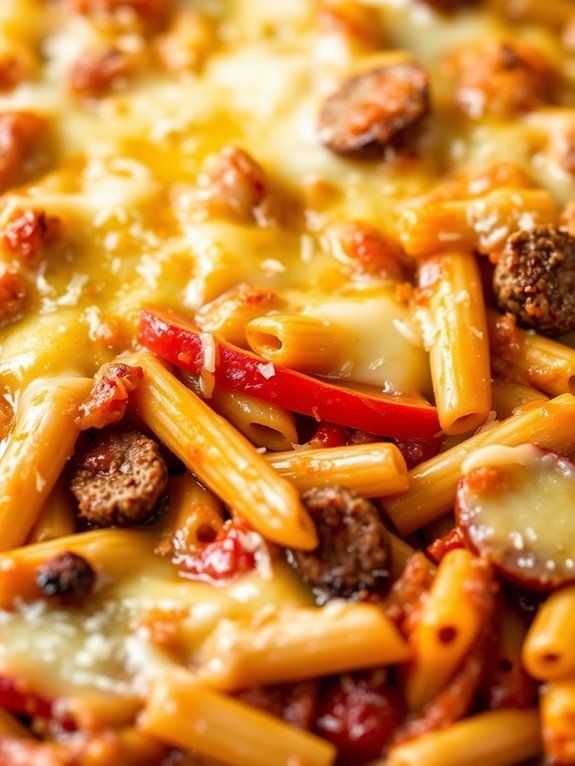
Baked Ziti With Sausage and Peppers is a hearty and flavorful casserole dish that combines the rich taste of Italian sausage with the vibrant sweetness of bell peppers, all enveloped in a luscious tomato sauce and topped with gooey melted cheese. This dish is perfect for family gatherings or a cozy night in, as it brings comfort and satisfaction to the table with its blend of textures and flavors.
The baked ziti not only warms you up but also fills your home with an irresistible aroma that will have everyone enthusiastically awaiting dinner. This recipe is designed to serve 4-6 people, making it ideal for a small crowd or for guaranteeing you have some delicious leftovers for the next day.
To make this baked ziti, you’ll need a mix of fresh vegetables, quality Italian sausage, and a combination of cheeses for that perfect melt. The preparation is straightforward, and the outcome is nothing short of delightful. Gather your ingredients and follow the step-by-step instructions to create this mouthwatering dish.
Ingredients:
- 1 pound ziti pasta
- 1 pound Italian sausage (casings removed)
- 1 red bell pepper, sliced
- 1 green bell pepper, sliced
- 1 yellow onion, chopped
- 3 cloves garlic, minced
- 24 ounces marinara sauce
- 1 teaspoon dried oregano
- 1 teaspoon dried basil
- 1/2 teaspoon red pepper flakes (optional)
- 1 cup ricotta cheese
- 2 cups shredded mozzarella cheese
- 1/2 cup grated Parmesan cheese
- Olive oil
- Salt and pepper to taste
Instructions:
- Preheat the Oven: Start by preheating your oven to 375°F (190°C). This guarantees it’s ready for the casserole once it’s assembled.
- Cook the Pasta: Bring a large pot of salted water to a boil. Add the ziti pasta and cook until al dente, according to package instructions. Drain and set aside.
- Prepare the Sausage and Peppers: In a large skillet over medium heat, add a drizzle of olive oil. Add the Italian sausage and cook until browned, breaking it into pieces with a spatula. Remove the sausage from the skillet and set aside.
- Sauté the Vegetables: In the same skillet, add the chopped onion and sliced bell peppers. Sauté until the onion is translucent and the peppers are tender. Add the minced garlic and cook for another minute until fragrant.
- Combine Ingredients: Return the sausage to the skillet, and stir in the marinara sauce, oregano, basil, and red pepper flakes. Let it simmer for about 5 minutes. Season with salt and pepper to taste.
- Assemble the Casserole: In a large bowl, combine the cooked ziti, sausage and pepper mixture, and ricotta cheese. Stir until well mixed. Transfer the mixture to a greased 9×13-inch baking dish.
- Top with Cheese: Sprinkle the mozzarella and Parmesan cheese evenly over the top of the ziti mixture.
- Bake: Place the baking dish in the preheated oven and bake for 25-30 minutes, or until the cheese is melted and bubbly with a golden-brown crust.
- Serve: Remove the dish from the oven and let it cool slightly before serving. Enjoy your Baked Ziti With Sausage and Peppers with a side salad or garlic bread.
Extra Tips:
To elevate the flavor of your Baked Ziti With Sausage and Peppers, consider using a high-quality marinara sauce or making your own from scratch for a more personalized taste.
If you prefer a spicier dish, you can increase the amount of red pepper flakes or use hot Italian sausage instead of mild. For a creamier texture, mix some heavy cream or béchamel sauce with the ricotta before combining it with the pasta.
Finally, if you’re making this dish ahead of time, assemble it completely, cover it with foil, and store it in the refrigerator. When you’re ready to bake, add an extra 5-10 minutes to the baking time to guarantee it’s heated through.
Mushroom and Wild Rice Casserole
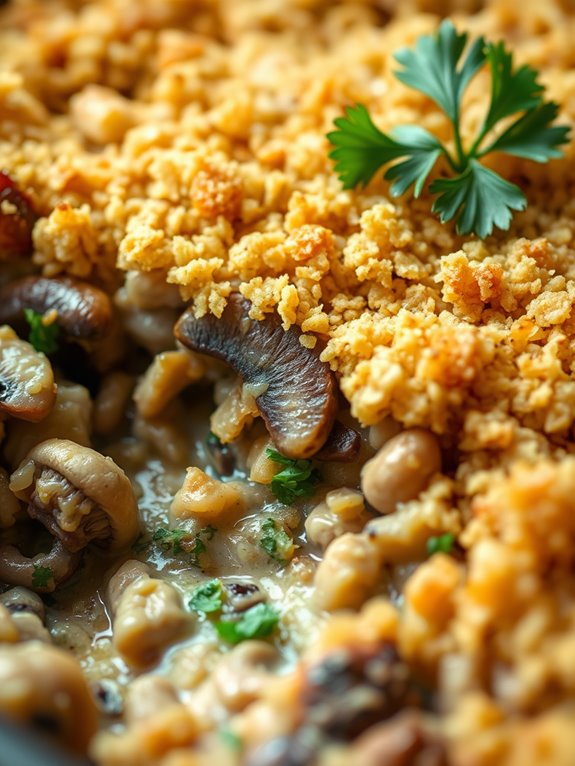
Mushroom and Wild Rice Casserole is a hearty and comforting dish that combines the earthy flavors of mushrooms with the nutty texture of wild rice. This casserole is perfect for a family dinner or a potluck, offering a delicious blend of savory ingredients that are both satisfying and wholesome.
By using a variety of mushrooms, you can enhance the depth of flavor, while the wild rice adds a toothsome bite that complements the creamy sauce. This recipe is ideal for serving 4-6 people and can be easily doubled for larger gatherings.
The preparation involves using fresh ingredients to guarantee a rich taste, and the dish can be made ahead of time and baked just before serving, making it a convenient option for busy days. Whether you’re looking for a side dish or a vegetarian main course, this Mushroom and Wild Rice Casserole is sure to please.
Ingredients:
- 1 cup wild rice, rinsed and drained
- 2 cups vegetable broth
- 2 tablespoons olive oil
- 1 medium onion, diced
- 3 cloves garlic, minced
- 1 pound mixed mushrooms (such as cremini, shiitake, and button), sliced
- 1 teaspoon dried thyme
- Salt and pepper to taste
- 1/4 cup all-purpose flour
- 2 cups milk
- 1/2 cup grated Parmesan cheese
- 1/4 cup chopped fresh parsley
- 1/2 cup breadcrumbs
Cooking Instructions:
- Cook the Wild Rice: Begin by cooking the wild rice. In a medium saucepan, bring the vegetable broth to a boil. Add the rinsed wild rice, reduce the heat to low, cover, and simmer for about 45-50 minutes, or until the rice is tender and the liquid is absorbed. Set aside.
- Prepare the Mushroom Mixture: In a large skillet, heat the olive oil over medium heat. Add the diced onion and sauté until translucent, about 5 minutes. Stir in the minced garlic and cook for another minute.
- Sauté the Mushrooms: Add the sliced mushrooms to the skillet and cook until they’re browned and any released liquid has evaporated, approximately 8-10 minutes. Season with dried thyme, salt, and pepper.
- Make the Sauce: Sprinkle the flour over the mushroom mixture and stir to coat. Gradually add the milk, stirring constantly to avoid lumps. Cook until the sauce thickens, about 5 minutes. Stir in the Parmesan cheese until melted and well combined.
- Combine Ingredients: Preheat your oven to 350°F (175°C). In a large mixing bowl, combine the cooked wild rice, mushroom sauce, and chopped parsley. Mix well and transfer to a greased 9×13-inch baking dish.
- Add Topping and Bake: Sprinkle the breadcrumbs evenly over the casserole. Place the dish in the preheated oven and bake for 25-30 minutes, or until the top is golden brown and the casserole is bubbly.
- Serve: Allow the casserole to cool slightly before serving. Garnish with additional parsley if desired.
Extra Tips:
To enhance the flavor of your Mushroom and Wild Rice Casserole, consider using a mix of different mushrooms for a more complex taste. You can also substitute half of the milk with cream for a richer sauce.
If you’re preparing this dish ahead of time, assemble the casserole but wait to add the breadcrumbs until just before baking to guarantee a crispy topping. Additionally, this casserole can be stored in the fridge for up to three days or frozen for up to a month, making it a great make-ahead meal option.
BBQ Pulled Pork Cornbread Bake

BBQ Pulled Pork Cornbread Bake is a delightful and hearty dish that combines the smoky flavors of BBQ pulled pork with the sweet, crumbly texture of cornbread. It’s the perfect comfort food for a family dinner or a gathering with friends, providing a satisfying blend of savory and sweet in every bite.
This casserole isn’t only delicious but also easy to make, requiring minimal preparation time and effort, making it an ideal choice for busy weeknights or casual entertaining.
To make this BBQ Pulled Pork Cornbread Bake, you’ll need to start by preparing your pulled pork, which can be made ahead of time or purchased pre-cooked from your local grocery store. The cornbread layer is simple and made from a mix, guaranteeing that you can whip up this dish without spending hours in the kitchen.
The bake is versatile, allowing you to adjust the level of spice or sweetness according to your preference by altering the BBQ sauce or adding additional ingredients like jalapeños or honey.
Ingredients (Serves 4-6):
- 3 cups of cooked pulled pork
- 1 cup of your favorite BBQ sauce
- 1 box (about 8.5 oz) of cornbread mix
- 1 egg
- 1/3 cup milk
- 1 cup shredded cheddar cheese
- 1/2 cup diced onions
- 1/4 cup sliced jalapeños (optional)
- 1 tablespoon vegetable oil
- Salt and pepper to taste
Cooking Instructions:
- Preheat Oven: Begin by preheating your oven to 375°F (190°C). This guarantees that your casserole will cook evenly and the cornbread will develop a golden crust.
- Prepare Pulled Pork: In a large bowl, combine the cooked pulled pork with your BBQ sauce, guaranteeing the pork is well coated. If you like a spicier dish, add more sauce or a sprinkle of chili flakes.
- Sauté Vegetables: Heat the vegetable oil in a skillet over medium heat. Add the diced onions and sauté for about 3-5 minutes until they become translucent. If you’re using jalapeños, add them in the last minute of cooking. Remove from heat and add to the pulled pork mixture.
- Make Cornbread Batter: In another bowl, prepare the cornbread mix according to package instructions by adding the egg and milk. Stir until smooth and free of lumps.
- Assemble the Bake: In a greased 9×13 inch baking dish, spread the pulled pork mixture evenly across the bottom. Sprinkle the shredded cheddar cheese on top of the pork. Then, pour the cornbread batter over the cheese and pork, spreading it into an even layer with a spatula.
- Bake: Place the dish in the preheated oven and bake for 25-30 minutes, or until the cornbread is golden brown and a toothpick inserted into the center comes out clean.
- Serve: Allow the bake to cool for a few minutes before serving. This will make it easier to cut and serve without falling apart.
Extra Tips:
For enhanced flavor, consider adding a layer of sautéed bell peppers or corn kernels between the pork and cornbread for added texture and taste.
If you prefer a sweeter cornbread topping, mix in a tablespoon of honey into the batter before pouring it over the pork. Additionally, you can garnish the finished bake with fresh cilantro or green onions for a pop of color and freshness.
To save time, the pulled pork can be prepared in advance and stored in the refrigerator for up to three days or frozen for longer storage.
Ham and Cheese Breakfast Casserole

The Ham and Cheese Breakfast Casserole is a delightful and hearty dish that’s perfect for a family breakfast or brunch gathering. This casserole combines savory ham, melted cheese, and fluffy eggs to create a comforting meal that’s certain to satisfy everyone at the table.
It’s simple to prepare and can be assembled the night before, making it a convenient option for busy mornings when you want a delicious homemade breakfast without the hassle.
This dish is versatile and can be customized with your favorite ingredients, such as adding vegetables like bell peppers or spinach for an extra nutritional boost. The combination of flavors and textures makes it a crowd-pleaser, and baking it in the oven guarantees that all the ingredients meld together beautifully.
Whether you’re serving it for a special occasion or a regular weekday morning, this Ham and Cheese Breakfast Casserole is certain to become a family favorite.
Ingredients (Serves 4-6):
- 8 large eggs
- 2 cups diced cooked ham
- 2 cups shredded cheddar cheese
- 1 cup milk
- 1 teaspoon salt
- 1/2 teaspoon black pepper
- 1 tablespoon Dijon mustard
- 4 cups cubed bread (e.g., French bread or sourdough)
- 1/4 cup chopped green onions
- 1 tablespoon butter (for greasing the baking dish)
Cooking Instructions:
- Preheat the Oven: Start by preheating your oven to 350°F (175°C). This guarantees that the casserole will cook evenly once it’s placed in the oven.
- Prepare the Baking Dish: Grease a 9×13-inch baking dish with butter. This will help prevent the casserole from sticking to the pan and make it easier to serve.
- Combine the Ingredients: In a large mixing bowl, whisk together the eggs, milk, Dijon mustard, salt, and black pepper until well combined. Stir in the diced ham, shredded cheese, and chopped green onions.
- Assemble the Casserole: Place the cubed bread into the greased baking dish, spreading it out evenly. Pour the egg mixture over the bread, making sure all the bread pieces are soaked. Use a spatula to gently press down on the bread to help it absorb the liquid.
- Let it Sit: Allow the casserole to sit for about 10 minutes. This resting time allows the bread to fully absorb the egg mixture, which is essential for achieving the right texture.
- Bake the Casserole: Place the baking dish in the preheated oven and bake for 40-45 minutes, or until the top is golden brown and the eggs are set. You can test doneness by inserting a knife into the center; it should come out clean.
- Cool and Serve: Remove the casserole from the oven and let it cool for a few minutes before serving. This resting period allows the casserole to set further, making it easier to cut and serve.
Extra Tips:
For maximum flavor, consider using a mix of cheeses such as sharp cheddar and Monterey Jack. If you prefer a spicier kick, add a pinch of cayenne pepper or a dash of hot sauce to the egg mixture.
You can also prepare this casserole the night before by assembling all the ingredients in the baking dish, covering it with plastic wrap, and storing it in the refrigerator overnight. In the morning, simply remove the plastic and bake as directed.
This make-ahead option is perfect for stress-free mornings and guarantees you can enjoy a warm, homemade breakfast with minimal effort.