

The magic of the holidays brings a special kind of joy when shared with someone dear.
With the season in full swing, I’ve curated a list of 10 delightful Christmas desserts perfect for two.
From molten chocolate lava cakes with peppermint cream to mini gingerbread cheesecakes, each recipe is designed to add a touch of romance to your festivities.
Whether you’re starting a new tradition or reliving treasured memories, these treats are sure to make your evening memorable.
Which sweet indulgence will you try first?
Chocolate Lava Cake With Peppermint Cream
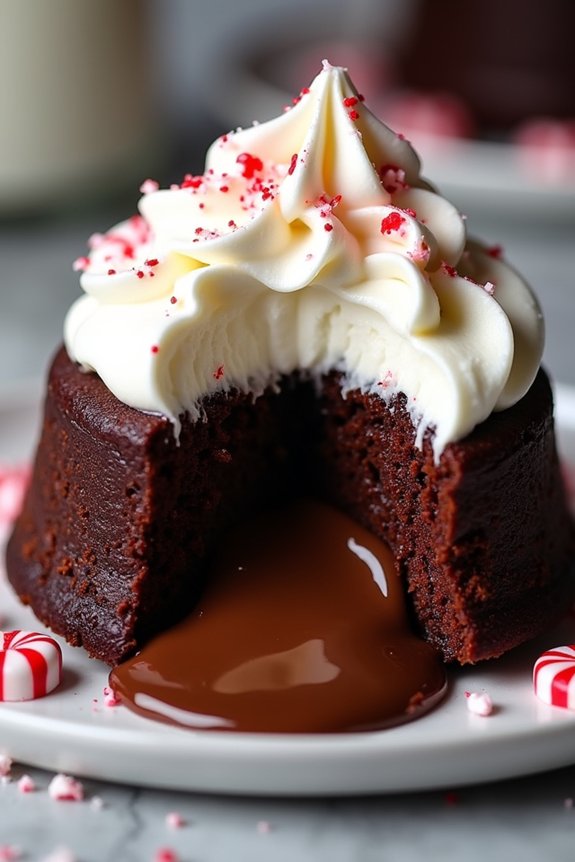
Indulge in a decadent dessert experience with our Chocolate Lava Cake With Peppermint Cream, perfect for a romantic Christmas celebration. This luxurious treat combines the rich, molten center of chocolate lava cake with a revitalizing peppermint cream, creating a sublime balance of flavors.
Whether you’re looking to impress a special someone or simply savor a festive dessert, this recipe promises to elevate your holiday dining experience.
The combination of warm, gooey chocolate and cool, revitalizing peppermint is a match made in heaven, offering both comfort and delight. While the molten chocolate center oozes out with each spoonful, the peppermint cream adds a burst of festive flavor that perfectly complements the richness of the cake.
Best of all, this recipe serves 4-6 people, making it ideal for an intimate gathering with loved ones or a double date dessert.
Ingredients (Serves 4-6):
- 1 cup (6 oz) semi-sweet chocolate chips
- 1/2 cup (1 stick) unsalted butter
- 1 cup powdered sugar
- 2 large eggs
- 2 egg yolks
- 1 teaspoon vanilla extract
- 1/2 cup all-purpose flour
- 1/4 teaspoon salt
- 1 cup heavy cream
- 2 tablespoons powdered sugar
- 1/2 teaspoon peppermint extract
- Crushed peppermint candies (for garnish)
- Butter and cocoa powder (for greasing ramekins)
Cooking Instructions:
- Preheat and Prepare Ramekins: Preheat your oven to 425°F (220°C). Thoroughly butter four to six ramekins and lightly dust them with cocoa powder to prevent sticking. Set aside.
- Melt Chocolate and Butter: In a microwave-safe bowl, combine the semi-sweet chocolate chips and butter. Microwave in 30-second intervals, stirring in between, until the mixture is completely smooth and melted.
- Mix Wet Ingredients: In a separate bowl, whisk together the eggs, egg yolks, and vanilla extract. Stir in the powdered sugar until the mixture is smooth and fully incorporated.
- Combine Ingredients: Gradually add the melted chocolate mixture to the egg mixture, stirring continuously. Once combined, gently fold in the all-purpose flour and salt until just mixed. Be careful not to overmix.
- Fill Ramekins and Bake: Divide the batter evenly among the prepared ramekins. Place them on a baking tray and bake in the preheated oven for 12-14 minutes, or until the edges are firm but the center is still soft.
- Prepare Peppermint Cream: While the cakes are baking, prepare the peppermint cream. In a chilled bowl, whisk the heavy cream until soft peaks form. Add the powdered sugar and peppermint extract, and continue whisking until stiff peaks form.
- Serve: Once the cakes are done, let them cool for 1-2 minutes before carefully running a knife around the edges. Invert the ramekins onto plates. Top each lava cake with a generous dollop of peppermint cream and sprinkle with crushed peppermint candies for a festive touch.
Extra Tips: When making the peppermint cream, make certain your bowl and whisk are cold to help the cream whip more efficiently.
Be gentle when folding the flour into the chocolate mixture to maintain the lightness of the batter. To test the cakes, gently shake the ramekin; the center should be slightly jiggly but not liquid.
If preparing in advance, you can refrigerate the batter in the ramekins for several hours and bake just before serving to guarantee a molten center. Enjoy this festive and romantic dessert while it’s warm for the best experience.
Mini Gingerbread Cheesecakes
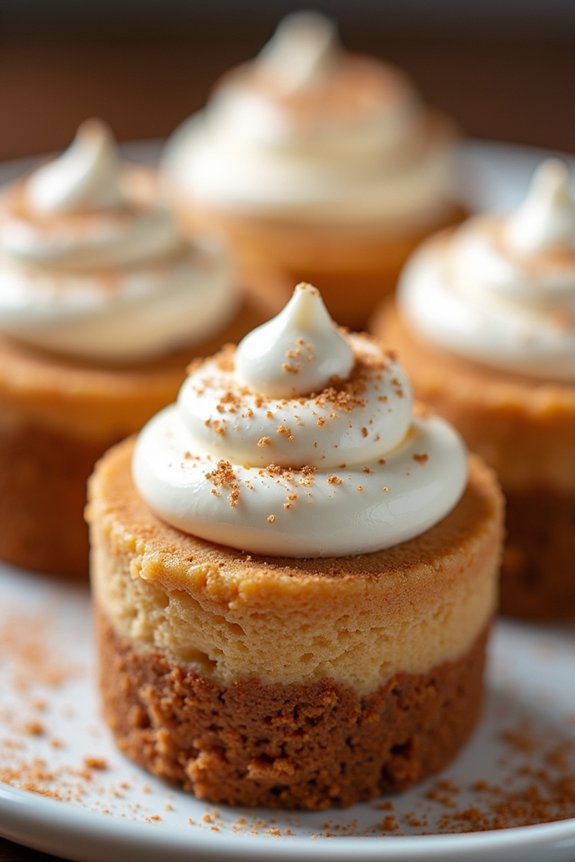
Indulge in the festive flavors of the season with these delightful Mini Gingerbread Cheesecakes. Perfectly portioned for sharing, these cheesecakes combine the warm spices of gingerbread with the creamy richness of cheesecake, creating a dessert that’s both comforting and sophisticated.
With a gingersnap crust and a spiced cream cheese filling, these mini treats are an ideal way to end a romantic Christmas dinner. The gingerbread spices—cinnamon, ginger, nutmeg, and cloves—infuse the cheesecake with holiday cheer, while the tangy cream cheese provides a luscious contrast.
These mini cheesecakes are easy to make, and their individual size makes them an elegant and intimate dessert for two. Plus, they can be prepared in advance, allowing you more time to spend with your loved one during the festive season.
Ingredients (Serving Size: 4-6 people):
- 1 cup gingersnap cookies, finely crushed
- 3 tablespoons unsalted butter, melted
- 8 ounces cream cheese, softened
- 1/4 cup granulated sugar
- 1/4 cup brown sugar
- 1 large egg
- 1 teaspoon vanilla extract
- 1 teaspoon ground ginger
- 1 teaspoon ground cinnamon
- 1/4 teaspoon ground nutmeg
- 1/4 teaspoon ground cloves
- 1/4 cup heavy cream
- Whipped cream, for topping (optional)
- Ground cinnamon, for garnish (optional)
Instructions:
- Prepare the Crust: Preheat your oven to 325°F (163°C). Line a 12-cup muffin tin with paper liners. In a medium bowl, mix the gingersnap cookie crumbs with melted butter until the mixture resembles wet sand. Press about 1 tablespoon of the crumb mixture into the bottom of each lined muffin cup to form the crust.
- Make the Cheesecake Filling: In a large mixing bowl, beat the softened cream cheese until smooth and creamy. Add the granulated sugar and brown sugar, and beat until well combined. Mix in the egg and vanilla extract until just incorporated.
- Add the Spices: Stir in the ground ginger, cinnamon, nutmeg, and cloves until evenly distributed. Gradually add the heavy cream, mixing until the filling is smooth and all ingredients are fully combined.
- Fill the Muffin Cups: Divide the cheesecake filling evenly among the prepared muffin cups, filling each about 3/4 full. Smooth the tops with the back of a spoon or a small spatula.
- Bake the Cheesecakes: Bake in the preheated oven for 18-20 minutes, or until the edges are set but the centers still have a slight jiggle. Remove from the oven and let the cheesecakes cool in the pan for 10 minutes, then transfer to a wire rack to cool completely.
- Chill and Serve: Once cooled, refrigerate the cheesecakes for at least 2 hours, or overnight, to set. Just before serving, top each mini cheesecake with a dollop of whipped cream and a sprinkle of ground cinnamon, if desired.
Extra Tips:
For the best results, verify all your ingredients are at room temperature, especially the cream cheese, to avoid lumps in the filling. If you prefer a thicker crust, increase the amount of gingersnap crumbs.
These mini cheesecakes can be made a day ahead and stored in the refrigerator, making them a convenient dessert option for busy holiday celebrations. Feel free to get creative with the toppings; a drizzle of caramel or a sprinkle of crushed gingerbread cookies can add an extra festive touch.
Red Velvet Cupcakes With Cream Cheese Frosting
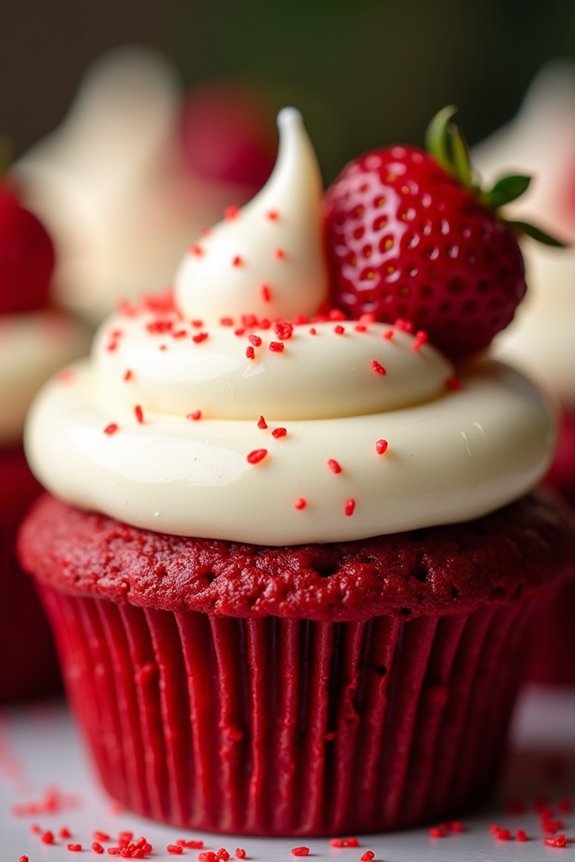
Red Velvet Cupcakes With Cream Cheese Frosting are a quintessential romantic dessert, perfect for celebrating Christmas with your loved one. These cupcakes are rich, moist, and have a delicate cocoa flavor that pairs perfectly with the tangy cream cheese frosting. The red hue of the cupcakes adds a festive touch, making them an ideal treat during the holiday season.
Whether you’re an experienced baker or trying your hand at baking for the first time, these cupcakes are both simple to make and irresistibly delicious. The combination of buttermilk and vinegar in the batter creates a tender crumb, while a splash of vanilla enhances the overall flavor, making these cupcakes hard to resist.
The cream cheese frosting adds a luscious, creamy topping that balances the sweetness of the cake. When garnished with a sprinkle of red sugar or a few fresh berries, these cupcakes become not only a treat for the taste buds but also a feast for the eyes. This recipe yields enough for 4-6 people, perfect for a small gathering or a cozy dessert for two with leftovers for the next day.
Ingredients for 4-6 servings:
- 1 1/4 cups all-purpose flour
- 1 cup granulated sugar
- 1 tablespoon cocoa powder
- 1/2 teaspoon baking soda
- 1/4 teaspoon salt
- 1/2 cup vegetable oil
- 1/2 cup buttermilk, at room temperature
- 1 large egg, at room temperature
- 1 tablespoon red food coloring
- 1/2 teaspoon white vinegar
- 1 teaspoon vanilla extract
For the Cream Cheese Frosting:
- 8 oz cream cheese, softened
- 1/4 cup unsalted butter, softened
- 2 cups powdered sugar
- 1 teaspoon vanilla extract
Instructions:
- Preheat and Prepare: Preheat your oven to 350°F (175°C) and line a muffin pan with cupcake liners. This will prevent the cupcakes from sticking to the pan and guarantee easy removal.
- Mix Dry Ingredients: In a large bowl, whisk together the flour, sugar, cocoa powder, baking soda, and salt until well combined. This helps to evenly distribute the dry ingredients and eliminates any lumps.
- Combine Wet Ingredients: In a separate bowl, whisk together the vegetable oil, buttermilk, egg, red food coloring, vinegar, and vanilla extract until smooth. The vinegar reacts with the baking soda to help the cupcakes rise.
- Blend Ingredients: Gradually add the dry ingredients to the wet ingredients, mixing just until combined. Be careful not to overmix, as this can result in dense cupcakes.
- Fill and Bake: Divide the batter evenly among the prepared cupcake liners, filling each about two-thirds full. Bake for 18-20 minutes, or until a toothpick inserted into the center of a cupcake comes out clean.
- Cool: Allow the cupcakes to cool in the pan for about 5 minutes before transferring them to a wire rack to cool completely. This prevents them from continuing to cook in the hot pan.
- Prepare Frosting: In a medium bowl, beat the softened cream cheese and butter together until smooth and creamy. Gradually add the powdered sugar and vanilla extract, beating until well combined and fluffy.
- Frost: Once the cupcakes are completely cool, use a piping bag or a spatula to frost the cupcakes with the cream cheese frosting. Decorate with your choice of toppings like festive sprinkles or fresh berries.
Extra Tips:
When making these Red Velvet Cupcakes, make certain that all your ingredients are at room temperature, especially the buttermilk and eggs, as this helps them combine more smoothly and results in a more even texture.
If you don’t have buttermilk on hand, you can make a quick substitute by adding a tablespoon of vinegar or lemon juice to a half-cup of milk and letting it sit for a few minutes. Additionally, when measuring flour, be sure to spoon it into the measuring cup and level it off with a knife to avoid overpacking, which can lead to dense cupcakes.
Finally, for a perfectly smooth frosting, make sure the cream cheese and butter are well softened before beating.
Spiced Eggnog Panna Cotta
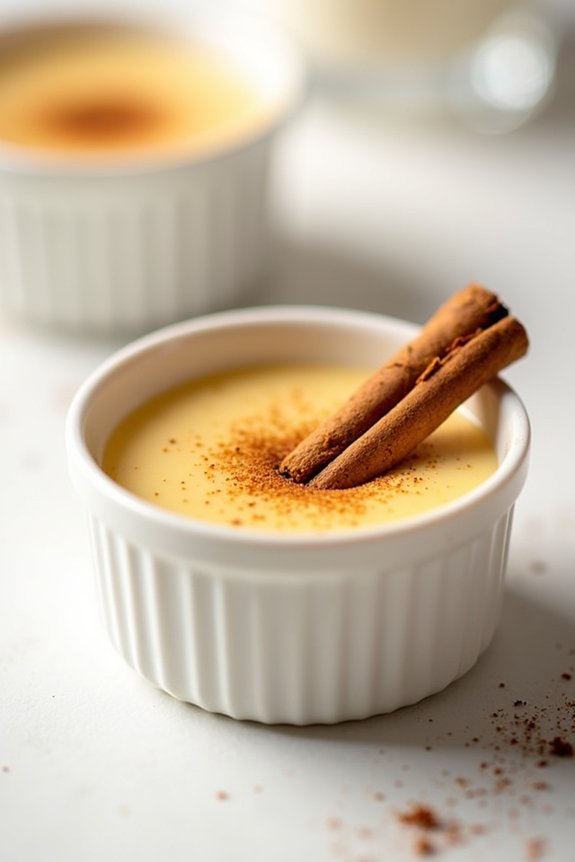
Indulge in the creamy, festive delight of Spiced Eggnog Panna Cotta, a perfect romantic Christmas dessert for two. This classic Italian dessert is given a holiday twist with the addition of rich, velvety eggnog and a mix of warming spices, creating a luscious treat that melts in your mouth.
The panna cotta itself is a smooth custard, lightly sweetened and infused with hints of nutmeg, cinnamon, and vanilla, evoking the comforting flavors of the season. As it chills, the dessert takes on a delicate jiggle, creating an elegant presentation when served.
This Spiced Eggnog Panna Cotta is perfect for a cozy Christmas dinner, offering a sophisticated yet simple way to end your meal on a sweet note. The recipe can easily be scaled up to serve 4-6 people, making it an ideal choice if you’re entertaining a small group or simply want to enjoy a little extra.
With a few basic ingredients and some patience while it sets, you’ll have a stunning dessert that captures the spirit of the holidays.
Ingredients:
- 2 1/2 cups eggnog
- 1/2 cup heavy cream
- 1/4 cup granulated sugar
- 1 teaspoon vanilla extract
- 1/2 teaspoon ground cinnamon
- 1/4 teaspoon ground nutmeg
- 1/4 teaspoon ground allspice
- 1 packet (2 1/4 teaspoons) unflavored gelatin
- 3 tablespoons cold water
Instructions:
- Prepare the Gelatin: Sprinkle the gelatin over 3 tablespoons of cold water in a small bowl. Let it sit for about 5 minutes to bloom, or until the gelatin absorbs the water and becomes spongy.
- Heat the Ingredients: In a medium saucepan, combine the eggnog, heavy cream, and granulated sugar. Heat the mixture over medium heat, stirring occasionally, until the sugar has dissolved and the mixture is hot but not boiling.
- Add Spices and Vanilla: Remove the saucepan from heat and stir in the vanilla extract, cinnamon, nutmeg, and allspice until well combined.
- Incorporate Gelatin: Add the bloomed gelatin to the hot eggnog mixture. Stir well until the gelatin is completely dissolved and the mixture is smooth.
- Pour and Set: Pour the panna cotta mixture into serving glasses or ramekins. Allow it to cool slightly before covering with plastic wrap. Refrigerate for at least 4 hours, or until set and firm.
- Serve: Once set, serve the panna cotta chilled. Optionally, garnish with a sprinkle of additional nutmeg or a cinnamon stick for decoration.
Extra Tips:
When making panna cotta, verify that the gelatin is fully dissolved into the hot liquid to avoid any lumps in the final dessert.
Be cautious not to overheat the mixture, as boiling can affect the gelatin’s setting ability. If you prefer a stronger spice flavor, feel free to adjust the quantities of cinnamon and nutmeg to taste.
For an added touch of elegance, serve the panna cotta with a dollop of whipped cream or a drizzle of caramel sauce.
Cranberry Orange Bread Pudding
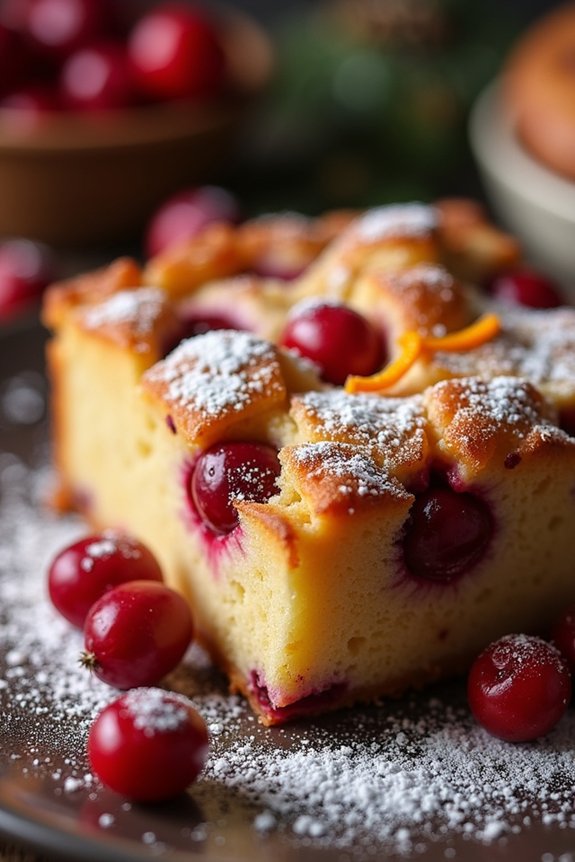
Cranberry Orange Bread Pudding is a delightful and romantic dessert perfect for a cozy Christmas evening shared with your special someone. This dish combines the tartness of cranberries with the zesty brightness of oranges, all nestled in a rich, custardy bread pudding. The warm, comforting flavors are ideal for the holiday season, filling your home with an irresistible aroma.
Whether you’re celebrating your first Christmas together or your fiftieth, this Cranberry Orange Bread Pudding is a sweet way to end a festive meal. The recipe is designed to serve 4-6 people, so you can enjoy a generous portion or invite a couple of friends over to share in the holiday spirit. This dessert is best served warm, with a scoop of vanilla ice cream or a dollop of freshly whipped cream.
Ingredients (Serves 4-6)
- 6 cups of day-old brioche or challah bread, cubed
- 1 cup fresh or frozen cranberries
- Zest of 1 large orange
- 1/2 cup fresh orange juice
- 1/2 cup granulated sugar
- 1 teaspoon vanilla extract
- 1 teaspoon ground cinnamon
- 1/4 teaspoon ground nutmeg
- 3 large eggs
- 2 cups whole milk
- 1/2 cup heavy cream
- 3 tablespoons unsalted butter, melted
- 1/4 teaspoon salt
- Powdered sugar for dusting (optional)
- Vanilla ice cream or whipped cream for serving (optional)
Instructions
- Prepare the Bread: Start by preheating your oven to 350°F (175°C). Place the cubed bread on a baking sheet and toast it in the oven for about 10 minutes until lightly golden. This step helps to dry out the bread, allowing it to better absorb the custard mixture.
- Mix the Custard: In a large mixing bowl, whisk together the eggs, milk, heavy cream, orange juice, granulated sugar, vanilla extract, ground cinnamon, ground nutmeg, and salt until well combined.
- Assemble the Pudding: Grease a 9×13-inch baking dish with a little butter. Spread half of the toasted bread cubes evenly in the dish. Sprinkle half of the cranberries and orange zest over the bread. Repeat with the remaining bread, cranberries, and orange zest.
- Add the Custard: Pour the custard mixture evenly over the bread and fruit. Use the back of a spoon or your hands to gently press the bread down, ensuring it’s fully submerged and soaking in the custard.
- Bake: Cover the dish with foil and bake in the preheated oven for 30 minutes. Remove the foil and continue baking for another 15-20 minutes, or until the top is golden brown and the custard is set, but still slightly wobbly in the center.
- Serve: Allow the bread pudding to cool for a few minutes before serving. Dust with powdered sugar if desired, and serve warm with a scoop of vanilla ice cream or a dollop of whipped cream.
Extra Tips
For best results, use bread that’s at least a day old; fresh bread mightn’t absorb the custard as well. If you only have fresh bread, try toasting it a little longer to dry it out.
You can also experiment with adding chopped nuts or a splash of liqueur—such as Grand Marnier or Cointreau—to the custard for an added depth of flavor.
Finally, if you prefer a sweeter dessert, consider increasing the sugar to 3/4 cup. Enjoy your romantic holiday treat!
White Chocolate Raspberry Mousse
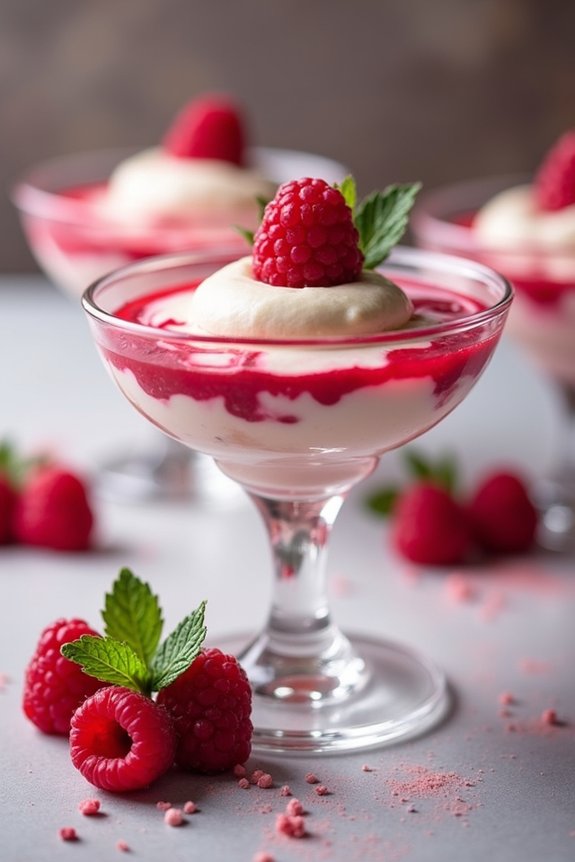
White Chocolate Raspberry Mousse is the perfect romantic dessert to share with your loved one this Christmas. Its creamy texture combined with the tangy sweetness of raspberries creates an exquisite flavor that will leave you both enchanted.
This delightful mousse isn’t only visually stunning with its layers of white and pink but also incredibly satisfying with every spoonful. Whether you’re enjoying it by the fireplace or as a special treat after a festive meal, this dessert is bound to add a touch of romance to your holiday celebration.
Making this dessert is a straightforward process that results in an elegant and impressive dish. You’ll start by preparing a luscious white chocolate mousse, which serves as the base. Then, you’ll create a vibrant raspberry coulis to swirl into the mousse, giving it a beautiful marbled effect. The combination of the smooth white chocolate and the bright raspberry is a match made in dessert heaven.
This recipe serves 4-6 people, making it perfect for a small gathering or intimate dinner.
Ingredients (Serves 4-6):
- 1 1/2 cups white chocolate chips
- 1 cup heavy cream
- 1 teaspoon vanilla extract
- 1 cup fresh raspberries (plus extra for garnish)
- 2 tablespoons sugar
- 1 tablespoon lemon juice
- 1/2 cup powdered sugar
- 2 large egg whites
- Pinch of salt
Cooking Instructions:
- Prepare the Raspberry Coulis: In a small saucepan, combine the fresh raspberries, sugar, and lemon juice. Cook over medium heat for about 5 minutes, stirring occasionally, until the raspberries break down and form a sauce. Strain the mixture through a fine mesh sieve to remove seeds and set aside to cool.
- Melt the White Chocolate: In a heatproof bowl, melt the white chocolate over a pot of simmering water, stirring occasionally until smooth. Be careful not to let the water touch the bowl to prevent the chocolate from seizing.
- Whip the Cream: In a large mixing bowl, whip the heavy cream and vanilla extract until soft peaks form. Gently fold the melted white chocolate into the whipped cream until fully incorporated.
- Beat the Egg Whites: In a separate bowl, beat the egg whites and a pinch of salt until soft peaks form. Gradually add the powdered sugar, beating until the mixture is glossy and forms stiff peaks.
- Combine Mixtures: Gently fold the egg whites into the white chocolate mixture, being careful not to deflate the mixture. Confirm everything is mixed evenly.
- Assemble the Mousse: In serving dishes, layer the white chocolate mousse with spoonfuls of raspberry coulis. Use a skewer or knife to gently swirl the coulis into the mousse for a marbled effect. Chill in the refrigerator for at least 2 hours to set.
- Garnish and Serve: Before serving, garnish each mousse with fresh raspberries and a sprig of mint if desired.
Extra Tips: When preparing the white chocolate, verify that the chocolate is fully melted and smooth before incorporating it into the whipped cream. This will help in achieving a silky texture for the mousse.
If your raspberries are very tart, you can adjust the sugar in the coulis to taste. For an added touch, consider serving the mousse in elegant glassware to showcase the beautiful marbled design, making the dessert even more visually appealing.
Festive Tiramisu Trifles
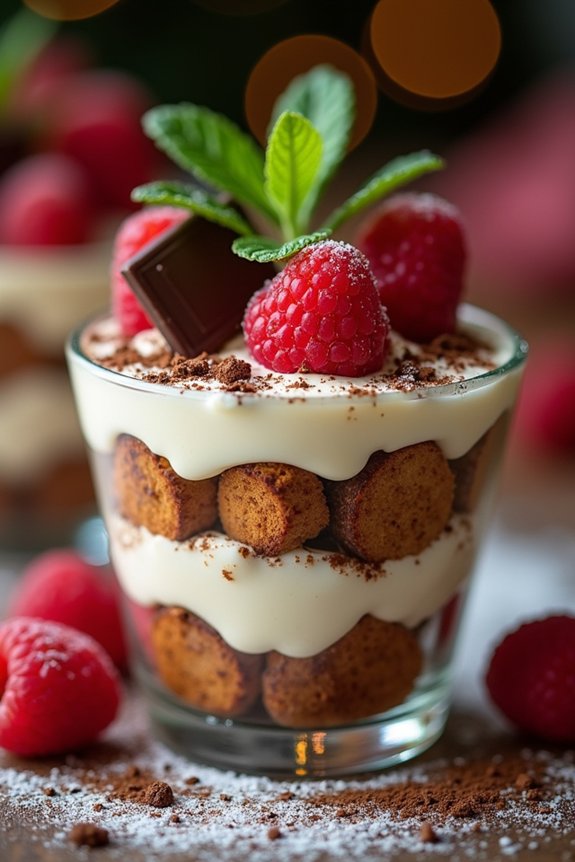
Indulge in the elegance and warmth of the holiday season with our Festive Tiramisu Trifles, a delightful dessert that combines the classic flavors of tiramisu with a touch of festive cheer. Perfect for a romantic Christmas dinner for two, these trifles layer creamy mascarpone, rich espresso-soaked ladyfingers, and a hint of cocoa in individual servings that make them both beautiful and delicious.
The addition of a subtle splash of holiday liqueur adds a sophisticated twist to this beloved Italian dessert, guaranteeing it’s the perfect sweet ending to your intimate celebration.
This recipe is designed to serve 4-6 people, making it ideal for sharing with loved ones or for enjoying over a couple of days. The preparation is simple, yet the result is a dessert that looks as impressive as it tastes. The layers of the trifle allow the flavors to meld together beautifully, offering a creamy texture that contrasts perfectly with the slightly firm ladyfingers.
Whether you’re a seasoned chef or a kitchen novice, these Festive Tiramisu Trifles are sure to become a holiday favorite.
Ingredients (for 4-6 servings):
- 12 ladyfingers
- 1 cup freshly brewed espresso, cooled
- 2 tablespoons coffee liqueur or marsala wine
- 8 ounces mascarpone cheese
- 1 cup heavy cream
- 1/2 cup granulated sugar
- 1 teaspoon vanilla extract
- 2 tablespoons cocoa powder
- Dark chocolate shavings (optional, for garnish)
- Fresh raspberries or strawberries (optional, for garnish)
- Mint leaves (optional, for garnish)
Instructions:
- Prepare the Espresso Mixture: In a shallow bowl, combine the cooled espresso with the coffee liqueur or marsala wine. Stir well to mix the flavors. This will be used to soak the ladyfingers.
- Whip the Cream: In a large mixing bowl, combine the heavy cream, granulated sugar, and vanilla extract. Using an electric mixer, whip the cream until soft peaks form. Be careful not to over-whip, as this can lead to a grainy texture.
- Mix the Mascarpone: In a separate bowl, gently fold the mascarpone cheese into the whipped cream mixture. Use a spatula to incorporate the mascarpone evenly until you have a smooth, creamy mixture.
- Soak the Ladyfingers: Quickly dip each ladyfinger into the espresso mixture, making sure they’re fully soaked but not overly soggy. Arrange the soaked ladyfingers at the bottom of your serving glasses or bowls, breaking them if necessary to fit.
- Layer the Trifle: Spoon a layer of the mascarpone and cream mixture over the ladyfingers. Use a sieve to dust a light layer of cocoa powder over the mascarpone layer. Repeat the layers until your glasses are filled, ending with a mascarpone layer.
- Chill the Trifles: Cover the trifles with plastic wrap and refrigerate for at least 2 hours, or overnight if possible. This allows the flavors to meld together beautifully.
- Garnish and Serve: Before serving, garnish each trifle with dark chocolate shavings, fresh raspberries or strawberries, and a sprig of mint leaves for a festive touch.
Extra Tips:
For the best results, verify the espresso is cooled before dipping the ladyfingers to prevent them from becoming too soft. If you prefer a non-alcoholic version, you can omit the liqueur and use a little extra espresso.
Adjust the sweetness to your taste by adding more or less sugar as desired. Ultimately, serving the trifles in clear glasses or bowls enhances their visual appeal, allowing the layers to create an eye-catching presentation that’s sure to impress your guests.
Mulled Wine Poached Pears
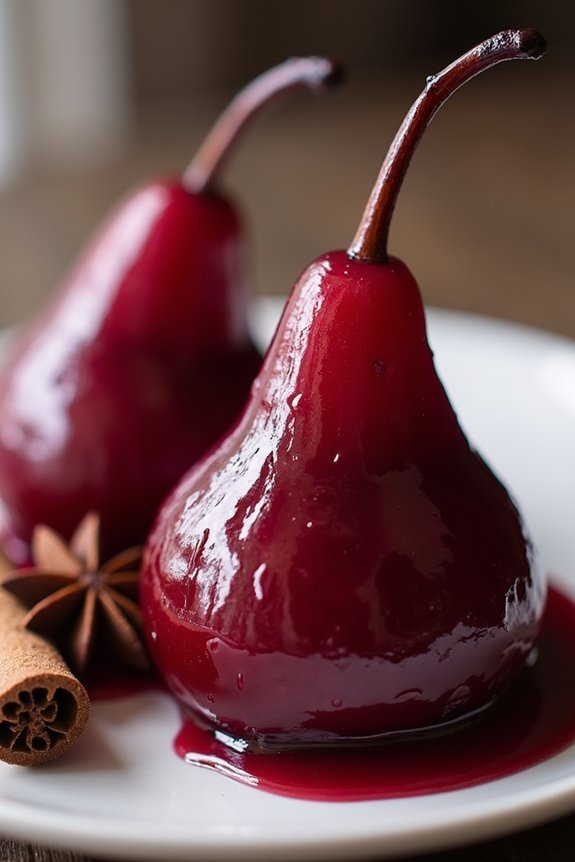
Mulled Wine Poached Pears are a romantic and elegant dessert perfect for a cozy Christmas celebration. This dish combines the warmth of mulled wine with the delicate sweetness of ripe pears, resulting in a sophisticated and aromatic treat. The pears absorb the rich flavors of the wine and spices, creating a beautifully infused dessert that’s certain to impress your loved one.
Serve these pears with a dollop of whipped cream or a scoop of vanilla ice cream for an extra indulgent touch.
This recipe is designed for a serving size of 4-6 people, making it ideal for a small gathering or an intimate dinner. The combination of red wine, spices, and citrus zest creates a beautifully aromatic poaching liquid that transforms the pears into a stunning centerpiece. Not only is this dish visually appealing, but it’s also a wonderful way to end a festive meal with a touch of elegance and romance.
Ingredients:
- 4-6 ripe but firm pears, peeled and cored
- 750 ml bottle of red wine
- 1 cup granulated sugar
- 1 cinnamon stick
- 4 whole cloves
- 2 star anise
- Zest of 1 orange
- Zest of 1 lemon
- 1 vanilla bean, split and seeds scraped
- Whipped cream or vanilla ice cream (optional, for serving)
Instructions:
- Prepare the poaching liquid: In a large saucepan, combine the red wine, sugar, cinnamon stick, cloves, star anise, orange zest, lemon zest, and vanilla bean along with its seeds. Stir the mixture over medium heat until the sugar has completely dissolved.
- Poach the pears: Once the sugar has dissolved, reduce the heat to low and add the peeled and cored pears to the saucepan. Ascertain the pears are fully submerged in the liquid. If necessary, add a little water to cover the pears completely.
- Simmer the pears: Allow the pears to poach gently in the liquid for 20-30 minutes, or until they’re tender when pierced with a fork. Turn the pears occasionally to ascertain even poaching on all sides.
- Cool the pears: Once the pears are tender, remove them from the saucepan and set aside to cool slightly. Continue to simmer the poaching liquid until it’s reduced by half and has a syrupy consistency.
- Serve the pears: Arrange the poached pears on serving plates and drizzle with the reduced wine syrup. For an extra indulgent touch, serve with a dollop of whipped cream or a scoop of vanilla ice cream on the side.
Extra Tips:
When selecting pears for poaching, choose varieties that are firm enough to hold their shape during cooking, such as Bosc or Anjou.
If you prefer a non-alcoholic version, substitute the red wine with pomegranate or cranberry juice. You can also experiment with different spices to suit your taste, such as adding a pinch of nutmeg or a few cardamom pods.
The leftover poaching liquid can be stored in the refrigerator and used as a flavorful syrup for pancakes or waffles.
Almond Biscotti With Dark Chocolate Drizzle
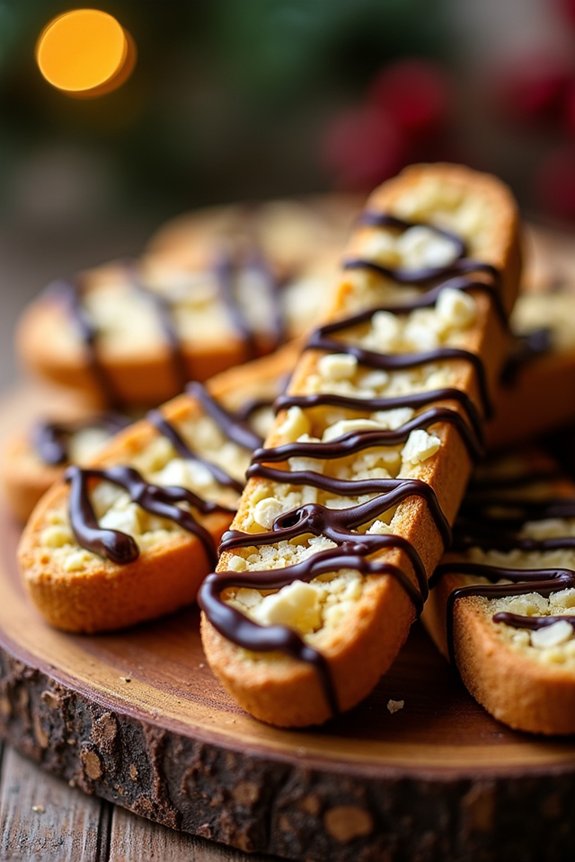
Indulging in a cozy and romantic Christmas evening calls for a delightful dessert that can be shared and savored together. Almond Biscotti with Dark Chocolate Drizzle is a perfect choice for such an occasion. These crisp, twice-baked Italian cookies are infused with the nutty flavor of almonds and topped with a luscious dark chocolate drizzle, adding a touch of elegance and a hint of decadence. Serve them alongside a warm cup of coffee or a glass of dessert wine to complete your intimate holiday celebration.
Biscotti, known for their delightful crunch, are perfect for dipping and sharing. This recipe yields enough for 4-6 people, making it ideal for a small gathering or for a couple to enjoy over a few days. The combination of almonds and dark chocolate not only enhances the flavor but also brings a festive touch to your dessert table. The biscotti can be made ahead of time, allowing you to spend more quality time with your loved one during the holidays.
Ingredients for 4-6 Servings:
- 2 cups all-purpose flour
- 1 cup granulated sugar
- 1 teaspoon baking powder
- 1/2 teaspoon salt
- 3 large eggs
- 1 teaspoon vanilla extract
- 1 teaspoon almond extract
- 1 cup whole almonds, toasted and chopped
- 4 ounces dark chocolate, melted
Cooking Instructions:
- Preheat the Oven: Begin by preheating your oven to 350°F (175°C). Line a baking sheet with parchment paper to prevent sticking.
- Mix Dry Ingredients: In a large mixing bowl, combine the flour, sugar, baking powder, and salt. Stir these ingredients together until they’re well blended.
- Incorporate the Wet Ingredients: In a separate bowl, whisk together the eggs, vanilla extract, and almond extract. Pour this mixture into the dry ingredients and stir until a dough begins to form.
- Add the Almonds: Gently fold in the toasted and chopped almonds, making certain they’re evenly distributed throughout the dough.
- Shape the Dough: On a lightly floured surface, divide the dough in half. Shape each half into a log about 12 inches long and 2 inches wide. Place the logs on the prepared baking sheet, leaving space between them.
- First Bake: Bake the logs in the preheated oven for 25-30 minutes, or until they’re golden brown. Remove from the oven and let them cool on the baking sheet for 10 minutes.
- Slice the Biscotti: Transfer the logs to a cutting board. Using a serrated knife, slice them diagonally into 1/2-inch thick slices.
- Second Bake: Arrange the slices cut side down on the baking sheet. Return them to the oven and bake for an additional 10-12 minutes, flipping halfway through, until they’re dry and crisp.
- Prepare the Chocolate Drizzle: While the biscotti cool, melt the dark chocolate in a microwave-safe bowl or using a double boiler until smooth.
- Drizzle the Chocolate: Using a fork or a piping bag, drizzle the melted dark chocolate over the cooled biscotti. Allow the chocolate to set before serving.
Extra Tips:
For an enhanced flavor, you can substitute half of the almonds with other nuts like pistachios or hazelnuts. If you prefer a sweeter touch, consider adding dried cranberries or cherries to the dough.
To guarantee the biscotti maintain their crisp texture, store them in an airtight container at room temperature. If you want to add a festive flair, sprinkle a little sea salt over the chocolate drizzle before it sets for a delightful contrast of flavors.
Holiday Spiced Apple Crisp
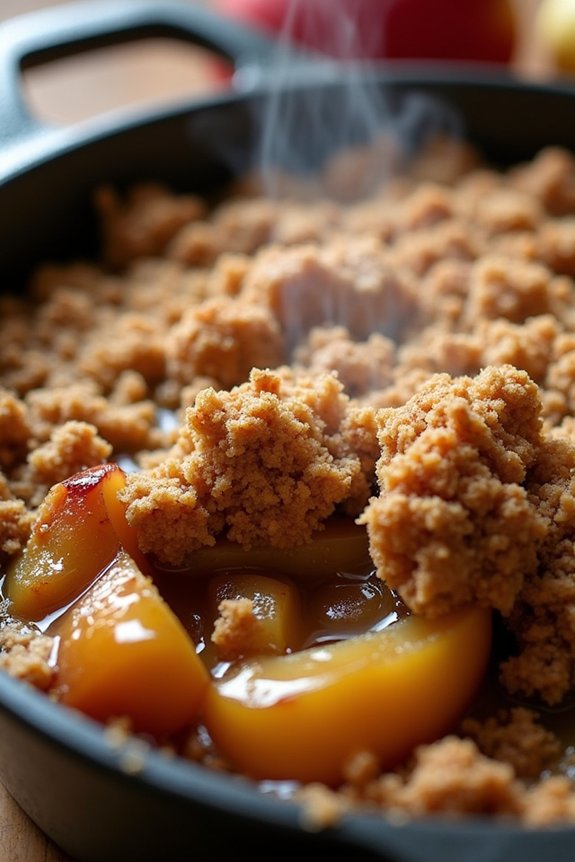
This holiday season, indulge in the delightful aroma and comforting flavors of a Holiday Spiced Apple Crisp. This dessert is a perfect way to end a cozy dinner for two, offering a blend of warm spices and sweet apples, topped with a buttery, crunchy topping. The combination of cinnamon, nutmeg, and cloves brings a festive feel to the table, making it an ideal choice for a romantic Christmas evening.
As the apples bake to perfection in the oven, their sweetness intensifies, melting into a luscious filling that pairs beautifully with the crisp, golden topping.
Whether you’re celebrating a quiet Christmas Eve or simply enjoying a seasonal treat, this Holiday Spiced Apple Crisp is sure to be a hit. The recipe is straightforward and can be prepared in advance, making it an excellent option for those who want to spend more time relaxing with their loved one.
While the original recipe is perfect for two, here’s how you can make it for a larger gathering of 4-6 people, ensuring everyone gets a taste of this heartwarming dessert.
Ingredients (Serves 4-6):
- 6 medium apples, peeled, cored, and sliced
- 1/3 cup granulated sugar
- 1 tablespoon lemon juice
- 1 teaspoon ground cinnamon
- 1/2 teaspoon ground nutmeg
- 1/4 teaspoon ground cloves
- 1 cup rolled oats
- 1 cup all-purpose flour
- 3/4 cup light brown sugar
- 1/2 cup unsalted butter, cold and cubed
- 1/2 teaspoon salt
- Optional: vanilla ice cream or whipped cream for serving
Instructions:
- Prepare the Apples: Preheat your oven to 350°F (175°C). In a large mixing bowl, combine the sliced apples with granulated sugar, lemon juice, cinnamon, nutmeg, and cloves. Toss everything together until the apples are evenly coated with the spices and sugar.
- Make the Topping: In another bowl, mix the rolled oats, flour, brown sugar, and salt. Add the cold, cubed butter to the mixture. Using a pastry cutter or your fingers, combine the ingredients until the mixture resembles coarse crumbs.
- Assemble the Crisp: Spread the spiced apples evenly in a 9×13-inch baking dish. Sprinkle the oat mixture evenly over the apples, ensuring that the entire surface is covered.
- Bake: Place the baking dish in the preheated oven and bake for about 45-50 minutes, or until the topping is golden brown and the apples are bubbling beneath.
- Serve: Allow the apple crisp to cool slightly before serving. For an extra indulgent treat, top with a scoop of vanilla ice cream or a dollop of whipped cream.
Extra Tips:
When selecting apples, opt for a mix of sweet and tart varieties like Granny Smith and Honeycrisp for a more complex flavor profile.
If your topping starts to brown too quickly in the oven, cover it with aluminum foil to prevent burning. You can also add a handful of chopped nuts like walnuts or pecans to the topping for added crunch and flavor.
To save time, the apple mixture and topping can be prepared separately a day ahead and stored in the refrigerator until you’re ready to bake. Enjoy your Holiday Spiced Apple Crisp warm for the best experience!