

As the Halloween season unfolds, I’ve stumbled upon some savory treats that promise to enchant your taste buds. Picture yourself indulging in mummy jalapeño poppers or savoring a bite of spooky spider deviled eggs. These 11 salty snacks aren’t just about flavor; they’re about the fun and festivity they bring to your Halloween celebrations. Are you curious about how to craft these ghoulishly delightful appetizers? Join me on this culinary adventure as we uncover each tantalizing recipe, perfect for adding a touch of spook to your gatherings.
Spooky Spider Deviled Eggs
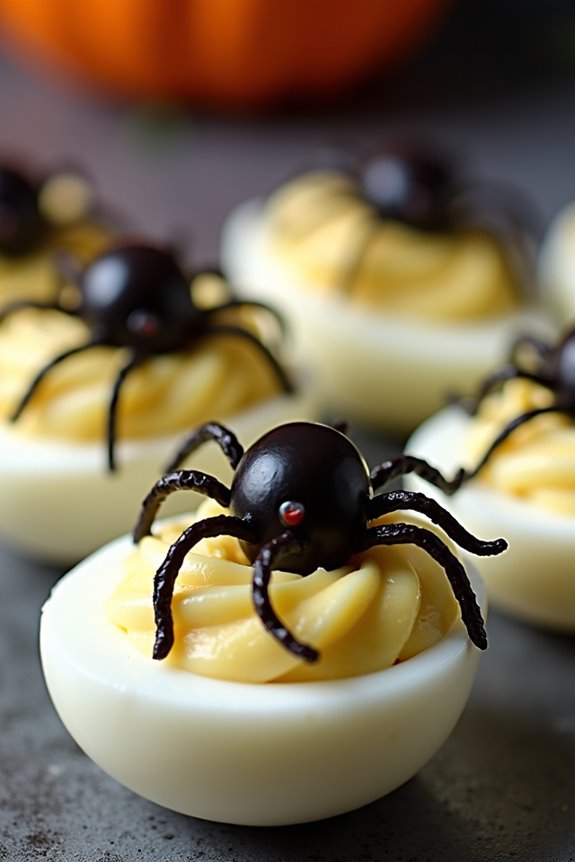
Delight your guests this Halloween with an eerie twist on a classic appetizer. Spooky Spider Deviled Eggs bring a playful, yet chilling, element to your Halloween spread. These deviled eggs, though simple in concept, are transformed into a creepy culinary masterpiece with the addition of olive spiders perched on top. Perfect for a Halloween party or a spooky-themed dinner, these eggs not only taste delicious but also add a fun and festive touch to your table.
Creating these Spooky Spider Deviled Eggs is an enjoyable activity that can involve the whole family. While the base is made using traditional deviled egg ingredients, the fun lies in crafting the spiders from black olives. Each egg half is topped with a carefully designed olive spider, sure to catch the eye and add a whimsical, yet spooky, feel to your Halloween gatherings. This recipe is designed to serve 4-6 people, making it a great choice for small get-togethers or as part of a larger buffet spread.
Ingredients:
- 6 large eggs
- 1/4 cup mayonnaise
- 1 teaspoon Dijon mustard
- 1 teaspoon white vinegar
- Salt and pepper to taste
- 12 black olives
Instructions:
- Boil the Eggs: Place the eggs in a saucepan and cover them with cold water. Bring to a boil over medium-high heat. Once boiling, turn off the heat and cover the pan. Let the eggs sit in the hot water for 10-12 minutes.
- Cool and Peel: After the eggs have sat in the hot water, transfer them to a bowl of ice water to cool completely. Once cooled, peel the eggs carefully to prevent damaging the whites.
- Prepare the Halves: Slice each egg in half lengthwise and gently remove the yolks to a separate bowl. Place the egg white halves on a serving platter.
- Make the Filling: Mash the egg yolks with a fork until fine. Add the mayonnaise, Dijon mustard, white vinegar, salt, and pepper. Mix until the filling is smooth and creamy.
- Fill the Egg Whites: Spoon or pipe the yolk mixture back into the egg white halves, filling each cavity generously.
- Create the Olive Spiders: Cut 6 olives in half, placing one half on top of each filled egg as the spider’s body. Slice the remaining olives into thin strips to form the spider legs, placing four strips on each side of the olive halves.
- Serve and Enjoy: Once the spiders are complete, serve your Spooky Spider Deviled Eggs immediately, or refrigerate until ready to serve.
Extra Tips:
For an extra touch of flavor, consider adding a pinch of paprika or a few drops of hot sauce to the yolk mixture. If you want your olive spiders to be more secure on top of the eggs, you can lightly press them into the filling.
Additionally, using a piping bag with a star tip can give the yolk filling a decorative finish, adding to the visual appeal of your spooky snacks. Remember to adjust the seasoning to your taste, as some like their deviled eggs on the tangier or spicier side!
Creepy Crawly Cheese Sticks
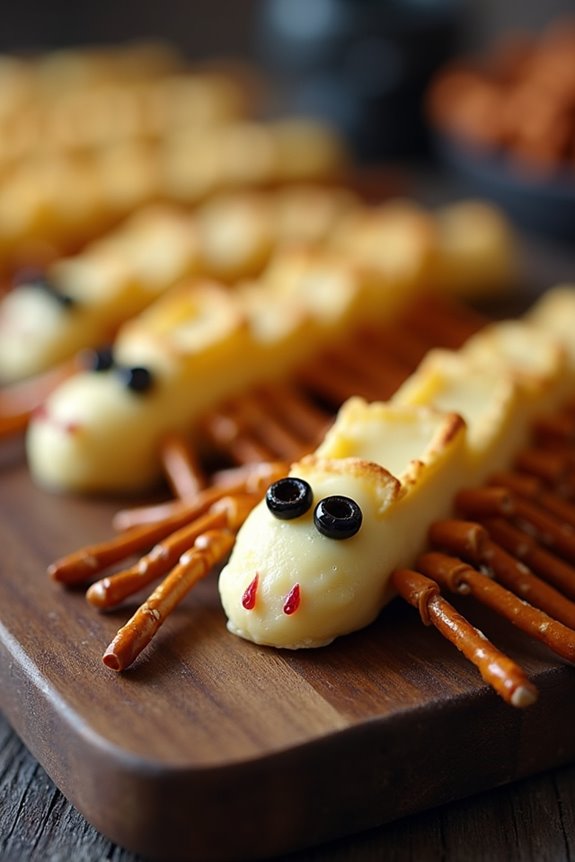
Creepy Crawly Cheese Sticks are a fun and spooky treat perfect for any Halloween celebration. These delicious and eerie snacks aren’t only tasty but also visually intriguing, making them a hit for both kids and adults. The combination of crunchy pretzel sticks and creamy cheese creates a snack that’s both savory and satisfying.
Transforming simple ingredients into something that looks like creepy critters adds an element of surprise and delight to your Halloween spread.
To make these Creepy Crawly Cheese Sticks, you’ll need a few simple ingredients, and the process is straightforward enough to involve the whole family. This recipe is designed to serve 4-6 people, making it perfect for small gatherings or as part of a larger Halloween party menu. With just a little bit of creativity and some easy-to-find ingredients, you can whip up a batch of these spooky snacks that are sure to be a crowd-pleaser.
Ingredients (serving size: 4-6 people):
- 12 mozzarella cheese sticks
- 48 pretzel sticks
- 48 sliced almonds
- 1/4 cup black olives (pitted and sliced)
- Red food coloring (optional)
- 1/4 cup cream cheese (softened)
Cooking Instructions:
- Prepare the Cheese Sticks: Unwrap the mozzarella cheese sticks and cut each stick into four equal pieces. This will give you a total of 48 small cheese segments.
- Insert the Legs: Carefully insert a pretzel stick into each side of the cheese segments to create the appearance of legs. Each cheese segment should have two pretzel “legs” on each side, resembling a creepy crawler.
- Create the Faces: Using a small amount of softened cream cheese as glue, stick a sliced almond onto one end of each cheese segment to form the face of your creepy crawly. You can use a small spoon or a piping bag to apply the cream cheese for precision.
- Add the Eyes: Cut small pieces of black olive to form eyes and attach them to the almond face using a dab of cream cheese. If you want to add a spooky touch, use a toothpick dipped in red food coloring to create veins or bloodshot effects on the almond face.
- Chill the Cheese Sticks: Once assembled, place the creepy crawly cheese sticks in the refrigerator for about 15 minutes to allow the cheese to firm up and the “legs” to set in place.
- Serve and Enjoy: After chilling, arrange the creepy crawly cheese sticks on a platter and serve them as a delightful and eerie Halloween snack.
Extra Tips:
For a more colorful presentation, consider using different colored food coloring to create a variety of creepy crawly creatures.
If you’re serving these at a party, prepare them just before your guests arrive to ascertain the cheese stays fresh and the pretzel sticks remain crunchy. Additionally, you can experiment with different types of cheese to suit your taste preferences or dietary needs.
Remember to have fun with the decoration process, as the more creative you get, the more enchanting these snacks will be!
Ghostly Guacamole With Bat Chips
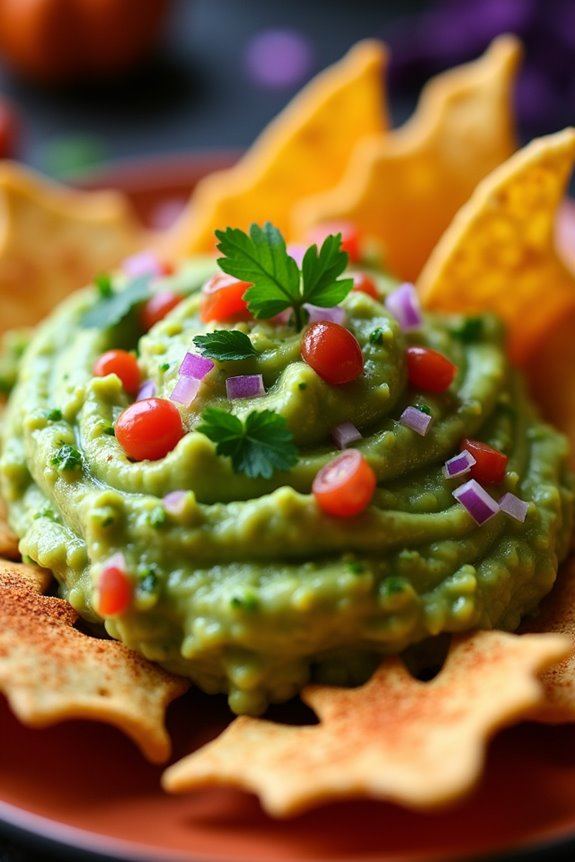
Ghostly Guacamole With Bat Chips is a fun and festive dish perfect for any Halloween gathering. This spooky snack combines creamy guacamole with crispy bat-shaped tortilla chips, making it an eye-catching centerpiece for your party table. The guacamole is made with fresh avocados, lime juice, and a hint of spice, while the bat chips bring a playful element to the mix. Together, they create a salty and savory treat that’s sure to delight both kids and adults alike.
This dish isn’t only tasty but also easy to prepare, making it a great choice for busy hosts looking to add a touch of Halloween flair to their menu. The key to success lies in the presentation; the bat-shaped chips add an element of whimsy to the classic guacamole. Whether you’re hosting a big party or just enjoying a themed snack with family, Ghostly Guacamole With Bat Chips is a surefire way to bring the Halloween spirit to your culinary creations.
Ingredients (Serves 4-6):
- 4 ripe avocados
- 2 limes, juiced
- 1 small red onion, finely chopped
- 1 tomato, diced
- 1-2 jalapeños, seeded and minced
- 2 tablespoons fresh cilantro, chopped
- Salt and pepper to taste
- 8 large flour tortillas
- 2 tablespoons olive oil
- 1 tablespoon smoked paprika
- Salt to taste
Instructions:
- Prepare the Guacamole:
- Cut the avocados in half, remove the pits, and scoop the flesh into a mixing bowl.
- Add lime juice and mash the avocados using a fork or potato masher until smooth but still chunky.
- Stir in the red onion, tomato, jalapeños, cilantro, salt, and pepper. Mix well and adjust seasoning to taste. Cover and refrigerate while preparing the chips.
- Make the Bat Chips:
- Preheat the oven to 375°F (190°C).
- Use a bat-shaped cookie cutter to cut out bat shapes from the flour tortillas.
- Arrange the tortilla bats on a baking sheet lined with parchment paper.
- Brush each bat with olive oil and sprinkle with smoked paprika and a little salt.
- Bake for 8-10 minutes or until the chips are golden and crispy. Keep an eye on them to prevent burning.
- Serve:
- Spoon the guacamole into a serving bowl and place it in the center of a large platter.
- Surround the guacamole with the bat chips, arranging them decoratively around the bowl.
- Serve immediately and enjoy the festive Halloween snack.
Extra Tips:
- To keep the guacamole from browning, press a piece of plastic wrap directly onto its surface before refrigerating. This minimizes air exposure.
- If you don’t have a bat-shaped cookie cutter, you can use a sharp knife to cut out bat shapes freehand.
- For added flavor, consider adding a pinch of garlic powder or a splash of hot sauce to the guacamole.
- The bat chips can be made a day ahead and stored in an airtight container to save time on the day of your event.
Witch’s Broomstick Pretzels

Witch’s Broomstick Pretzels are a creative and spooky addition to your Halloween snack spread. These fun and flavorful snacks are perfect for parties or a festive family night in. With just a few simple ingredients, you can craft these edible broomsticks that will delight both kids and adults alike. The combination of salty pretzels and savory cheese makes for a satisfying treat that’s both easy to make and enjoy.
The key to making Witch’s Broomstick Pretzels is in the presentation, resembling witch’s brooms with a clever use of string cheese and pretzel sticks. This recipe makes sure that your Halloween-themed snacks are as visually appealing as they’re delicious. With minimal prep time and ingredients, you can whip up a batch of these broomsticks in no time, leaving you with more time to enjoy the festivities.
Ingredients (Serves 4-6)
- 8 string cheese sticks
- 24 pretzel sticks
- Fresh chives or thin strips of green onion
Cooking Instructions
- Prepare the Cheese: Begin by unwrapping the string cheese sticks. Using a sharp knife, cut each stick in half. Once halved, carefully fray one end of each piece to resemble the bristles of a broom by making several lengthwise cuts about 2/3 of the way up.
- Attach the Handle: Gently insert a pretzel stick into the unfrayed end of each piece of string cheese. Be sure to push the pretzel in just far enough to secure it without breaking the cheese.
- Tie the Brooms: Take a fresh chive or thin strip of green onion and tie it around the top of the frayed cheese end, just under where the pretzel is inserted, to complete the broomstick appearance. Trim any excess chive or onion for a neat finish.
- Serve and Enjoy: Arrange the Witch’s Broomstick Pretzels on a platter, and serve them fresh. They can be paired with a dip of your choice or enjoyed on their own.
Extra Tips
For an extra touch of flavor, consider lightly brushing the cheese with melted garlic butter before adding the chive or onion tie. This will give the broomsticks an aromatic boost.
If you’re preparing these in advance, keep them refrigerated until serving to maintain freshness and firmness. Also, be gentle when inserting the pretzel sticks to avoid cracking them, as pretzels can be quite brittle.
Enjoy these delightful snacks as a whimsical centerpiece at your Halloween gathering!
Mummy Jalapeño Poppers

Mummy Jalapeño Poppers are a delightful savory treat, perfect for adding a spooky twist to your Halloween snack spread. These poppers combine the heat of jalapeños with a creamy cheese filling, all wrapped in a flaky crescent dough to resemble a mummy. The combination of flavors and the playful presentation make them a hit at any Halloween gathering.
Whether you’re hosting a party or just looking to indulge in a fun, festive snack, these Mummy Jalapeño Poppers are bound to impress.
This recipe is designed to serve 4-6 people, making it ideal for a small get-together or family snack time. The process involves preparing the jalapeños, stuffing them with a rich cheese filling, and wrapping them in crescent roll dough to achieve the mummy look.
With a little creativity and some simple ingredients, you can create a delicious and visually appealing treat that both kids and adults will love.
Ingredients:
- 12 large jalapeño peppers
- 8 oz cream cheese, softened
- 1 cup shredded cheddar cheese
- 1 teaspoon garlic powder
- 1 teaspoon onion powder
- 1/2 teaspoon smoked paprika
- 1/4 teaspoon salt
- 1/4 teaspoon black pepper
- 1 can (8 oz) refrigerated crescent roll dough
- 24 small candy eyes
Cooking Instructions:
- Prepare the Jalapeños: Preheat your oven to 375°F (190°C). Wearing gloves, slice each jalapeño in half lengthwise and remove the seeds and membranes. This will help reduce the heat; however, if you prefer spicier poppers, you can leave some seeds in.
- Make the Cheese Filling: In a medium bowl, combine the softened cream cheese, shredded cheddar cheese, garlic powder, onion powder, smoked paprika, salt, and black pepper. Mix until all ingredients are well incorporated and smooth.
- Stuff the Jalapeños: Using a spoon or a piping bag, fill each jalapeño half with the cheese mixture. Be generous with the filling but confirm it doesn’t overflow.
- Prepare the Crescent Dough: Unroll the crescent roll dough on a clean surface. Cut the dough into thin strips, about 1/4 inch wide. You should have enough strips to wrap each jalapeño half.
- Wrap the Jalapeños: Take a stuffed jalapeño half and wrap a strip of dough around it, leaving a small gap where the eyes will be placed. The dough should resemble mummy bandages. Repeat with all jalapeños.
- Bake the Poppers: Place the wrapped jalapeños on a baking sheet lined with parchment paper. Bake in the preheated oven for 15-20 minutes, or until the dough is golden brown and cooked through.
- Add the Eyes: Remove the jalapeños from the oven. While they’re still warm, gently press two candy eyes into the cheese filling of each jalapeño mummy.
Extra Tips:
For a milder version of this dish, you can substitute mini sweet peppers for the jalapeños. This will maintain the festive look without the heat.
If you find your crescent dough strips breaking, consider refrigerating the dough for a few minutes to make it easier to handle.
To confirm the candy eyes stick, press them into the cheese filling when the poppers are still warm.
Finally, serving these poppers with a side of sour cream or a cool ranch dip can provide a nice contrast to the heat of the jalapeños.
Monster Eyeball Meatballs
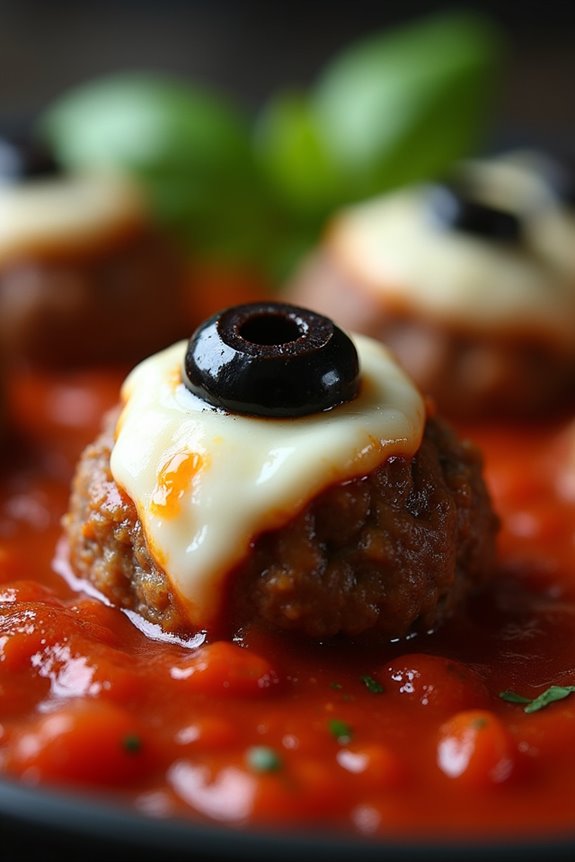
Monster Eyeball Meatballs are a spooky and savory treat perfect for adding some ghoulish fun to your Halloween celebrations. These meatballs aren’t only delicious, but their eerie appearance will delight both kids and adults alike. By incorporating ingredients that mimic the look of eyeballs, you can transform a simple meatball dish into something that looks like it came straight out of a monster movie. The combination of flavorful meat, tangy tomato sauce, and gooey mozzarella “eyeballs” makes for a hauntingly good appetizer or main course.
Creating Monster Eyeball Meatballs is relatively simple, making it a great dish to prepare for a Halloween party or family gathering. The meatballs are made from a blend of ground beef and pork, seasoned with herbs and spices to give them a rich, savory flavor. Each meatball is topped with a slice of mozzarella cheese and an olive to create the “eyeball” effect, all nestled in a bed of tomato sauce. Whether you’re hosting a haunted house event or simply enjoying a Halloween-themed dinner, these meatballs are bound to be a hit.
Ingredients for 4-6 servings:
- 1 pound ground beef
- 1 pound ground pork
- 1 cup breadcrumbs
- 1/2 cup grated Parmesan cheese
- 2 large eggs
- 1 teaspoon garlic powder
- 1 teaspoon onion powder
- 1 teaspoon dried oregano
- 1 teaspoon salt
- 1/2 teaspoon black pepper
- 2 cups marinara sauce
- 12 slices of mozzarella cheese (approximately 1/4 inch thick)
- 12 black olives, pitted and halved
Cooking Instructions:
- Preheat the Oven: Begin by preheating your oven to 375°F (190°C). This guarantees that your meatballs cook evenly and thoroughly.
- Prepare the Meatball Mixture: In a large bowl, combine the ground beef, ground pork, breadcrumbs, Parmesan cheese, eggs, garlic powder, onion powder, oregano, salt, and black pepper. Mix everything together using your hands or a spatula until the ingredients are well combined.
- Form the Meatballs: Take small handfuls of the meat mixture and roll them into balls about 1.5 inches in diameter. You should have approximately 24 meatballs.
- Bake the Meatballs: Place the meatballs on a baking sheet lined with parchment paper. Bake in the preheated oven for about 20 minutes, or until they’re browned and cooked through.
- Prepare the Sauce: While the meatballs are baking, heat the marinara sauce in a large saucepan over medium heat until it begins to simmer.
- Add the Meatballs to the Sauce: Once the meatballs are cooked, transfer them into the simmering marinara sauce. Let them cook in the sauce for an additional 10 minutes to absorb the flavors.
- Create the Eyeballs: Place a slice of mozzarella cheese on top of each meatball. Press half a black olive into the center of the cheese to resemble an eyeball.
- Melt the Cheese: Cover the saucepan with a lid and let the meatballs simmer for another 5 minutes, or until the mozzarella has melted slightly and resembles an eerie eyeball.
Extra Tips:
For an extra kick of flavor, consider adding a pinch of red pepper flakes to the meatball mixture. If you prefer a smokier taste, smoked paprika can be a great addition as well.
When forming the meatballs, keeping your hands slightly damp can prevent the mixture from sticking. If you’re making these for a party, the meatballs can be prepared in advance and then reheated in the sauce before serving.
Finally, for a more dramatic presentation, serve the Monster Eyeball Meatballs with some creepy Halloween-themed garnishes like fresh basil leaves or edible fake blood (ketchup mixed with a touch of balsamic vinegar).
Zombie Finger Breadsticks

The process of making Zombie Finger Breadsticks is both fun and simple. Using basic bread dough, you can easily mold and shape each breadstick into a finger-like form. A few clever additions, such as almond “fingernails” and a slight dusting of paprika, help bring these spooky snacks to life. Perfect for a serving size of 4-6 people, this recipe guarantees that everyone gets a taste of these ghoulish delights.
Ingredients (for 4-6 people):
- 1 pound pizza or bread dough
- 12 whole blanched almonds
- 1/4 cup grated Parmesan cheese
- 1 tablespoon olive oil
- 1 teaspoon dried oregano
- 1/2 teaspoon salt
- 1/4 teaspoon garlic powder
- 1/4 teaspoon smoked paprika
- Red food coloring (optional)
Instructions:
- Preheat the Oven: Start by preheating your oven to 375°F (190°C). Line a baking sheet with parchment paper or a silicone baking mat to prevent sticking.
- Prepare the Dough: Divide the bread or pizza dough into 12 equal pieces. Roll each piece into a 5-inch long log, tapering one end for the fingertip and slightly widening the other end.
- Shape the Fingers: Use a knife to create knuckle indentations along the length of each breadstick. Make shallow slashes on the knuckles to mimic the look of wrinkles.
- Add the Nails: Press one almond onto the tapered end of each breadstick to form the “fingernail.” Use a touch of water to help the almond adhere if necessary.
- Season the Breadsticks: In a small bowl, mix together the Parmesan cheese, olive oil, oregano, salt, garlic powder, and paprika. Brush this mixture generously over each breadstick.
- Color the Fingernails (Optional): If desired, use a small brush to lightly paint the almond fingernails with red food coloring for a bloodied effect.
- Bake: Place the breadsticks on the prepared baking sheet, guaranteeing they’re spaced slightly apart. Bake for 15-20 minutes or until golden brown and cooked through.
- Cool and Serve: Allow the breadsticks to cool slightly before serving. They can be enjoyed warm or at room temperature.
Extra Tips:
For added flavor, consider mixing in some shredded cheddar cheese or fresh herbs into the dough before shaping. If you find the dough too sticky to work with, lightly dust your hands and work surface with flour.
To make these breadsticks even more realistic, you can experiment with different food coloring techniques to create “bloody” effects or use black olives as alternative fingernails.
Haunted Popcorn Mix
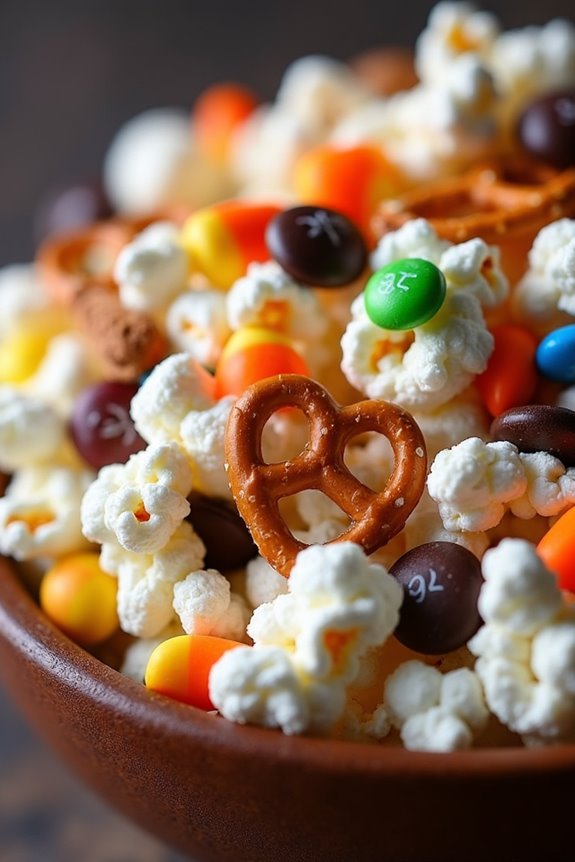
Halloween is the perfect time to indulge in fun, festive treats, and our Haunted Popcorn Mix is no exception. This spooky snack combines the savory crunch of popcorn with a medley of salty and sweet ingredients for a ghoulishly good treat. Perfect for a Halloween party or a scary movie night at home, this mix is sure to satisfy a variety of taste buds.
With its combination of textures and flavors, the Haunted Popcorn Mix will become a Halloween staple that both kids and adults can enjoy. Whether you’re hosting a gathering or simply enjoying a cozy night in, this mix is incredibly easy to prepare and can be made in advance.
The contrasting flavors of this mix, from salty pretzels to sweet candy corn, create a delightful experience with each bite. Plus, the recipe is versatile, allowing you to customize it to suit your preferences or dietary needs. So, gather your ingredients and follow the steps below to whip up this delicious and festive Halloween treat.
Ingredients (Serves 4-6):
- 8 cups popped popcorn
- 1 cup mini pretzels
- 1 cup candy corn
- 1 cup roasted peanuts
- 1/2 cup chocolate chips
- 1/2 cup candy-coated chocolates (such as M&Ms)
- 1 tablespoon unsalted butter
- 1 teaspoon salt
Instructions:
- Pop the Popcorn: Begin by popping 8 cups of popcorn using your preferred method, whether it’s on the stovetop, in an air popper, or microwave. Once popped, transfer the popcorn to a large mixing bowl.
- Prepare the Mix: Add 1 cup of mini pretzels, 1 cup of candy corn, 1 cup of roasted peanuts, 1/2 cup of chocolate chips, and 1/2 cup of candy-coated chocolates to the bowl with the popcorn. Gently toss the ingredients together until well mixed.
- Melt the Butter: In a small saucepan, melt 1 tablespoon of unsalted butter over low heat. Once melted, stir in 1 teaspoon of salt until fully dissolved.
- Combine and Coat: Drizzle the melted butter mixture over the popcorn and snack mix. Use a large spoon or your hands to gently toss everything together, ensuring that the butter and salt are evenly distributed throughout the mix.
- Serve and Enjoy: Once everything is combined, transfer the Haunted Popcorn Mix to a serving bowl or divide it into individual portions. Enjoy immediately, or store in an airtight container for later consumption.
Extra Tips:
For an extra spooky touch, consider adding Halloween-themed candies or using colored candy melts to drizzle over the mix for a pop of color. If you’re preparing this mix in advance, store it in an airtight container to keep the popcorn crunchy and fresh.
Feel free to adjust the ingredient quantities or substitute with your favorite snacks to customize the mix to your liking. It’s a versatile treat that can be adapted for any festive occasion!
Vampire Bat Wings

Vampire Bat Wings are a spooky and savory addition to any Halloween party spread. These wings are inspired by the dark allure of vampire bats, and their rich, smoky flavor is certain to tantalize your taste buds. Perfectly seasoned and oven-roasted, these wings are bound to be a hit with guests of all ages. The deep, dark glaze gives them an eerie appearance, making them a perfect thematic treat for your haunted festivities.
The recipe combines classic wing flavors with a Halloween twist, offering a balance of heat, sweet, and tang that’s certain to satisfy your cravings. With a simple preparation process, you can easily make a batch of Vampire Bat Wings for your next gathering, guaranteeing your party is a memorable one. Follow the instructions carefully to achieve the ideal crispness and flavor.
Ingredients for 4-6 servings:
- 3 lbs chicken wings
- 1/2 cup soy sauce
- 1/4 cup honey
- 1/4 cup balsamic vinegar
- 2 tablespoons sriracha sauce
- 3 cloves garlic, minced
- 1 teaspoon smoked paprika
- 1 teaspoon ground black pepper
- 1 tablespoon sesame seeds (optional)
- Fresh chopped parsley for garnish (optional)
Cooking Instructions:
- Prepare the Wings: Begin by preheating your oven to 400°F (200°C). Pat the chicken wings dry with paper towels to remove excess moisture; this will help them crisp up in the oven.
- Make the Marinade: In a large mixing bowl, combine the soy sauce, honey, balsamic vinegar, sriracha sauce, minced garlic, smoked paprika, and black pepper. Whisk the ingredients together until well combined.
- Marinate the Wings: Add the chicken wings to the marinade, guaranteeing each wing is thoroughly coated. Cover the bowl with plastic wrap and let the wings marinate in the refrigerator for at least 30 minutes, or up to 4 hours for deeper flavor.
- Bake the Wings: Line a baking sheet with aluminum foil and place a wire rack on top. Arrange the marinated wings on the wire rack, ensuring they’re spaced evenly. Bake in the preheated oven for 35-40 minutes, turning once halfway through, until the wings are cooked through and the skin is crispy.
- Glaze the Wings (optional): If you desire an extra sticky glaze, remove the wings from the oven 5 minutes early. Baste them with the remaining marinade, then return to the oven to finish cooking.
- Serve: Once done, remove the wings from the oven and let them rest for a few minutes. If desired, sprinkle with sesame seeds and fresh parsley before serving.
Extra Tips:
For a spicier kick, you can increase the amount of sriracha sauce in the marinade. If you prefer a less spicy version, reduce the sriracha or replace it with a milder hot sauce.
To guarantee maximum crispiness, make sure to arrange the wings in a single layer and avoid overcrowding them on the baking rack. If you don’t have a wire rack, you can bake the wings directly on the foil-lined baking sheet, but be sure to flip them frequently to achieve even cooking.
Pumpkin-Shaped Stuffed Peppers
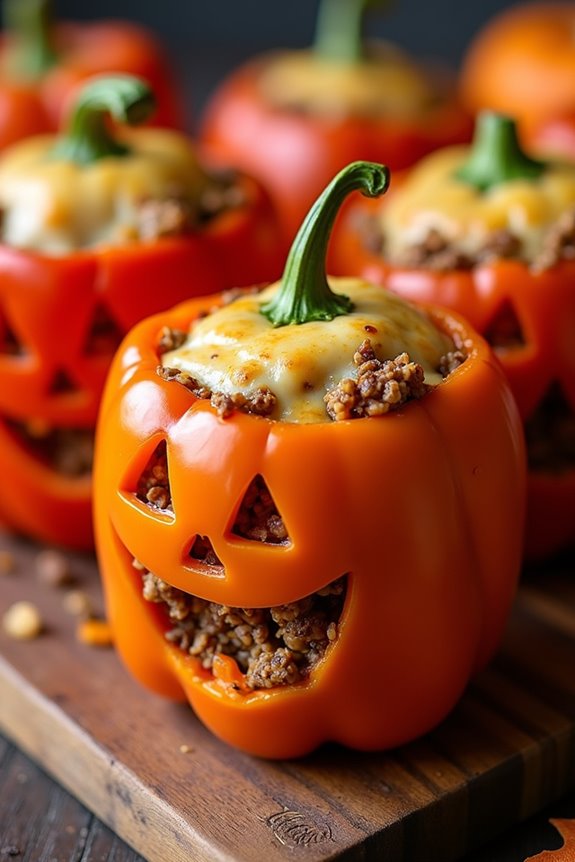
Pumpkin-Shaped Stuffed Peppers are a festive and savory treat perfect for any Halloween gathering. These vibrant orange bell peppers are carved to resemble mini pumpkins, adding a touch of spooky charm to your appetizer spread. Stuffed with a delicious mixture of seasoned ground beef, rice, and vegetables, they offer a comforting and hearty flavor profile.
The presentation isn’t only fun but also incredibly eye-catching, making this dish a standout at any party. These stuffed peppers aren’t only tasty but also relatively simple to prepare, allowing you to focus on other aspects of your Halloween festivities. The recipe incorporates ingredients that are easy to find and adaptable to suit various dietary preferences.
Whether you’re hosting a Halloween party or simply want to enjoy a themed family dinner, Pumpkin-Shaped Stuffed Peppers are sure to please both children and adults alike.
Ingredients (Serves 4-6):
- 6 large orange bell peppers
- 1 pound ground beef
- 1 cup cooked rice
- 1 small onion, finely chopped
- 2 cloves garlic, minced
- 1 cup tomato sauce
- 1 cup shredded cheese (cheddar or mozzarella)
- 1 tablespoon olive oil
- 1 teaspoon salt
- 1/2 teaspoon black pepper
- 1 teaspoon Italian seasoning
- 1/2 teaspoon smoked paprika
Cooking Instructions:
- Prepare the Bell Peppers: Preheat your oven to 375°F (190°C). Cut the tops off the bell peppers and remove the seeds and membranes. Using a small, sharp knife, carve jack-o’-lantern faces into one side of each pepper. Set the carved peppers aside.
- Cook the Filling: In a large skillet, heat olive oil over medium heat. Add the chopped onion and minced garlic, sautéing until the onion becomes translucent. Add the ground beef to the skillet, cooking until it’s browned and fully cooked. Drain any excess fat from the skillet.
- Mix Ingredients: Stir in the tomato sauce, cooked rice, salt, black pepper, Italian seasoning, and smoked paprika into the skillet with the beef mixture. Cook for an additional 2-3 minutes, allowing the flavors to meld together. Remove from heat and stir in half of the shredded cheese.
- Stuff the Peppers: Carefully spoon the beef and rice mixture into each carved bell pepper, filling them generously. Place the stuffed peppers into a baking dish, making sure they’re standing upright.
- Bake the Peppers: Cover the baking dish with aluminum foil and bake in the preheated oven for 25 minutes. Remove the foil, sprinkle the remaining cheese on top of each pepper, and continue baking for another 10 minutes, or until the cheese is melted and bubbly.
- Serve: Allow the peppers to cool slightly before serving. They can be enjoyed as a main dish or a hearty appetizer.
Extra Tips:
For a vegetarian version, substitute the ground beef with a mixture of sautéed mushrooms and lentils. You can also experiment with different types of cheese or add some chopped jalapeños for a spicy kick.
If the peppers are small, you may need additional peppers to use up all the filling. Always verify that the peppers are tender enough when done baking by checking them with a fork. Enjoying these Pumpkin-Shaped Stuffed Peppers with a side of sour cream or guacamole can also enhance their flavor.
Skeleton Bone Chex Mix

Skeleton Bone Chex Mix is a fun and spooky snack that’s perfect for Halloween gatherings. This savory mix combines crunchy Chex cereal with pretzels, nuts, and a variety of seasonings to create a satisfying, bone-chilling treat. The mix is tossed and baked to perfection, resulting in a crispy and flavorful snack that resembles a pile of skeleton bones, making it a festive and thematic addition to any Halloween celebration.
Ideal for serving a crowd, this recipe yields enough to satisfy 4-6 people, making it a great option for parties or family get-togethers. The combination of textures and flavors guarantees that there’s something for everyone to enjoy, and the ease of preparation means you can whip this up in no time. Whether you’re hosting a Halloween bash or just want to enjoy a themed snack, Skeleton Bone Chex Mix is a go-to choice.
Ingredients for 4-6 servings:
- 3 cups Rice Chex cereal
- 3 cups Corn Chex cereal
- 2 cups mini pretzel twists
- 1 cup roasted almonds
- 1 cup roasted peanuts
- 1/4 cup butter, melted
- 2 tablespoons Worcestershire sauce
- 1 teaspoon garlic powder
- 1 teaspoon onion powder
- 1/2 teaspoon smoked paprika
- 1/2 teaspoon salt
- 1/4 teaspoon cayenne pepper (optional, for heat)
Cooking Instructions:
- Preheat the Oven: Begin by preheating your oven to 250°F (120°C). This low temperature will make sure that your Chex mix bakes evenly without burning.
- Prepare the Mix: In a large mixing bowl, combine the Rice Chex, Corn Chex, mini pretzel twists, roasted almonds, and roasted peanuts. Toss them together until evenly mixed.
- Make the Seasoning: In a separate small bowl, whisk together the melted butter, Worcestershire sauce, garlic powder, onion powder, smoked paprika, salt, and cayenne pepper if you’re using it.
- Combine with Seasoning: Pour the butter and seasoning mixture over the Chex mix, making certain that you coat all the ingredients. Use a large spoon to gently stir until everything is well covered.
- Bake the Mix: Spread the seasoned Chex mix evenly onto a large baking sheet. Place it in the preheated oven and bake for about 1 hour, stirring every 15 minutes to make certain of even baking and seasoning distribution.
- Cool and Serve: Once baked, remove the Chex mix from the oven and allow it to cool completely on the baking sheet. Once cool, transfer it to a serving bowl and enjoy.
Extra Tips:
For an even more festive look, consider adding some Halloween-themed colored candies or candy eyes to the mix after it cools for a sweet and spooky touch.
Be sure to store any leftovers in an airtight container to maintain freshness and crispness. Additionally, feel free to customize the mix by adding other nuts or replacing the pretzels with your favorite snacks, such as bagel chips or cheese crackers, to suit your personal tastes.