

When it comes to Halloween, there’s nothing more exciting than a cake that’s both spooky and scrumptious. I’ve rounded up 11 eerie cake ideas that are sure to thrill and chill your guests. From Creepy Crawly Spider Cakes to zombie brains, these creative desserts will make your Halloween celebration unforgettable. Each cake is hauntingly irresistible, promising a deliciously dark treat for everyone. Join me as we explore these spine-tingling cake inspirations that are perfect for your next Halloween bash.
Creepy Crawly Spider Cake
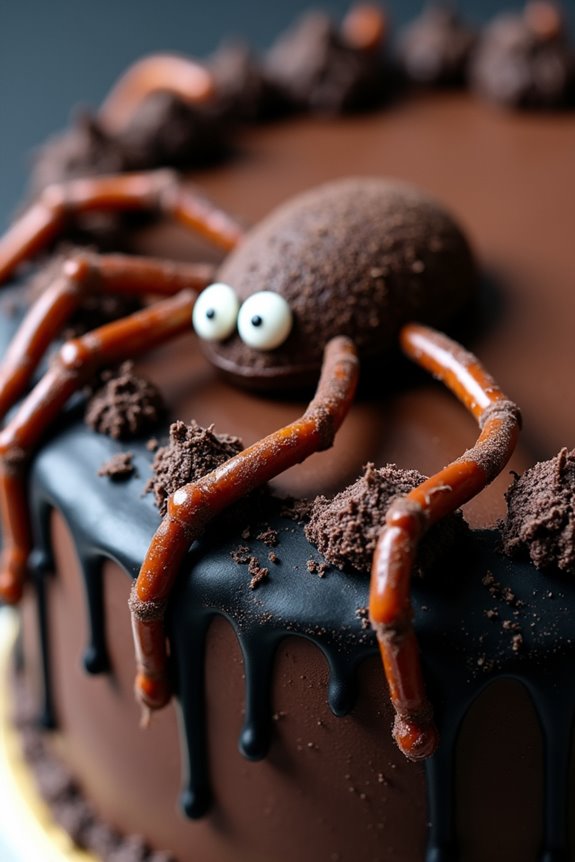
Creepy Crawly Spider Cake is the perfect addition to your Halloween party spread, combining a delicious decadent taste with a spine-chilling appearance. This cake is designed to look like a giant spider, complete with chocolate legs and a fuzzy-looking exterior that will have your guests squirming with delight. Not only does this cake make for a spooky centerpiece, but it’s also a treat that will satisfy the sweet tooth of both kids and adults alike.
This recipe is suitable for serving 4-6 people and offers a delightful blend of rich chocolate flavors with a hint of spooky fun. The cake itself is a moist chocolate base, layered with a smooth chocolate ganache, and topped with a chocolate frosting that gives it a velvety texture. The spider legs are crafted from chocolate licorice or pretzel sticks, adding a crunchy contrast to the soft cake. By following this recipe, you’ll be able to create a Halloween masterpiece that looks as good as it tastes.
Ingredients:
- 1 1/2 cups all-purpose flour
- 1 cup granulated sugar
- 1/2 cup unsweetened cocoa powder
- 1 teaspoon baking powder
- 1/2 teaspoon baking soda
- 1/2 teaspoon salt
- 1/2 cup buttermilk
- 1/2 cup vegetable oil
- 2 large eggs
- 1 teaspoon vanilla extract
- 3/4 cup boiling water
- 1 cup semi-sweet chocolate chips
- 1/2 cup heavy cream
- 1/2 cup unsalted butter, softened
- 2 cups powdered sugar
- Black food coloring
- Chocolate licorice or pretzel sticks (for legs)
- Candy eyes or white chocolate chips for eyes
Cooking Instructions:
- Preheat and Prepare: Preheat your oven to 350°F (175°C). Grease and flour a 9-inch round cake pan.
- Mix Dry Ingredients: In a large bowl, combine the flour, sugar, cocoa powder, baking powder, baking soda, and salt. Mix well to guarantee everything is evenly distributed.
- Combine Wet Ingredients: In a separate bowl, whisk together the buttermilk, vegetable oil, eggs, and vanilla extract.
- Create Batter: Gradually add the wet ingredients to the dry ingredients, stirring until just combined. Carefully stir in the boiling water until the batter is smooth.
- Bake the Cake: Pour the batter into the prepared cake pan. Bake for 30-35 minutes, or until a toothpick inserted into the center comes out clean. Allow the cake to cool completely before removing it from the pan.
- Make Ganache: In a small saucepan, heat the heavy cream until just about to boil. Remove from heat and pour over the chocolate chips in a bowl. Let it sit for 2 minutes, then stir until smooth. Allow it to cool slightly before spreading it over the cooled cake.
- Prepare Frosting: In a mixing bowl, beat the softened butter until creamy. Gradually add the powdered sugar and beat until light and fluffy. Add black food coloring until you reach the desired shade.
- Assemble the Cake: Spread the black frosting over the ganache layer. Use the chocolate licorice or pretzel sticks to create spider legs, inserting them into the sides of the cake. Place the candy eyes or white chocolate chips on top for the spider’s eyes.
Extra Tips:
When creating the spider legs, ascertain they’re evenly spaced to maintain balance and prevent the cake from tipping over.
If you want to add extra texture to the spider’s body, consider using chocolate sprinkles or grated chocolate to create a fuzzy effect.
Additionally, chilling the cake for a short period before adding the ganache can help the layers set better.
If you prefer a less sweet option, you can substitute dark chocolate for the semi-sweet chocolate chips in the ganache.
Blood Drip Red Velvet Cake
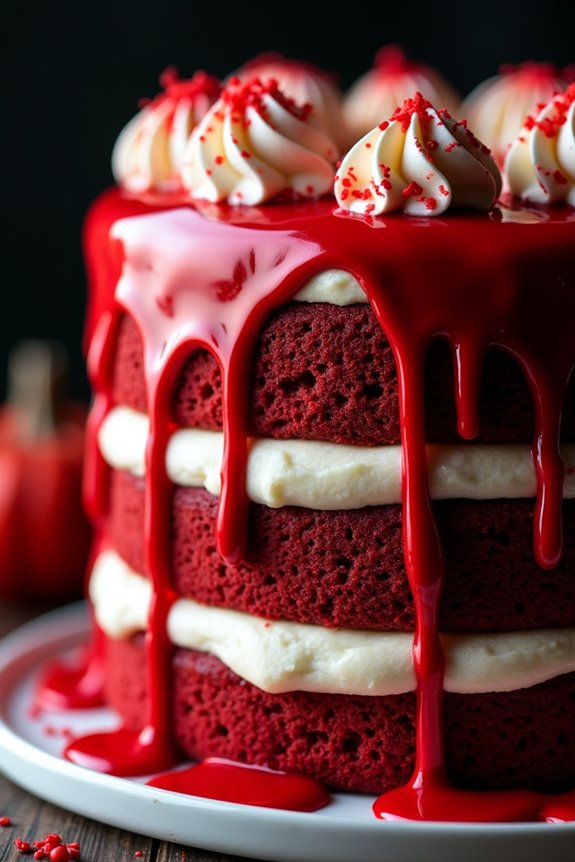
Celebrate Halloween with a spooky twist on a classic dessert by making a Blood Drip Red Velvet Cake. This deliciously eerie cake combines the rich, velvety texture of red velvet layers with a strikingly dramatic blood-red drip glaze that oozes down the sides, creating a hauntingly beautiful effect. Perfect for Halloween parties or as a festive centerpiece, this cake will captivate both the eyes and taste buds of your guests.
The Blood Drip Red Velvet Cake isn’t only visually striking but also deliciously indulgent. The moist layers of red velvet cake are complemented by a creamy, tangy cream cheese frosting, while the red drip glaze, made from a simple combination of white chocolate and red food coloring, adds a sweet, glossy finish. This recipe is designed to serve 4-6 people, making it an ideal choice for intimate gatherings or family celebrations.
Ingredients (serving size: 4-6 people):
- 2 ½ cups all-purpose flour
- 1 ½ cups granulated sugar
- 1 teaspoon baking soda
- 1 teaspoon salt
- 1 teaspoon cocoa powder
- 1 ½ cups vegetable oil
- 1 cup buttermilk, room temperature
- 2 large eggs, room temperature
- 2 tablespoons red food coloring
- 1 teaspoon white vinegar
- 1 teaspoon vanilla extract
- 8 oz cream cheese, softened
- ½ cup unsalted butter, softened
- 4 cups powdered sugar
- 1 teaspoon vanilla extract (for frosting)
- 1 cup white chocolate chips
- 2 tablespoons heavy cream
- Red food coloring (for glaze)
Instructions:
- Prepare the Cake Batter: Preheat your oven to 350°F (175°C). Grease and flour two 9-inch round cake pans. In a large bowl, whisk together the flour, sugar, baking soda, salt, and cocoa powder. In another bowl, mix the vegetable oil, buttermilk, eggs, food coloring, vinegar, and vanilla extract until well combined.
- Combine and Bake: Gradually add the wet ingredients to the dry ingredients, mixing until smooth. Divide the batter evenly between the prepared cake pans. Bake for 25-30 minutes, or until a toothpick inserted into the center comes out clean. Allow the cakes to cool in the pans for 10 minutes before transferring to a wire rack to cool completely.
- Prepare the Cream Cheese Frosting: In a mixing bowl, beat the softened cream cheese and butter until creamy. Gradually add the powdered sugar, beating until smooth. Stir in the vanilla extract. Once the cakes have cooled, spread a layer of frosting over one cake layer, top with the second layer, and frost the top and sides of the cake.
- Make the Blood Drip Glaze: In a microwave-safe bowl, melt the white chocolate chips and heavy cream together in 20-second intervals, stirring in between, until smooth. Add red food coloring to achieve the desired blood-red hue. Allow the glaze to cool slightly so it thickens.
- Apply the Blood Drip: Carefully pour the red glaze over the center of the cake, allowing it to drip down the sides naturally. For a more controlled drip effect, use a spoon to guide the glaze over the edges. Let the glaze set before serving.
Extra Tips:
When making the Blood Drip Red Velvet Cake, make certain that your cake layers are completely cool before applying the frosting to prevent it from melting.
If you prefer a more intense red color for the cake, you can adjust the amount of red food coloring to your liking.
For the glaze, test the consistency by letting a small amount drip from a spoon before applying it to the cake—if it’s too runny, let it cool a bit longer; if too thick, add a little more cream.
Finally, for easier slicing, chill the cake in the refrigerator for 30 minutes before serving.
Haunted Graveyard Cake
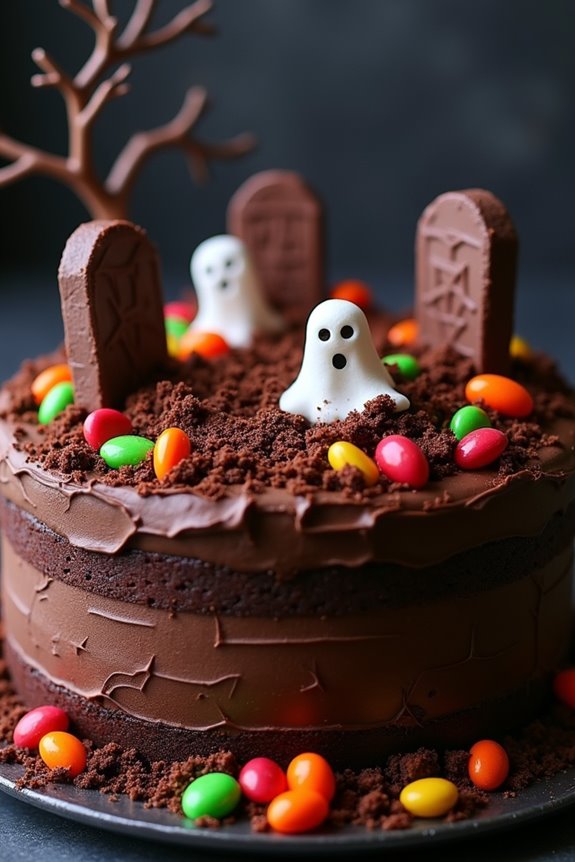
Transform your Halloween celebration into a spooky spectacle with a Haunted Graveyard Cake. This dessert isn’t only delicious but also a show-stopping centerpiece for any Halloween gathering. With its eerie design featuring tombstones, eerie trees, and a chocolate dirt path, this cake is sure to delight both children and adults. The combination of rich chocolate cake, creamy frosting, and creative decorations makes it the perfect treat for Halloween night.
This Haunted Graveyard Cake serves 4-6 people and is perfect for a small party or family gathering. The cake layers are made from a moist chocolate cake, which provides a dark and mysterious base. The frosting acts as the glue for the decorations, which include graham cracker crumbs for dirt, chocolate cookie headstones, and various candies to create ghosts and other spooky decorations. Follow this recipe to bring a piece of the haunted graveyard to your Halloween table.
Ingredients:
- 1 cup all-purpose flour
- 1 cup granulated sugar
- 1/2 cup unsweetened cocoa powder
- 1 teaspoon baking powder
- 1/2 teaspoon baking soda
- 1/4 teaspoon salt
- 1/2 cup unsalted butter, melted
- 2 large eggs
- 1 teaspoon vanilla extract
- 1/2 cup milk
- 1/2 cup hot water
- 1 cup chocolate frosting
- 1/2 cup graham cracker crumbs
- 8-10 chocolate sandwich cookies
- Assorted Halloween candies (such as candy corn, gummy worms, and marshmallow ghosts)
Instructions:
- Preheat Oven: Preheat your oven to 350°F (175°C). Grease and flour two 8-inch round cake pans for even baking and easy removal of the cakes.
- Mix Dry Ingredients: In a large mixing bowl, whisk together the flour, sugar, cocoa powder, baking powder, baking soda, and salt until well combined.
- Combine Wet Ingredients: In a separate bowl, combine the melted butter, eggs, and vanilla extract. Mix until smooth. Gradually add the wet mixture to the dry ingredients, stirring gently.
- Add Liquid Ingredients: Add the milk and hot water to the batter, mixing until smooth and well incorporated. The batter will be thin, which is normal for a moist chocolate cake.
- Bake the Cakes: Pour the batter evenly between the prepared cake pans. Bake in the preheated oven for 25-30 minutes, or until a toothpick inserted into the center comes out clean.
- Cool and Frost: Allow the cakes to cool in the pans for 10 minutes before transferring them to a wire rack to cool completely. Once cooled, spread a layer of chocolate frosting on top of one cake, then place the other cake on top to create a layered effect. Finish by frosting the entire cake.
- Decorate: Sprinkle graham cracker crumbs on top of the frosted cake to create the appearance of dirt. Press chocolate sandwich cookies into the cake to resemble tombstones. Use assorted Halloween candies to create ghosts, pumpkins, and other spooky decorations around the cake.
Extra Tips:
To enhance the Haunted Graveyard Cake’s spooky theme, consider using edible markers to write “RIP” on the chocolate sandwich cookies or to draw ghostly faces on marshmallow figures.
If you have extra time, make a few chocolate trees by melting chocolate, piping tree shapes onto parchment paper, and allowing them to set before placing them on the cake.
For an added touch of eeriness, use a little green food coloring in the frosting to create patches of grass and moss. Adjust the candy decorations according to your own creative vision and make your haunted graveyard truly unique!
Mummy Wrap Cake
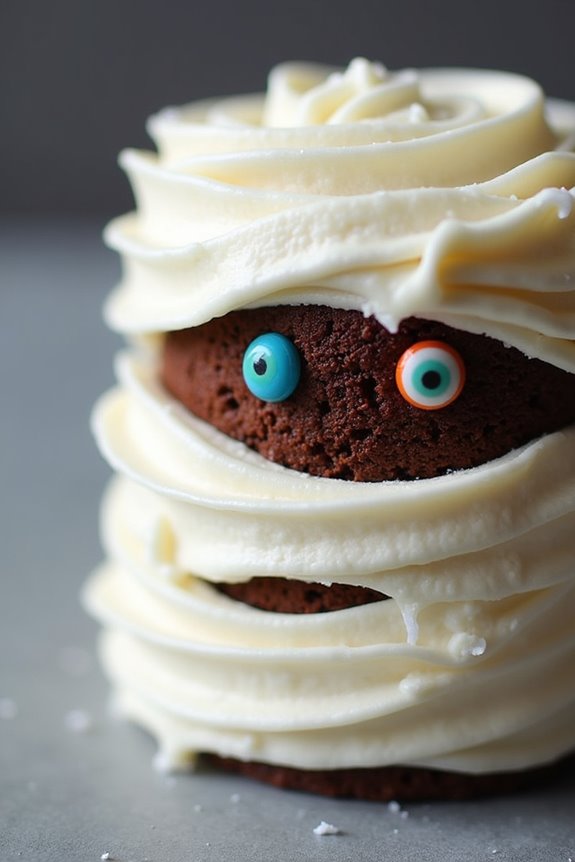
Mummy Wrap Cake is a spooktacular addition to your Halloween festivities! This delightful cake captures the essence of Halloween with its eerie mummy design, providing both a visual and culinary treat for guests. The cake itself is a rich, moist chocolate base that serves as a perfect canvas for the mummy wrap design. The wrapping is made from a simple yet delicious buttercream frosting, piped in such a way that it resembles the iconic bandages of a mummy. To complete the look, candy eyes are strategically placed, bringing the mummy to life in a fun and playful way.
Not only is the Mummy Wrap Cake visually impressive, but it’s also incredibly easy to make, even for novice bakers. The ingredients are basic and likely already in your pantry, and the decorating process, while intricate-looking, is quite straightforward. This cake is perfect for a Halloween party, family gathering, or any autumnal celebration where you want to impress your guests with a themed dessert. With a serving size of 4-6 people, it’s the perfect size for a small get-together or as part of a larger dessert spread.
Ingredients (Serves 4-6):
- 1 ½ cups all-purpose flour
- 1 cup granulated sugar
- ½ cup unsweetened cocoa powder
- 1 teaspoon baking soda
- ½ teaspoon salt
- 1 cup water
- ⅓ cup vegetable oil
- 1 tablespoon white vinegar
- 1 teaspoon vanilla extract
- 1 cup unsalted butter (room temperature)
- 4 cups powdered sugar
- ¼ cup milk
- 1 teaspoon vanilla extract
- Black food coloring gel
- Edible candy eyes
Cooking Instructions:
- Preheat the Oven: Begin by preheating your oven to 350°F (175°C). Line a 9-inch round cake pan with parchment paper and lightly grease the sides with butter or non-stick spray.
- Prepare the Cake Batter: In a large mixing bowl, sift together the flour, granulated sugar, cocoa powder, baking soda, and salt. Add the water, vegetable oil, vinegar, and vanilla extract. Mix until the batter is smooth and well combined.
- Bake the Cake: Pour the batter into the prepared cake pan. Bake for 30-35 minutes or until a toothpick inserted into the center of the cake comes out clean. Once baked, let the cake cool in the pan for 10 minutes before transferring it to a wire rack to cool completely.
- Make the Buttercream Frosting: In a separate bowl, beat the room-temperature butter with an electric mixer until creamy. Gradually add in the powdered sugar, milk, and vanilla extract. Continue mixing until the frosting is smooth and fluffy.
- Color the Frosting: Set aside a small portion of the frosting and add black food coloring to it until you achieve the desired shade for the mummy’s eyes. The rest of the frosting will remain white for the mummy wrapping.
- Frost the Cake: Once the cake is completely cooled, spread a thin layer of the white frosting over the top and sides of the cake to create a base layer.
- Create the Mummy Wrap: Fill a piping bag fitted with a flat nozzle with the remaining white frosting. Pipe strips across the cake to resemble mummy bandages, leaving space for the eyes.
- Add the Eyes: Use the black frosting to create small circles for the eyes on the cake, then place edible candy eyes in the center of each black circle. This gives the mummy its characteristic look.
- Finishing Touches: Allow the cake to set for at least 15 minutes before serving to let the frosting slightly firm up.
Extra Tips:
When making the Mummy Wrap Cake, make certain your cake is completely cool before frosting; otherwise, the frosting may melt and not hold its shape. If you find the buttercream too thick for piping, add a little more milk to achieve the desired consistency. If you don’t have a piping bag, you can use a plastic sandwich bag by cutting a small corner to pipe the frosting. Finally, consider practicing the piping technique on a piece of parchment paper before applying it to the cake to get comfortable with the motion.
Witch’s Brew Cauldron Cake
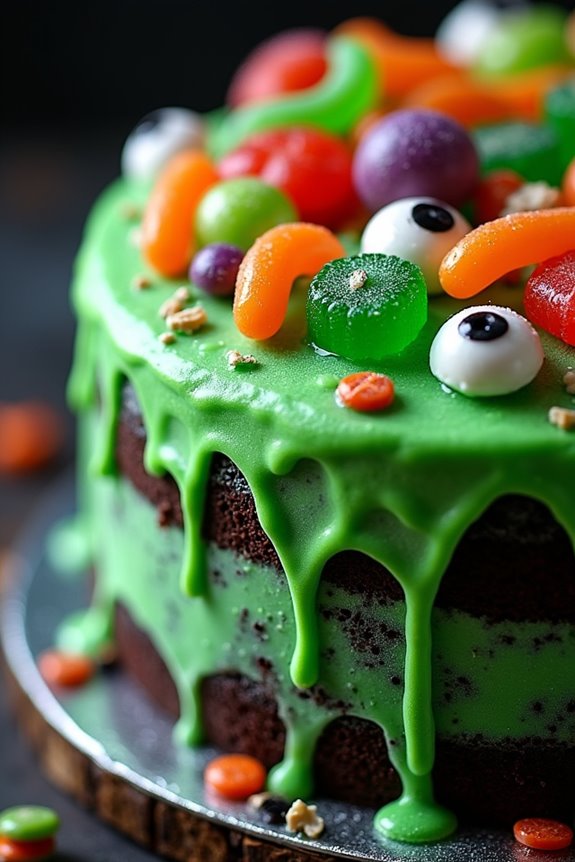
If you’re looking to create a Halloween dessert with a magical twist, the Witch’s Brew Cauldron Cake is the perfect choice. This whimsical treat captures the spooky essence of the holiday with its bubbling cauldron appearance and rich, chocolatey goodness. Perfect for a Halloween party or a fun family gathering, this cake is as much a feast for the eyes as it’s for the taste buds.
The cake itself is a moist chocolate concoction, while the decorations make it look like a witch’s cauldron bubbling over with a mysterious brew. Creating this enchanting cake involves baking a delicious chocolate cake, crafting a green fondant or buttercream “brew,” and using candies to mimic ingredients found in a witch’s potion. By following these detailed instructions, you’ll be able to recreate a magical centerpiece that will leave your guests spellbound.
The recipe is designed to serve 4-6 people, guaranteeing everyone gets a taste of this delightful Halloween creation.
Ingredients:
- 2 cups all-purpose flour
- 2 cups granulated sugar
- 3/4 cup unsweetened cocoa powder
- 1 1/2 teaspoons baking powder
- 1 1/2 teaspoons baking soda
- 1 teaspoon salt
- 2 large eggs
- 1 cup whole milk
- 1/2 cup vegetable oil
- 2 teaspoons vanilla extract
- 1 cup boiling water
- Green food coloring
- 1 cup unsalted butter (softened)
- 4 cups powdered sugar
- Assorted Halloween candies (e.g., gummy worms, eyeballs, bones)
Instructions:
- Preheat the Oven: Preheat your oven to 350°F (175°C). Grease and flour two 9-inch round cake pans to guarantee the cakes don’t stick.
- Mix the Dry Ingredients: In a large bowl, combine the flour, sugar, cocoa powder, baking powder, baking soda, and salt. Mix thoroughly to guarantee even distribution of all ingredients.
- Prepare the Wet Ingredients: In a separate bowl, beat the eggs, then add the milk, vegetable oil, and vanilla extract. Mix until well combined. Gradually add the wet ingredients to the dry ingredients, stirring until the mixture is smooth and uniform.
- Add Boiling Water: Carefully stir in the boiling water. The batter will be thin, but this is expected and will result in a moist cake.
- Bake the Cakes: Divide the batter evenly between the two prepared cake pans. Bake in the preheated oven for 30-35 minutes, or until a toothpick inserted into the center of the cakes comes out clean. Allow the cakes to cool in the pans for 10 minutes before transferring them to a wire rack to cool completely.
- Prepare the Buttercream: Beat the softened butter until creamy. Gradually add the powdered sugar, beating until smooth. Add a few drops of green food coloring and mix until you achieve a vibrant green color that represents the witch’s brew.
- Assemble the Cake: Once the cakes are completely cool, spread a layer of green buttercream between them. Cover the entire cake with a thin layer of buttercream to create a crumb coat. Refrigerate for 20 minutes to set.
- Decorate the Cake: Apply a final layer of green buttercream on the cake. Use a spatula to create swirls that mimic the look of a bubbling cauldron. Arrange Halloween candies on top to simulate potion ingredients spilling over.
- Finish the Presentation: If desired, place the cake on a black or dark-colored cake board to enhance the cauldron effect. Add more candies around the base for an extra spooky touch.
Extra Tips:
For a more dramatic effect, consider using a small amount of dry ice placed safely in a cup within the top of the cake to create a smoky, bubbling effect (be cautious and guarantee no direct contact with the cake).
Additionally, you can use black fondant to cover the sides of the cake, giving it a more authentic cauldron look. Remember to adjust the level of green food coloring to achieve the desired shade for your brew, and don’t hesitate to get creative with the candy decorations for a personalized touch.
Eerie Eyeball Cake
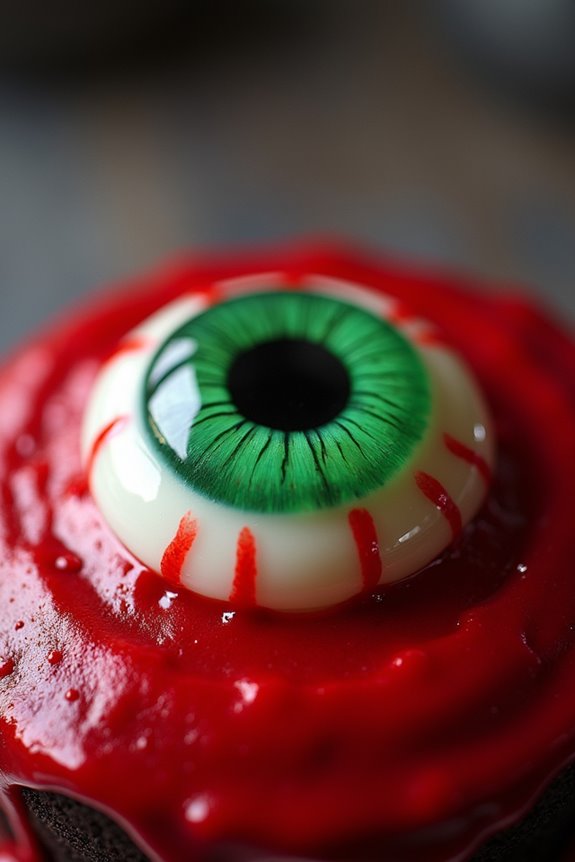
This Halloween, take your dessert to a spine-chilling level with the Eerie Eyeball Cake. Perfect for a gathering of 4-6 people, this cake isn’t just about its spooky appearance but also delivers on taste. The combination of a rich chocolate cake base with a hauntingly realistic gelatin eyeball topper will leave your guests both impressed and slightly unnerved. The flavors meld together perfectly, guaranteeing that while the cake may look terrifying, it tastes heavenly.
Creating the Eerie Eyeball Cake involves a few different components: a moist chocolate cake, a rich buttercream frosting, and a gelatin-based eyeball to give the cake its signature look. While the process requires some attention to detail, particularly when crafting the eyeball, the finished product is well worth the effort. This cake isn’t only a feast for the taste buds but also a centerpiece that will certainly become the talk of your Halloween party.
Ingredients (Serves 4-6):
- 1 1/2 cups all-purpose flour
- 1 cup granulated sugar
- 1/3 cup unsweetened cocoa powder
- 1 teaspoon baking soda
- 1/2 teaspoon salt
- 1 cup water
- 1/3 cup vegetable oil
- 1 tablespoon white vinegar
- 1 teaspoon vanilla extract
- 1/2 cup unsalted butter (softened)
- 2 cups powdered sugar
- 2 tablespoons milk
- Red and black food coloring
- 1 package unflavored gelatin
- 1/4 cup cold water
- 2 tablespoons light corn syrup
- 3/4 cup boiling water
- 1/4 teaspoon almond extract
- Green food coloring
Cooking Instructions:
- Prepare the Chocolate Cake Base: Preheat your oven to 350°F (175°C). In a large mixing bowl, combine the flour, sugar, cocoa powder, baking soda, and salt. In a separate bowl, mix the water, oil, vinegar, and vanilla extract. Gradually add the wet ingredients to the dry ingredients and mix until smooth. Pour the batter into a greased 9-inch round cake pan. Bake for 30-35 minutes or until a toothpick inserted into the center comes out clean. Let the cake cool completely.
- Make the Buttercream Frosting: In another bowl, beat the softened butter until creamy. Gradually add the powdered sugar, mixing well after each addition. Add milk, a few drops of red food coloring, and mix until you achieve a blood-red hue. Once the desired color is reached, spread the frosting evenly over the cooled cake.
- Create the Gelatin Eyeball: Sprinkle the gelatin over 1/4 cup of cold water in a bowl and let it sit for 5 minutes to bloom. Stir in the corn syrup and boiling water until the gelatin dissolves completely. Add almond extract and a few drops of green food coloring, stirring until well mixed. Pour the mixture into a round spherical mold and refrigerate until set.
- Assemble the Eerie Eyeball Cake: Remove the set gelatin eyeball from the mold and place it in the center of the frosted cake. Use a small amount of black food coloring to dot the center of the gelatin to create a pupil. Add red food coloring streaks around the eyeball to mimic blood vessels.
Extra Tips:
When creating the gelatin eyeball, make sure your mold is slightly larger than a golf ball to give an accurate proportion to the cake. If you don’t have a spherical mold, you can use a half-sphere and carefully piece two halves together. If the gelatin is difficult to remove from the mold, briefly dip the mold in warm water to loosen it.
To make the cake even more eerie, consider adding red food coloring streaks to the frosting to mimic blood drips. Remember, the key to a successful Eerie Eyeball Cake is in the details, so take your time with each step for the spookiest effect!
Ghostly Graveyard Cake
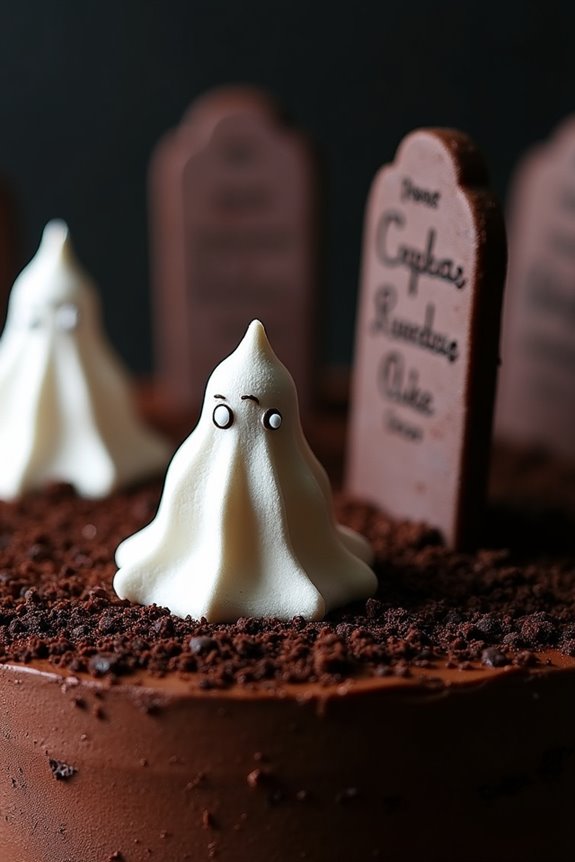
Transform your Halloween celebration into a spooktacular event with a Ghostly Graveyard Cake that’s as eerie as it’s delicious. This cake is perfect for those who love a good fright and a tasty treat. With its hauntingly delightful decorations, this cake will be the centerpiece of your Halloween party, leaving your guests both impressed and a little spooked.
This dessert combines a rich chocolate cake base with a creamy frosting, all topped with edible decorations that resemble a spooky graveyard. The Ghostly Graveyard Cake is designed to serve 4-6 people and is perfect for a small gathering.
The cake features a moist chocolate base, layered with creamy frosting, and topped with cookie crumbs that mimic soil. The addition of ghostly meringues and tombstone-shaped cookies add an extra layer of fun and flavor. Whether you’re an experienced baker or a novice in the kitchen, this recipe is easy to follow and guarantees a hauntingly delicious result.
Ingredients:
- 1 ½ cups all-purpose flour
- 1 cup granulated sugar
- ½ cup unsweetened cocoa powder
- 1 tsp baking soda
- ½ tsp salt
- 1 cup water
- 1/3 cup vegetable oil
- 1 tbsp white vinegar
- 1 tsp vanilla extract
- 1 cup chocolate frosting
- 10 chocolate sandwich cookies, crushed
- 6 meringue ghosts (store-bought or homemade)
- 6 rectangular cookies (e.g., Milano cookies) for tombstones
- Edible gel pen or icing for decorating tombstones
Instructions:
- Preheat the Oven: Begin by preheating your oven to 350°F (175°C). Grease and flour an 8-inch round cake pan to guarantee that the cake won’t stick when baking.
- Mix Dry Ingredients: In a large mixing bowl, combine the all-purpose flour, granulated sugar, cocoa powder, baking soda, and salt. Whisk together until well blended.
- Combine Wet Ingredients: In a separate bowl, mix the water, vegetable oil, white vinegar, and vanilla extract. Stir until all ingredients are well combined.
- Create the Batter: Slowly add the wet ingredients to the dry ingredients, stirring continuously until you achieve a smooth and lump-free batter.
- Bake the Cake: Pour the batter into the prepared cake pan. Bake in the preheated oven for 30-35 minutes, or until a toothpick inserted into the center comes out clean. Allow the cake to cool completely on a wire rack.
- Decorate the Cake: Once the cake has cooled, spread an even layer of chocolate frosting over the top. Sprinkle the crushed chocolate sandwich cookies over the frosting to create the appearance of soil.
- Add Tombstones and Ghosts: Use an edible gel pen or icing to write spooky messages or “RIP” on the rectangular cookies. Place these tombstone cookies upright into the cake. Arrange the meringue ghosts around the tombstones to complete the graveyard scene.
Extra Tips:
For an extra spooky touch, consider adding gummy worms or candy pumpkins to the top of your Ghostly Graveyard Cake. You can also use different colored icing to create a more vibrant and eerie decoration on the tombstones.
Remember to store your cake in a cool place to prevent the frosting from melting, especially if you make it in advance. Don’t be afraid to get creative with your decorations to make your graveyard as creepy as you desire!
Zombie Brain Cake
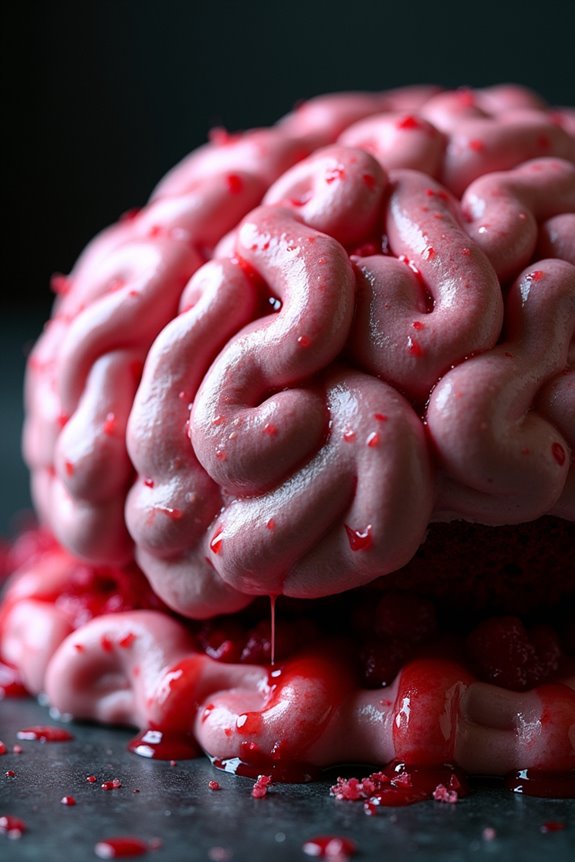
Zombie Brain Cake is the perfect spooky treat for your Halloween festivities. This eerie dessert combines a moist red velvet cake with a realistic brain-like appearance, offering a deliciously creepy centerpiece for your party table. The soft texture of the cake pairs beautifully with a rich, homemade buttercream frosting, creating a dessert that’s both visually striking and delightful to eat.
Whether you’re hosting a haunted house party or an intimate gathering, this cake is sure to impress your guests and satisfy their sweet tooth.
Creating a Zombie Brain Cake isn’t only about the flavor but also about the presentation. The cake is sculpted to resemble a brain, and the realistic effect is enhanced with the help of some clever decorating techniques. The red velvet cake provides the perfect base, with its deep red color adding to the gory effect, while the buttercream frosting is tinted with just the right shades to mimic brain tissue.
To make this cake, you’ll need to have a steady hand and a bit of patience, but the end result will be well worth the effort.
Ingredients (Serves 4-6 people):
- 2 1/2 cups all-purpose flour
- 1 1/2 cups granulated sugar
- 1 teaspoon baking soda
- 1 teaspoon salt
- 1 teaspoon cocoa powder
- 1 1/2 cups vegetable oil
- 1 cup buttermilk, room temperature
- 2 large eggs, room temperature
- 2 tablespoons red food coloring
- 1 teaspoon vanilla extract
- 1 teaspoon white vinegar
- 1/2 cup unsalted butter, softened
- 4 cups powdered sugar
- 1 teaspoon vanilla extract (for frosting)
- 2-3 tablespoons heavy cream
- Pink and gray food coloring
- 1/4 cup raspberry jam
Instructions:
- Preheat the Oven: Begin by preheating your oven to 350°F (175°C). Grease and flour two 8-inch round cake pans to guarantee the cakes won’t stick.
- Mix Dry Ingredients: In a medium bowl, whisk together the flour, sugar, baking soda, salt, and cocoa powder. Set aside.
- Combine Wet Ingredients: In a large bowl, beat together the oil, buttermilk, eggs, red food coloring, vanilla extract, and vinegar until smooth.
- Combine Wet and Dry Mixtures: Gradually add the dry ingredients to the wet mixture, mixing gently until just combined. Be careful not to overmix, as this can result in a tough cake.
- Bake the Cake: Divide the batter evenly between the prepared cake pans. Bake for 25-30 minutes or until a toothpick inserted into the center comes out clean. Let the cakes cool in their pans for 10 minutes, then transfer them to a wire rack to cool completely.
- Prepare the Frosting: In a large bowl, beat the softened butter until creamy. Gradually add the powdered sugar, alternating with heavy cream, until the frosting is smooth and spreadable. Stir in the vanilla extract.
- Color and Assemble: Divide the frosting into two portions, tint one pink and the other gray. Place one cake layer on a serving plate, spread a thin layer of raspberry jam over it, then cover with a layer of pink frosting. Add the second cake layer on top.
- Sculpt the Brain: Using a serrated knife, carve the top of the cake into a round, dome shape. Apply a crumb coat of pink frosting over the entire cake to lock in the crumbs, then chill for 30 minutes.
- Decorate the Brain: Fill a piping bag with pink frosting fitted with a small round tip. Pipe the frosting in squiggly lines to resemble brain folds. Add details using the gray frosting to create a more realistic look.
- Finishing Touches: For added gore, heat a small amount of raspberry jam and drizzle it over the cake to mimic blood.
Extra Tips:
When carving the cake into a dome shape, go slowly and carefully to avoid cutting away too much cake. Chilling the cake before applying the final frosting layer will help it hold its shape better.
If your frosting becomes too soft while piping, put it back in the fridge for a few minutes to firm up. Finally, get creative with the decorations; you can add more red food coloring to the jam for a bloodier effect or even use edible glitter for a supernatural touch.
Skeleton Surprise Cake
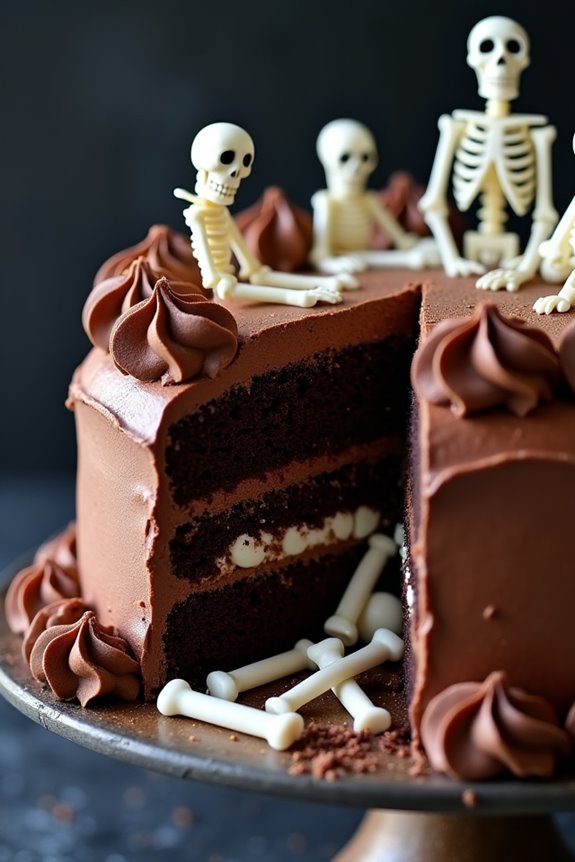
Creating a spooky and delightful Skeleton Surprise Cake is a perfect way to celebrate Halloween with your family and friends. This cake isn’t only visually striking, but it also offers a delightful surprise inside, making it a fun treat for children and adults alike. With layers of moist chocolate cake and a hidden skeleton candy centerpiece, this dessert will surely be the highlight of your Halloween party.
The Skeleton Surprise Cake combines the rich flavors of chocolate with the playful essence of Halloween, making it an irresistible treat for everyone. To craft this eerie yet delicious creation, you’ll begin by baking a chocolate cake that serves as the base for your skeleton surprise. The key to this cake is the hollow center that you’ll fill with candy bones, which will spill out when the cake is cut open, much to the delight of your guests.
The cake is then frosted with a luscious chocolate buttercream and decorated with edible skeletons or other spooky decorations to enhance the Halloween theme. Whether you’re hosting a party or simply want to surprise your loved ones with a creative dessert, this Skeleton Surprise Cake is bound to impress.
Ingredients (serves 4-6 people):
- 1 ¾ cups all-purpose flour
- ¾ cup unsweetened cocoa powder
- 1 ½ teaspoons baking powder
- 1 ½ teaspoons baking soda
- 1 teaspoon salt
- 2 cups granulated sugar
- 2 large eggs
- 1 cup whole milk
- ½ cup vegetable oil
- 2 teaspoons vanilla extract
- 1 cup boiling water
- 1 cup mini skeleton candies or candy bones
- 1 ½ cups unsalted butter, softened (for frosting)
- 4 cups powdered sugar (for frosting)
- ½ cup unsweetened cocoa powder (for frosting)
- 1 teaspoon vanilla extract (for frosting)
- 4 tablespoons milk (for frosting)
- Edible skeleton decorations
Instructions:
- Preheat and Prepare Pans: Preheat your oven to 350°F (175°C). Grease and flour two 9-inch round cake pans, then set them aside for later use.
- Mix Dry Ingredients: In a large mixing bowl, whisk together the flour, cocoa powder, baking powder, baking soda, and salt until well combined.
- Combine Wet Ingredients: In a separate bowl, beat the sugar and eggs together until light and fluffy. Then, add the milk, vegetable oil, and vanilla extract, mixing until smooth.
- Combine Mixtures: Gradually add the dry ingredients to the wet ingredients, mixing on low speed. Once combined, slowly pour in the boiling water, mixing until the batter is smooth and well combined.
- Bake the Cake: Divide the batter evenly between the prepared cake pans. Bake in the preheated oven for 30-35 minutes, or until a toothpick inserted into the center of the cakes comes out clean. Allow the cakes to cool in the pans for 10 minutes, then transfer them to a wire rack to cool completely.
- Prepare the Frosting: In a large bowl, beat the softened butter until creamy. Gradually add in the powdered sugar and cocoa powder, beating until smooth. Mix in the vanilla extract and milk, adjusting the consistency with more milk if necessary.
- Assemble the Cake: Once the cakes are completely cool, use a round cookie cutter or a sharp knife to cut out a circle in the center of one of the cake layers, creating a hollow area for the candy. Place the uncut cake layer on a serving platter and spread a layer of frosting on top.
- Add the Surprise: Place the hollowed cake layer on top of the frosted cake. Fill the hollow center with the mini skeleton candies or candy bones.
- Frost and Decorate: Spread a thin layer of frosting over the entire cake as a crumb coat, then apply a thicker layer over the top and sides. Decorate with edible skeletons or other Halloween-themed decorations as desired.
Extra Tips:
For an even more impressive reveal, consider adding a few additional layers to your cake, creating more space for candy fillings. You can also color the frosting with food coloring to match your Halloween theme or add fun designs using a piping bag.
If you don’t have mini skeleton candies, you can substitute with any small candy that fits the theme. Remember to let your cake cool completely before frosting to promote a smooth application. Enjoy your spooky, delicious creation!
Batty Black Forest Cake
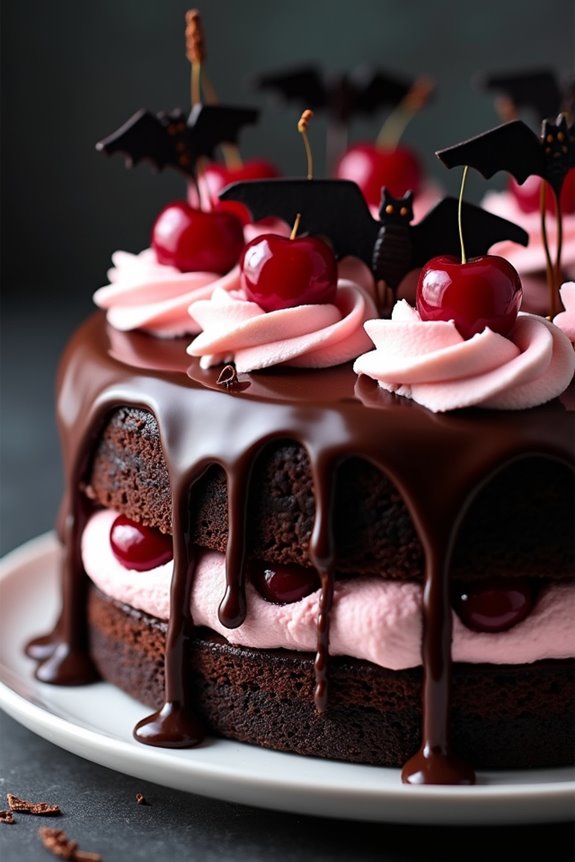
Indulge in the dark and decadent flavors of the Batty Black Forest Cake this Halloween season. This cake is a spooky twist on the classic German Black Forest Cake, bringing together rich layers of chocolate cake, tart cherries, and luscious whipped cream. Enveloped in a dark, chocolate glaze and adorned with bat-shaped decorations, this cake is certain to be the centerpiece of your Halloween dessert table, leaving guests both enchanted and delighted.
The Batty Black Forest Cake isn’t just a treat for the eyes, but a symphony of flavors and textures. Each bite offers a perfect balance of sweetness from the chocolate and cream, combined with the tangy juiciness of cherries. Whether you’re hosting a Halloween party or simply want to enjoy a festive dessert with your family, this cake serves 4-6 people, making it an ideal choice for intimate gatherings.
Ingredients (serves 4-6):
- 1 cup all-purpose flour
- 1 cup granulated sugar
- 1/2 cup unsweetened cocoa powder
- 1 teaspoon baking powder
- 1/2 teaspoon baking soda
- 1/4 teaspoon salt
- 2 large eggs
- 1/2 cup buttermilk
- 1/2 cup vegetable oil
- 1 teaspoon vanilla extract
- 1/2 cup boiling water
- 1 can (14 oz) pitted dark sweet cherries, drained (reserve juice)
- 2 cups heavy whipping cream
- 1/4 cup powdered sugar
- 1/2 teaspoon almond extract
- 1 cup dark chocolate chips
- 1 tablespoon unsalted butter
- Bat-shaped decorations (optional)
Cooking Instructions:
- Prepare the Cake Batter: Preheat your oven to 350°F (175°C). Grease and flour two 9-inch round cake pans. In a large mixing bowl, whisk together the flour, sugar, cocoa powder, baking powder, baking soda, and salt. Add the eggs, buttermilk, oil, and vanilla extract. Beat with an electric mixer on medium speed until well combined. Stir in the boiling water until the batter is smooth.
- Bake the Cake Layers: Divide the batter evenly between the prepared cake pans. Bake in the preheated oven for 25-30 minutes, or until a toothpick inserted into the center of the cakes comes out clean. Remove from the oven and let the cakes cool in the pans for 10 minutes before transferring to a wire rack to cool completely.
- Prepare the Whipped Cream Filling: In a chilled mixing bowl, combine the heavy whipping cream, powdered sugar, and almond extract. Beat on high speed with a mixer until stiff peaks form. Gently fold in the reserved cherry juice to tint the cream light pink.
- Assemble the Cake: Place one cake layer on a serving plate. Spread a layer of whipped cream over the top and evenly distribute half of the drained cherries over the cream. Place the second cake layer on top and repeat the process with the remaining whipped cream and cherries.
- Make the Chocolate Glaze: In a small saucepan over low heat, melt the dark chocolate chips and butter, stirring constantly until smooth. Allow the glaze to cool slightly before pouring over the top of the cake, allowing it to drip down the sides.
- Decorate and Serve: Once the glaze has set, decorate the cake with bat-shaped decorations as desired. Chill the cake in the refrigerator for at least 1 hour before serving to allow the flavors to meld together.
Extra Tips: To guarantee the cake layers are moist and flavorful, don’t skip the step of adding boiling water to the batter; it helps to bloom the cocoa powder. For a more intense cherry flavor, consider soaking the cherries in a little cherry liqueur before using them in the cake. If you don’t have a bat-shaped cookie cutter, use melted chocolate to draw bat shapes on parchment paper, freeze them, and then use those as decorations. Allowing the cake to chill before serving enhances the overall flavor and makes it easier to slice neatly.
Petrifying Pumpkin Patch Cake
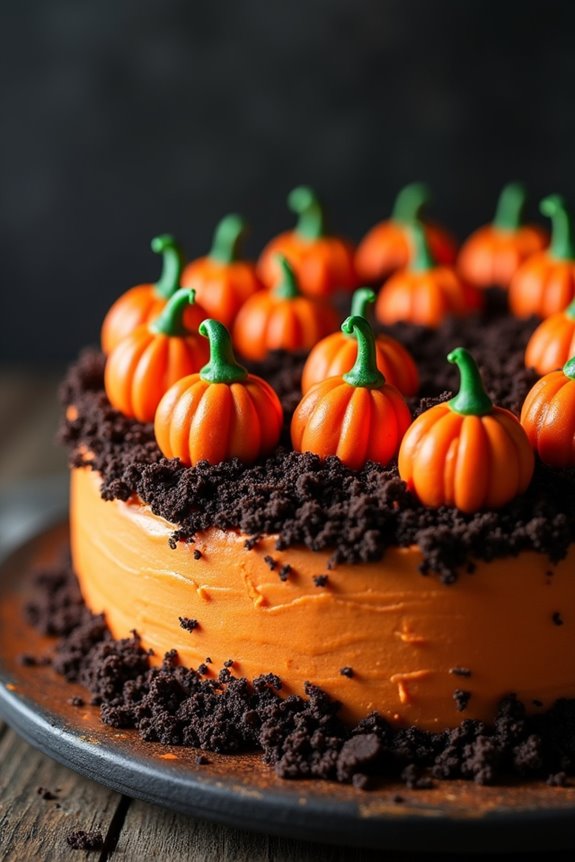
Release the spirit of Halloween with a Petrifying Pumpkin Patch Cake that will both delight and terrify your guests. This spooky dessert combines the rich, comforting flavors of pumpkin spice with a hauntingly festive decoration that resembles a patch of eerie pumpkins. The cake is moist and flavorful, enhanced with warming spices like cinnamon and nutmeg, which perfectly complement the subtle sweetness of pumpkin. Topped with a luscious cream cheese frosting and adorned with mini fondant pumpkins and cookie crumb “dirt,” this cake is sure to be the centerpiece of your Halloween celebration.
Creating this Petrifying Pumpkin Patch Cake is a fun and engaging activity, perfectly suited for a gathering of 4-6 people. Whether you’re hosting a Halloween party or simply want to enjoy a themed dessert, this cake is a delicious and visually striking choice. The process involves baking a spiced pumpkin cake, crafting a creamy frosting, and decorating with whimsical yet spooky elements that capture the essence of a haunted pumpkin patch.
So gather your ingredients, invite your friends or family, and start on this baking adventure that promises to deliver thrills and chills in every bite.
Ingredients (Serves 4-6):
- 1 1/2 cups all-purpose flour
- 1 cup granulated sugar
- 1/2 cup brown sugar
- 1 teaspoon baking powder
- 1/2 teaspoon baking soda
- 1/2 teaspoon salt
- 1 teaspoon ground cinnamon
- 1/2 teaspoon ground nutmeg
- 1/2 cup vegetable oil
- 2 large eggs
- 1 cup pumpkin puree
- 1 teaspoon vanilla extract
- 8 oz cream cheese, softened
- 1/2 cup unsalted butter, softened
- 2 cups powdered sugar
- 1 teaspoon vanilla extract (for frosting)
- Orange and green food coloring
- Fondant for pumpkins
- Chocolate cookies, crushed for “dirt”
Cooking Instructions:
- Prepare the Oven and Pan: Preheat your oven to 350°F (175°C). Grease and flour a 9-inch round cake pan to guarantee easy removal after baking.
- Mix Dry Ingredients: In a large bowl, whisk together the flour, granulated sugar, brown sugar, baking powder, baking soda, salt, cinnamon, and nutmeg until well combined.
- Combine Wet Ingredients: In another bowl, mix the vegetable oil, eggs, pumpkin puree, and vanilla extract until smooth and uniform in texture.
- Create Cake Batter: Gradually add the dry ingredients to the wet mixture, stirring gently until just combined. Be careful not to overmix to keep the cake light and fluffy.
- Bake the Cake: Pour the batter into the prepared cake pan and smooth the top with a spatula. Bake for 30-35 minutes, or until a toothpick inserted into the center comes out clean. Allow the cake to cool completely on a wire rack.
- Prepare the Frosting: In a mixing bowl, beat the softened cream cheese and butter together until creamy. Add the powdered sugar and vanilla extract, and continue to beat until smooth and fluffy.
- Decorate the Cake: Once the cake is cool, spread the cream cheese frosting evenly over the top and sides. Add a few drops of orange food coloring to a portion of the fondant and green to another. Shape small pumpkins from the orange fondant and add tiny green stems.
- Create the Pumpkin Patch: Sprinkle the crushed chocolate cookies over the frosting to simulate “dirt.” Arrange the fondant pumpkins on top, creating a charming yet spooky pumpkin patch scene.
Extra Tips:
For a more pronounced pumpkin flavor, consider adding a teaspoon of pumpkin spice to the cake batter. When shaping the fondant pumpkins, use a small knife to score lines around the sides to mimic the natural ridges of a pumpkin. If you’re short on time, you can use store-bought cream cheese frosting.