

Whenever I pull out my holiday recipe collection, thumbprint cookies immediately come to mind. These delightful treats with their buttery base and vibrant fillings are a must during the festive season. From tangy lemon curd to indulgent chocolate hazelnut, each flavor is a nostalgic nod to Christmas celebrations. I’m thrilled to present 11 scrumptious variations that will spark joy in your holiday baking journey. Let’s get inspired and create some magic in the kitchen!
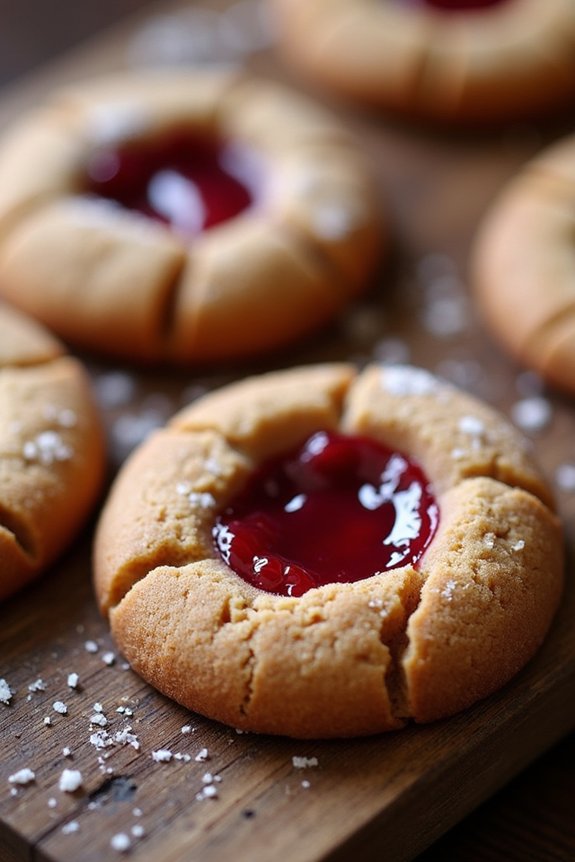
Classic Raspberry Thumbprint Cookies
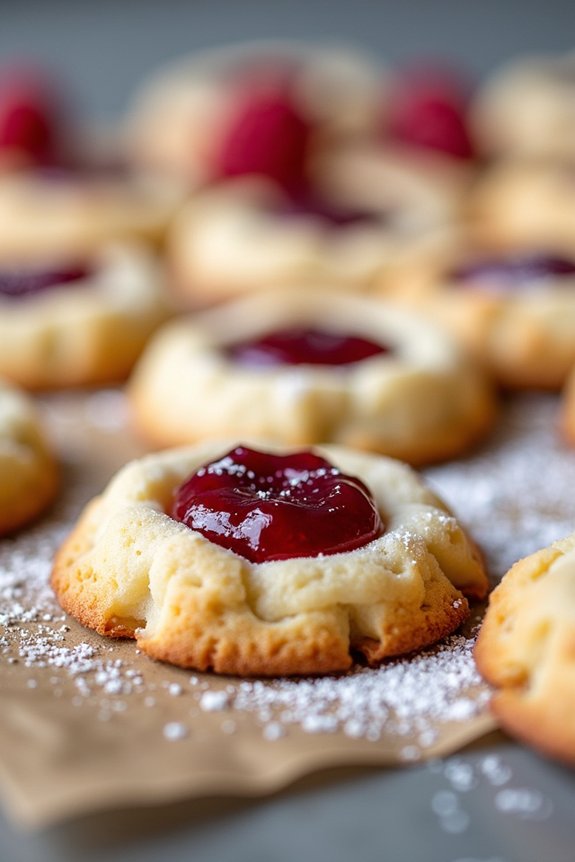
Classic Raspberry Thumbprint Cookies are a delightful holiday treat that brings together the buttery richness of shortbread with the sweet, tangy flavor of raspberry jam.
These cookies, with their rustic appearance and vibrant filling, are a staple in many households during the Christmas season. Their name comes from the technique used to create the small indentation in the center of the cookie, which is typically done using a thumb, and then filled with jam before baking.
Perfect for sharing with friends and family, these cookies aren’t only delicious but also relatively easy to make. The simplicity of the ingredients guarantees that the flavors of the butter and raspberry are the stars of the show.
Whether you’re a seasoned baker or a beginner, this recipe will guide you through creating a batch of these timeless treats that are sure to impress your guests.
Ingredients for Classic Raspberry Thumbprint Cookies (Serves 4-6)
- 1 cup unsalted butter, softened
- 2/3 cup granulated sugar
- 1/2 teaspoon vanilla extract
- 2 cups all-purpose flour
- 1/2 cup raspberry jam
- 1/4 teaspoon salt
- Optional: Powdered sugar for dusting
Cooking Instructions
- Preheat the Oven: Start by preheating your oven to 350°F (175°C). Line a baking sheet with parchment paper or a silicone baking mat to prevent sticking.
- Prepare the Dough: In a large mixing bowl, cream the softened butter and granulated sugar together until light and fluffy. This should take about 2-3 minutes using an electric mixer on medium speed. Add the vanilla extract and mix until combined.
- Incorporate Dry Ingredients: Gradually add the all-purpose flour and salt to the butter mixture. Mix on low speed until the dough begins to come together. It should be soft but not sticky.
- Shape the Cookies: Scoop tablespoon-sized portions of dough and roll them into balls. Place the balls on the prepared baking sheet, spacing them about 2 inches apart.
- Create the Thumbprint: Using your thumb or the back of a small spoon, gently press down in the center of each dough ball to create a small well. Be careful not to press too hard or through the dough.
- Fill with Jam: Fill each indentation with about 1/2 teaspoon of raspberry jam. Be cautious not to overfill, as the jam will spread during baking.
- Bake: Place the baking sheet in the preheated oven and bake for 12-15 minutes, or until the edges are lightly golden. The cookies should still be soft to the touch.
- Cool: Remove the cookies from the oven and let them cool on the baking sheet for 5 minutes before transferring them to a wire rack to cool completely.
Extra Tips
For the best results, verify your butter is at room temperature before you start to mix it with the sugar. This helps in achieving the right texture for the dough.
Also, you can experiment with different types of jam if you wish to vary the flavor; apricot or strawberry jams are wonderful alternatives to raspberry.
If you prefer a touch of elegance, lightly dust the cooled cookies with powdered sugar before serving. Finally, store these cookies in an airtight container to keep them fresh for several days.
Chocolate Hazelnut Thumbprint Cookies

Chocolate Hazelnut Thumbprint Cookies are a delightful treat perfect for the holiday season. These soft and chewy cookies are enhanced by the rich, nutty flavor of hazelnuts and the decadence of chocolate. The thumbprint design not only gives them a unique appearance but also creates the perfect little well for a luscious chocolate-hazelnut spread or your favorite chocolate ganache.
Whether for a festive gathering or a cozy treat at home, these cookies are certain to bring joy and sweetness to your holiday celebration.
The recipe for Chocolate Hazelnut Thumbprint Cookies makes enough for 4-6 people, a perfect serving size for a small gathering or to enjoy with family. The combination of chocolate and hazelnut is a classic one that never fails to please. The cookies are simple to prepare, making them a great choice for both novice and experienced bakers. With a buttery dough and a gooey chocolate center, these cookies are certain to become a holiday favorite.
Ingredients:
- 1 cup all-purpose flour
- 1/2 cup unsweetened cocoa powder
- 1/4 teaspoon salt
- 1/2 cup unsalted butter, softened
- 1/2 cup granulated sugar
- 1 large egg yolk
- 1 teaspoon vanilla extract
- 1/2 cup finely chopped hazelnuts
- 1/2 cup chocolate hazelnut spread (such as Nutella)
Instructions:
- Preheat the Oven: Preheat your oven to 350°F (175°C). Line a baking sheet with parchment paper or a silicone baking mat.
- Mix Dry Ingredients: In a medium bowl, whisk together the flour, cocoa powder, and salt. This guarantees that the dry ingredients are well combined and will evenly distribute throughout the dough.
- Cream Butter and Sugar: In a large bowl, beat the softened butter and granulated sugar together using an electric mixer on medium speed until light and fluffy, about 2-3 minutes.
- Add Egg Yolk and Vanilla: Add the egg yolk and vanilla extract to the butter and sugar mixture, beating until well combined.
- Combine the Mixtures: Gradually add the dry ingredients to the wet ingredients, mixing on low speed until the dough comes together. Be careful not to overmix, as this can make the cookies tough.
- Form the Cookies: Roll the dough into 1-inch balls, then roll each ball in the chopped hazelnuts to coat. Place the balls on the prepared baking sheet about 2 inches apart.
- Create Thumbprints: Use your thumb or the back of a teaspoon to gently press a small indentation into the center of each cookie ball.
- Bake: Bake the cookies in the preheated oven for 10-12 minutes, or until the edges are set.
- Fill with Chocolate Hazelnut Spread: Remove the cookies from the oven and immediately fill each indentation with about 1/2 teaspoon of chocolate hazelnut spread. Allow the cookies to cool on the baking sheet for 5 minutes before transferring them to a wire rack to cool completely.
Extra Tips:
For the best results, verify that your butter is softened to room temperature before you begin. This will help create a smooth and creamy dough.
If you don’t have hazelnuts, you can substitute with almonds or pecans for a different flavor profile. Be sure to press gently when making the thumbprints, as pressing too hard can cause the cookies to crack.
If you prefer a more pronounced chocolate flavor, you can also drizzle some melted dark chocolate over the cookies once they’ve cooled for an extra touch of elegance. Enjoy these cookies with a glass of milk or a hot cup of cocoa for the ultimate holiday indulgence.
Lemon Curd Thumbprint Cookies

Lemon Curd Thumbprint Cookies are a delightful twist on the classic thumbprint cookie, filled with a zesty and invigorating lemon curd that pairs beautifully with the buttery and crumbly cookie base. These cookies are perfect for any holiday gathering or simply as a sweet treat to enjoy with a cup of tea. The combination of lemon and butter creates a bright and flavorful cookie that’s sure to be a hit with family and friends.
These cookies aren’t only delicious but also visually appealing with their sunny yellow centers. They’re relatively simple to make and require only a few ingredients that you might already have in your pantry. The key to perfecting these cookies is in the balance of the sweet and tart flavors, as well as achieving the right texture of the cookie dough to hold the curd without it spilling over.
Follow the instructions below to make a batch of Lemon Curd Thumbprint Cookies that will be loved by all.
Ingredients (serves 4-6 people):
- 1 cup unsalted butter, softened
- 2/3 cup granulated sugar
- 1 teaspoon vanilla extract
- 2 cups all-purpose flour
- 1/4 teaspoon salt
- 1/2 cup lemon curd
- Powdered sugar, for dusting (optional)
Cooking Instructions:
- Preheat and Prepare: Preheat your oven to 350°F (175°C). Line two baking sheets with parchment paper to guarantee the cookies don’t stick.
- Cream Butter and Sugar: In a large mixing bowl, cream together the softened butter and granulated sugar using an electric mixer on medium speed until the mixture is light and fluffy, about 3 minutes.
- Add Vanilla: Add the vanilla extract to the butter and sugar mixture and beat until it’s fully incorporated.
- Combine Dry Ingredients: In a separate bowl, whisk together the all-purpose flour and salt. Gradually add this dry mixture to the wet ingredients, mixing on low speed until a dough forms. The dough should be smooth and not sticky.
- Shape Cookies: Roll the dough into 1-inch balls and place them on the prepared baking sheets, spacing them about 2 inches apart. Use your thumb or the back of a small spoon to gently press an indentation into the center of each ball.
- Fill with Lemon Curd: Carefully spoon about 1/2 teaspoon of lemon curd into each indentation. Be careful not to overfill, as the curd can spill over during baking.
- Bake: Place the baking sheets in the preheated oven and bake the cookies for 12-15 minutes, or until the edges are lightly golden. Rotate the sheets halfway through baking to guarantee even cooking.
- Cool and Dust: Once baked, remove the cookies from the oven and allow them to cool on the baking sheets for 5 minutes before transferring them to a wire rack to cool completely. If desired, dust the cooled cookies with powdered sugar before serving.
Extra Tips:
For the best results, use high-quality lemon curd, whether store-bought or homemade, as it will greatly influence the flavor of the cookies. If the dough seems too crumbly, add a teaspoon of milk to help it come together.
When making the indentations, try to make them deep enough to hold a decent amount of curd, but not so deep that the cookie falls apart. These cookies can be stored in an airtight container for up to a week, making them a convenient make-ahead option for holiday gatherings.
Almond Joy Thumbprint Cookies

Almond Joy Thumbprint Cookies are a delightful twist on the classic thumbprint cookie, combining the beloved flavors of coconut, almond, and chocolate into a festive treat perfect for the holiday season.
These cookies offer a soft and chewy base with a rich chocolate center and are topped with a sprinkle of shredded coconut and a whole almond. They’re a crowd-pleaser at Christmas gatherings, providing a burst of flavor in every bite.
The recipe yields approximately 24 cookies, making it perfect for serving 4-6 people. These Almond Joy Thumbprint Cookies aren’t only delicious but also visually appealing, making them a great addition to any holiday cookie platter.
Whether you’re baking for a party or just for yourself, these cookies are sure to bring a touch of joy to your festivities.
Ingredients:
- 1 cup unsalted butter, softened
- 2/3 cup granulated sugar
- 1 teaspoon vanilla extract
- 2 cups all-purpose flour
- 1/4 teaspoon salt
- 1 cup sweetened shredded coconut
- 1/2 cup chocolate chips
- 1 tablespoon heavy cream
- 24 whole almonds
Instructions:
1. Preheat the Oven: Begin by preheating your oven to 350°F (175°C). Line two baking sheets with parchment paper to prevent the cookies from sticking.
2. Prepare the Dough: In a large mixing bowl, cream together the softened butter and granulated sugar until light and fluffy. Add the vanilla extract and mix until well combined. Gradually add the all-purpose flour and salt, mixing until the dough comes together.
Gently fold in 1/2 cup of the shredded coconut.
3. Shape the Cookies: Roll tablespoon-sized amounts of dough into balls. Place each ball onto the prepared baking sheets, leaving about an inch of space between each. Use your thumb or the back of a small spoon to press a small indentation into the center of each cookie.
4. Bake the Cookies: Place the baking sheets in the preheated oven and bake for 12-15 minutes, or until the edges of the cookies are lightly golden. Remove from the oven and allow the cookies to cool on the baking sheets for 5 minutes before transferring to a wire rack to cool completely.
5. Prepare the Chocolate Filling: While the cookies cool, melt the chocolate chips and heavy cream together in a small saucepan over low heat, stirring constantly until smooth. Alternatively, melt them in the microwave in 15-second intervals, stirring in between.
6. Assemble the Cookies: Once the cookies are cool, fill each thumbprint indentation with a small spoonful of the melted chocolate mixture. Sprinkle the remaining shredded coconut over the chocolate and gently press a whole almond into the center of each cookie.
7. Set the Cookies: Allow the cookies to sit at room temperature until the chocolate has set, about 30 minutes. For faster setting, place the cookies in the refrigerator for about 10 minutes.
Extra Tips:
For the best results, verify that your butter is at room temperature before you start mixing, as this helps to create a smooth, creamy dough. If the dough feels too sticky to handle, you can chill it in the refrigerator for about 20 minutes before shaping the cookies.
Additionally, to achieve perfectly shaped cookies, try using a small melon baller or the back of a teaspoon to create the thumbprint indentations. Finally, if you prefer a nut-free version, simply omit the almonds or replace them with a dried fruit of your choice.
Spiced Apple Butter Thumbprint Cookies
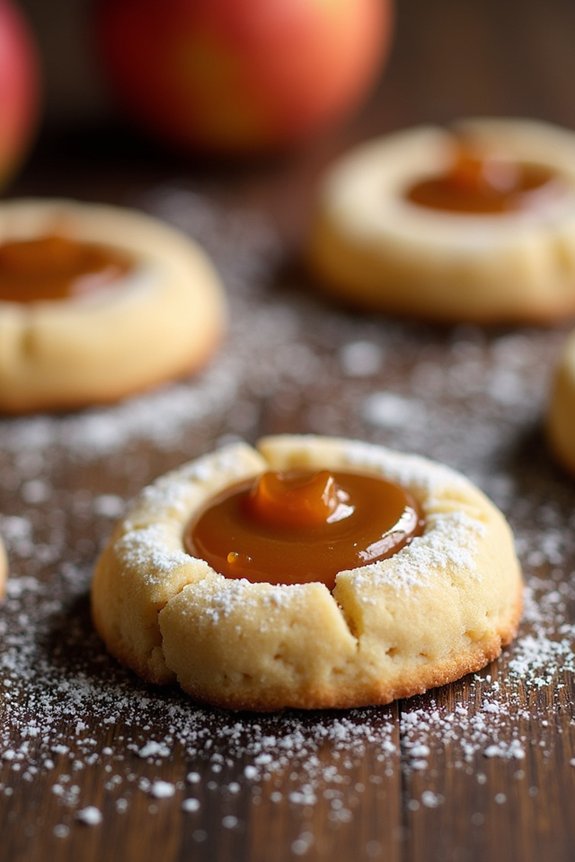
Spiced Apple Butter Thumbprint Cookies are a delightful twist on the classic thumbprint cookie, perfect for the holiday season. These cookies combine the warm, comforting flavors of spiced apple butter with a buttery shortbread base, creating a treat that’s both festive and delicious. The soft, spiced apple butter filling provides a burst of flavor in every bite, while the cookie itself is tender and crumbly, making it an irresistible addition to your Christmas cookie platter.
These cookies are an excellent choice for gatherings or simply enjoying with a cup of hot cocoa by the fire. The recipe yields about 18-24 cookies, making it ideal for serving 4-6 people. Whether you’re a seasoned baker or a newcomer to cookie-making, these Spiced Apple Butter Thumbprint Cookies are certain to impress your family and friends with their unique flavor and festive appearance.
Ingredients for 4-6 servings:
- 1 cup (2 sticks) unsalted butter, softened
- 1/2 cup granulated sugar
- 1 teaspoon pure vanilla extract
- 2 cups all-purpose flour
- 1/4 teaspoon salt
- 1/2 teaspoon ground cinnamon
- 1/4 teaspoon ground nutmeg
- 3/4 cup spiced apple butter
- Optional: powdered sugar for dusting
Cooking Instructions:
- Preheat the Oven: Begin by preheating your oven to 350°F (175°C). Line two baking sheets with parchment paper to prevent the cookies from sticking.
- Cream the Butter and Sugar: In a large mixing bowl, use an electric mixer to cream together the softened butter and granulated sugar until the mixture is light and fluffy, about 3-5 minutes. Add in the vanilla extract and mix until combined.
- Combine Dry Ingredients: In a separate bowl, whisk together the all-purpose flour, salt, ground cinnamon, and ground nutmeg.
- Form the Dough: Gradually add the dry ingredients to the butter mixture, mixing on low speed until a dough forms. The dough should be soft but not sticky.
- Shape the Cookies: Roll the dough into 1-inch balls and place them on the prepared baking sheets, spacing them about 2 inches apart. Use your thumb or the back of a small spoon to make an indentation in the center of each cookie.
- Fill with Apple Butter: Spoon about 1/2 teaspoon of spiced apple butter into the indentation of each cookie.
- Bake the Cookies: Bake the cookies in the preheated oven for 12-15 minutes, or until the edges are lightly golden. Be careful not to overbake, as the cookies should remain tender.
- Cool and Dust: Remove the cookies from the oven and allow them to cool on the baking sheets for 5 minutes before transferring them to a wire rack to cool completely. If desired, dust the cookies with powdered sugar before serving.
Extra Tips:
When making these Spiced Apple Butter Thumbprint Cookies, make sure the butter is at room temperature before you start mixing; this guarantees a smooth and creamy dough. If your dough feels too dry, you can add a teaspoon of milk to help it come together.
For an extra festive touch, consider adding a pinch of ground cloves or allspice to the dough. These cookies can be stored in an airtight container at room temperature for up to a week, although they’re unlikely to last that long once your family and friends get a taste!
Peppermint Chocolate Thumbprint Cookies

Peppermint Chocolate Thumbprint Cookies are a festive treat perfect for the holiday season. These delightful cookies combine the rich flavors of chocolate with the invigorating taste of peppermint, creating a perfect balance that’s sure to please any crowd. The chewy chocolate base is complemented by a smooth peppermint filling nestled in the center, making them visually appealing as well as delicious.
Whether you’re baking for a holiday party, a cookie exchange, or just to enjoy with a cup of hot cocoa, these cookies are sure to be a hit.
Not only are Peppermint Chocolate Thumbprint Cookies delightful to eat, but they’re also fun and easy to make. With just a few simple ingredients and steps, you can create a batch of these festive cookies that will fill your kitchen with the warm and inviting smells of chocolate and peppermint. This recipe yields approximately 24 cookies, making it perfect for serving 4-6 people, depending on how many cookies each person enjoys.
Ingredients:
- 1 cup all-purpose flour
- 1/3 cup unsweetened cocoa powder
- 1/4 teaspoon salt
- 1/2 cup unsalted butter, softened
- 2/3 cup granulated sugar
- 1 large egg yolk
- 1 teaspoon vanilla extract
- 1/2 teaspoon peppermint extract
- 1/2 cup semi-sweet chocolate chips
- 1/4 cup heavy cream
- Crushed peppermint candies or candy canes (for garnish)
Instructions:
- Preheat the Oven: Start by preheating your oven to 350°F (175°C). Line a baking sheet with parchment paper to prevent the cookies from sticking.
- Mix Dry Ingredients: In a medium bowl, whisk together the flour, cocoa powder, and salt. This guarantees that the cocoa is evenly distributed throughout the flour, which will help achieve a uniform chocolate flavor in the cookies.
- Cream Butter and Sugar: In a large mixing bowl, beat the softened butter and sugar together using an electric mixer until light and fluffy, about 2-3 minutes. Add the egg yolk, vanilla extract, and peppermint extract, and mix until well combined.
- Combine Mixtures: Gradually add the dry ingredients to the wet mixture, mixing on low speed until just combined. Be careful not to overmix, as this can result in tough cookies.
- Shape Cookies: Scoop tablespoon-sized amounts of dough and roll them into balls. Place the balls on the prepared baking sheet, spacing them about 2 inches apart. Use your thumb or the back of a small spoon to create an indentation in the center of each cookie ball.
- Bake: Bake the cookies in the preheated oven for 10-12 minutes, or until the edges are set and the tops appear dry. Remove from the oven and allow them to cool slightly on the baking sheet before transferring to a wire rack.
- Prepare Peppermint Chocolate Filling: In a small saucepan, heat the heavy cream over medium heat until it just begins to simmer. Remove from heat and pour over the chocolate chips in a heatproof bowl. Let it sit for a minute, then stir until smooth and incorporated.
- Fill and Garnish: Once the cookies are completely cooled, spoon the peppermint chocolate filling into the thumbprint indentations. Garnish each cookie with a sprinkle of crushed peppermint candies for an extra festive touch.
Extra Tips:
To guarantee your Peppermint Chocolate Thumbprint Cookies turn out perfect every time, make sure your butter is softened to room temperature to achieve the right consistency in the dough.
If the dough feels too sticky to handle, refrigerate it for 15-20 minutes before shaping the cookies. For a deeper chocolate flavor, you can use dark chocolate chips instead of semi-sweet.
Additionally, if you prefer a more pronounced peppermint flavor, you can adjust the amount of peppermint extract to your liking, but be cautious as a little goes a long way.
Salted Caramel Thumbprint Cookies
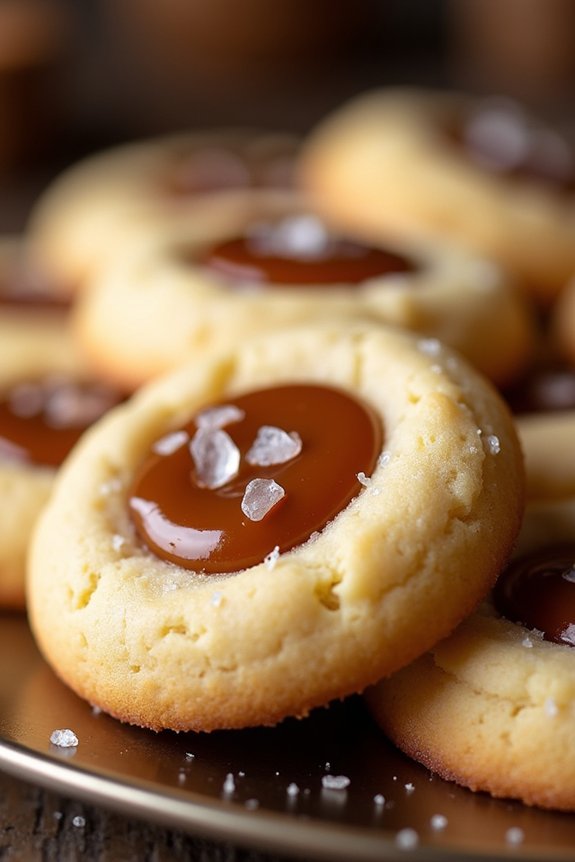
Salted Caramel Thumbprint Cookies are a delightful twist on the traditional thumbprint cookie, offering a perfect balance of sweet and salty flavors. These cookies are an excellent addition to any holiday spread, with their buttery base and rich caramel filling that’s accented with a sprinkle of sea salt.
The combination of textures and flavors makes these cookies irresistible and certain to be a hit at any Christmas gathering. Whether you’re a seasoned baker or a novice in the kitchen, this recipe is simple to follow and will yield delicious results.
The process begins with making a classic shortbread dough, which is then shaped into small rounds and indented to hold the luscious caramel filling. The caramel sauce is made separately and then added to the cookies after they’ve baked and cooled slightly. The final touch of sea salt adds a sophisticated finish, enhancing the sweetness of the caramel and adding a layer of complexity to each bite.
This recipe yields about 24 cookies, making it perfect for serving 4-6 people, or for sharing at a holiday party.
Ingredients:
- 1 cup unsalted butter, softened
- 2/3 cup granulated sugar
- 2 large egg yolks
- 1 teaspoon vanilla extract
- 2 cups all-purpose flour
- 1/2 teaspoon salt
- 1 cup caramel sauce (store-bought or homemade)
- Sea salt flakes for garnish
Instructions:
- Prepare the Dough: In a large mixing bowl, cream together the softened butter and granulated sugar using an electric mixer until light and fluffy, about 3 minutes. Add the egg yolks and vanilla extract, and continue to beat until well combined.
- Mix Dry Ingredients: In a separate bowl, whisk together the all-purpose flour and salt. Gradually add the dry ingredients to the wet mixture, mixing on low speed until just combined. Be careful not to overmix the dough.
- Shape the Cookies: Preheat your oven to 350°F (175°C). Line two baking sheets with parchment paper. Roll the dough into 1-inch balls, and place them 2 inches apart on the prepared baking sheets. Using your thumb or the back of a spoon, gently press an indentation into the center of each ball.
- Bake the Cookies: Bake the cookies in the preheated oven for 12-15 minutes, or until the edges are lightly golden. Remove from the oven and allow the cookies to cool on the baking sheets for 5 minutes before transferring them to a wire rack to cool completely.
- Fill with Caramel: Once the cookies are cool, fill each indentation with about 1 teaspoon of caramel sauce. You can use a piping bag or a small spoon for this step.
- Finish with Sea Salt: Sprinkle a small pinch of sea salt flakes over the caramel-filled cookies. Allow the caramel to set slightly before serving or storing.
Extra Tips:
For the best results, make certain that your butter is at room temperature before beginning the recipe. This will help achieve the desired creamy texture when creaming the butter and sugar.
If you choose to make your own caramel sauce, make sure it has cooled to a slightly thickened consistency before filling the cookies, as this will prevent it from running out. Additionally, these cookies can be stored in an airtight container for up to a week, making them a convenient make-ahead option for busy holiday schedules.
Cranberry Orange Thumbprint Cookies
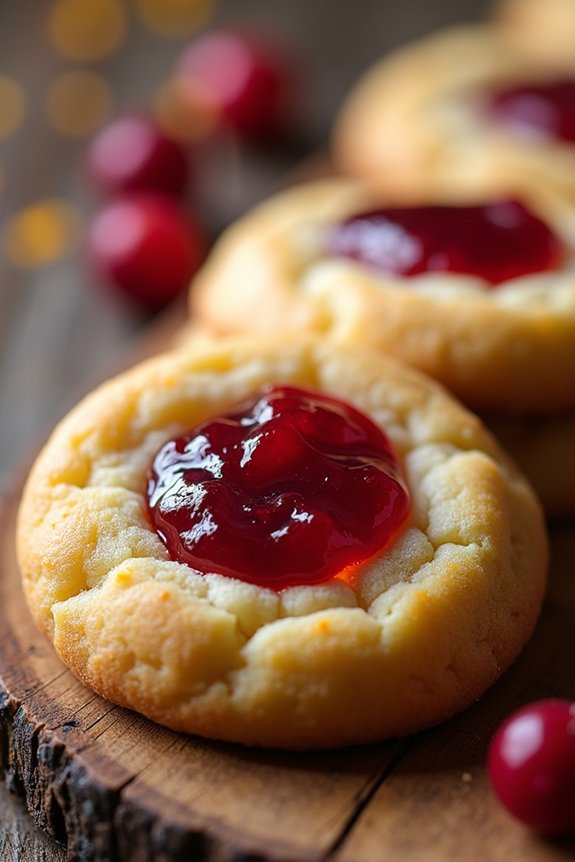
Cranberry Orange Thumbprint Cookies are an elegant and festive treat perfect for your holiday gatherings. These delightful cookies combine the tartness of cranberries with the invigorating zest of oranges to create a deliciously balanced flavor. The thumbprint in each cookie is filled with a luscious cranberry-orange jam, adding a burst of fruitiness in every bite.
These cookies aren’t only delicious but also visually appealing, making them a great addition to any Christmas dessert spread. Ideal for serving 4-6 people, these cookies provide a sweet ending to your holiday meals or a delightful treat for your guests. They’re easy to prepare and can be made in advance, allowing you more time to enjoy the festivities.
In this recipe, you’ll learn how to make the dough from scratch, create the cranberry-orange filling, and assemble the cookies for baking. Whether you’re a seasoned baker or a beginner, these cookies are sure to impress your family and friends.
Ingredients:
- 1 cup unsalted butter, softened
- 2/3 cup granulated sugar
- 1 large egg
- 1 teaspoon vanilla extract
- 2 cups all-purpose flour
- 1/4 teaspoon salt
- 1/2 cup cranberry sauce (homemade or store-bought)
- 1 tablespoon orange zest
- 1 tablespoon fresh orange juice
- Additional granulated sugar for rolling
Cooking Instructions:
- Preheat the Oven: Begin by preheating your oven to 350°F (175°C). Line two baking sheets with parchment paper and set them aside.
- Prepare Dough: In a large mixing bowl, cream together the softened butter and granulated sugar until light and fluffy. Add the egg and vanilla extract, and mix until well combined.
- Mix Dry Ingredients: In another bowl, whisk together the all-purpose flour and salt. Gradually add the dry ingredients to the wet mixture, stirring until a soft dough forms.
- Make the Filling: In a small bowl, mix the cranberry sauce with the orange zest and orange juice until well combined.
- Shape Cookies: Roll tablespoon-sized balls of dough and then roll each ball in additional granulated sugar to coat. Place them on the prepared baking sheets, spacing them about 2 inches apart.
- Create Thumbprints: Using your thumb or the back of a spoon, press a small indentation into the center of each cookie. Be gentle to avoid cracking the dough.
- Fill Cookies: Spoon approximately 1/2 teaspoon of the cranberry-orange filling into each indentation.
- Bake Cookies: Bake the cookies in the preheated oven for 12-15 minutes, or until the edges are lightly golden. Allow the cookies to cool on the baking sheets for 5 minutes before transferring them to wire racks to cool completely.
Extra Tips:
For the best results, make sure that the butter is softened to room temperature before beginning the recipe. This will help you achieve a smooth and creamy dough.
If the dough becomes too sticky to handle, refrigerate it for 15-20 minutes to firm up. For a more intense orange flavor, you can add a few drops of orange extract to the dough.
These cookies can be stored in an airtight container for up to a week, making them a convenient make-ahead option for holiday entertaining. Enjoy your Cranberry Orange Thumbprint Cookies with a warm cup of tea or coffee for a comforting holiday treat.
Pistachio White Chocolate Thumbprint Cookies
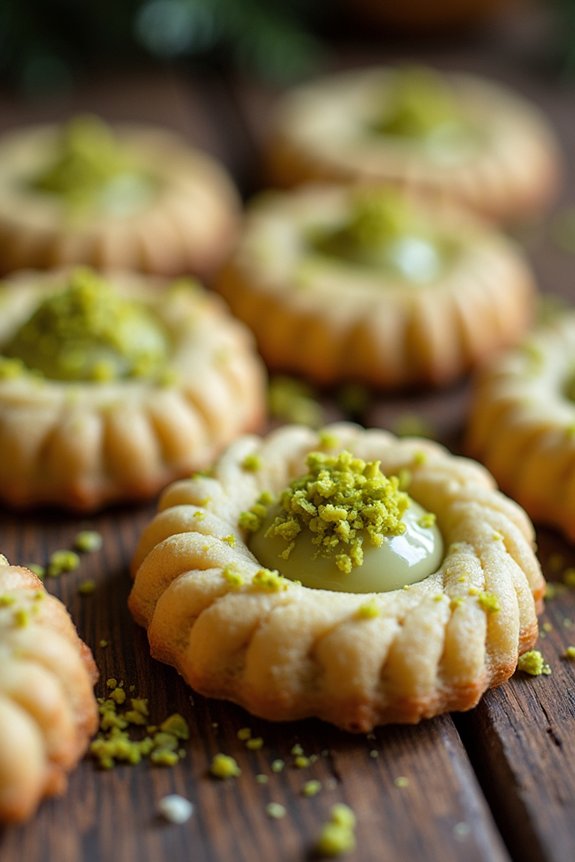
If you’re looking to add a touch of elegance and a burst of flavor to your holiday cookie tray, Pistachio White Chocolate Thumbprint Cookies are an excellent choice. These cookies combine the rich, buttery taste of traditional thumbprints with the nutty crunch of pistachios and the creamy sweetness of white chocolate. The vibrant green pistachios add a festive pop of color that makes these cookies as delightful to look at as they’re to eat.
Whether you’re serving them at a holiday gathering or giving them as a gift, they’re sure to impress.
Preparing these cookies is a delightful process that fills your kitchen with the warm, comforting scent of freshly baked goods. With a delicate shortbread base and a luscious white chocolate center, these cookies are perfect for serving 4-6 people. The recipe is simple enough to make with your family or friends, transforming an ordinary baking session into a fun holiday experience.
Gather your ingredients and get ready to whip up a batch of these delectable treats that will surely become a favorite holiday tradition.
Ingredients for 4-6 servings:
- 1 cup unsalted butter, softened
- 1/2 cup granulated sugar
- 1 teaspoon vanilla extract
- 2 cups all-purpose flour
- 1/2 cup finely chopped pistachios
- 1/4 teaspoon salt
- 1/2 cup white chocolate chips
- 2 tablespoons heavy cream
- Additional chopped pistachios for garnish
Cooking Instructions:
- Prepare the Dough: In a large mixing bowl, cream together the softened butter and granulated sugar until light and fluffy. Add the vanilla extract and mix until incorporated. Gradually add the all-purpose flour and salt, mixing until a soft dough forms. Stir in the finely chopped pistachios until evenly distributed throughout the dough.
- Shape the Cookies: Preheat your oven to 350°F (175°C). Line a baking sheet with parchment paper. Roll the dough into 1-inch balls and place them on the prepared baking sheet about 2 inches apart. Use your thumb or the back of a teaspoon to gently press an indentation into the center of each ball.
- Bake the Cookies: Bake the cookies in the preheated oven for 10-12 minutes, or until the edges are lightly golden. Remove from the oven and allow them to cool on the baking sheet for a few minutes before transferring to a wire rack to cool completely.
- Prepare the White Chocolate Filling: In a small microwave-safe bowl, combine the white chocolate chips and heavy cream. Microwave in 20-second intervals, stirring in between, until the white chocolate is completely melted and smooth.
- Fill and Garnish the Cookies: Once the cookies are completely cooled, spoon the melted white chocolate into the indentation of each cookie. Sprinkle additional chopped pistachios over the white chocolate before it sets. Allow the cookies to rest until the white chocolate is firm.
Extra Tips:
For an extra burst of flavor, consider toasting the pistachios before adding them to the dough. Simply spread the pistachios on a baking sheet and roast them in the oven at 350°F (175°C) for about 5-7 minutes, or until fragrant.
Be careful not to overbake the cookies, as they should remain soft and tender. If you prefer, you can also experiment with different types of chocolate for the filling, such as dark or milk chocolate, to suit your taste preferences.
Store the cookies in an airtight container to keep them fresh and maintain their delightful texture.
Gingerbread Thumbprint Cookies
Gingerbread Thumbprint Cookies are a delightful twist on the classic holiday treat. These cookies combine the rich, spiced flavors of traditional gingerbread with a sweet surprise in the center. Perfect for holiday gatherings or as a festive gift, these cookies are sure to impress with their unique flavor and charming appearance.
The dough is infused with molasses and warm spices like cinnamon and ginger, and then shaped into thumbprint cookies that hold a dollop of your favorite jam or icing in the center.
These cookies aren’t only delicious but also fun to make with family or friends. The process of rolling the dough, creating the thumbprint, and filling it with a sweet center is an enjoyable activity that can become a cherished holiday tradition. The recipe below yields about 24 cookies, making it perfect for serving 4-6 people during your holiday festivities.
Ingredients:
- 2 1/4 cups all-purpose flour
- 1/2 teaspoon baking soda
- 1/4 teaspoon salt
- 1 teaspoon ground ginger
- 1 teaspoon ground cinnamon
- 1/4 teaspoon ground cloves
- 1/4 teaspoon ground nutmeg
- 3/4 cup unsalted butter, softened
- 1/2 cup dark brown sugar
- 1 egg
- 1/4 cup molasses
- 1 teaspoon vanilla extract
- 1/2 cup granulated sugar (for rolling)
- 1/2 cup jam or icing of choice (for filling)
Instructions:
- Prepare the Dry Ingredients: In a medium bowl, whisk together the all-purpose flour, baking soda, salt, ground ginger, ground cinnamon, ground cloves, and ground nutmeg. Set aside.
- Mix the Wet Ingredients: In a large mixing bowl, cream together the softened butter and dark brown sugar until light and fluffy. Add the egg, molasses, and vanilla extract, beating until well combined.
- Combine Wet and Dry Ingredients: Gradually add the dry ingredients to the wet ingredients, mixing until just combined and a dough forms. Be careful not to overmix.
- Chill the Dough: Cover the dough with plastic wrap and refrigerate for at least 1 hour. This helps the dough firm up, making it easier to shape and bake without spreading too much.
- Preheat the Oven: Preheat your oven to 350°F (175°C) and line two baking sheets with parchment paper.
- Shape the Cookies: Roll the chilled dough into 1-inch balls. Roll each ball in granulated sugar to coat, then place on the prepared baking sheets about 2 inches apart.
- Create the Thumbprint: Use your thumb or the back of a teaspoon to make an indentation in the center of each cookie ball.
- Bake the Cookies: Bake in the preheated oven for 10-12 minutes, or until the edges are set and the cookies are lightly golden.
- Fill the Indentations: Remove the cookies from the oven and immediately fill each indentation with about 1 teaspoon of jam or icing. Allow the cookies to cool on the baking sheets for 5 minutes before transferring to a wire rack to cool completely.
Extra Tips:
For the best results, verify your butter is properly softened before starting the recipe. This will help achieve the perfect creamy consistency when creaming with sugar.
When creating the thumbprint, try to make a deep enough indentation to hold a good amount of filling, but be careful not to press all the way through the dough.
If you prefer a more festive look, consider dusting the cookies with powdered sugar once they’re filled and cooled.
Finally, feel free to experiment with different fillings like raspberry jam, lemon curd, or chocolate ganache to suit your taste preferences.
Maple Pecan Thumbprint Cookies

Maple Pecan Thumbprint Cookies are a delightful twist on the traditional thumbprint cookie, incorporating the rich flavors of maple syrup and crunchy pecans. These cookies are perfect for the holiday season, offering a sweet and nutty treat that complements any festive spread.
The unique addition of maple syrup provides a subtle sweetness and depth of flavor, while the pecan halves add a satisfying crunch, making these cookies irresistible to both kids and adults alike. Perfect for serving at Christmas gatherings or for gifting to loved ones, these cookies are easy to prepare and even easier to enjoy.
With a buttery shortbread base and a gooey maple pecan filling, they strike a perfect balance of textures and flavors. Whether you’re an experienced baker or a novice in the kitchen, you’ll find these Maple Pecan Thumbprint Cookies simple to make and even simpler to devour.
Ingredients (serves 4-6 people):
- 1 cup unsalted butter, softened
- 1/2 cup granulated sugar
- 1 teaspoon vanilla extract
- 2 cups all-purpose flour
- 1/4 teaspoon salt
- 1/2 cup finely chopped pecans
- 1/2 cup pure maple syrup
- 1/4 cup packed light brown sugar
- 1 tablespoon heavy cream
- 1 tablespoon unsalted butter
- 1/2 teaspoon vanilla extract
- 24 pecan halves (for topping)
Instructions:
- Prepare the Cookie Dough: In a large mixing bowl, cream together the softened butter and granulated sugar until light and fluffy. Add in the vanilla extract and mix until combined. Gradually add the flour and salt, mixing until a soft dough forms. Stir in the finely chopped pecans.
- Shape the Cookies: Preheat your oven to 350°F (175°C). Line a baking sheet with parchment paper. Roll the dough into 1-inch balls and place them on the prepared baking sheet about 2 inches apart. Using your thumb or the back of a small spoon, gently press down in the center of each ball to create a small indentation.
- Make the Filling: In a small saucepan over medium heat, combine the maple syrup, brown sugar, heavy cream, and 1 tablespoon of butter. Bring the mixture to a gentle boil, stirring constantly, until the sugar has dissolved and the mixture thickens slightly, about 2-3 minutes. Remove from heat and stir in the vanilla extract.
- Fill and Bake: Carefully spoon about a teaspoon of the maple pecan filling into each cookie indentation. Place a pecan half on top of the filling in each cookie. Bake in the preheated oven for 12-15 minutes, or until the edges are lightly golden.
- Cool and Serve: Remove the cookies from the oven and allow them to cool on the baking sheet for 5 minutes before transferring them to a wire rack to cool completely. Serve once cooled and enjoy!
Extra Tips: To guarantee your cookies maintain their shape and the filling doesn’t overflow, avoid overfilling the indentations. If the dough is too soft to handle, refrigerate it for about 30 minutes before shaping the cookies.
Additionally, for a more pronounced pecan flavor, consider lightly toasting the chopped pecans before incorporating them into the dough. These cookies can be stored in an airtight container for up to a week, making them an excellent make-ahead option for holiday festivities.