

Gathering my favorite Christmas dessert recipes always fills me with nostalgia for the timeless treats that make the holidays so special. There’s something truly magical about the rich flavors of a classic fruitcake or the comforting aroma of gingerbread cookies baking in the oven. Each dessert carries a story and a cherished tradition that warms the heart. I’ll be sharing some of these classic sweets, along with their history and flavors. Let’s create memories that last well beyond the holiday season.
Fruitcake
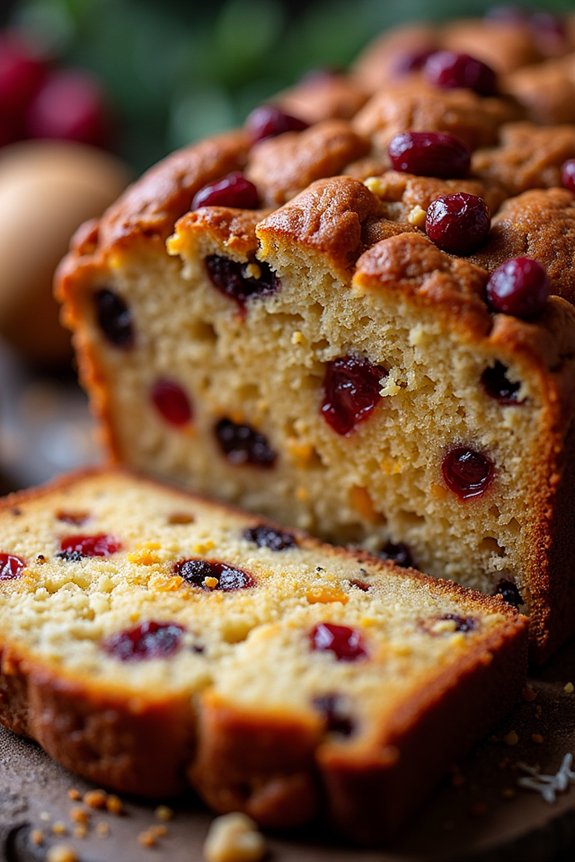
Fruitcake is a classic holiday dessert that has been cherished for centuries. Known for its rich flavors, dense texture, and the perfect blend of fruits and nuts, fruitcake is a staple in many households during the Christmas season. This traditional recipe combines a variety of dried fruits, nuts, and warm spices, soaked in brandy or rum, and baked to perfection.
It’s a delightful treat that can be made ahead of time, allowing the flavors to mature and intensify as the festive day approaches. What sets this fruitcake recipe apart is its balance of sweetness and spice, making it a favorite among those who appreciate a dessert that’s not overly sugary.
The combination of ingredients results in a moist, flavorful cake with a satisfying chewiness that’s complemented by the crunch of nuts. Whether enjoyed with a cup of tea, coffee, or a glass of holiday cheer, this fruitcake promises to be a memorable part of your Christmas celebrations.
Ingredients (serving size: 4-6 people):
- 1 cup of dried apricots, chopped
- 1 cup of raisins
- 1 cup of dried cranberries
- 1/2 cup of chopped candied peel
- 1/2 cup of chopped almonds
- 1/2 cup of chopped walnuts
- 1/2 cup of brandy or rum
- 1 cup of unsalted butter, softened
- 1 cup of brown sugar
- 4 large eggs
- 2 cups of all-purpose flour
- 1 teaspoon of baking powder
- 1 teaspoon of ground cinnamon
- 1/2 teaspoon of ground nutmeg
- 1/4 teaspoon of ground cloves
- 1/2 teaspoon of salt
- Grated zest of 1 orange
- Grated zest of 1 lemon
Cooking Instructions:
- Prepare the Fruit Mix: In a large mixing bowl, combine the dried apricots, raisins, cranberries, candied peel, almonds, and walnuts. Pour in the brandy or rum and mix well. Cover the bowl and let the fruits soak overnight at room temperature to absorb the alcohol and soften.
- Preheat the Oven: Preheat your oven to 300°F (150°C). Grease and line a 9-inch round cake pan with parchment paper.
- Cream the Butter and Sugar: In a separate bowl, beat the softened butter and brown sugar together until light and fluffy. This should take about 3-4 minutes using an electric mixer.
- Add Eggs: Gradually add the eggs one at a time, beating well after each addition to fully incorporate them into the butter and sugar mixture.
- Mix Dry Ingredients: In another bowl, sift together the flour, baking powder, cinnamon, nutmeg, cloves, and salt.
- Combine Everything: Gradually add the dry ingredients to the butter and sugar mixture, mixing until just combined. Stir in the grated orange and lemon zest.
- Fold in Fruit Mix: Carefully fold the soaked fruits and nuts into the cake batter, making certain they’re evenly distributed.
- Bake the Cake: Pour the batter into the prepared cake pan and smooth the top with a spatula. Bake in the preheated oven for about 2 to 2.5 hours, or until a skewer inserted into the center comes out clean.
- Cool and Store: Allow the cake to cool in the pan for 15 minutes before transferring it to a wire rack to cool completely. Once cooled, wrap the fruitcake in parchment paper and then in aluminum foil. Store in an airtight container in a cool, dark place.
Extra Tips:
For the best flavor, make the fruitcake at least a few weeks in advance. This will allow the flavors to blend and mature over time. Once a week, you can brush the cake with additional brandy or rum to keep it moist and enhance the taste.
Confirm the cake is well-wrapped and stored properly to prevent it from drying out. When serving, use a sharp knife to cut the dense cake into neat slices. Enjoy your fruitcake with a dollop of whipped cream or a slice of sharp cheddar cheese for a delightful contrast.
Gingerbread Cookies

Gingerbread cookies are a classic holiday treat that have been delighting families for generations. Their warm spices and sweet molasses flavor make them a festive favorite, perfect for cookie exchanges, holiday gatherings, or simply enjoying with a cup of hot cocoa.
The dough is easy to work with, allowing you to create a variety of shapes and designs that capture the spirit of the season. Whether you prefer the traditional gingerbread figures or more intricate patterns, these cookies are sure to bring a touch of nostalgia and joy to your holiday celebrations.
These gingerbread cookies aren’t only delicious but also a fun activity to share with loved ones. Rolling out the dough and decorating the cookies with icing and sprinkles can become a cherished tradition in itself.
This recipe is designed to yield a batch large enough to serve 4-6 people, making it perfect for a small family gathering or to share with a few friends. So, gather your ingredients and get ready to fill your home with the delightful aroma of freshly baked gingerbread cookies.
Ingredients for 4-6 servings:
- 3 cups all-purpose flour
- 3/4 teaspoon baking soda
- 1 tablespoon ground ginger
- 1 tablespoon ground cinnamon
- 1/2 teaspoon ground cloves
- 1/2 teaspoon ground nutmeg
- 1/2 teaspoon salt
- 1/2 cup unsalted butter, softened
- 1/2 cup packed dark-brown sugar
- 1 large egg
- 1/2 cup unsulfured molasses
- 2 teaspoons vanilla extract
- Icing and sprinkles for decoration (optional)
Cooking Instructions:
- Prepare the Dough: In a large mixing bowl, whisk together the flour, baking soda, ginger, cinnamon, cloves, nutmeg, and salt until well combined. Set aside.
- Cream Butter and Sugar: In another bowl, beat the softened butter and brown sugar with an electric mixer on medium speed until the mixture becomes light and fluffy. This should take about 2 minutes.
- Add Wet Ingredients: Add the egg, molasses, and vanilla extract to the butter-sugar mixture. Beat until well incorporated, making sure there are no lumps.
- Combine Ingredients: Gradually add the dry ingredients to the wet mixture, mixing on low speed until a dough forms. Be careful not to overmix.
- Chill the Dough: Divide the dough into two equal portions, flatten into disks, wrap them in plastic wrap, and refrigerate for at least 1 hour. This will make the dough easier to roll out.
- Preheat Oven and Roll Dough: Preheat your oven to 350°F (175°C). On a lightly floured surface, roll out one disk of dough to about 1/4 inch thickness. Use cookie cutters to cut out desired shapes.
- Bake the Cookies: Place the cookies on a baking sheet lined with parchment paper, leaving some space between each one. Bake for 8-10 minutes or until the edges are firm. Let them cool on the sheet for a few minutes before transferring to a wire rack to cool completely.
- Decorate: Once the cookies are completely cool, decorate them with icing and sprinkles if desired.
Extra Tips:
When making gingerbread cookies, it’s important to chill the dough thoroughly as this prevents the cookies from spreading too much while baking. If the dough becomes too sticky to work with, dust it with a little flour, but be cautious not to add too much, as it can alter the texture.
If you want to hang the cookies as ornaments, remember to make a small hole near the top of each cookie before baking. Finally, seal the finished cookies in an airtight container to keep them fresh for up to a week, retaining their delightful flavor and texture.
Christmas Pudding
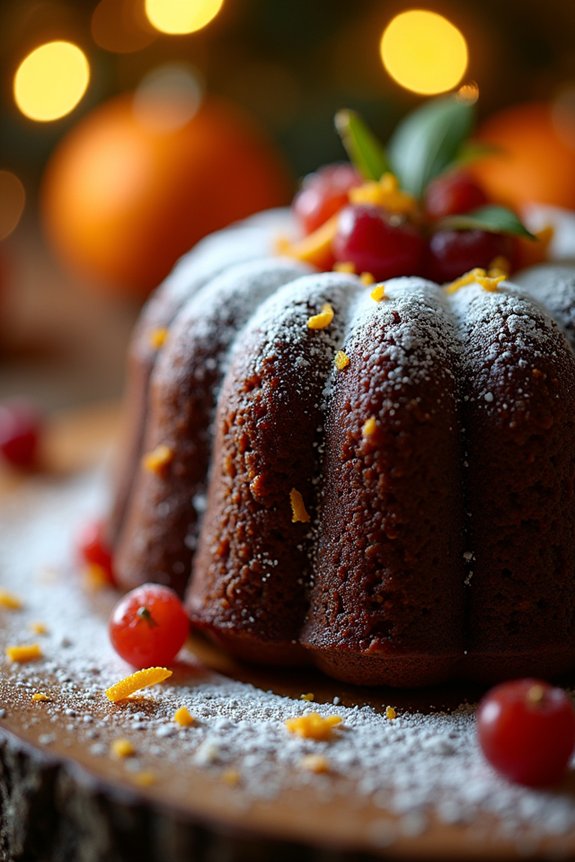
Christmas Pudding is a quintessential holiday dessert that brings warmth and joy to festive celebrations. This dense, fruity, and spiced pudding is a traditional British dish enjoyed on Christmas Day. It’s often made weeks in advance, allowing the flavors to mature and develop into a rich, complex taste. The pudding is typically steamed, giving it a moist texture that perfectly complements the array of dried fruits, spices, and hints of alcohol.
The origins of Christmas Pudding date back centuries, and it has become symbolic of the holiday season. A traditional serving involves flaming the pudding with brandy and serving it with a dollop of rich brandy butter or creamy custard. This recipe will guide you through creating a delicious pudding that serves 4-6 people, filling your home with the inviting aromas of Christmas spices.
Ingredients:
- 120g plain flour
- 120g breadcrumbs
- 120g suet (or vegetarian suet)
- 120g dark brown sugar
- 200g mixed dried fruit (raisins, currants, sultanas)
- 50g chopped mixed peel
- 50g chopped almonds
- 1 apple, peeled and grated
- Zest of 1 lemon
- Zest of 1 orange
- 1 tsp mixed spice
- 1/2 tsp cinnamon
- 1/2 tsp nutmeg
- 3 eggs, beaten
- 120ml stout or dark beer
- 60ml brandy or rum
- Extra brandy for flaming (optional)
Cooking Instructions:
- Prepare the Fruit Mixture: In a large mixing bowl, combine the mixed dried fruit, mixed peel, and chopped almonds. Add the grated apple, lemon zest, and orange zest. Stir to distribute the fruits evenly.
- Mix the Dry Ingredients: In another bowl, sift together the flour, breadcrumbs, suet, dark brown sugar, mixed spice, cinnamon, and nutmeg. Verify that all the dry ingredients are well-blended.
- Combine Wet Ingredients: Beat the eggs in a separate bowl. Gradually stir in the stout and brandy. Make certain the mixture is smooth and well-combined.
- Incorporate All Ingredients: Create a well in the center of the dry ingredients. Pour in the egg and stout mixture, and then add the soaked fruit mixture. Stir thoroughly with a wooden spoon until all ingredients are evenly distributed and the batter is homogenous.
- Prepare the Pudding Basin: Grease a 1.2-liter pudding basin with butter. Spoon the pudding mixture into the basin, pressing down gently to remove air pockets.
- Cover and Steam the Pudding: Cover the pudding basin with a layer of baking parchment, then a layer of foil, and secure tightly with string. Place the basin in a large pot with a trivet or a folded tea towel at the bottom. Fill the pot with boiling water up to halfway up the sides of the basin. Cover the pot with a lid and steam for approximately 4-5 hours, checking occasionally to top up with boiling water as needed.
- Rest the Pudding: Once cooked, carefully remove the pudding from the pot and allow it to cool slightly. Store in a cool, dry place until ready to serve.
- Reheat and Serve: To serve, steam the pudding again for about 1-2 hours. Turn out onto a serving plate. If desired, warm some additional brandy, pour over the pudding, and carefully ignite to create a festive flame. Serve with brandy butter or custard.
Extra Tips:
For a more intense flavor, make the pudding several weeks before Christmas and store it in a cool, dry place. This allows the flavors to mature and meld together. You can occasionally feed the pudding with a little extra brandy during storage to keep it moist.
If you’re short on time, the pudding can also be made a day or two in advance. When flaming the pudding, be cautious and ascertain you’re in a safe area. Enjoy the process and the delightful aromas that will fill your home, making the preparation a part of your festive traditions.
Yule Log
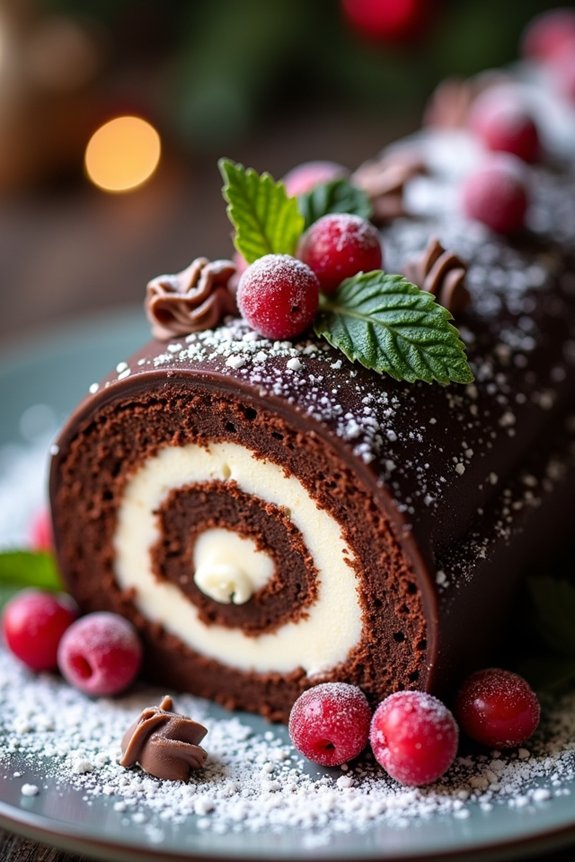
The Yule Log, or Bûche de Noël, is a classic French dessert that beautifully captures the festive spirit of Christmas. This cake symbolizes the Yule log that was traditionally burned in the hearth as part of winter solstice celebrations. Made from a light sponge cake filled with rich chocolate buttercream and rolled to resemble a log, it’s then decorated with a luscious chocolate ganache and festive garnishes to mimic the look of a wooden log covered in snow. Perfect for a gathering of 4-6 people, this dessert is as delightful to make as it’s to eat.
Embrace the tradition and artistry of the Yule Log by preparing this delectable dessert for your holiday celebrations. While it might seem intricate, the process is quite straightforward, and the result is a visually stunning centerpiece that will impress your guests. The combination of fluffy sponge cake, creamy filling, and decadent ganache makes each bite a merry indulgence, perfect for celebrating the season with loved ones.
Ingredients (serving size: 4-6 people):
- For the Sponge Cake:
- 4 large eggs, separated
- 100g granulated sugar
- 1 teaspoon vanilla extract
- 65g all-purpose flour
- 25g unsweetened cocoa powder
- 1/4 teaspoon salt
- For the Chocolate Buttercream Filling:
- 100g unsalted butter, softened
- 150g powdered sugar
- 2 tablespoons unsweetened cocoa powder
- 1 teaspoon vanilla extract
- 2 tablespoons milk
- For the Chocolate Ganache:
- 150g dark chocolate, chopped
- 150ml heavy cream
- For Decoration:
- Powdered sugar (for dusting)
- Chocolate shavings or curls
- Sugared cranberries and mint leaves (optional for garnish)
Instructions:
- Prepare the Sponge Cake:
- Preheat your oven to 180°C (350°F) and line a 10×15 inch jelly roll pan with parchment paper.
- In a bowl, beat the egg yolks and sugar until thick and pale. Add the vanilla extract and mix until combined.
- In another bowl, sift together flour, cocoa powder, and salt. Gradually fold the dry ingredients into the yolk mixture.
- In a separate clean bowl, beat the egg whites until stiff peaks form. Gently fold the egg whites into the batter, being careful not to deflate them.
- Spread the batter evenly into the prepared pan and bake for 10-12 minutes until the cake springs back when touched.
- Once baked, immediately invert the cake onto a clean kitchen towel dusted with powdered sugar. Carefully peel off the parchment paper and roll the cake up with the towel. Let it cool completely.
- Make the Chocolate Buttercream Filling:
- Beat the softened butter until creamy. Gradually add powdered sugar, cocoa powder, vanilla extract, and milk, beating until smooth and fluffy.
- Fill and Roll the Cake:
- Once the cake has cooled, gently unroll it and spread the chocolate buttercream evenly over the surface.
- Roll the cake back up tightly without the towel this time, and place it seam-side down on a serving platter.
- Prepare the Chocolate Ganache:
- Heat the heavy cream in a saucepan until it just begins to simmer. Pour over the chopped dark chocolate and let it sit for a minute. Stir until smooth and glossy.
- Let the ganache cool slightly, then pour over the rolled cake, spreading evenly with a spatula.
- Decorate:
- Dust the Yule Log with powdered sugar to resemble snow. Add chocolate shavings or curls and garnish with sugared cranberries and mint leaves for a festive touch.
Extra Tips:
When making the Yule Log, verify that the sponge cake isn’t overbaked, as it needs to be flexible enough to roll without cracking. Rolling the cake while it’s still warm helps to prevent cracks. If any cracks do occur, the ganache can easily cover them for a seamless finish.
Allow the ganache to cool to a spreadable consistency before applying it to avoid it running off the cake. Finally, refrigerate the Yule Log for an hour before serving to allow the flavors to meld and the cake to set. Enjoy your holiday confection!
Panettone
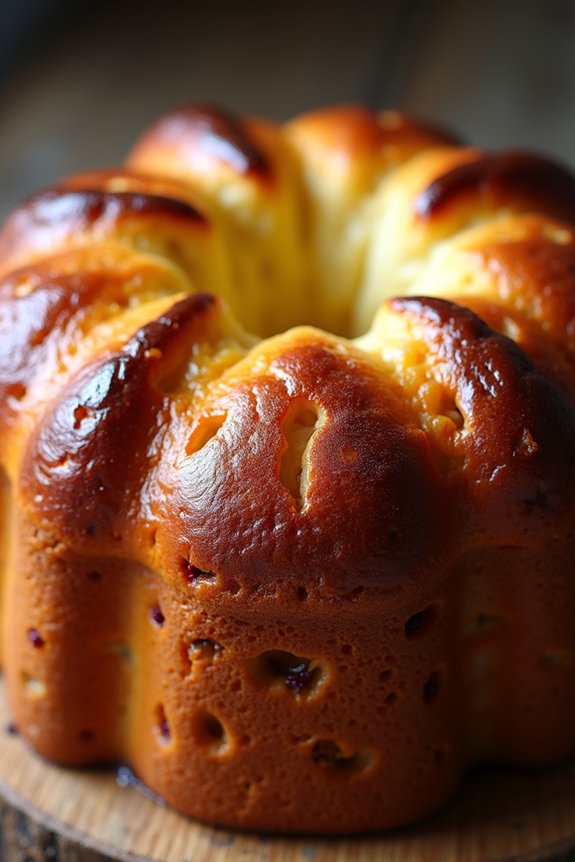
Panettone is a classic Italian Christmas dessert that has become a holiday staple around the world. This sweet, dome-shaped bread is light and fluffy, studded with dried fruits and citrus zest, and often enjoyed with a cup of coffee or a glass of sweet wine.
Originating from Milan, panettone has a unique and delicious flavor that comes from a slow fermentation process, often involving a natural yeast starter. Its delightful texture and rich taste make it a perfect addition to any festive table.
Making panettone at home can be a rewarding experience, as it allows you to customize the flavors and fillings to suit your taste. While the process requires some patience and careful attention to detail, the end result is well worth the effort. This recipe yields a panettone that serves 4-6 people and captures the authentic essence of this traditional Italian dessert.
Ingredients for Panettone (serving size: 4-6 people):
- 4 cups all-purpose flour
- 1/2 cup granulated sugar
- 1/2 cup warm water
- 2 teaspoons active dry yeast
- 4 large eggs, at room temperature
- 1/2 cup unsalted butter, softened
- 1 teaspoon vanilla extract
- Zest of 1 orange
- Zest of 1 lemon
- 1/2 teaspoon salt
- 1 cup mixed dried fruits (such as raisins, currants, candied orange peel)
- 1/4 cup slivered almonds (optional)
- 1 tablespoon melted butter (for brushing)
Cooking Instructions:
- Prepare the Yeast Mixture: In a small bowl, dissolve the active dry yeast in warm water and let it sit for about 5-10 minutes until it becomes frothy. This indicates that the yeast is active and ready to use.
- Mix the Dough: In a large mixing bowl, combine the flour, sugar, and salt. Make a well in the center and add the yeast mixture, eggs, softened butter, vanilla extract, orange zest, and lemon zest. Mix until the dough begins to come together.
- Knead the Dough: Transfer the dough onto a floured surface and knead it for about 10 minutes until it’s smooth and elastic. If the dough is too sticky, add a little more flour, but be careful not to make it too dry.
- Incorporate the Fruits: Gently knead in the mixed dried fruits and slivered almonds until they’re evenly distributed throughout the dough.
- First Rise: Place the dough in a greased bowl, cover it with a damp cloth, and let it rise in a warm place for 1-2 hours, or until it has doubled in size.
- Shape the Panettone: Punch down the risen dough to remove excess air, then shape it into a round loaf. Place the dough into a panettone mold or a high-sided, greased round baking dish.
- Second Rise: Cover the shaped dough with the damp cloth again and let it rise in a warm place for another 1-2 hours, or until it reaches the top of the mold.
- Preheat the Oven: Preheat your oven to 350°F (175°C).
- Bake the Panettone: Brush the top of the dough with melted butter. Bake in the preheated oven for 35-40 minutes, or until the top is golden brown and a skewer inserted into the center comes out clean.
- Cool the Bread: Once baked, remove the panettone from the oven and let it cool in the mold for about 15 minutes before transferring it to a wire rack to cool completely.
Extra Tips:
When making panettone, patience is key. Allowing the dough to rise properly will guarantee a light and fluffy texture.
It’s also important to use room temperature eggs and softened butter to achieve the perfect dough consistency. If you prefer a more pronounced citrus flavor, feel free to add a bit more zest or even a splash of citrus juice.
Finally, for a more authentic touch, try hanging the panettone upside down to cool; this helps maintain its shape and texture. Enjoy your homemade panettone with a sprinkle of powdered sugar or a drizzle of glaze for an extra festive touch.
Stollen
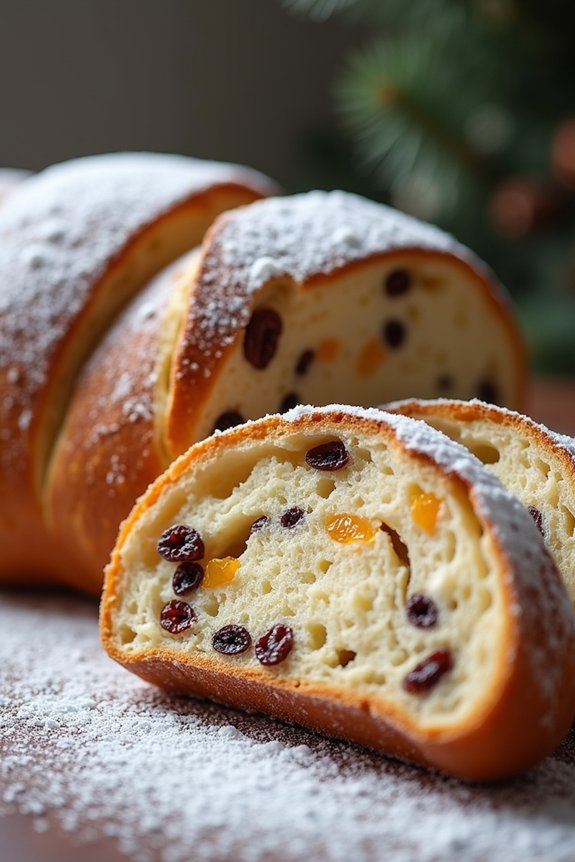
Stollen is a traditional German Christmas dessert that dates back to the 15th century. It’s a rich, dense, and slightly sweet bread, brimming with dried fruits, nuts, and often marzipan. The loaf is dusted with powdered sugar, resembling the snowy landscapes of the holiday season.
Stollen is a festive treat often enjoyed with a warm cup of tea or coffee and is a staple in many households during the holiday season.
The preparation of Stollen requires patience and precision, as it involves a series of steps to guarantee the perfect blend of flavors and textures. The dough is enriched with butter and milk, and it’s vital to give it ample time to rise.
The combination of candied citrus peels, raisins, and almonds gives Stollen its characteristic taste, while the marzipan center adds a delightful surprise in every slice. This recipe is tailored for a serving size of 4-6 people, allowing everyone to enjoy a generous slice of this festive delight.
Ingredients:
- 500g all-purpose flour
- 100g granulated sugar
- 1 packet (7g) active dry yeast
- 250ml warm milk
- 150g unsalted butter, softened
- 1 large egg
- 1 teaspoon vanilla extract
- 1 teaspoon salt
- 1 teaspoon ground nutmeg
- 1 teaspoon ground cinnamon
- 150g raisins
- 100g candied citrus peel
- 100g chopped almonds
- 200g marzipan
- Powdered sugar for dusting
Cooking Instructions:
- Prepare the Yeast Mixture: In a small bowl, dissolve the yeast in warm milk and let it sit for about 10 minutes until it becomes frothy.
- Mix the Dough: In a large mixing bowl, combine the flour, sugar, salt, nutmeg, and cinnamon. Add the softened butter, egg, vanilla extract, and the yeast mixture. Mix until a dough forms.
- Knead the Dough: Transfer the dough onto a floured surface and knead for about 10 minutes until it becomes smooth and elastic.
- First Rise: Place the dough in a lightly oiled bowl, cover with a damp cloth, and let it rise in a warm place for about 1 hour, or until it has doubled in size.
- Incorporate Fruits and Nuts: Once risen, punch down the dough and knead in the raisins, candied citrus peel, and chopped almonds until evenly distributed.
- Shape the Stollen: Roll out the dough into a rectangle. Place the marzipan in a log shape in the center and fold the dough over to encase the marzipan, shaping it into a loaf.
- Second Rise: Place the loaf on a baking sheet lined with parchment paper, cover, and let it rise for another 30 minutes.
- Bake the Stollen: Preheat the oven to 180°C (350°F). Bake the Stollen for 35-40 minutes, or until it’s golden brown and sounds hollow when tapped.
- Cool and Dust: Allow the Stollen to cool on a wire rack. Once cooled, generously dust with powdered sugar to create a snowy effect.
Extra Tips:
When preparing Stollen, it’s essential to verify that your ingredients, especially the butter and egg, are at room temperature to achieve the best dough consistency.
Additionally, if you have the time, soaking the raisins in a bit of rum or brandy overnight can add an extra depth of flavor to your Stollen.
Also, when handling marzipan, make sure it’s pliable by kneading it briefly, so it integrates seamlessly into the loaf.
Finally, for a richer taste, you can brush the warm Stollen with melted butter before dusting with powdered sugar.
Mince Pies
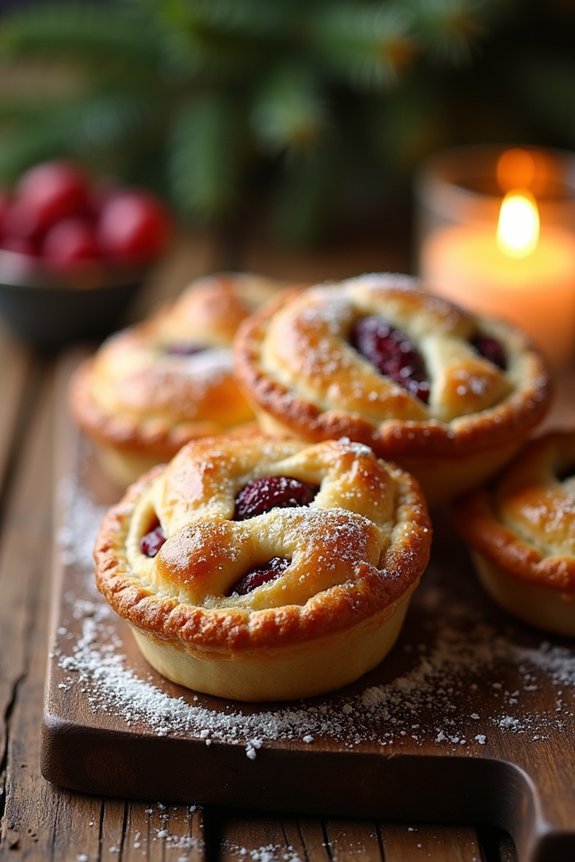
Mince pies are a quintessential treat during the Christmas season, embodying the traditional flavors and aromas that evoke warmth and festivity. Originating from the United Kingdom, these delightful pastries are filled with a sweet mixture of dried fruits, spices, and sometimes a touch of brandy or rum.
Historically, the mincemeat filling included actual meat, but modern versions are purely sweet and vegetarian. The pies are typically enjoyed with a hot cup of tea or mulled wine, making them a perfect indulgence for holiday gatherings or cozy evenings by the fire.
Making mince pies at home is a rewarding experience, allowing you to fill your kitchen with the inviting scent of spices like cinnamon, nutmeg, and cloves. This recipe yields between four to six servings, ideal for a small family gathering or as a delightful addition to a festive dessert spread.
Whether you’re a seasoned baker or a novice in the kitchen, this step-by-step guide will help you create delicious mince pies that will surely impress your family and friends this holiday season.
Ingredients (Serves 4-6):
- 225g plain flour
- 125g unsalted butter, chilled and diced
- 50g caster sugar
- 1 large egg
- 250g mincemeat (store-bought or homemade)
- 1 small egg, beaten (for egg wash)
- Icing sugar, for dusting
Cooking Instructions:
1. Prepare the Pastry Dough**: In a large mixing bowl, combine the plain flour and diced unsalted butter. Use your fingertips to rub the butter into the flour until the mixture resembles coarse breadcrumbs**.
Stir in the caster sugar and then add the egg, mixing until the dough comes together. Wrap the dough in cling film and refrigerate for at least 30 minutes to chill.
2. Preheat the Oven: Preheat your oven to 200°C (400°F) or 180°C (350°F) for a fan oven. This guarantees the oven is at the right temperature when your pies are ready to bake.
3. Roll Out the Dough: On a lightly floured surface, roll out the chilled pastry dough to a thickness of about 3mm. Using a round cutter, cut out 12 circles to fit into a 12-hole tart tin.
Gently press each circle into the tin to form the pie bases.
4. Fill the Pies: Spoon approximately a tablespoon of mincemeat into each pastry case, ensuring not to overfill them.
5. Top the Pies: Re-roll the remaining pastry and use a slightly smaller cutter to create lids for each pie. Place the lids on top of the mincemeat, pressing the edges gently to seal.
Make a small slit or poke holes in the top of each pie to allow steam to escape.
6. Egg Wash and Bake: Brush the tops of the pies with the beaten egg to give them a golden finish. Place the tray in the preheated oven and bake for 20-25 minutes until the pastry is crisp and golden brown.
7. Cool and Serve: Once baked, remove the mince pies from the oven and allow them to cool slightly in the tin before transferring them to a wire rack. Dust with icing sugar before serving.
Extra Tips:
For an added depth of flavor, consider adding a teaspoon of grated orange zest to the pastry dough. If using store-bought mincemeat, you can personalize it by mixing in a handful of chopped nuts or a splash of your favorite liqueur before filling the pies.
To guarantee even baking, rotate the tray halfway through the cooking time. Finally, mince pies can be made in advance and frozen, allowing you to simply reheat them when needed, guaranteeing fresh and warm pies on demand throughout the festive season.
Buche De Noel
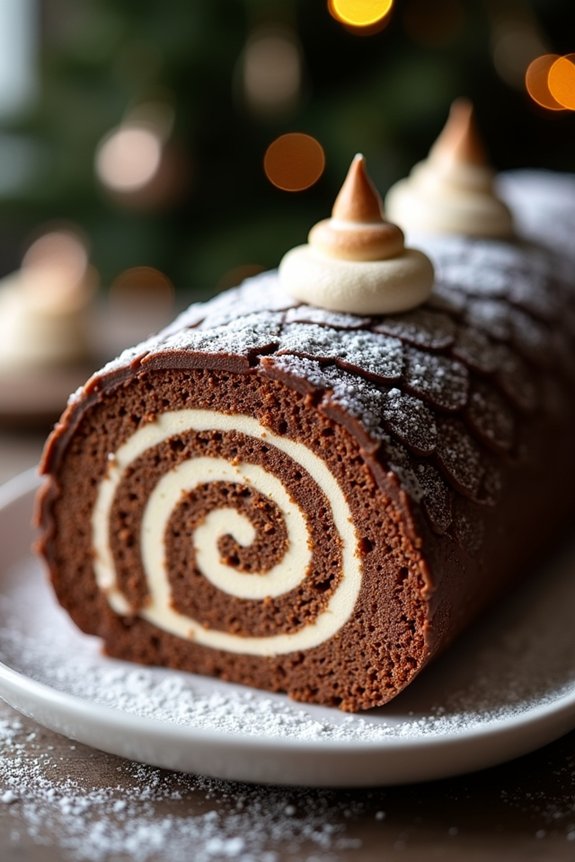
Buche de Noel, also known as Yule Log, is a classic French dessert traditionally served during the Christmas season. This delightful cake is designed to mimic an actual Yule log, which was historically burned in the hearth as a symbol of good luck for the coming year. The Buche de Noel is typically a sponge cake rolled to resemble a log and is filled and frosted with rich chocolate buttercream.
Decorated with meringue mushrooms, sugared cranberries, or dusted with powdered sugar to resemble snow, this dessert is as visually stunning as it’s delicious.
Creating a Buche de Noel requires patience and a bit of finesse, but the end result is well worth the effort. The combination of the light and fluffy sponge cake with the creamy and decadent chocolate filling makes for a treat that’s sure to impress your family and friends.
Whether you’re an experienced baker or a novice in the kitchen, following this detailed recipe will guide you in mastering this traditional Christmas dessert.
Ingredients for 4-6 servings:
- 5 large eggs, separated
- 1/2 cup granulated sugar
- 1/3 cup unsweetened cocoa powder
- 1 teaspoon vanilla extract
- 1/4 teaspoon salt
- 1/4 cup all-purpose flour
- 1/2 teaspoon baking powder
- 1 cup heavy cream
- 2 tablespoons confectioners’ sugar
- 1 teaspoon vanilla extract (for filling)
- 1 1/2 cups semi-sweet chocolate chips
- 1/2 cup unsalted butter
- 1/2 cup powdered sugar
Cooking Instructions:
- Preheat and Prepare Pans: Preheat your oven to 350°F (175°C). Line a 15×10-inch jelly roll pan with parchment paper, ensuring the paper extends over the edges for easy removal.
- Make the Sponge Cake Batter: In a large mixing bowl, beat egg yolks, granulated sugar, and vanilla extract until thick and pale in color. In a separate bowl, sift together the cocoa powder, flour, baking powder, and salt. Gently fold these dry ingredients into the yolk mixture.
- Whip Egg Whites: In another clean bowl, beat egg whites until soft peaks form. Gradually fold the egg whites into the chocolate batter, being careful not to deflate them.
- Bake the Cake: Spread the batter evenly into the prepared pan. Bake for 12-15 minutes or until the cake springs back when lightly touched. Remove from the oven and let it cool for a few minutes.
- Roll the Cake: While the cake is still warm, carefully invert it onto a clean kitchen towel dusted with confectioners’ sugar. Remove the parchment paper and roll the cake up with the towel, starting from the short end. Let it cool completely.
- Prepare the Filling: In a chilled bowl, whip the heavy cream with the confectioners’ sugar and vanilla extract until stiff peaks form.
- Unroll and Fill the Cake: Gently unroll the cooled cake and spread the whipped cream evenly over the surface. Re-roll the cake (without the towel) and place seam-side down on a serving platter.
- Make the Chocolate Frosting: Melt the chocolate chips and butter in a heatproof bowl over simmering water. Stir until smooth, then remove from heat and let cool slightly. Beat in the powdered sugar until the mixture is smooth and spreadable.
- Frost the Cake: Spread the chocolate frosting over the rolled cake, using a spatula to create a log-like texture. Decorate as desired with meringue mushrooms or powdered sugar.
Extra Tips:
When making Buche de Noel, it’s important to not overbake the sponge cake, as it needs to be pliable enough to roll without cracking.
If you’re new to rolling cakes, practice patience and handle the cake gently to avoid breaks. Make sure the frosting has cooled to a spreadable consistency before applying it to prevent it from sliding off the cake.
For added flair, consider using a fork to create bark-like grooves on the frosting or add festive decorations to enhance the appearance of your Yule log.
Pecan Pie
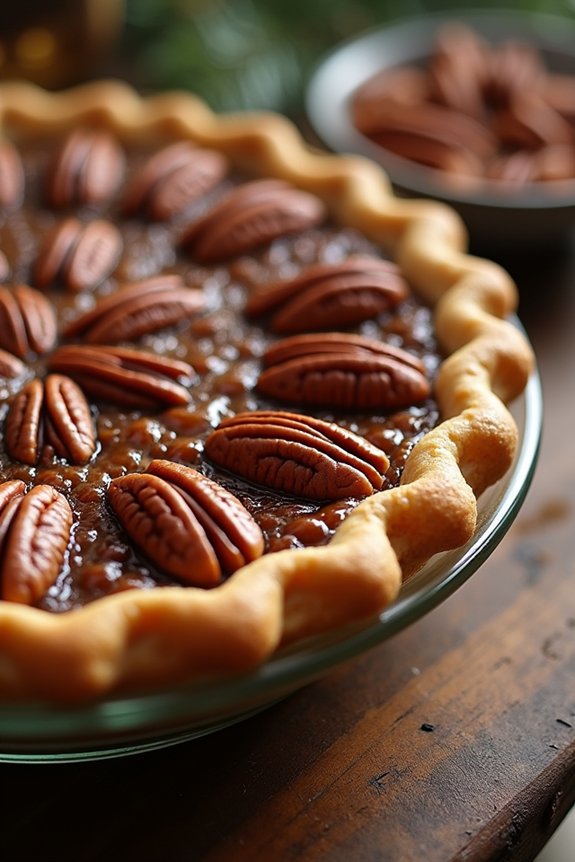
Pecan Pie is a classic dessert that graces many tables during the Christmas season. Known for its rich, nutty flavor and gooey filling, this pie is a beloved staple in many households. The buttery crust perfectly complements the sweet, caramelized center, which is packed with crunchy pecans. Ideal for serving after a festive holiday meal, Pecan Pie not only satisfies the sweet tooth but also adds a touch of tradition and warmth to your holiday gatherings.
The origins of Pecan Pie are deeply rooted in Southern United States cuisine, where pecan trees are abundant. The combination of simple ingredients such as eggs, sugar, and corn syrup with pecans creates a harmonious blend of flavors that has been cherished for generations.
Whether you’re a seasoned baker or someone trying their hand at creating a holiday dessert for the first time, this Pecan Pie recipe is straightforward, guaranteeing that you can deliver a delightful finish to your Christmas feast.
Ingredients for Serving 4-6 People
- 1 9-inch pie crust (homemade or store-bought)
- 1 cup pecans, chopped
- 3/4 cup dark corn syrup
- 3/4 cup granulated sugar
- 3 large eggs
- 1/4 cup unsalted butter, melted
- 1 teaspoon vanilla extract
- 1/4 teaspoon salt
- Whole pecans for garnish (optional)
Cooking Instructions
- Prepare the Pie Crust: Preheat your oven to 350°F (175°C). If using a homemade pie crust, roll it out on a lightly floured surface and fit it into a 9-inch pie dish. Trim the edges and crimp them decoratively. If using a store-bought crust, simply place it in the pie dish.
- Make the Filling: In a large mixing bowl, whisk together the corn syrup, granulated sugar, eggs, melted butter, vanilla extract, and salt until smooth and well combined. Stir in the chopped pecans until they’re evenly distributed.
- Assemble the Pie: Pour the filling into the prepared pie crust. Use a spatula to guarantee the pecans are spread evenly throughout the filling. If desired, arrange whole pecans on top of the pie for an attractive finish.
- Bake the Pie: Place the pie on a baking sheet to catch any drips and bake in the preheated oven for 50-60 minutes, or until the filling is set and the crust is golden brown. The center should be slightly jiggly but will firm up as it cools.
- Cool and Serve: Remove the pie from the oven and allow it to cool completely on a wire rack before serving. This will take about 2 hours. Serve at room temperature or slightly warm, with whipped cream or vanilla ice cream if desired.
Extra Tips
When making Pecan Pie, be sure not to overbake it. The key to a perfect pie is a filling that’s set but not too firm, as it will continue to set as it cools.
If the edges of the crust are browning too quickly, you can cover them with aluminum foil to prevent burning. Additionally, toasting the pecans before adding them to the filling can enhance their flavor, giving your pie an extra depth of taste that’s sure to impress your holiday guests.
Trifle
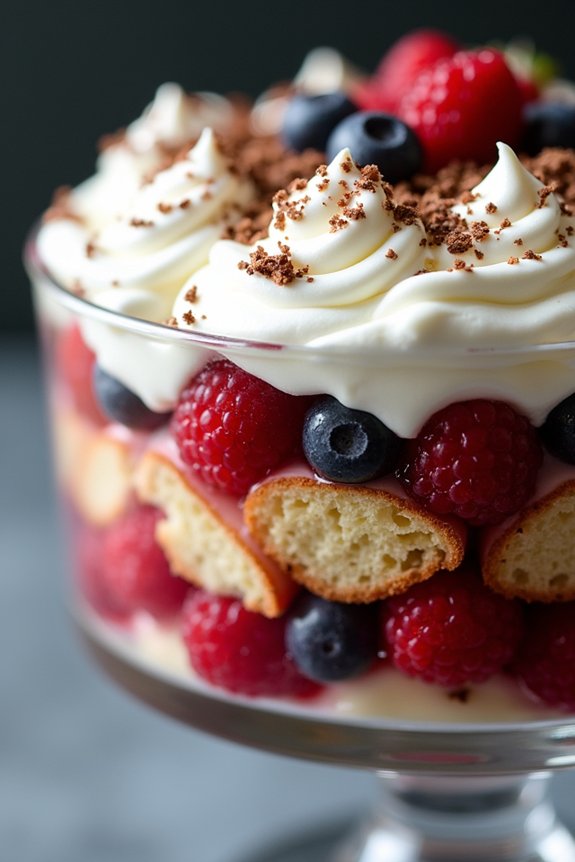
The trifle is a classic Christmas dessert that has been enjoyed for generations. This layered dessert is known for its rich and indulgent flavors, combining sponge cake, fruit, jelly, custard, and cream into a delightful treat. The beauty of a trifle lies in its versatility and the ability to adapt the layers to suit your taste, making it a perfect addition to any holiday table.
With its beautiful presentation in a glass bowl, the trifle not only pleases the palate but also the eyes.
Creating a traditional Christmas trifle involves layering these delicious components in a way that each bite offers a harmonious blend of flavors and textures. The sponge cake, often soaked in sherry or fruit juice, serves as the base, followed by a layer of fruit and then jelly. A creamy custard is poured over, and the trifle is finished off with a generous topping of whipped cream. To add a festive touch, you can sprinkle the top with toasted almonds or grated chocolate.
Here’s how to prepare this delightful dessert for 4-6 people.
Ingredients:
- 1 sponge cake or 8 slices of pound cake
- 1/2 cup sherry or fruit juice
- 2 cups mixed berries (e.g., strawberries, raspberries, blueberries)
- 1 package (3 oz) strawberry or raspberry jelly
- 2 cups custard (store-bought or homemade)
- 1.5 cups heavy whipping cream
- 1 tablespoon powdered sugar
- 1 teaspoon vanilla extract
- Optional: toasted almonds or grated chocolate for garnish
Cooking Instructions:
- Prepare the Sponge Cake Base: Cut the sponge cake or pound cake into cubes and place them evenly at the bottom of a large glass trifle bowl. Drizzle the sherry or fruit juice over the cake cubes to moisten them, confirming the liquid is absorbed properly.
- Add the Fruit Layer: Distribute the mixed berries evenly over the soaked sponge cake. Confirm the berries are well-drained if using canned or frozen fruit to prevent excess moisture.
- Make the Jelly Layer: Prepare the jelly according to the package instructions. Allow it to cool slightly until it reaches a syrup-like consistency, then pour it over the fruit and cake layers. Place the bowl in the refrigerator to allow the jelly to set, which usually takes about 2 hours.
- Prepare the Custard Layer: Once the jelly is set, pour the custard evenly over it. Make sure the custard completely covers the jelly and fruit layers to create a smooth surface.
- Whip the Cream: In a mixing bowl, combine the heavy whipping cream, powdered sugar, and vanilla extract. Whip the cream until soft peaks form, being careful not to over-whip.
- Top with Whipped Cream: Spoon the whipped cream over the custard layer, spreading it evenly across the trifle. For added effect, create soft peaks or swirls with the back of a spoon.
- Garnish: If desired, sprinkle toasted almonds or grated chocolate over the whipped cream for an added festive touch.
Extra Tips:
When making a trifle, it’s important to allow enough time for each layer to set properly in the refrigerator. This step confirms the trifle maintains its structure and the flavors meld together beautifully.
If you’re preparing the trifle a day ahead, wait to add the whipped cream and garnish until just before serving to keep the cream fresh and fluffy. Additionally, feel free to experiment with different fruits or jelly flavors to suit your preferences or what’s available seasonally.
Eggnog
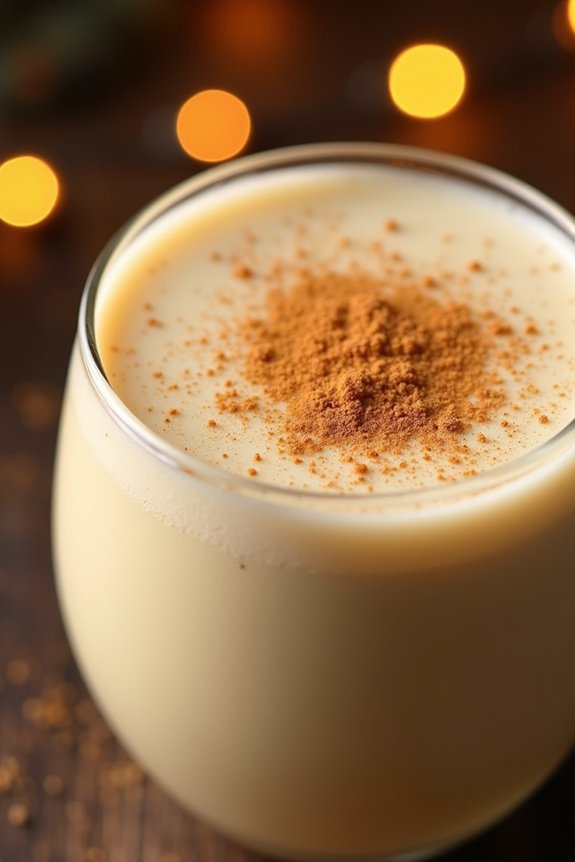
Eggnog is a classic and beloved holiday beverage that brings warmth and joy to many festive gatherings. Its creamy texture, rich flavors of nutmeg and vanilla, and the subtle kick from the spirits make it a staple during Christmas celebrations.
The origins of eggnog can be traced back to medieval Britain, where it was enjoyed by the upper class. Today, it’s a cherished tradition in many homes, often served in festive mugs with a sprinkle of nutmeg or cinnamon on top.
Making homemade eggnog is a delightful way to embrace the holiday spirit. This recipe creates a creamy and flavorful eggnog that’s perfect for serving at holiday parties or enjoying with family by the fireplace. Not only is it easy to prepare, but it also allows you to customize the flavors to your liking.
Whether you prefer it with a touch of rum or brandy, or simply alcohol-free for the little ones, this eggnog will surely be a hit.
Ingredients for 4-6 Servings:
- 4 large eggs
- 1/2 cup granulated sugar
- 2 cups whole milk
- 1 cup heavy cream
- 1/2 cup rum or brandy (optional)
- 1 teaspoon vanilla extract
- 1/2 teaspoon ground nutmeg
- 1/4 teaspoon ground cinnamon
- Pinch of salt
- Freshly grated nutmeg or cinnamon stick for garnish
Cooking Instructions:
- Separate the Eggs: Carefully separate the egg yolks from the whites. Place the yolks in a medium-sized bowl and set the whites aside for another use, or discard them if you prefer.
- Whisk the Yolks and Sugar: Add the granulated sugar to the bowl with the yolks. Whisk them together until the mixture is smooth and pale yellow, about 2-3 minutes.
- Heat the Milk and Cream: In a medium saucepan, combine the whole milk, heavy cream, and a pinch of salt. Heat over medium-low heat, stirring occasionally, until the mixture is warm and just starting to steam. Don’t let it boil.
- Temper the Egg Mixture: Slowly add a small amount of the warm milk mixture into the egg yolk mixture while whisking constantly. This process is called tempering and prevents the eggs from scrambling. Gradually incorporate the rest of the milk mixture.
- Cook the Eggnog Base: Pour the tempered egg mixture back into the saucepan. Cook over medium heat, stirring constantly, until the mixture thickens slightly and reaches 160°F (71°C) on a thermometer, about 5-7 minutes.
- Add Flavorings: Remove the saucepan from heat. Stir in the vanilla extract, ground nutmeg, and ground cinnamon. If you’re adding alcohol, mix in the rum or brandy at this stage.
- Chill the Eggnog: Transfer the eggnog to a bowl or pitcher and cover it with plastic wrap. Refrigerate for at least 2 hours or until it’s thoroughly chilled.
- Serve: Once chilled, give the eggnog a good stir. Pour it into glasses and garnish with freshly grated nutmeg or a cinnamon stick.
Extra Tips:
When preparing eggnog, it’s important to temper the eggs carefully to avoid curdling. If you prefer a thicker eggnog, you can reduce the milk slightly or increase the amount of heavy cream.
For a non-alcoholic version, simply omit the rum or brandy. Additionally, eggnog can be made a day in advance, allowing the flavors to meld together beautifully.
If you find your eggnog has become too thick after chilling, you can thin it out with a little milk before serving. Enjoy your homemade eggnog with a sprinkle of nutmeg for that perfect holiday touch.
Pavlova
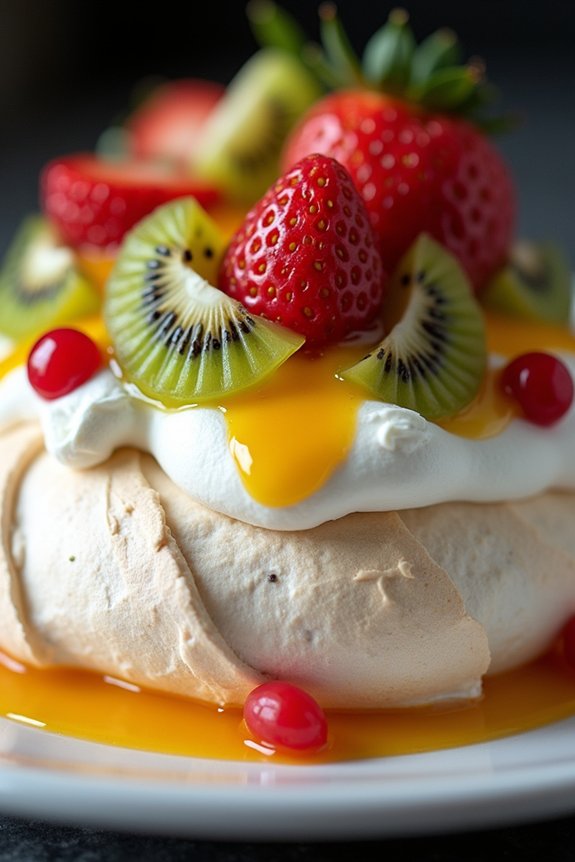
Pavlova is a classic dessert that embodies the festive spirit of Christmas with its light and airy texture, adorned with a vibrant display of fresh fruits. Named after the Russian ballerina Anna Pavlova, this dessert is as elegant as it’s delicious. The meringue base, crispy on the outside and soft on the inside, is topped with a layer of whipped cream and an assortment of seasonal fruits. Its beauty lies not only in its appearance but also in its balance of sweetness and tanginess, making it a perfect end to a festive meal.
This recipe will guide you through creating a Pavlova that serves 4-6 people, guaranteeing that everyone at your Christmas gathering gets a taste of this delightful dessert. The preparation involves precise whipping of egg whites to achieve the finest meringue, followed by a gentle assembly of cream and fruit. With a little patience and attention to detail, you can create a Pavlova that looks and tastes like it came straight from a professional bakery.
Ingredients:
- 4 large egg whites
- 1 cup granulated sugar
- 1 teaspoon vanilla extract
- 1 teaspoon white vinegar
- 1 teaspoon cornstarch
- 1 cup heavy cream
- 2 tablespoons powdered sugar
- 1 teaspoon vanilla extract (for whipped cream)
- Fresh fruits such as strawberries, kiwis, and passion fruit
Cooking Instructions:
- Preheat the Oven and Prepare the Baking Sheet: Preheat your oven to 300°F (150°C). Line a baking sheet with parchment paper and draw a 9-inch circle as a guide for your Pavlova.
- Whip the Egg Whites: In a clean, dry mixing bowl, beat the egg whites on medium speed until soft peaks form. Gradually add the granulated sugar, one tablespoon at a time, while continuing to beat on high speed. Beat until stiff, glossy peaks form.
- Add Flavorings and Stabilizers: Gently fold in the vanilla extract, white vinegar, and cornstarch into the meringue using a spatula. This step helps stabilize the meringue and adds a subtle flavor.
- Shape the Meringue: Spoon the meringue onto the prepared baking sheet, using the circle as a guide. Shape it into a nest with slightly raised edges to hold the cream and fruit.
- Bake the Meringue: Place the meringue in the preheated oven, then immediately reduce the temperature to 250°F (120°C). Bake for 1 hour and 15 minutes, or until the meringue is dry to the touch. Turn off the oven and leave the meringue inside to cool completely, with the oven door slightly ajar.
- Prepare the Whipped Cream: In a chilled mixing bowl, whip the heavy cream with powdered sugar and vanilla extract until soft peaks form. Be careful not to overwhip.
- Assemble the Pavlova: Once the meringue is completely cool, spread the whipped cream evenly over its surface. Top with an assortment of fresh fruits, such as sliced strawberries, kiwis, and passion fruit pulp.
- Serve and Enjoy: Carefully transfer the Pavlova to a serving platter. Slice and serve immediately to enjoy the perfect combination of textures and flavors.
Extra Tips:
When making Pavlova, the key to success is guaranteeing that your mixing bowl and beaters are completely clean and free of any grease or moisture before whipping the egg whites. This guarantees maximum volume and stability in the meringue.
Additionally, be patient while cooling the meringue in the oven, as this helps prevent cracks. Feel free to experiment with different fruits and toppings to customize your Pavlova to your taste and the season’s best produce.
Sugar Cookies
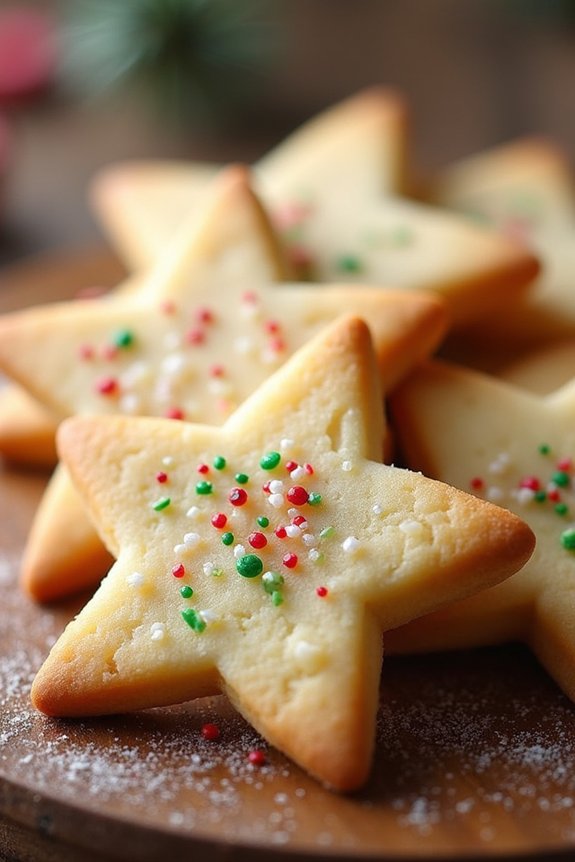
Sugar cookies are a timeless classic when it comes to traditional Christmas desserts. Known for their buttery, sweet flavor and delightful crispiness, these cookies are perfect for decorating with icing, sprinkles, or simply enjoying plain.
Sugar cookies are cherished for their simplicity and versatility, making them a must-have during the holiday season. Whether you’re hosting a festive gathering or simply indulging in the holiday spirit, sugar cookies are sure to bring joy to your table.
This recipe will yield enough sugar cookies to serve 4-6 people, making it perfect for a small holiday gathering or a cozy family treat. The dough is easy to work with, allowing you to cut out your favorite festive shapes with ease. Follow these instructions to create delicious sugar cookies that are sure to become a family favorite.
Ingredients:
- 2 3/4 cups all-purpose flour
- 1 teaspoon baking soda
- 1/2 teaspoon baking powder
- 1 cup unsalted butter, softened
- 1 1/2 cups white sugar
- 1 egg
- 1 teaspoon vanilla extract
- 1/2 teaspoon almond extract (optional)
- 3 to 4 tablespoons milk
- Colored sugar or sprinkles (optional for decorating)
Cooking Instructions:
- Preheat the Oven: Start by preheating your oven to 375°F (190°C). Line a baking sheet with parchment paper or a silicone baking mat to prevent the cookies from sticking.
- Mix Dry Ingredients: In a medium-sized bowl, whisk together the all-purpose flour, baking soda, and baking powder. This guarantees that the baking soda and powder are evenly distributed throughout the flour.
- Cream Butter and Sugar: In a large bowl, use an electric mixer to cream the softened butter and white sugar together until the mixture is light and fluffy. This should take about 2-3 minutes.
- Add Wet Ingredients: Beat in the egg, vanilla extract, and almond extract (if using) until well combined. The extracts add a lovely depth of flavor to the cookies.
- Combine Ingredients: Gradually add the dry ingredients to the wet ingredients, mixing until just combined. Add milk one tablespoon at a time until the dough reaches a good consistency for rolling—soft, but not sticky.
- Roll and Cut Dough: On a lightly floured surface, roll out the dough to about 1/4 inch thickness. Use cookie cutters to cut out shapes and place them onto the prepared baking sheet.
- Decorate (Optional): If desired, sprinkle the cookies with colored sugar or sprinkles before baking for added festive flair.
- Bake Cookies: Bake the cookies in the preheated oven for 8-10 minutes, or until the edges are just beginning to turn golden. Remove them from the oven and allow them to cool on the baking sheet for a few minutes before transferring to a wire rack to cool completely.
- Serve and Enjoy: Once cooled, you can further decorate the cookies with icing if desired, or serve them as they are.
Extra Tips:
For the best results, verify that your butter is properly softened before creaming it with the sugar. This will help create a light and airy mixture.
If your dough becomes too soft to handle, you can chill it in the refrigerator for about 15-20 minutes before rolling it out. Additionally, if you prefer a more tender cookie, you can substitute part of the all-purpose flour with cake flour.
Finally, storing the cookies in an airtight container will keep them fresh and crisp for several days, allowing you to enjoy them throughout the holiday season.