

Christmas cookies are my absolute favorite, especially when they’re all the rage this season.
I’ve stumbled upon some fabulous recipes that offer a fresh take on tradition, like gingerbread men with a hint of zesty lemon.
Picture the delightful aroma of almond snowball cookies or the cheerful appearance of sprinkle confetti cookies.
I’m thrilled to share these festive treats that add sparkle to holiday gatherings and inspire even beginner bakers.
Ready to discover what’s trending in the oven this year?
Classic Sugar Cookies With Royal Icing
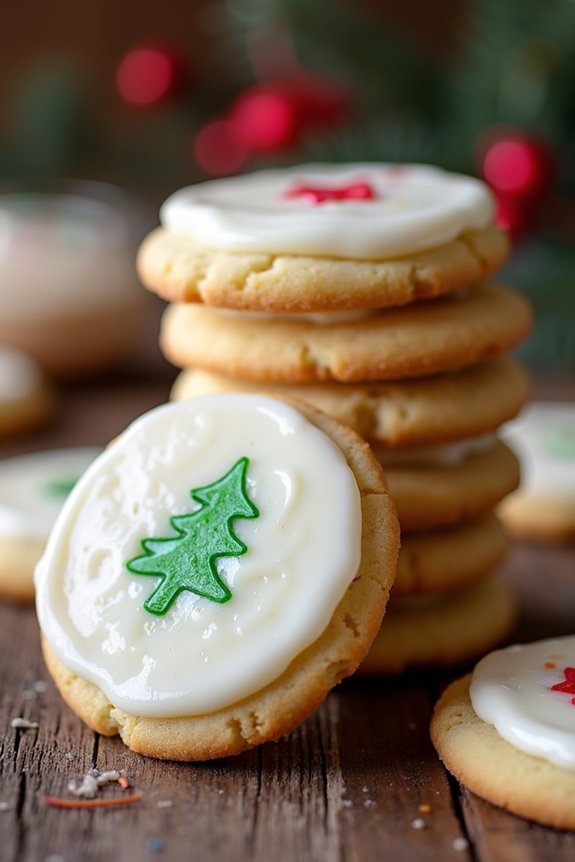
Classic Sugar Cookies With Royal Icing are a holiday staple that bring joy and festive spirit to any gathering. These cookies aren’t only delicious but also fun to decorate, making them perfect for family activities or holiday parties. The combination of a slightly crisp yet tender sugar cookie base and the smooth, sweet royal icing makes for an irresistible treat that appeals to people of all ages.
Whether you’re an experienced baker or a novice in the kitchen, this recipe is straightforward and allows room for creativity with your icing designs. The key to great sugar cookies lies in the balance of ingredients, guaranteeing a dough that holds its shape well during baking while maintaining a delightful texture.
The royal icing, made with just a few simple ingredients, hardens beautifully, providing a perfect canvas for your artistic endeavors. This recipe will yield about 24 cookies, making it ideal for a serving size of 4-6 people, depending on how many cookies you assign per person. Gather your ingredients and kitchen tools, and let’s get started on creating these festive Classic Sugar Cookies With Royal Icing.
Ingredients for Classic Sugar Cookies:
- 2 ¾ cups all-purpose flour
- 1 teaspoon baking powder
- ½ teaspoon salt
- 1 cup unsalted butter, softened
- 1 cup granulated sugar
- 1 large egg
- 2 teaspoons vanilla extract
Ingredients for Royal Icing:
- 3 cups powdered sugar, sifted
- 2 large egg whites
- 1 teaspoon lemon juice
- Food coloring (optional)
Instructions:
- Prepare the Dough: In a medium bowl, whisk together the flour, baking powder, and salt. In a large bowl, beat the softened butter and sugar with an electric mixer on medium speed until light and fluffy, about 2-3 minutes. Add the egg and vanilla extract, and continue to mix until fully incorporated. Gradually add the flour mixture to the butter mixture, mixing on low speed until the dough comes together.
- Chill the Dough: Divide the dough into two equal portions. Flatten each into a disk, wrap in plastic wrap, and refrigerate for at least 1-2 hours, or until firm. This helps the dough retain its shape during baking.
- Preheat and Prep: Preheat your oven to 350°F (175°C). Line baking sheets with parchment paper. On a lightly floured surface, roll out one portion of dough to about 1/4-inch thickness. Use cookie cutters to cut out shapes and transfer them to the prepared baking sheets, spacing them about 1 inch apart.
- Bake the Cookies: Bake in the preheated oven for 8-10 minutes, or until the edges are lightly golden. Remove from the oven and let them cool on the baking sheet for a few minutes before transferring to a wire rack to cool completely.
- Make the Royal Icing: In a clean bowl, beat the egg whites and lemon juice on low speed until frothy. Gradually add the sifted powdered sugar, beating on low speed until the icing is smooth and thick enough to hold its shape. If using, divide the icing into bowls and add food coloring as desired.
- Decorate the Cookies: Once the cookies are completely cool, use a piping bag or a small spoon to apply the royal icing. Start with an outline and then fill in the center. Allow the icing to set at room temperature for a few hours until it hardens.
Extra Tips:
When making the dough, guarantee all ingredients are at room temperature for easier mixing. Chilling the dough is essential for maintaining the shape of the cookies, so don’t skip this step.
If you find the royal icing too thick, add a few drops of water until the desired consistency is achieved. Conversely, if it’s too thin, add a bit more powdered sugar. For intricate designs, use a small piping tip or a toothpick to fine-tune details.
Remember to store the decorated cookies in a single layer to prevent the icing from smudging. Enjoy your beautifully decorated Classic Sugar Cookies With Royal Icing!
Double Chocolate Peppermint Crunch Cookies

Double Chocolate Peppermint Crunch Cookies are the perfect festive treat for the holiday season. They combine the rich, decadent flavors of chocolate with the invigorating zing of peppermint, resulting in a cookie that’s both indulgent and energizing.
These cookies have a delightful crunch from crushed peppermint candies, adding texture and a burst of minty freshness that complements the deep chocolate flavor. Whether you’re making them for a holiday party or simply to enjoy with a cup of hot cocoa by the fire, these cookies are sure to be a hit.
To achieve the perfect Double Chocolate Peppermint Crunch Cookies, it’s vital to use high-quality ingredients, especially in the chocolate department. The combination of cocoa powder and chocolate chips guarantees that each bite is filled with gooey chocolate goodness, while the peppermint extract and candies provide the perfect holiday touch.
This recipe yields about 24 cookies, making it ideal for serving 4-6 people, depending on how many cookies each person indulges in.
Ingredients:
- 1 cup unsalted butter, softened
- 1 cup granulated sugar
- 1 cup packed light brown sugar
- 2 large eggs
- 1 teaspoon vanilla extract
- 1 teaspoon peppermint extract
- 2 cups all-purpose flour
- 2/3 cup unsweetened cocoa powder
- 1 teaspoon baking soda
- 1/2 teaspoon salt
- 2 cups semi-sweet chocolate chips
- 1 cup crushed peppermint candies
Cooking Instructions:
1. Preheat Oven: Start by preheating your oven to 350°F (175°C). Line two baking sheets with parchment paper to prevent the cookies from sticking.
2. Mix Wet Ingredients: In a large mixing bowl, cream together the softened butter, granulated sugar, and brown sugar until the mixture is light and fluffy. This should take about 3-4 minutes with an electric mixer on medium speed.
Add the eggs one at a time, mixing well after each addition. Stir in the vanilla and peppermint extracts until well combined.
3. Combine Dry Ingredients: In a separate bowl, whisk together the flour, cocoa powder, baking soda, and salt. This guarantees that the baking soda and cocoa powder are evenly distributed, which is vital for the cookies’ texture and flavor.
4. Combine Wet and Dry Mixtures: Gradually add the dry ingredients to the wet ingredients, mixing on low speed until just combined. Be careful not to overmix, as this can lead to tough cookies.
5. Add Chocolate Chips and Peppermint: Gently fold in the chocolate chips and crushed peppermint candies with a spatula or wooden spoon, making sure they’re evenly distributed throughout the dough.
6. Shape and Bake: Using a cookie scoop or tablespoon, drop rounded balls of dough onto the prepared baking sheets, spacing them about 2 inches apart.
Bake in the preheated oven for 10-12 minutes, or until the cookies are set around the edges but still slightly soft in the center.
7. Cool: Allow the cookies to cool on the baking sheets for about 5 minutes before transferring them to a wire rack to cool completely. This helps the cookies firm up and develop their full flavor.
Extra Tips:
For the best results, make sure your butter is at room temperature before starting the recipe, as this guarantees it creams properly with the sugars.
If you prefer a more intense peppermint flavor, you can increase the peppermint extract slightly, but be cautious, as too much can overpower the chocolate. Crushing the peppermint candies can be done by placing them in a zip-top bag and using a rolling pin to break them into small pieces.
These cookies can be stored in an airtight container at room temperature for up to a week, maintaining their delicious flavor and texture. Enjoy the festive spirit these cookies bring to any holiday gathering!
Gingerbread Men With Lemon Zest

Gingerbread Men With Lemon Zest are a delightful twist on the classic gingerbread cookie, bringing a zesty citrus flavor to your favorite holiday treat. These cookies are perfect for a festive gathering, as the bright lemon zest complements the warm spices of ginger, cinnamon, and cloves, creating a revitalizing and aromatic treat.
Perfect for decorating with the family, these gingerbread men are sure to become a holiday tradition. The addition of lemon zest not only enhances the flavor but also adds a subtle freshness to each bite, making these cookies stand out on any dessert table.
This recipe yields about 24 cookies, making it ideal for a serving size of 4-6 people. Whether you’re baking for a holiday party or simply enjoying a cozy day at home, these cookies are a great choice for a seasonal indulgence.
Ingredients:
- 3 cups all-purpose flour
- 3/4 cup brown sugar, packed
- 1 tablespoon ground ginger
- 1 tablespoon ground cinnamon
- 1/2 teaspoon ground cloves
- 1/2 teaspoon baking soda
- 1/2 teaspoon salt
- Zest of 2 lemons
- 3/4 cup unsalted butter, room temperature
- 3/4 cup molasses
- 1 large egg
- 1 teaspoon vanilla extract
- Icing for decoration (optional)
Instructions:
- Preheat the Oven: Preheat your oven to 350°F (175°C). Line two baking sheets with parchment paper or silicone baking mats.
- Mix Dry Ingredients: In a large bowl, whisk together the flour, brown sugar, ginger, cinnamon, cloves, baking soda, and salt. Add the lemon zest and mix until well combined.
- Combine Wet Ingredients: In a separate bowl, cream the butter and molasses using an electric mixer on medium speed until smooth and creamy. Add the egg and vanilla extract, and continue to beat until fully incorporated.
- Form the Dough: Gradually add the dry ingredients to the wet mixture, beating on low speed until a dough forms. The dough should be firm but pliable.
- Chill the Dough: Divide the dough in half, wrap each half in plastic wrap, and refrigerate for at least 1 hour. Chilling the dough will make it easier to roll out and cut.
- Roll and Cut the Dough: On a lightly floured surface, roll out one portion of the dough to about 1/4-inch thickness. Use gingerbread men cookie cutters to cut out shapes, and place them on the prepared baking sheets about 1 inch apart.
- Bake the Cookies: Bake the cookies in the preheated oven for 8-10 minutes, or until the edges are firm and the centers are set. Remove from the oven and let them cool on the baking sheets for 5 minutes, then transfer to wire racks to cool completely.
- Decorate: Once cooled, use icing to decorate the cookies as desired. Let the icing set before serving or storing.
Extra Tips:
For the best results, make sure that the butter is at room temperature before creaming it with molasses. This will help achieve a smooth and creamy texture.
If you prefer a stronger lemon flavor, you can increase the amount of lemon zest or add a few drops of lemon extract. When rolling out the dough, keep it chilled and work in small batches to prevent it from becoming too soft.
If the dough becomes too sticky, lightly dust it with flour. These cookies can be stored in an airtight container at room temperature for up to a week, making them a great option for make-ahead holiday baking.
Almond Snowball Cookies

Almond Snowball Cookies are a delightful holiday treat that evoke the magic of snowfall with their powdery white coating and delicate almond flavor. These bite-sized cookies, also known as Mexican wedding cookies or Russian tea cakes, are beloved for their tender, crumbly texture. Their simple yet sophisticated flavor profile makes them a perfect addition to any holiday cookie platter, or as a standalone treat to enjoy with a warm cup of tea or coffee.
The recipe for Almond Snowball Cookies is straightforward and requires just a few simple ingredients, making it an ideal choice for both novice bakers and seasoned pros looking for a quick and satisfying dessert. The key to these cookies is the buttery dough, which is enriched with finely ground almonds and a hint of vanilla.
Once baked, they’re rolled in powdered sugar while still warm, giving them their signature “snowball” appearance. This recipe yields enough cookies for a group of 4-6 people, guaranteeing everyone gets to enjoy a taste of this holiday classic.
Ingredients:
- 1 cup unsalted butter, softened
- 1/2 cup powdered sugar, plus extra for rolling
- 1 teaspoon vanilla extract
- 2 cups all-purpose flour
- 1 cup finely ground almonds
- 1/4 teaspoon salt
Instructions:
- Preheat and Prepare: Preheat your oven to 350°F (175°C). Line a baking sheet with parchment paper or a silicone baking mat to prevent the cookies from sticking.
- Cream Butter and Sugar: In a large mixing bowl, use an electric mixer to cream together the softened butter and 1/2 cup of powdered sugar until light and fluffy. This should take about 2-3 minutes on medium speed. Add the vanilla extract and mix until combined.
- Combine Dry Ingredients: In a separate bowl, whisk together the all-purpose flour, ground almonds, and salt. Gradually add the dry ingredients to the butter mixture, mixing on low speed until the dough comes together. Be careful not to overmix.
- Shape the Cookies: Using a small cookie scoop or a tablespoon, portion out the dough and roll it into 1-inch balls. Place the balls on the prepared baking sheet, spacing them about 1 inch apart.
- Bake the Cookies: Bake in the preheated oven for 15-20 minutes, or until the edges are just beginning to turn golden. The cookies should remain pale in color overall.
- Roll in Sugar: Remove the cookies from the oven and allow them to cool on the baking sheet for 5 minutes. While they’re still warm, gently roll each cookie in additional powdered sugar until fully coated.
- Cool and Coat Again: Transfer the cookies to a wire rack to cool completely. Once cooled, roll them in powdered sugar a second time for a thick, snowy coating.
Extra Tips:
For the best texture, verify that the butter is softened at room temperature before starting. If you prefer a more pronounced almond flavor, consider adding a few drops of almond extract along with the vanilla.
If you don’t have finely ground almonds, you can substitute with almond flour, which will give a similar result. Store the cookies in an airtight container to keep them fresh, and re-roll them in powdered sugar just before serving if needed for a pristine, snowy finish.
Red Velvet Crinkle Cookies
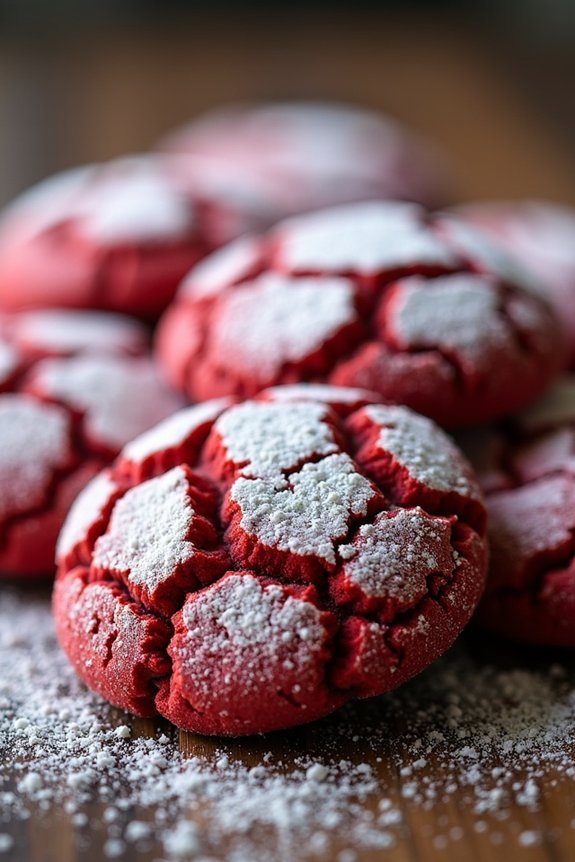
Red Velvet Crinkle Cookies are a delightful holiday treat that combines the rich, velvety flavor of red velvet cake with the classic crinkle cookie texture. These cookies are perfect for adding a festive touch to your Christmas cookie platter. The vibrant red color and dusting of powdered sugar create a striking contrast, making them as visually appealing as they’re delicious.
Whether you’re baking for a holiday party or simply indulging in a sweet treat at home, these cookies are sure to impress. To achieve the perfect red velvet flavor, these cookies are made with a combination of cocoa powder and red food coloring, giving them their signature taste and appearance.
The dough is rolled in powdered sugar before baking, which creates the distinctive crinkle effect as the cookies spread and crack in the oven. This recipe yields approximately 18-24 cookies, making it ideal for serving 4-6 people, depending on how generously you portion them. Gather your ingredients, preheat your oven, and get ready to enjoy these scrumptious Red Velvet Crinkle Cookies.
Ingredients:
- 1 and 1/2 cups all-purpose flour
- 1/4 cup unsweetened cocoa powder
- 1 teaspoon baking powder
- 1/4 teaspoon salt
- 1/2 cup unsalted butter, softened
- 3/4 cup granulated sugar
- 1 large egg
- 1 teaspoon vanilla extract
- 1 tablespoon red food coloring
- 1/2 cup confectioners’ sugar (for rolling)
Instructions:
- Preheat the Oven: Begin by preheating your oven to 350°F (175°C). Line two baking sheets with parchment paper to guarantee the cookies bake evenly and don’t stick.
- Mix Dry Ingredients: In a medium-sized bowl, whisk together the all-purpose flour, unsweetened cocoa powder, baking powder, and salt. This will assure that the dry ingredients are evenly distributed.
- Cream Butter and Sugar: In a large mixing bowl, beat the softened butter and granulated sugar together using an electric mixer until the mixture is light and fluffy. This should take about 2-3 minutes.
- Add Wet Ingredients: Add the egg, vanilla extract, and red food coloring to the butter and sugar mixture. Beat until fully combined and the color is evenly distributed.
- Combine Ingredients: Gradually add the dry ingredients to the wet mixture, mixing on low speed until just combined. Be careful not to overmix, as this can make the cookies tough.
- Chill the Dough: Cover the dough with plastic wrap and refrigerate for at least 30 minutes. Chilling the dough will make it easier to handle and help the cookies maintain their shape while baking.
- Roll the Cookies: Once the dough is chilled, scoop out tablespoon-sized portions and roll them into balls. Roll each ball in the confectioners’ sugar until thoroughly coated.
- Bake the Cookies: Place the sugar-coated dough balls onto the prepared baking sheets, spacing them about 2 inches apart. Bake in the preheated oven for 10-12 minutes, or until the cookies have spread and developed a crinkled appearance.
- Cool and Serve: Allow the cookies to cool on the baking sheets for a few minutes before transferring them to a wire rack to cool completely. Enjoy them with a glass of milk or a cup of hot cocoa.
Extra Tips:
For the best results, make sure your butter is softened to room temperature before starting, as this will help it cream more effectively with the sugar. If you prefer a deeper red color, feel free to add a little more food coloring.
These cookies can be stored in an airtight container at room temperature for up to a week, making them a great make-ahead option for holiday gatherings. Finally, for an extra touch of holiday flavor, consider adding a teaspoon of espresso powder to the dry ingredients to enhance the cocoa flavor.
Spiced Eggnog Thumbprint Cookies
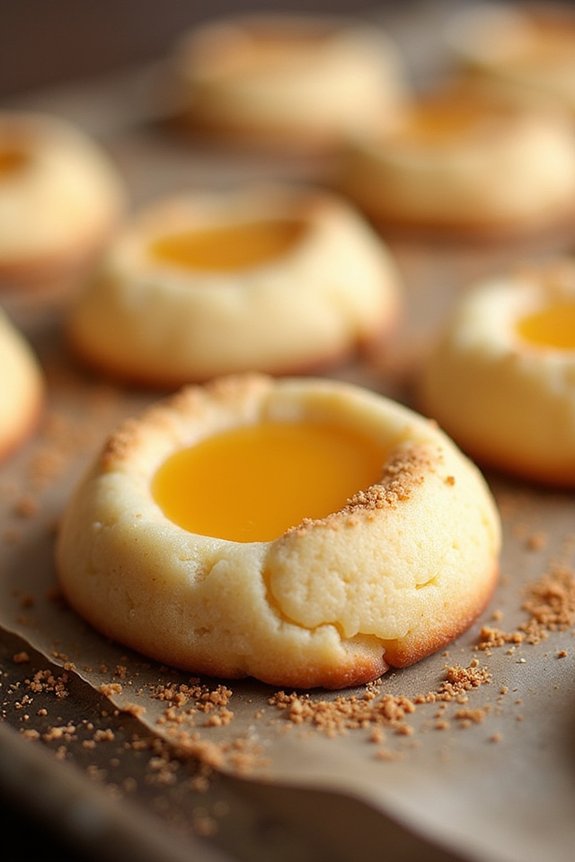
Spiced Eggnog Thumbprint Cookies are a delightful holiday treat that combines the warmth of spices with the creamy richness of eggnog. Perfect for Christmas gatherings, these cookies offer a unique twist on traditional thumbprint cookies by incorporating the classic holiday beverage into both the dough and the filling. The result is a soft, buttery cookie with a luscious eggnog center, making it a festive addition to any dessert table.
These cookies aren’t only delicious but also visually appealing, with their golden-brown hue and glossy eggnog filling. They’re simple to make and can be stored for several days, making them an ideal choice for holiday baking. Whether you’re an experienced baker or trying your hand at baking for the first time, Spiced Eggnog Thumbprint Cookies will impress your family and friends with their distinctive flavor and festive charm.
Ingredients (serving size: 4-6 people):
- 2 1/4 cups all-purpose flour
- 1/2 teaspoon ground cinnamon
- 1/4 teaspoon ground nutmeg
- 1/4 teaspoon salt
- 1 cup unsalted butter, softened
- 3/4 cup granulated sugar
- 1 large egg yolk
- 1 teaspoon vanilla extract
- 1/2 cup eggnog
For the filling:
- 1/4 cup eggnog
- 1 tablespoon cornstarch
- 3 tablespoons granulated sugar
- 1/4 teaspoon vanilla extract
- Pinch of ground nutmeg
Instructions:
- Preheat Oven: Start by preheating your oven to 350°F (175°C). Line two baking sheets with parchment paper to prevent the cookies from sticking.
- Prepare Dry Ingredients: In a medium bowl, whisk together the flour, cinnamon, nutmeg, and salt. This guarantees the spices are evenly distributed throughout the dough.
- Cream Butter and Sugar: In a large bowl, cream the softened butter and granulated sugar together using an electric mixer on medium speed until light and fluffy. This should take about 3-4 minutes.
- Add Egg and Vanilla: Beat in the egg yolk and vanilla extract until well combined, scraping down the sides of the bowl as needed.
- Incorporate Eggnog: Gradually add the eggnog, continuing to mix until fully incorporated. The mixture may look slightly curdled; this is normal.
- Combine Dry and Wet Ingredients: Slowly add the dry ingredients to the wet mixture, mixing on low speed until just combined. Avoid overmixing to keep the cookies tender.
- Shape Cookies: Using a small cookie scoop or tablespoon, roll the dough into 1-inch balls. Place them 2 inches apart on the prepared baking sheets.
- Create Thumbprints: Use your thumb or the back of a small spoon to make an indentation in the center of each cookie.
- Prepare Filling: In a small saucepan, whisk together the eggnog, cornstarch, and sugar over medium heat. Cook, stirring constantly, until the mixture thickens, about 2-3 minutes. Remove from heat and stir in vanilla and nutmeg.
- Fill Cookies: Spoon about 1/2 teaspoon of the eggnog filling into each indentation.
- Bake Cookies: Bake in the preheated oven for 12-15 minutes or until the edges are lightly golden. Allow the cookies to cool on the baking sheets for 5 minutes before transferring them to a wire rack to cool completely.
Extra Tips:
For the best results, make sure the butter is fully softened before starting the recipe, as this will help to create a smooth, creamy dough. If you find the dough is too sticky to work with, refrigerate it for 20-30 minutes before shaping it into balls.
You can also experiment by adding a pinch of ground cloves or ginger to the dough for an extra layer of spice. These cookies can be stored in an airtight container at room temperature for up to a week, making them a convenient option for holiday gifting or parties.
Candy Cane Shortbread Cookies

Candy Cane Shortbread Cookies are a delightful treat that combines the classic, buttery goodness of shortbread with the festive flavor and appearance of candy canes. These cookies are perfect for holiday gatherings or as a cozy homemade gift. Their crisp texture and the subtle cooling note of peppermint make them a must-try during the Christmas season.
Whether you’re an experienced baker or a novice in the kitchen, this recipe is straightforward and fun to make. The distinctive look of Candy Cane Shortbread Cookies is achieved by incorporating crushed candy canes into the dough, creating a beautiful speckled effect. Not only do these cookies look festive, but they also carry the sweet, minty aroma of peppermint.
When baked, the candy canes melt slightly, adding a little crunch and a burst of flavor to each bite. With this recipe, you’ll have a batch of 24 cookies, perfect for sharing with family and friends during the holidays.
Ingredients (Serving Size: 24 cookies)
- 1 cup unsalted butter, softened
- 1 cup powdered sugar
- 1 teaspoon vanilla extract
- 1/2 teaspoon peppermint extract
- 2 cups all-purpose flour
- 1/4 teaspoon salt
- 1/2 cup crushed candy canes
- Red or green sanding sugar (optional, for decoration)
Instructions
- Preheat your oven to 350°F (175°C). Line two baking sheets with parchment paper or silicone baking mats.
- Cream the butter and sugar: In a large mixing bowl, beat the softened butter and powdered sugar together using a hand mixer or stand mixer until the mixture is light and fluffy. This should take about 2-3 minutes.
- Add in extracts: Mix in the vanilla and peppermint extracts until they’re fully incorporated into the butter and sugar mixture.
- Combine dry ingredients: In a separate bowl, whisk together the all-purpose flour and salt. Gradually add the dry ingredients to the wet ingredients, mixing on low speed until just combined. Be careful not to overmix.
- Fold in candy canes: Using a spatula, gently fold the crushed candy canes into the dough until they’re evenly distributed. This will give your cookies their festive appearance.
- Shape the cookies: Roll the dough into tablespoon-sized balls and place them on the prepared baking sheets about 2 inches apart. If using, sprinkle the tops with red or green sanding sugar for added decoration.
- Bake the cookies: Place the baking sheets in the preheated oven and bake for 12-15 minutes, or until the edges of the cookies are just starting to turn golden. Don’t overbake, as the cookies will continue to firm up as they cool.
- Cool the cookies: Allow the cookies to cool on the baking sheets for 5 minutes before transferring them to a wire rack to cool completely.
Extra Tips
When crushing the candy canes, place them in a sealed plastic bag and use a rolling pin to gently crush them into small pieces. Be sure not to pulverize them into a powder.
If you prefer a stronger peppermint flavor, you can adjust the peppermint extract to taste, but be cautious as peppermint can quickly become overpowering. These cookies can be stored in an airtight container at room temperature for up to a week, making them an excellent make-ahead option for your holiday celebrations.
Pistachio Cranberry Biscotti
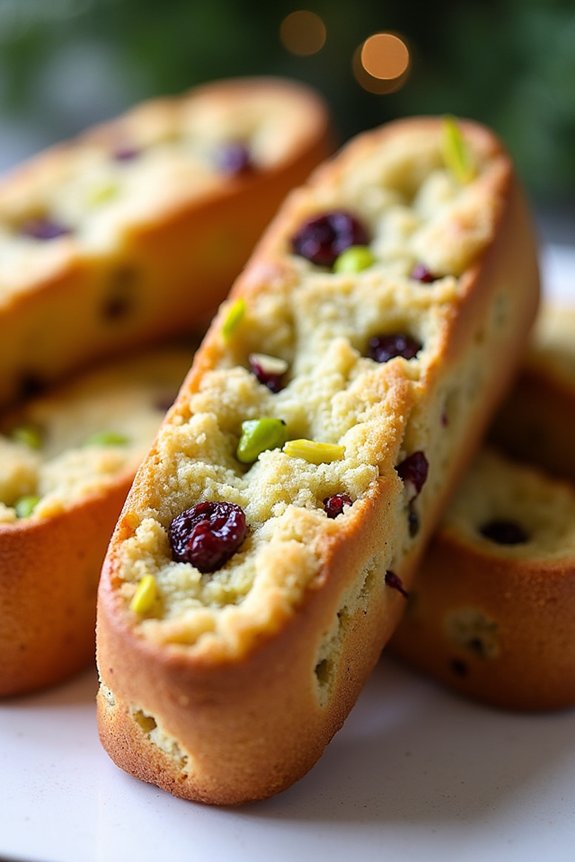
Pistachio Cranberry Biscotti is a delightful treat that combines the rich, nutty flavor of pistachios with the tartness of dried cranberries, offering a perfect balance of taste and texture.
These twice-baked Italian cookies are ideal for dipping in coffee or tea and make a festive addition to any holiday cookie platter. Their vibrant colors and complex flavors are certain to impress your guests and bring a touch of elegance to your Christmas celebrations.
Preparing Pistachio Cranberry Biscotti is a straightforward process that yields a generous batch, perfect for sharing with family and friends. This recipe is designed to serve 4-6 people and provides a delightful combination of sweet and savory notes.
The biscotti are crisp and light, making them a satisfying yet not overly indulgent treat. Whether you’re an experienced baker or new to making biscotti, this recipe is certain to become a holiday favorite.
Ingredients (Serves 4-6):
- 2 cups all-purpose flour
- 1 cup granulated sugar
- 1 teaspoon baking powder
- 1/2 teaspoon salt
- 3 large eggs
- 1 teaspoon vanilla extract
- 1 teaspoon almond extract
- 1 cup shelled pistachios
- 1 cup dried cranberries
Instructions:
- Preheat and Prepare: Preheat your oven to 350°F (175°C). Line a baking sheet with parchment paper or a silicone baking mat to prevent sticking and guarantee even baking.
- Mix Dry Ingredients: In a large mixing bowl, whisk together the all-purpose flour, granulated sugar, baking powder, and salt until well combined.
- Combine Wet Ingredients: In a separate bowl, lightly beat the eggs. Add the vanilla extract and almond extract, mixing until combined.
- Form the Dough: Gradually add the wet ingredients to the dry ingredients, stirring until a dough forms. The dough will be sticky, but this is normal.
- Incorporate Nuts and Fruit: Fold in the pistachios and dried cranberries, ensuring they’re evenly distributed throughout the dough.
- Shape the Logs: Divide the dough into two equal portions. On a floured surface, shape each portion into a log about 12 inches long and 2 inches wide. Place the logs on the prepared baking sheet, leaving space between them.
- First Bake: Bake in the preheated oven for 25-30 minutes, or until the logs are golden brown and firm to the touch. Remove from the oven and allow them to cool for about 10 minutes.
- Slice the Biscotti: Reduce the oven temperature to 300°F (150°C). Using a serrated knife, carefully slice the logs diagonally into 1/2 inch thick slices.
- Second Bake: Arrange the slices, cut side down, on the baking sheet. Return them to the oven and bake for an additional 10-12 minutes on each side, or until the biscotti are dry and crisp.
- Cool and Serve: Remove the biscotti from the oven and let them cool completely on a wire rack before serving.
Extra Tips:
For best results, guarantee your pistachios are fresh and unsalted to maintain a balanced flavor. If you prefer a softer biscotti, reduce the second baking time slightly.
To make slicing easier, use a sharp serrated knife and a gentle sawing motion to prevent crumbling. These biscotti can be stored in an airtight container for up to two weeks, making them perfect for holiday gifting.
Enjoy dipping them in your favorite hot beverage for a delightful treat!
Salted Caramel Chocolate Chip Cookies

Salted Caramel Chocolate Chip Cookies are a delightful twist on the classic chocolate chip cookie that brings together the rich, buttery flavor of caramel with the sweetness of chocolate chips and a hint of saltiness. These cookies are perfect for the holiday season, offering a decadent treat that’s both chewy and slightly crunchy.
The salted caramel not only enhances the chocolate flavor but also adds a sophisticated touch that elevates this beloved cookie to a new level of deliciousness. When preparing these cookies, it’s essential to get the balance of flavors just right. The salt in the caramel helps to cut through the sweetness, giving the cookies a more complex taste.
You’ll find that these cookies aren’t only a hit with children but are also beloved by adults who appreciate the combination of sweet and salty. Serve them warm with a glass of milk or a cup of hot cocoa for a comforting winter treat that will surely become a family favorite.
Ingredients for 4-6 servings:
- 2 1/4 cups all-purpose flour
- 1 teaspoon baking soda
- 1/2 teaspoon salt
- 1 cup unsalted butter, at room temperature
- 3/4 cup granulated sugar
- 3/4 cup packed brown sugar
- 1 teaspoon vanilla extract
- 2 large eggs
- 1 1/2 cups semisweet chocolate chips
- 1 cup caramel bits
- Sea salt flakes for sprinkling
Cooking Instructions:
- Preheat the Oven: Begin by preheating your oven to 350°F (175°C). Line two baking sheets with parchment paper or silicone baking mats to prevent the cookies from sticking.
- Mix Dry Ingredients: In a medium-sized bowl, whisk together the all-purpose flour, baking soda, and salt. This will guarantee that the baking soda is evenly distributed throughout the flour, leading to even baking.
- Cream the Butter and Sugars: In a large mixing bowl, use an electric mixer to cream the butter, granulated sugar, and brown sugar together until the mixture is light and fluffy. This process should take about 2-3 minutes.
- Add Eggs and Vanilla: Beat in the eggs, one at a time, making sure each egg is fully incorporated before adding the next. Then, mix in the vanilla extract.
- Combine Wet and Dry Ingredients: Gradually add the dry ingredients to the wet ingredients, mixing just until combined. Avoid overmixing, as this can lead to tough cookies.
- Stir in Chocolate Chips and Caramel Bits: Gently fold in the semisweet chocolate chips and caramel bits until they’re evenly distributed throughout the dough.
- Scoop and Bake: Using a cookie scoop or a tablespoon, drop rounded spoonfuls of dough onto the prepared baking sheets, leaving about 2 inches between each cookie to allow for spreading.
- Bake and Cool: Bake the cookies in the preheated oven for 10-12 minutes, or until they’re golden brown around the edges but still soft in the center. Remove the cookies from the oven and immediately sprinkle them with sea salt flakes. Let them cool on the baking sheet for 5 minutes before transferring them to a wire rack to cool completely.
Extra Tips:
For the best results, use quality chocolate chips and caramel bits to guarantee a rich flavor. If you prefer a gooey center, slightly underbake the cookies by a minute or two, keeping an eye on them towards the end of the baking time.
If your dough is too sticky to handle, refrigerate it for 30 minutes before baking. This will also help prevent the cookies from spreading too much during baking. Enjoy your Salted Caramel Chocolate Chip Cookies with a sprinkle of extra sea salt for a perfect balance of flavors!
Linzer Cookies With Raspberry Jam
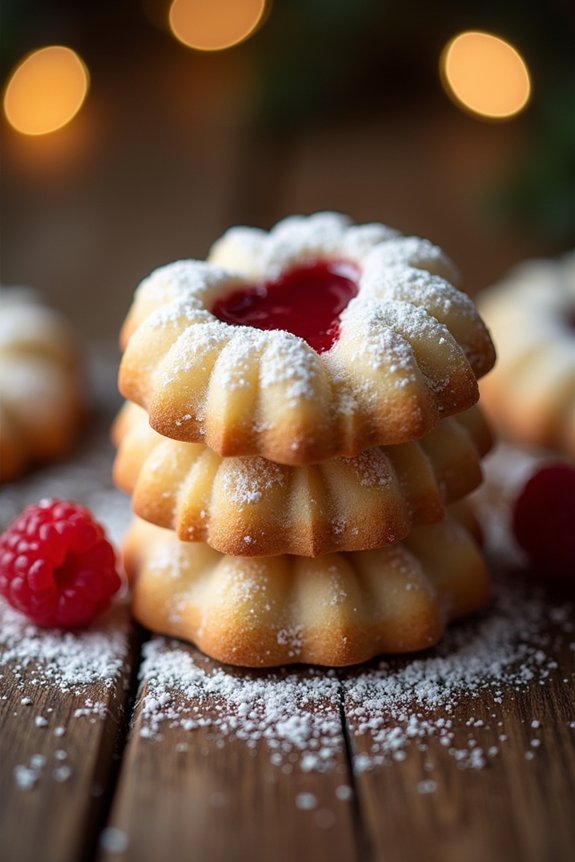
Linzer Cookies With Raspberry Jam are a delightful and festive treat that are perfect for the holiday season. Originating from Austria, these cookies are known for their buttery, nutty flavor and their beautiful, jam-filled centers. Made with ground almonds and flavored with a hint of cinnamon, Linzer cookies are a classic Christmas cookie that pairs wonderfully with a cup of hot cocoa or coffee. The raspberry jam not only adds a pop of color but also a sweet and slightly tart flavor, making these cookies irresistibly delicious.
These cookies aren’t only tasty but also visually appealing, with their traditional cut-out tops that showcase the vibrant jam filling. The dough is simple to make, and the cookies come together beautifully with just a bit of patience and care. Whether you’re baking for a holiday gathering or simply enjoying a cozy day at home, Linzer Cookies With Raspberry Jam are certain to be a hit.
Here’s how to make a batch for 4-6 people:
Ingredients:
- 1 3/4 cups all-purpose flour
- 1 cup ground almonds
- 1/2 teaspoon ground cinnamon
- 1/4 teaspoon salt
- 3/4 cup unsalted butter, softened
- 1/2 cup granulated sugar
- 1 large egg yolk
- 1 teaspoon vanilla extract
- 1/2 cup raspberry jam
- Powdered sugar, for dusting
Instructions:
- Prepare the Dough: In a medium bowl, whisk together the all-purpose flour, ground almonds, ground cinnamon, and salt. In a large bowl, beat the softened butter and granulated sugar together until light and fluffy. Add the egg yolk and vanilla extract, mixing until well incorporated. Gradually add the dry ingredients to the wet ingredients, mixing until a dough forms.
- Chill the Dough: Divide the dough into two discs, wrap them in plastic wrap, and refrigerate for at least 1 hour. This will help the dough firm up and make it easier to roll out.
- Roll Out the Dough: Preheat your oven to 350°F (175°C). On a lightly floured surface, roll out one disc of dough to about 1/8-inch thickness. Use a 2-inch round cookie cutter to cut out cookies. Transfer the cookies to a baking sheet lined with parchment paper.
- Create the Cookie Tops: Roll out the second disc of dough to the same thickness. Use the same round cookie cutter to cut out circles, then use a smaller cutter to make a window in the center of each one. These will be the tops of your Linzer cookies.
- Bake the Cookies: Bake the cookies in the preheated oven for 10-12 minutes, or until the edges are lightly golden. Allow them to cool on the baking sheet for a few minutes before transferring them to a wire rack to cool completely.
- Assemble the Cookies: Once the cookies are cool, spread about 1 teaspoon of raspberry jam on the bottom halves of the cookies. Place the windowed top halves on top, pressing gently to adhere them together.
- Dust with Powdered Sugar: Lightly dust the assembled cookies with powdered sugar before serving.
Extra Tips: When making Linzer Cookies With Raspberry Jam, make sure to chill the dough thoroughly to guarantee ease in rolling and cutting. If the dough becomes too warm while working, return it to the refrigerator for a few minutes.
Additionally, you can experiment with different jams for a variety of flavors. When storing the cookies, keep them in an airtight container to maintain their freshness. Enjoy these beautiful and tasty treats as part of your holiday celebrations!
Orange Cardamom Biscuit Stars
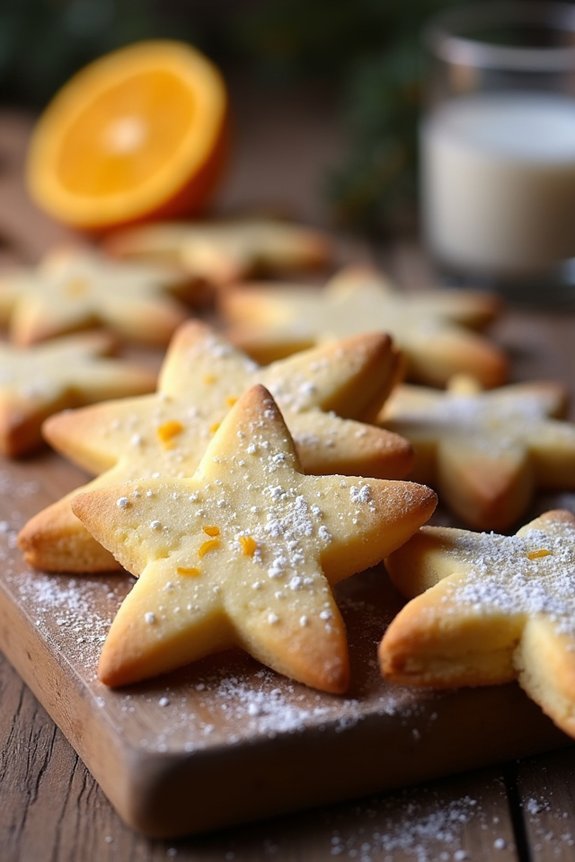
Orange Cardamom Biscuit Stars are a delightful holiday treat that perfectly capture the essence of Christmas with their aromatic blend of orange and cardamom. These biscuits, shaped like stars, make for a charming addition to any festive gathering, and they’re as pleasing to the eye as they’re to the palate. The warm, spicy notes of cardamom paired with the zesty brightness of orange create an unforgettable flavor that’s bound to impress your family and friends.
These cookies aren’t only delicious but also relatively easy to prepare, making them a great option for both novice and experienced bakers. The recipe yields a batch of cookies that are perfect for sharing or gifting, with a serving size suitable for 4-6 people. The dough comes together quickly and can be rolled out and cut into star shapes with ease. Once baked, the cookies can be decorated with icing or left plain to let their natural flavors shine.
Ingredients (Serves 4-6):
- 2 cups all-purpose flour
- 1/2 teaspoon baking powder
- 1/4 teaspoon salt
- 1 teaspoon ground cardamom
- 1/2 cup unsalted butter, softened
- 3/4 cup granulated sugar
- 1 large egg
- 1 teaspoon vanilla extract
- Zest of 1 large orange
- 2 tablespoons fresh orange juice
Cooking Instructions:
- Prepare the Dry Ingredients: In a medium-sized bowl, whisk together the flour, baking powder, salt, and ground cardamom. This guarantees that the cardamom is evenly distributed throughout the flour mixture.
- Cream the Butter and Sugar: In a large mixing bowl, beat the softened butter and granulated sugar together until the mixture is light and fluffy. This should take about 2-3 minutes using an electric mixer on medium speed. This step is vital as it incorporates air into the mixture, resulting in lighter cookies.
- Add the Wet Ingredients: Add the egg, vanilla extract, orange zest, and orange juice to the butter and sugar mixture. Beat until everything is fully combined. The orange zest and juice will infuse the dough with a bright citrus flavor.
- Combine the Dry and Wet Ingredients: Gradually add the dry ingredients to the wet ingredients, mixing on low speed until a dough forms. Be careful not to overmix, as this can make the cookies tough.
- Chill the Dough: Wrap the dough in plastic wrap and refrigerate for at least 1 hour. Chilling the dough helps to firm it up, making it easier to roll out and cut into shapes.
- Preheat the Oven: Preheat your oven to 350°F (175°C). Line two baking sheets with parchment paper.
- Roll and Cut the Dough: On a lightly floured surface, roll out the chilled dough to about 1/4 inch thick. Use a star-shaped cookie cutter to cut out the cookies, and place them on the prepared baking sheets, leaving a little space between each one.
- Bake the Cookies: Bake the cookies in the preheated oven for 10-12 minutes, or until the edges are lightly golden. Be sure to rotate the baking sheets halfway through to guarantee even baking.
- Cool the Cookies: Allow the cookies to cool on the baking sheets for a few minutes before transferring them to a wire rack to cool completely.
Extra Tips: For an extra festive touch, consider decorating the cooled cookies with a simple glaze made from powdered sugar and orange juice, or sprinkle them with a bit of sanding sugar before baking for a subtle sparkle. If you prefer a stronger cardamom flavor, you can increase the amount to 1 1/2 teaspoons.
These cookies also store well; keep them in an airtight container at room temperature for up to a week, or freeze them for longer storage. Enjoy your Orange Cardamom Biscuit Stars with a cup of hot cocoa or mulled wine for the perfect holiday treat.
White Chocolate Cranberry Oatmeal Cookies
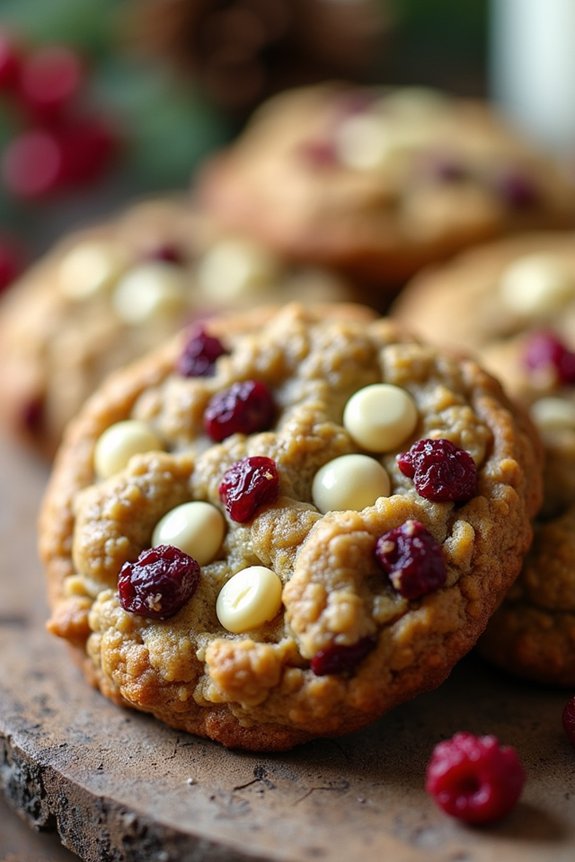
White Chocolate Cranberry Oatmeal Cookies are a delightful treat perfect for the holiday season. These cookies combine the rich, creamy sweetness of white chocolate with the tartness of dried cranberries, all nestled in a hearty oatmeal base. The result is a cookie that’s both chewy and satisfying, with each bite offering a burst of flavor.
They’re perfect for sharing with family and friends during Christmas gatherings or as a sweet treat for yourself to enjoy by the fire.
The combination of textures and flavors in these cookies is truly irresistible. The oats provide a wholesome foundation, while the white chocolate chips melt slightly during baking, creating pockets of sweetness. The cranberries add a festive touch, both in appearance and taste, making these cookies a standout on any holiday cookie platter.
Whether you’re an experienced baker or new to the kitchen, this recipe is straightforward and yields delicious results every time.
Ingredients (Serves 4-6)
- 1 cup unsalted butter, softened
- 1 cup packed brown sugar
- 1/2 cup granulated sugar
- 2 large eggs
- 1 teaspoon vanilla extract
- 1 1/2 cups all-purpose flour
- 1 teaspoon baking soda
- 1/2 teaspoon salt
- 3 cups rolled oats
- 1 cup white chocolate chips
- 1 cup dried cranberries
Instructions
- Preheat and Prepare: Preheat your oven to 350°F (175°C). Line two baking sheets with parchment paper or silicone baking mats to prevent sticking.
- Cream the Butter and Sugars: In a large mixing bowl, cream together the softened butter, brown sugar, and granulated sugar until the mixture is light and fluffy. This should take about 2-3 minutes using an electric mixer on medium speed.
- Add Eggs and Vanilla: Beat in the eggs one at a time, ensuring each is fully incorporated before adding the next. Mix in the vanilla extract until combined.
- Combine Dry Ingredients: In a separate bowl, whisk together the flour, baking soda, and salt. Gradually add these dry ingredients to the wet mixture, mixing on low speed until just combined.
- Stir in Oats, Chocolate, and Cranberries: Using a spatula or wooden spoon, fold in the rolled oats, white chocolate chips, and dried cranberries until evenly distributed throughout the dough.
- Shape the Cookies: Scoop tablespoon-sized balls of dough onto the prepared baking sheets, spacing them about 2 inches apart to allow for spreading during baking.
- Bake: Bake in the preheated oven for 10-12 minutes or until the edges are golden brown. The centers might appear slightly underbaked, but they’ll continue to set as they cool.
- Cool: Allow the cookies to cool on the baking sheets for about 5 minutes before transferring them to a wire rack to cool completely.
Extra Tips
For the best texture, make sure not to overbake the cookies; they should be slightly soft when removed from the oven. If you prefer a more uniform shape, gently press the dough balls flat before baking.
You can also experiment by adding nuts like chopped pecans or almonds for added crunch. If you have time, chilling the dough for an hour before baking can enhance the flavor and texture, making the cookies even more delicious.
Enjoy these cookies fresh, or store them in an airtight container to maintain their chewy texture.
Holiday Sprinkle Confetti Cookies

Holiday Sprinkle Confetti Cookies are the perfect festive treat to brighten up your holiday season. Bursting with colorful sprinkles and a delightful buttery flavor, these cookies aren’t only visually appealing but also incredibly delicious. Their soft and chewy texture makes them a crowd-pleaser at any holiday gathering.
Whether you’re an experienced baker or a novice in the kitchen, this recipe is simple to follow and guarantees a delightful outcome. These cookies are a fantastic way to get into the holiday spirit with family and friends. The combination of vibrant sprinkles and the sweet aroma of freshly baked cookies will surely fill your home with warmth and joy.
Perfect for gift-giving or as a special treat for Santa, these Holiday Sprinkle Confetti Cookies are a must-have in your festive baking repertoire. Now, let’s explore the ingredients and steps needed to create this delightful holiday treat.
Ingredients (Serves 4-6 people):
- 2 1/4 cups all-purpose flour
- 1/2 teaspoon baking soda
- 1/2 teaspoon baking powder
- 1/4 teaspoon salt
- 1 cup unsalted butter, softened
- 1 cup granulated sugar
- 1 large egg
- 2 teaspoons vanilla extract
- 1/4 cup holiday-themed sprinkles (plus extra for topping)
Cooking Instructions:
- Preheat and Prepare Baking Sheets: Preheat your oven to 350°F (175°C). Line two baking sheets with parchment paper and set them aside.
- Mix Dry Ingredients: In a medium-sized bowl, whisk together the flour, baking soda, baking powder, and salt. Set this dry mixture aside.
- Cream Butter and Sugar: In a large mixing bowl, beat the softened butter and granulated sugar together using an electric mixer on medium speed until light and fluffy, about 2 minutes.
- Add Wet Ingredients: Beat in the egg and vanilla extract to the butter-sugar mixture, mixing until well combined.
- Combine Wet and Dry Mixtures: Gradually add the dry ingredients to the wet ingredients, mixing on low speed until just combined. Be sure not to overmix the dough.
- Fold in Sprinkles: Gently fold in the holiday-themed sprinkles until evenly distributed throughout the dough.
- Shape and Arrange Cookies: Scoop tablespoon-sized amounts of dough and roll them into balls. Place them on the prepared baking sheets, spaced about 2 inches apart. Gently press additional sprinkles onto the tops of each cookie ball for extra festiveness.
- Bake the Cookies: Bake in the preheated oven for 10-12 minutes, or until the edges are lightly golden. The centers should still be soft.
- Cool and Serve: Remove the cookies from the oven and allow them to cool on the baking sheets for 5 minutes before transferring them to a wire rack to cool completely.
Extra Tips: To guarantee that your Holiday Sprinkle Confetti Cookies maintain their soft and chewy texture, avoid overbaking them. Remember that the cookies will continue to cook slightly after being removed from the oven while cooling on the baking sheets.
Also, feel free to experiment with different sprinkle colors and shapes to match various holidays or events. For added flavor, you can substitute half of the vanilla extract with almond extract. Enjoy the festive fun of baking these delightful cookies with family and friends!