

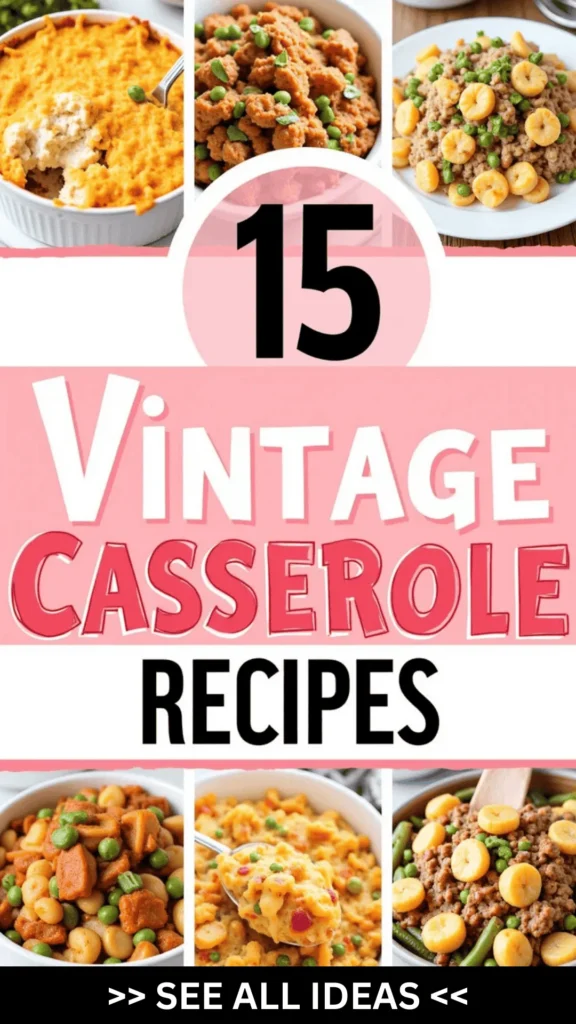
There’s something so heartwarming about vintage casserole recipes that brings back the sweet memories of family gatherings in my grandmother’s kitchen.
These dishes are a perfect blend of creamy comfort and hearty flavors, making them ideal for busy weeknights when you want something satisfying.
From the beloved Tuna Noodle Casserole to the classic Baked Ziti, each recipe offers a cozy embrace that feels like home.
I can’t wait to share these timeless treasures with you, as they might just become your family’s new favorites.
Let’s get cooking!
Classic Tuna Noodle Casserole
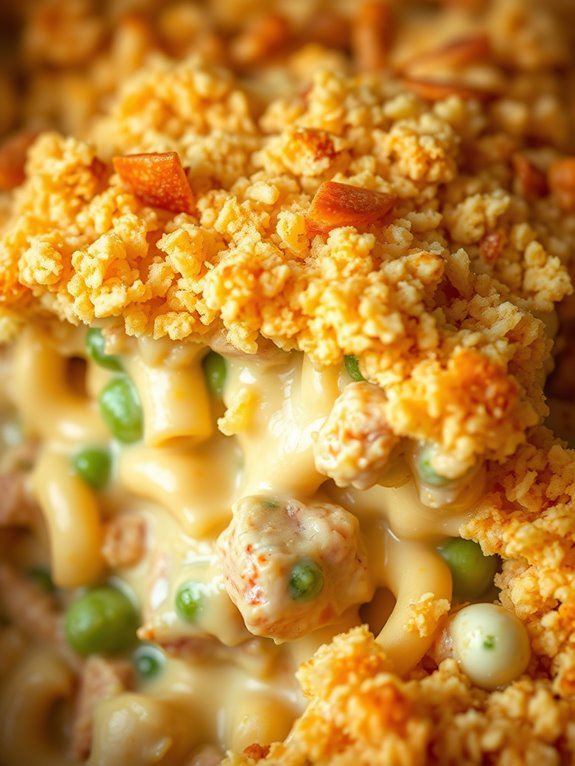
Classic Tuna Noodle Casserole is a beloved vintage recipe that combines the convenience of pantry staples with the comforting flavors of a homemade meal. This dish has been a staple in many households for decades, thanks to its simplicity and the comforting, creamy texture that appeals to both children and adults alike.
Often served during the cooler months, this casserole provides a hearty and filling meal that warms the soul and brings a touch of nostalgia to the dinner table.
The recipe’s origins can be traced back to the mid-20th century when casseroles became a popular way to stretch ingredients and create satisfying meals with minimal effort. Tuna Noodle Casserole typically features tender egg noodles, canned tuna, and a creamy sauce, often made with a can of cream of mushroom soup.
Topped with a crunchy layer of breadcrumbs or crushed potato chips, this dish is baked to golden perfection, making it a quintessential comfort food for families everywhere.
Ingredients (Serves 4-6)
- 8 ounces of egg noodles
- 2 cans (5 ounces each) of tuna in water, drained
- 1 can (10.5 ounces) of cream of mushroom soup
- 1 cup of frozen peas
- 1 cup of shredded cheddar cheese
- 1/2 cup of milk
- 1/2 cup of sour cream
- 1/4 cup of diced onion
- 1 tablespoon of butter
- Salt and pepper to taste
- 1 cup of breadcrumbs or crushed potato chips
Cooking Instructions
1. Preheat the Oven: Start by preheating your oven to 350°F (175°C) to make sure it’s ready for baking the casserole.
2. Cook the Noodles: In a large pot, bring water to a boil and cook the egg noodles according to the package instructions until al dente. Drain and set aside.
3. Prepare the Sauce: In a large skillet, melt the butter over medium heat. Add the diced onion and sauté until translucent, about 3-4 minutes.
Stir in the cream of mushroom soup, milk, sour cream, salt, and pepper. Cook for another 2-3 minutes until the mixture is smooth and heated through.
4. Combine Ingredients: In a large mixing bowl, combine the cooked noodles, drained tuna, frozen peas, and the sauce. Mix in the shredded cheddar cheese, making sure all ingredients are evenly distributed.
5. Assemble the Casserole: Transfer the mixture into a greased 9×13-inch baking dish. Spread it out evenly and sprinkle the breadcrumbs or crushed potato chips on top to create a crispy crust.
6. Bake: Place the casserole in the preheated oven and bake for 25-30 minutes, or until the top is golden brown and the cheese is bubbly around the edges.
7. Serve: Remove from the oven and let the casserole cool for a few minutes before serving. Enjoy your Classic Tuna Noodle Casserole warm.
Extra Tips
For an extra layer of flavor, consider adding a teaspoon of garlic powder or a dash of Worcestershire sauce to the sauce mixture.
If you prefer a crunchier topping, mix the breadcrumbs with a tablespoon of melted butter before sprinkling them on the casserole.
Feel free to customize with your favorite vegetables or substitute cheddar cheese with another type of cheese like mozzarella or Monterey Jack for a different flavor profile.
This dish is also a great way to use up leftover vegetables or proteins you have on hand.
Hearty Chicken and Rice Bake
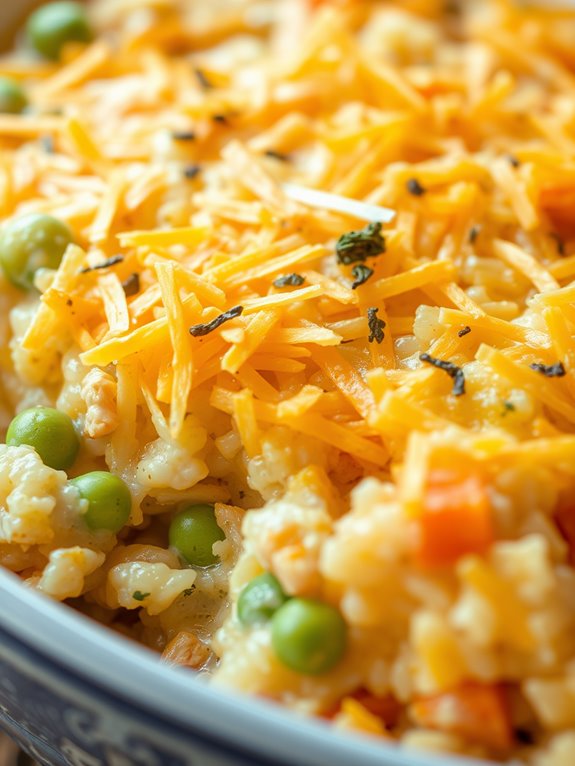
Indulge in the comforting nostalgia of a Hearty Chicken and Rice Bake, a classic vintage casserole recipe that brings warmth and satisfaction to your dining table. This sumptuous dish blends tender chicken, fluffy rice, and a savory combination of vegetables, all enveloped in a creamy sauce. Perfect for family gatherings or a cozy weeknight dinner, this casserole is designed to serve 4-6 people, making it an ideal choice for sharing with loved ones.
The beauty of this recipe lies in its simplicity and ability to deliver a satisfying meal with minimal fuss. By using pantry staples and a few fresh ingredients, you can create a wholesome dish that captures the essence of home-cooked comfort food. The Hearty Chicken and Rice Bake isn’t only delicious but also versatile, allowing for easy customization to suit your taste preferences or dietary needs.
Ingredients (Serves 4-6):
- 1 1/2 pounds boneless, skinless chicken breasts
- 1 cup long-grain white rice, uncooked
- 2 cups chicken broth
- 1 cup milk
- 1 can (10.5 oz) condensed cream of mushroom soup
- 1 cup frozen peas and carrots mix
- 1 medium onion, finely chopped
- 2 cloves garlic, minced
- 1 teaspoon dried thyme
- 1 teaspoon dried parsley
- Salt and pepper to taste
- 1 cup shredded cheddar cheese
- 2 tablespoons olive oil
Cooking Instructions:
- Preheat Oven: Begin by preheating your oven to 350°F (175°C) to guarantee it’s ready for baking the casserole.
- Prepare Chicken: Season the chicken breasts with salt and pepper. Heat the olive oil in a large skillet over medium heat. Add the chicken and cook for about 5-7 minutes per side, until browned. Remove from skillet and set aside to cool slightly, then cut into bite-sized pieces.
- Sauté Vegetables: In the same skillet, add the chopped onion and minced garlic. Sauté for 2-3 minutes until the onion becomes translucent and fragrant.
- Combine Ingredients: In a large mixing bowl, combine the uncooked rice, chicken broth, milk, cream of mushroom soup, thyme, parsley, sautéed onion and garlic, and the frozen peas and carrots mix. Stir well to combine.
- Transfer to Casserole Dish: Pour the rice mixture into a greased 9×13-inch casserole dish. Evenly distribute the bite-sized chicken pieces over the mixture.
- Bake: Cover the casserole dish with aluminum foil and bake in the preheated oven for 40 minutes.
- Add Cheese: After 40 minutes, remove the foil and sprinkle the shredded cheddar cheese over the top of the casserole. Return to the oven, uncovered, and bake for an additional 10-15 minutes, or until the cheese is melted and bubbly, and the rice is tender.
- Serve: Once cooked, remove the casserole from the oven and let it rest for 5 minutes before serving. This allows the flavors to meld together beautifully.
Extra Tips:
For a richer flavor, you can substitute cream of chicken soup for the cream of mushroom soup. If you prefer a bit of a kick, consider adding a pinch of cayenne pepper or a splash of hot sauce to the rice mixture.
Feel free to switch up the vegetables by using fresh broccoli or spinach for a different twist on the classic recipe. Remember, letting the casserole rest for a few minutes before serving helps to set the ingredients and makes it easier to serve. Enjoy your Hearty Chicken and Rice Bake with a side salad or crusty bread for a complete meal.
Traditional Beef Stroganoff Casserole

Traditional Beef Stroganoff Casserole is a delightful twist on the classic Russian dish, combining the rich flavors of beef, mushrooms, and a creamy sauce, all baked together with noodles into a comforting casserole.
This version is perfect for family dinners or potlucks, offering a hearty meal that’s easy to prepare and sure to satisfy everyone at the table. The casserole format means that you get all the deliciousness of beef stroganoff with the convenience of a one-dish meal that’s easy to serve.
The casserole is layered with tender slices of beef, savory mushrooms, and egg noodles, all enveloped in a creamy sauce made with sour cream and beef broth. It’s then topped with a sprinkle of cheese and baked until bubbly and golden brown.
This dish is perfect for serving 4-6 people, making it an ideal choice for family gatherings or dinner parties. With just a few simple steps, you’ll have a delicious and comforting meal that’s sure to become a family favorite.
Ingredients (for 4-6 servings):
- 1 pound beef sirloin, thinly sliced
- 8 ounces egg noodles
- 2 tablespoons olive oil
- 1 medium onion, chopped
- 2 cloves garlic, minced
- 8 ounces mushrooms, sliced
- 2 tablespoons all-purpose flour
- 2 cups beef broth
- 1 cup sour cream
- 1 teaspoon Dijon mustard
- Salt and pepper to taste
- 1 cup shredded cheddar cheese
- 2 tablespoons chopped fresh parsley (optional)
Instructions:
- Preheat and Prepare: Preheat your oven to 350°F (175°C). Start by cooking the egg noodles according to the package instructions. Once cooked, drain and set aside.
- Cook the Beef: In a large skillet over medium-high heat, add 1 tablespoon of olive oil. Add the sliced beef and cook until browned, about 5 minutes. Remove the beef from the skillet and set aside.
- Sauté Vegetables: In the same skillet, add the remaining tablespoon of olive oil. Add the chopped onion and garlic, sautéing for about 2 minutes until the onion is translucent. Stir in the sliced mushrooms and cook until they’re tender and browned, about 5 minutes.
- Make the Sauce: Sprinkle the flour over the vegetables and stir well to coat. Gradually add the beef broth, stirring continuously to avoid lumps. Bring the mixture to a simmer, then reduce the heat to low and stir in the sour cream and Dijon mustard. Add salt and pepper to taste.
- Combine and Assemble: Return the cooked beef to the skillet, mixing it into the sauce. Add the cooked egg noodles, stirring until everything is well combined. Transfer the mixture to a greased baking dish.
- Top and Bake: Sprinkle the shredded cheddar cheese evenly over the top of the casserole. Place the baking dish in the preheated oven and bake for 20-25 minutes, or until the cheese is melted and bubbly.
- Garnish and Serve: Remove the casserole from the oven and let it cool for a few minutes. If desired, garnish with chopped fresh parsley before serving.
To enhance the flavor of your Traditional Beef Stroganoff Casserole, consider adding a splash of Worcestershire sauce to the beef while it cooks for an extra depth of flavor.
If you prefer a thicker sauce, you can increase the amount of flour used. For a lighter version, substitute Greek yogurt for sour cream. This dish pairs beautifully with a simple green salad or steamed vegetables, making it a well-rounded and satisfying meal.
Timeless Green Bean Casserole

The Timeless Green Bean Casserole is a classic dish that has graced tables across generations, beloved for its creamy texture and savory flavors. Perfect for a family gathering or a holiday feast, this casserole combines tender green beans with a rich mushroom sauce and a crispy onion topping.
It’s a dish that brings warmth and comfort to any meal, with its delightful blend of flavors and textures. Originally popularized in the mid-20th century, the green bean casserole has become a staple in American kitchens. This recipe stays true to its roots while offering a simple yet delicious approach to creating the dish.
With fresh green beans and a homemade mushroom sauce, you’ll discover just why this casserole has stood the test of time. Prepare to enjoy a delectable experience that will have your guests asking for seconds.
Ingredients for 4-6 servings:
- 1 pound fresh green beans, trimmed and cut into 1-inch pieces
- 2 tablespoons unsalted butter
- 1 small onion, finely chopped
- 2 cloves garlic, minced
- 8 ounces button mushrooms, sliced
- 2 tablespoons all-purpose flour
- 1 cup chicken or vegetable broth
- 1 cup heavy cream
- Salt and pepper to taste
- 1 cup fried onions, for topping
Cooking Instructions:
- Preheat and Prepare: Preheat your oven to 350°F (175°C). Bring a large pot of salted water to a boil. Add the green beans and cook until tender-crisp, about 5 minutes. Drain and set aside.
- Sauté the Aromatics: In a large skillet over medium heat, melt the butter. Add the chopped onion and sauté until translucent, about 3-4 minutes. Add the garlic and sliced mushrooms, and cook until the mushrooms are tender and have released their moisture, about 5 more minutes.
- Make the Sauce: Sprinkle the flour over the mushroom mixture and stir to combine, cooking for another 1-2 minutes to eliminate the raw flour taste. Slowly whisk in the broth, making certain there are no lumps. Then add the heavy cream, stirring continuously until the sauce thickens, about 3-5 minutes. Season with salt and pepper to taste.
- Combine and Transfer: Add the cooked green beans to the mushroom sauce, stirring to mix well. Transfer the mixture into a greased 9×13 inch baking dish.
- Top and Bake: Evenly spread the fried onions over the top of the casserole. Place the dish in the preheated oven and bake for 25-30 minutes, or until the top is golden brown and the edges are bubbly.
- Serve: Remove from the oven and let it cool for a few minutes before serving. Enjoy this timeless dish as a side to your favorite main course.
Extra Tips:
For a richer flavor, consider using a mixture of cremini and white button mushrooms. If you’re short on time, canned green beans can be used, but fresh green beans will provide the best texture.
When making the mushroom sauce, make certain it thickens enough to coat the back of a spoon for the perfect consistency. If you prefer a bit of spice, add a dash of cayenne pepper to the sauce.
Finally, the casserole can be assembled ahead of time and stored in the refrigerator until ready to bake, making it a convenient option for busy cooks.
Old-Fashioned Shepherd’s Pie
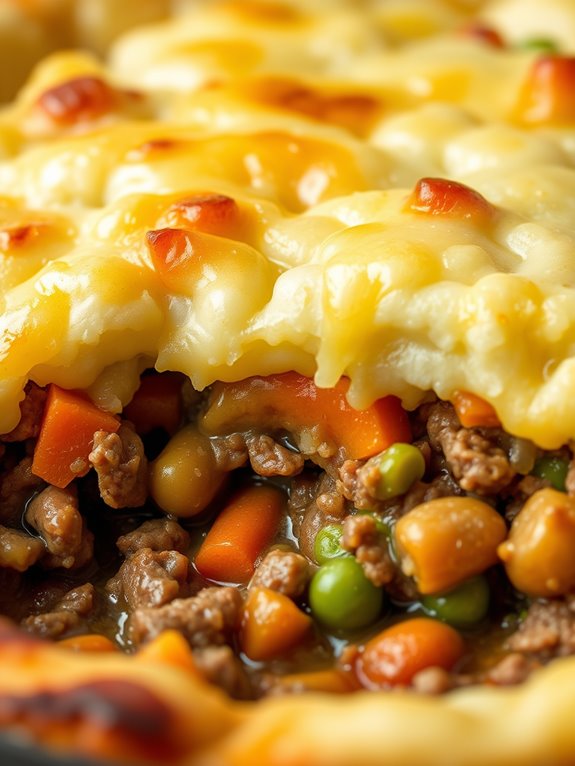
Old-Fashioned Shepherd’s Pie is a classic comfort food that has stood the test of time. This dish combines a savory ground meat filling with hearty vegetables, all topped with a creamy layer of mashed potatoes. It’s perfect for family dinners or cozy gatherings, offering a warm and satisfying meal that brings a touch of nostalgia to your table.
Originally hailing from the UK, Shepherd’s Pie has been adapted over the years, but the core ingredients and flavors remain just as delightful as ever.
The beauty of this dish lies in its simplicity and the harmony of flavors it brings together. The rich and flavorful meat mixture is enhanced by the earthiness of carrots and peas, while the smooth and buttery mashed potatoes provide the perfect finishing touch.
Whether you’re revisiting cherished memories or discovering this dish for the first time, Old-Fashioned Shepherd’s Pie is sure to become a beloved staple in your culinary repertoire.
Ingredients (Serving Size: 4-6 people):
- 1 1/2 pounds ground lamb or beef
- 1 onion, chopped
- 2 carrots, diced
- 1 cup frozen peas
- 2 cloves garlic, minced
- 2 tablespoons tomato paste
- 1 cup beef broth
- 1 tablespoon Worcestershire sauce
- 2 tablespoons flour
- Salt and pepper to taste
- 4 cups mashed potatoes
- 1/2 cup shredded cheddar cheese
- 1 tablespoon olive oil
- 1 tablespoon butter
Cooking Instructions:
- Prepare the Meat Filling:
- Heat the olive oil in a large skillet over medium heat. Add the chopped onion, diced carrots, and minced garlic. Sauté until the vegetables are softened, about 5 minutes.
- Cook the Meat:
- Add the ground lamb or beef to the skillet. Cook until browned, breaking it apart with a spoon. Drain any excess fat.
- Add Flavor:
- Stir in the tomato paste, flour, Worcestershire sauce, salt, and pepper. Cook for another 2 minutes to blend the flavors.
- Simmer:
- Pour in the beef broth and add the frozen peas. Bring to a simmer and let it cook for about 10-15 minutes, or until the mixture thickens slightly and the peas are tender.
- Prepare the Topping:
- Preheat your oven to 400°F (200°C). Spread the meat mixture evenly in a baking dish. Spoon the mashed potatoes over the top, smoothing them out with a spatula.
- Add Cheese:
- Sprinkle the shredded cheddar cheese over the mashed potatoes.
- Bake:
- Place the baking dish in the preheated oven. Bake for 20-25 minutes, or until the cheese is melted and the top is golden brown.
- Serve:
- Allow the Shepherd’s Pie to cool slightly before serving.
Extra Tips:
For an extra crispy topping, consider broiling the Shepherd’s Pie for a couple of minutes at the end of the baking time. Keep a close eye to prevent burning.
If you prefer a bit more depth in flavor, try adding a splash of red wine to the meat mixture during the simmering process.
Also, for a smoother mashed potato topping, whip the potatoes with a bit of cream or milk before spreading them over the meat.
This dish is versatile, so feel free to adjust the vegetables according to your preference or seasonal availability.
Vintage Scalloped Potatoes and Ham
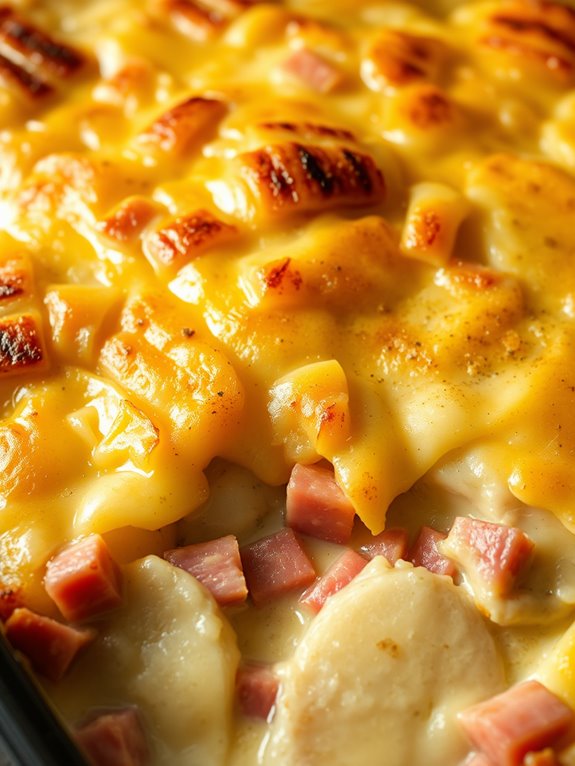
Vintage Scalloped Potatoes and Ham is a classic casserole dish that has been a family favorite for generations. This dish combines tender potatoes and savory ham, layered with a creamy sauce and topped with melted cheese, creating a comforting and satisfying meal.
The origins of scalloped potatoes date back to European cuisine, and over time, the addition of ham has made it a more substantial dish, perfect for family gatherings or as a hearty weeknight dinner.
This recipe serves 4-6 people, making it ideal for a small family or a group of friends. The creamy sauce is made from scratch, infusing the dish with rich flavors, while the baked cheese provides a delightful contrast in texture.
Whether you’re revisiting this dish from childhood memories or trying it for the first time, Vintage Scalloped Potatoes and Ham is sure to become a staple in your recipe collection.
Ingredients:
- 4 cups thinly sliced potatoes
- 2 cups diced cooked ham
- 1 medium onion, finely chopped
- 2 cups shredded cheddar cheese
- 3 tablespoons butter
- 3 tablespoons all-purpose flour
- 2 cups milk
- Salt and pepper to taste
- 1/4 teaspoon garlic powder
- 1/4 teaspoon onion powder
- 1/4 teaspoon paprika
Cooking Instructions:
- Preheat the Oven: Preheat your oven to 375°F (190°C). Grease a 9×13-inch baking dish to prevent sticking.
- Prepare the Sauce: In a medium saucepan, melt the butter over medium heat. Add the chopped onion and sauté until translucent, about 3-4 minutes. Stir in the flour and cook for 1-2 minutes until the mixture is lightly browned.
- Make the Creamy Sauce: Gradually whisk in the milk, ensuring no lumps form. Continue to cook, stirring constantly, until the sauce thickens, about 5-7 minutes. Add salt, pepper, garlic powder, onion powder, and paprika to taste.
- Layer the Ingredients: Spread half of the sliced potatoes evenly in the prepared baking dish. Top with half of the ham and pour half of the creamy sauce over the layer. Repeat the layers with the remaining potatoes, ham, and sauce.
- Add Cheese and Bake: Sprinkle the shredded cheddar cheese over the top layer. Cover the dish with aluminum foil and bake in the preheated oven for 30 minutes. Remove the foil and bake for an additional 30 minutes, or until the potatoes are tender and the cheese is golden brown.
- Cool and Serve: Allow the casserole to cool for about 10 minutes before serving to let the flavors meld and the sauce thicken further.
Extra Tips:
For the best results, use a mandoline to slice the potatoes evenly, ensuring they cook uniformly. If you’re short on time, parboil the potato slices for 5 minutes before layering them in the dish to reduce baking time.
Feel free to experiment with different cheeses like Gruyère or Monterey Jack for a unique flavor. Also, adding a pinch of nutmeg to the sauce can enhance its richness. For a decorative touch, garnish with freshly chopped parsley before serving.

Savory Sausage and Egg Breakfast Casserole

Savory Sausage and Egg Breakfast Casserole is the perfect dish to start your day with a hearty and flavorful meal. Combining the rich taste of sausage with the fluffiness of eggs, this casserole is ideal for breakfast or brunch gatherings.
Its layers of cheese and bread provide a comforting texture, making it a classic choice for those who enjoy traditional breakfast flavors. This dish isn’t only delicious but also convenient, as it can be prepared ahead of time and baked just before serving.
The Savory Sausage and Egg Breakfast Casserole is a versatile recipe, allowing you to add your favorite ingredients such as vegetables or different types of cheese. Whether you’re hosting a brunch or simply want to treat your family to a special breakfast, this casserole is sure to be a hit.
This recipe serves 4-6 people, guaranteeing there’s plenty to go around. Let’s plunge into the ingredients and instructions to create this delightful dish.
Ingredients (Serves 4-6):
- 1 pound breakfast sausage
- 6 large eggs
- 2 cups milk
- 1 teaspoon salt
- 1/2 teaspoon black pepper
- 1 teaspoon mustard powder
- 6 cups cubed day-old bread
- 1 1/2 cups shredded cheddar cheese
- 1/4 cup diced onions
- 1/4 cup diced green bell peppers
- Butter or non-stick spray for greasing the dish
Instructions:
- Preheat the Oven: Begin by preheating your oven to 350°F (175°C) to confirm it reaches the right temperature by the time you’re ready to bake.
- Cook the Sausage: In a large skillet over medium heat, cook the breakfast sausage until it’s browned and cooked through. Break it into small pieces as it cooks. Once done, drain any excess grease and set aside.
- Prepare the Egg Mixture: In a large mixing bowl, whisk together the eggs, milk, salt, black pepper, and mustard powder. Make sure the mixture is well combined to guarantee even flavor throughout the casserole.
- Assemble the Casserole: Grease a 9×13 inch baking dish with butter or non-stick spray. Spread the cubed bread evenly in the dish. Sprinkle the cooked sausage, diced onions, and green bell peppers over the bread. Pour the egg mixture over the top, ensuring it covers the ingredients evenly. Finally, sprinkle the shredded cheddar cheese over everything.
- Bake the Casserole: Place the assembled casserole in the preheated oven and bake for 40-45 minutes, or until the eggs are set and the top is golden brown. You can test for doneness by inserting a knife into the center; it should come out clean.
- Let it Rest and Serve: Once baked, remove the casserole from the oven and let it sit for about 5 minutes before serving. This allows it to set further and makes it easier to cut into portions.
Extra Tips: To save time in the morning, you can prepare the casserole the night before. Simply assemble all the ingredients, cover the dish with plastic wrap, and refrigerate overnight.
In the morning, remove it from the fridge while preheating the oven, and then bake as directed. If you prefer a spicier version, consider adding a pinch of cayenne pepper or using spicy sausage.
Additionally, feel free to substitute ingredients based on your preferences, such as using different types of cheese or adding mushrooms or spinach for extra flavor and nutrition.
Retro Tamale Pie Casserole

Retro Tamale Pie Casserole is a delightful blast from the past that combines the rich flavors of Mexican cuisine with the comforting appeal of a classic casserole. This dish is known for its savory ground beef filling, layered with a cornbread topping that absorbs all the delicious juices from the meat, creating a mouthwatering combination. Perfect for family dinners or gatherings, this hearty casserole will certainly be a hit with both children and adults alike.
The preparation of Retro Tamale Pie Casserole is straightforward, making it an ideal choice for busy weeknight dinners. The recipe calls for simple ingredients that are easy to find and typically already in your pantry. The flavorful mix of spices, tomato sauce, and vegetables creates a robust filling that’s both satisfying and nutritious. Topped with a golden cornbread crust, this casserole is both visually appealing and delectable.
Ingredients (Serving Size: 4-6 People):
- 1 pound ground beef
- 1 onion, chopped
- 1 bell pepper, chopped
- 2 cloves garlic, minced
- 1 can (15 ounces) black beans, drained and rinsed
- 1 can (14.5 ounces) diced tomatoes
- 1 tablespoon chili powder
- 1 teaspoon cumin
- 1 teaspoon paprika
- Salt and pepper to taste
- 1 cup corn kernels (fresh or frozen)
- 1 cup shredded cheddar cheese
- 1 package (8.5 ounces) cornbread mix
- 1 egg
- 1/3 cup milk
- 2 tablespoons butter, melted
Cooking Instructions:
- Preheat the Oven: Start by preheating your oven to 375°F (190°C). This guarantees that the casserole will bake evenly.
- Cook the Beef Mixture: In a large skillet, brown the ground beef over medium heat. Once browned, add the chopped onion, bell pepper, and minced garlic. Continue to cook until the vegetables are soft.
- Add the Seasonings and Vegetables: Stir in the black beans, diced tomatoes, chili powder, cumin, paprika, salt, and pepper. Allow the mixture to simmer for about 10 minutes, letting the flavors meld together. Then, stir in the corn kernels.
- Prepare the Baking Dish: Transfer the beef mixture into a lightly greased 9×13 inch baking dish. Spread it out evenly.
- Add the Cheese Layer: Sprinkle the shredded cheddar cheese evenly over the beef mixture. This will add gooeyness and a rich flavor to the casserole.
- Prepare the Cornbread Topping: In a separate bowl, combine the cornbread mix, egg, milk, and melted butter. Stir until well combined and pour the batter over the cheese layer, spreading it evenly.
- Bake the Casserole: Place the baking dish in the preheated oven and bake for 25-30 minutes or until the cornbread topping is golden brown and a toothpick inserted into the center comes out clean.
- Cool and Serve: Allow the casserole to cool for a few minutes before serving. This will make it easier to cut and serve.
Extra Tips:
For an added kick, consider incorporating jalapeños into the beef mixture or using a pepper jack cheese instead of cheddar. If you prefer a vegetarian option, substitute the ground beef with a plant-based meat alternative.
To guarantee the cornbread topping cooks evenly, spread the batter carefully and avoid pouring it too thickly in any one spot. Retro Tamale Pie Casserole is a versatile dish, so feel free to modify the ingredients to match your family’s taste preferences.
Comforting Macaroni and Cheese Bake
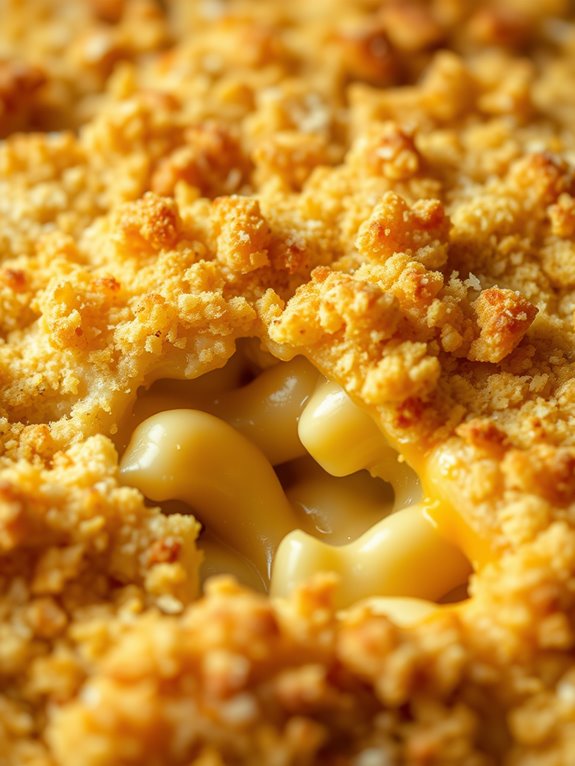
There’s nothing quite like the nostalgia of a rich and creamy macaroni and cheese bake to transport you back to simpler times. This vintage casserole recipe is the epitome of comfort food, combining tender macaroni with a luscious cheese sauce, all baked to golden perfection. This dish promises to be a crowd-pleaser, perfect for family gatherings or a cozy night in, offering warmth and satisfaction with every cheesy bite.
This recipe serves 4-6 people, making it ideal for a small dinner party or a family meal. The blend of cheeses guarantees a depth of flavor, while the crispy breadcrumb topping adds a delightful crunch. The key to mastering this classic dish lies in the balance of creamy sauce to pasta, assuring every mouthful is rich and indulgent. With a few simple steps, you’ll have a delicious macaroni and cheese bake that will have everyone coming back for seconds.
Ingredients:
- 8 ounces elbow macaroni
- 3 tablespoons unsalted butter
- 3 tablespoons all-purpose flour
- 2 cups whole milk
- 1 cup heavy cream
- 2 cups shredded sharp cheddar cheese
- 1 cup shredded mozzarella cheese
- 1 teaspoon Dijon mustard
- 1/2 teaspoon garlic powder
- Salt and pepper to taste
- 1/2 cup breadcrumbs
- 2 tablespoons melted butter
- 1/4 cup grated Parmesan cheese
Instructions:
- Preheat the Oven and Cook the Pasta: Preheat your oven to 350°F (175°C). Cook the elbow macaroni according to package instructions in a large pot of salted boiling water until al dente. Drain and set aside.
- Prepare the Cheese Sauce: In a large saucepan, melt the butter over medium heat. Stir in the flour and cook for about 1 minute until the mixture is golden and bubbly. Gradually whisk in the milk and cream, continuing to whisk until the mixture thickens, about 3-5 minutes.
- Add the Cheese: Reduce the heat to low and stir in the shredded cheddar cheese and mozzarella cheese until melted and smooth. Mix in the Dijon mustard, garlic powder, and season with salt and pepper to taste.
- Combine Pasta and Sauce: Add the cooked macaroni to the cheese sauce, stirring to combine until all the pasta is well coated.
- Assemble the Casserole: Pour the macaroni and cheese mixture into a greased 2-quart baking dish. In a small bowl, mix the breadcrumbs with melted butter and Parmesan cheese. Sprinkle the breadcrumb mixture evenly over the top of the macaroni and cheese.
- Bake the Casserole: Bake in the preheated oven for 25-30 minutes, or until the top is golden and bubbly. Let it cool for a few minutes before serving.
Extra Tips:
For a bit of variety, consider adding cooked bacon bits, caramelized onions, or a dash of hot sauce to the cheese sauce for an extra kick of flavor.
If you prefer a more pronounced cheese flavor, you can substitute some of the cheddar with Gruyère or add a hint of blue cheese. Ascertain not to overbake the casserole, as this can cause the sauce to dry out.
For a crunchy topping, use panko breadcrumbs instead of regular breadcrumbs.
Classic Swiss Vegetable Medley
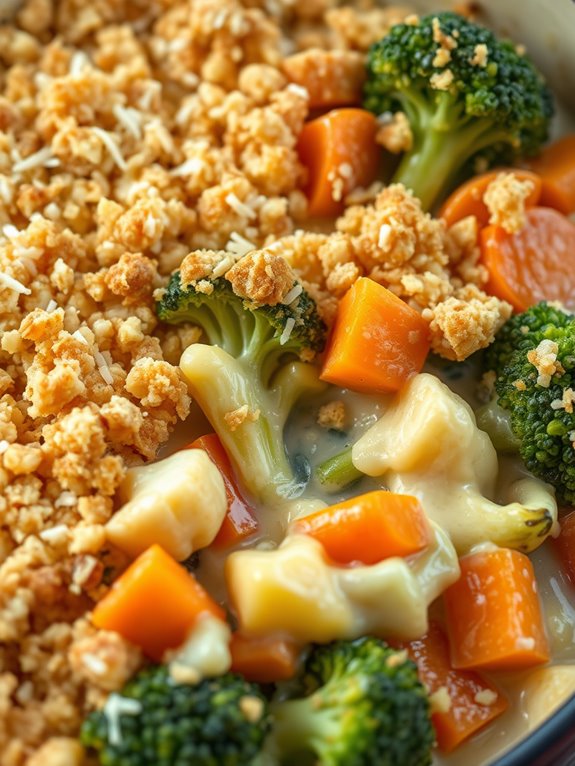
Classic Swiss Vegetable Medley is a timeless dish that brings together a delightful blend of vegetables and a creamy, cheesy sauce, reminiscent of the comforting flavors found in traditional Swiss cuisine.
This casserole is perfect for those who appreciate a hearty, wholesome meal that’s both nutritious and delicious. The vegetables are baked to perfection, creating a tender, flavorful dish that’s sure to please even the pickiest of eaters.
This vintage recipe is ideal for family gatherings or potluck dinners, as it can be prepared ahead of time and easily reheated. The combination of fresh vegetables and creamy cheese makes it a satisfying main course or a perfect side dish.
With its vibrant colors and rich flavors, Classic Swiss Vegetable Medley is destined to become a favorite at any table. This recipe serves 4-6 people, making it a great option for small dinner parties or a cozy family meal.
Ingredients:
- 2 cups broccoli florets
- 2 cups cauliflower florets
- 1 cup sliced carrots
- 1 cup sliced zucchini
- 1 medium onion, chopped
- 2 tablespoons butter
- 2 tablespoons all-purpose flour
- 1 1/2 cups milk
- 1 cup shredded Swiss cheese
- 1/2 teaspoon salt
- 1/4 teaspoon black pepper
- 1/4 teaspoon ground nutmeg
- 1/2 cup breadcrumbs
- 2 tablespoons grated Parmesan cheese
Cooking Instructions:
- Preheat the Oven: Begin by preheating your oven to 350°F (175°C). This will guarantee that the oven is at the right temperature when your casserole is ready to bake.
- Prepare the Vegetables: In a large pot of boiling water, blanch the broccoli, cauliflower, and carrots for about 3-4 minutes until they’re tender-crisp. Drain the vegetables and set them aside to cool slightly.
- Sauté the Onion and Zucchini: In a large skillet, melt the butter over medium heat. Add the chopped onion and sliced zucchini, and sauté until the onion becomes translucent and the zucchini is tender, about 5 minutes.
- Make the Cheese Sauce: Sprinkle the flour over the cooked onions and zucchini, stirring continuously to form a paste. Slowly whisk in the milk, making sure there are no lumps. Cook the mixture until it thickens, stirring frequently, then add the shredded Swiss cheese, salt, pepper, and nutmeg. Stir until the cheese is fully melted and the sauce is smooth.
- Combine Everything: In a large mixing bowl, combine the blanched vegetables and the cheese sauce. Mix well to guarantee all the vegetables are evenly coated with the sauce.
- Assemble the Casserole: Transfer the vegetable and sauce mixture into a greased 9×13 inch baking dish. Spread it out evenly. In a small bowl, mix the breadcrumbs with the grated Parmesan cheese, then sprinkle this mixture over the top of the casserole.
- Bake: Place the casserole in the preheated oven and bake for 25-30 minutes, or until the top is golden brown and the vegetables are tender.
- Serve: Allow the casserole to cool for a few minutes before serving. This will help the sauce set slightly, making it easier to serve.
Extra Tips: To save time, you can prepare the vegetables and cheese sauce a day in advance and store them separately in the refrigerator.
When ready to bake, simply combine them, top with the breadcrumb mixture, and bake. For additional flavor, consider adding a pinch of garlic powder or a tablespoon of Dijon mustard to the cheese sauce.
If you prefer a more substantial dish, you can also add cooked chicken or turkey to the vegetable mixture before baking.
Cheesy Broccoli and Rice Casserole
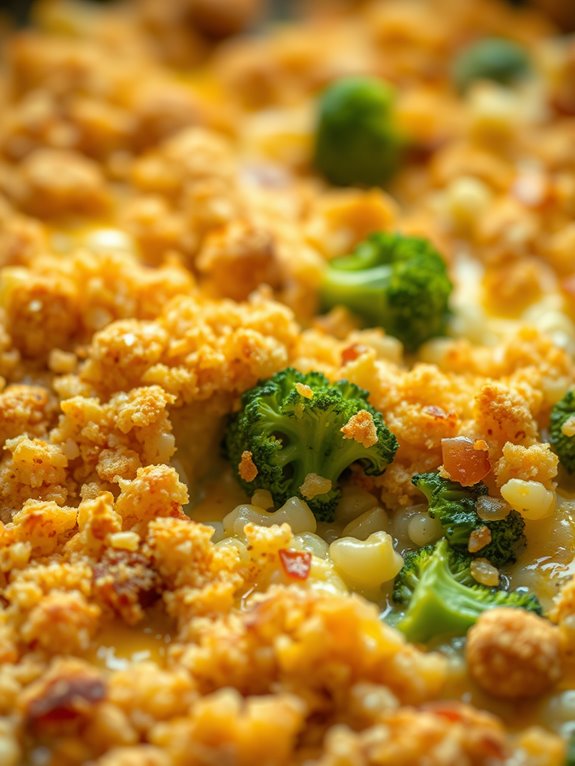
Cheesy Broccoli and Rice Casserole is a comforting and delicious classic that brings together the earthy goodness of broccoli, the heartiness of rice, and the creaminess of melted cheese. This dish is perfect for family gatherings, potlucks, or a cozy weeknight dinner, offering a delightful blend of flavors and textures that will satisfy even the pickiest eaters.
Its origins can be traced back to the mid-20th century when casseroles became a staple in American kitchens, celebrated for their convenience and ability to feed a crowd.
The beauty of the Cheesy Broccoli and Rice Casserole lies in its simplicity and flexibility. You can use fresh or frozen broccoli, and the choice of cheese can be adjusted to suit your preference, from sharp cheddar to a milder mozzarella. The dish is typically baked to a golden perfection, with a crispy topping that adds an extra layer of flavor and texture.
This recipe yields enough to serve 4-6 people, making it ideal for a family meal or leftovers for the week.
Ingredients for 4-6 people:
- 1 cup uncooked white rice
- 2 cups broccoli florets (fresh or frozen)
- 1 can (10.5 oz) condensed cream of mushroom soup
- 1 cup shredded cheddar cheese
- 1/2 cup sour cream
- 1/4 cup milk
- 1/2 cup chopped onion
- 1/4 cup butter
- 1/2 teaspoon garlic powder
- Salt and pepper to taste
- 1/2 cup breadcrumbs (optional)
Cooking Instructions:
- Prepare the Rice: Begin by cooking the rice according to package instructions. Once cooked, set it aside to cool slightly.
- Preheat the Oven: Preheat your oven to 350°F (175°C).
- Cook the Broccoli: If using fresh broccoli, steam it until it’s tender but still bright green. If using frozen, cook according to package instructions. Drain any excess water and set aside.
- Sauté the Onion: In a skillet over medium heat, melt the butter and add the chopped onion. Sauté until the onion is translucent and fragrant, about 5 minutes.
- Combine Ingredients: In a large mixing bowl, combine the cooked rice, broccoli, sautéed onions, cream of mushroom soup, sour cream, milk, garlic powder, salt, and pepper. Stir until well combined.
- Add Cheese: Fold in the shredded cheddar cheese, making sure it’s evenly distributed throughout the mixture.
- Assemble the Casserole: Transfer the mixture into a greased 9×13 inch baking dish, spreading it evenly. If desired, sprinkle breadcrumbs over the top for added crunch.
- Bake the Casserole: Place the dish in the preheated oven and bake for 25-30 minutes, or until the top is golden and bubbly.
- Serve: Remove from oven and let it cool for a few minutes before serving. Enjoy the casserole warm.
Extra Tips:
For a variation in flavor, consider adding cooked chicken or turkey to the casserole for added protein. You can also experiment with different types of cheese or add a sprinkle of Parmesan on top for an extra cheesy crust.
If you prefer a spicier dish, try adding a pinch of cayenne pepper or some chopped jalapeños to the mix. To guarantee the casserole doesn’t become too dry, be mindful not to overcook the broccoli, and adjust the milk or soup quantity if needed for a creamier texture.
Rustic Chicken Pot Pie Casserole
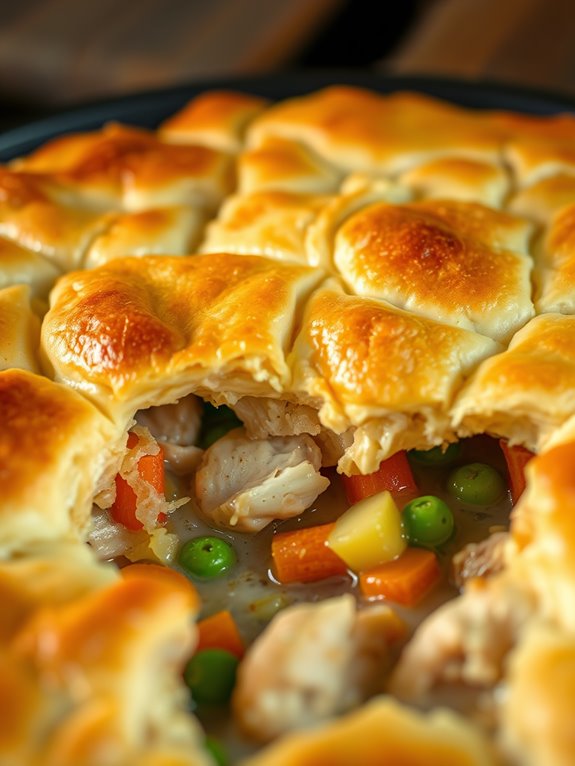
Rustic Chicken Pot Pie Casserole is a heartwarming dish that captures the essence of comfort food with its creamy filling and golden, flaky crust. Originating from classic French cuisine, the pot pie has evolved to include a variety of ingredients, but the core remains a delightful combination of tender chicken, vegetables, and a rich sauce, all encased in a buttery pastry.
This casserole version simplifies the process by layering the ingredients in a single dish, making it a perfect choice for family dinners or gatherings with friends. The charm of this casserole lies in its rustic appeal, combining the nostalgia of homemade chicken pot pie with the ease of a one-dish meal.
The filling is a medley of succulent chicken pieces, carrots, peas, and potatoes, all enveloped in a creamy, savory sauce. Topped with a golden, flaky crust, this casserole is baked to perfection, resulting in a dish that’s as pleasing to the eye as it’s to the palate. Whether served as a main course or an indulgent side, this Rustic Chicken Pot Pie Casserole is sure to guarantee your heart and soul.
Ingredients (Serves 4-6):
- 2 cups cooked chicken, diced
- 1 cup frozen peas
- 1 cup diced carrots
- 1 cup diced potatoes
- 1/2 cup diced onion
- 1/4 cup butter
- 1/4 cup all-purpose flour
- 2 cups chicken broth
- 1 cup milk
- 1 teaspoon salt
- 1/2 teaspoon black pepper
- 1/2 teaspoon dried thyme
- 1 refrigerated pie crust (store-bought or homemade)
Cooking Instructions:
- Preheat the Oven: Begin by preheating your oven to 400°F (200°C) to assure it’s ready for baking the casserole.
- Prepare the Filling: In a large skillet, melt the butter over medium heat. Add the diced onion and cook until translucent, about 3-4 minutes. Stir in the flour and cook for another minute to create a roux.
- Make the Sauce: Gradually whisk in the chicken broth and milk, stirring constantly to prevent lumps. Continue cooking until the sauce thickens and begins to bubble.
- Add Seasonings: Stir in the salt, black pepper, and dried thyme, making certain the seasonings are evenly distributed throughout the sauce.
- Combine Ingredients: Add the cooked chicken, peas, carrots, and potatoes to the sauce. Stir well to combine all ingredients, making sure the vegetables and chicken are evenly coated with the creamy sauce.
- Assemble the Casserole: Pour the chicken and vegetable mixture into a 9×13 inch baking dish. Roll out the pie crust and place it over the filling, trimming any excess and tucking the edges into the dish for a neat finish.
- Bake the Casserole: Place the assembled casserole in the preheated oven and bake for 30-35 minutes, or until the crust is golden brown and the filling is bubbly.
- Cool Slightly Before Serving: Once baked, remove the casserole from the oven and let it cool for about 10 minutes before serving. This will allow the filling to set slightly, making it easier to serve.
Extra Tips:
For a more flavorful crust, consider brushing the top with a beaten egg before baking. This not only gives the crust a beautiful sheen but also adds a subtle richness.
If you prefer a thicker filling, you can increase the flour in the roux by an additional tablespoon. Additionally, feel free to customize the vegetables based on your preferences or what’s in season. Adding mushrooms or corn can provide extra texture and flavor to the dish.
Traditional Tater Tot Hotdish
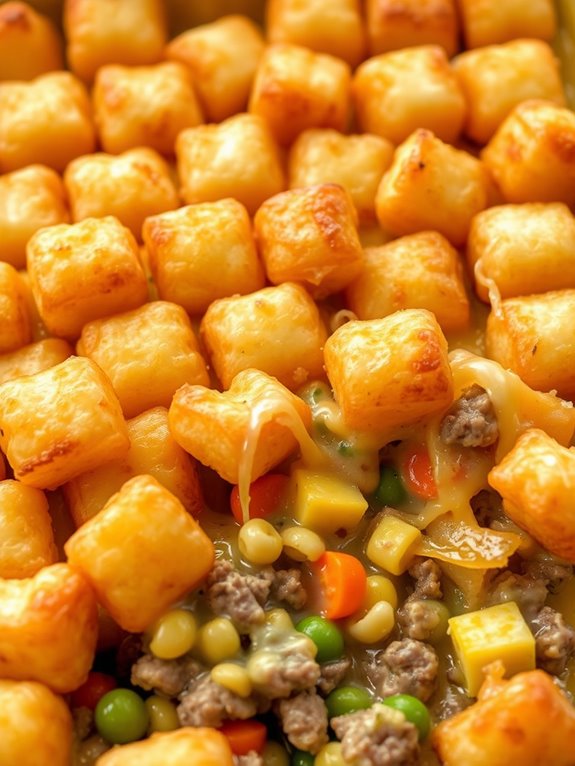
The Traditional Tater Tot Hotdish is a beloved classic that has stood the test of time in many households across America, especially in the Midwest. Known for its hearty and comforting qualities, this dish combines ground meat, a creamy sauce, and a crunchy topping of tater tots to create a meal that’s both satisfying and easy to prepare.
Whether you’re serving it as a weeknight dinner or bringing it to a potluck, this casserole is sure to be a crowd-pleaser. This version of the Traditional Tater Tot Hotdish serves 4-6 people and is perfect for a small family gathering or a cozy meal at home.
The combination of ground beef, mixed vegetables, and a creamy soup base creates a rich and flavorful filling, while the crispy tater tots on top add a delightful texture contrast. With minimal prep time and a straightforward cooking process, it’s an excellent choice for those who want to enjoy a homemade meal without spending hours in the kitchen.
Ingredients:
- 1 pound ground beef
- 1 medium onion, chopped
- 2 cups frozen mixed vegetables (such as peas, carrots, and corn)
- 1 can (10.5 oz) cream of mushroom soup
- 1/2 cup milk
- Salt and pepper to taste
- 1 teaspoon garlic powder
- 1 teaspoon Worcestershire sauce
- 1 package (32 oz) frozen tater tots
- 1 cup shredded cheddar cheese
Cooking Instructions:
- Preheat the Oven: Begin by preheating your oven to 375°F (190°C). This guarantees that the casserole will cook evenly once assembled.
- Cook the Beef: In a large skillet over medium heat, add the ground beef and chopped onion. Cook until the beef is browned and the onions are translucent, about 7-10 minutes. Drain off any excess fat.
- Combine Ingredients: In the same skillet, add the frozen mixed vegetables, cream of mushroom soup, milk, garlic powder, Worcestershire sauce, salt, and pepper. Stir everything together until well combined and the mixture is heated through.
- Assemble the Casserole: Transfer the beef and vegetable mixture to a 9×13-inch baking dish. Spread it out evenly in the dish.
- Add the Tater Tots: Arrange the frozen tater tots in a single layer over the top of the beef mixture, making certain they cover the entire surface.
- Bake: Place the baking dish in the preheated oven and bake for 30-40 minutes, until the tater tots are golden brown and crispy.
- Add Cheese: Remove the casserole from the oven and sprinkle shredded cheddar cheese over the top. Return it to the oven and bake for an additional 5-10 minutes, or until the cheese is melted and bubbly.
- Serve: Allow the hotdish to cool for a few minutes before serving. Enjoy it warm as a main course.
Extra Tips:
For added flavor, consider sautéing the onion with a bit of minced garlic before adding the ground beef. If you prefer a spicier kick, add a pinch of red pepper flakes to the beef mixture.
Feel free to customize the recipe by using your favorite vegetables or substituting ground turkey or chicken for the beef. For a creamier filling, you can add a splash more milk or another can of soup.
Finally, if you have leftovers, this dish reheats well and makes for a delicious lunch the next day.
Homestyle Baked Ziti Casserole

Homestyle Baked Ziti Casserole is a classic comfort food dish that combines pasta, rich marinara sauce, and a blend of cheeses for a hearty, satisfying meal. This vintage casserole recipe is perfect for family dinners or gatherings, offering a savory experience with every bite.
The origins of baked ziti can be traced back to Italy, where it’s often prepared for special occasions. Over time, it has become a staple in American households, known for its ease of preparation and warm, comforting flavors.
This dish isn’t only delicious but also versatile, allowing for various adaptations to suit personal preferences. Whether you prefer it with ground beef, sausage, or a vegetarian version, Homestyle Baked Ziti Casserole can be customized to fit your needs.
The key to its success lies in layering the ingredients to create a delightful blend of textures and tastes. The ziti pasta, cooked until al dente, is enveloped in a robust marinara sauce and topped with a gooey combination of mozzarella and ricotta cheeses. This results in a perfectly baked, golden-brown casserole that’s sure to delight.
Ingredients (Serves 4-6):
- 1 pound ziti pasta
- 1 tablespoon olive oil
- 1 pound ground beef or Italian sausage
- 1 medium onion, chopped
- 3 cloves garlic, minced
- 1 teaspoon dried oregano
- 1 teaspoon dried basil
- Salt and pepper to taste
- 24 ounces marinara sauce
- 1 cup ricotta cheese
- 2 cups shredded mozzarella cheese
- 1/2 cup grated Parmesan cheese
- Fresh basil leaves for garnish (optional)
Cooking Instructions:
- Preheat the Oven: Preheat your oven to 375°F (190°C). This will guarantee that the casserole bakes evenly.
- Cook the Pasta: In a large pot, bring salted water to a boil. Add the ziti pasta and cook until al dente, according to package instructions. Drain and set aside.
- Prepare the Meat Sauce: In a large skillet, heat olive oil over medium heat. Add the chopped onion and garlic, sautéing until the onion is translucent.
- Add ground beef or Italian sausage, breaking it apart with a spatula, and cook until browned. Drain excess fat if necessary.
- Season the Sauce: Add dried oregano, dried basil, salt, and pepper to the meat mixture, stirring to combine. Pour in the marinara sauce, reduce heat to low, and let it simmer for about 10 minutes to combine flavors.
- Assemble the Casserole: In a 9×13-inch baking dish, spread a thin layer of the meat sauce on the bottom. Add half of the cooked ziti, followed by half of the ricotta cheese, half of the remaining meat sauce, and half of the mozzarella cheese.
- Repeat the layers with the remaining ingredients, finishing with a layer of mozzarella cheese and Parmesan cheese on top.
- Bake the Casserole: Cover the dish with aluminum foil and bake in the preheated oven for 20 minutes. Remove the foil and bake for an additional 10-15 minutes, or until the cheese is bubbly and golden brown.
- Serve: Allow the casserole to cool for a few minutes before garnishing with fresh basil leaves, if desired. Serve warm.
Extra Tips:
For a richer flavor, consider using a combination of ground beef and Italian sausage. If you prefer a spicier dish, add a pinch of red pepper flakes to the meat sauce.
You can also incorporate vegetables such as bell peppers or mushrooms for added nutrition and taste. To guarantee the casserole sets well, let it rest for a few minutes after baking before slicing.
This dish also freezes well, making it an excellent choice for meal prep or future meals. Enjoy your Homestyle Baked Ziti Casserole with a side salad and garlic bread for a complete, satisfying meal.
Nostalgic Cornbread and Chili Casserole
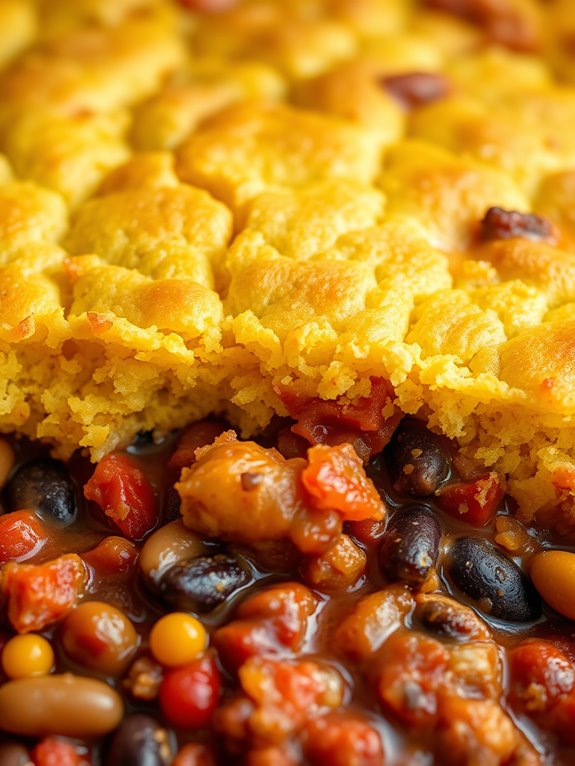
Transport yourself back to a simpler time with this hearty and comforting Nostalgic Cornbread and Chili Casserole. Perfect for family gatherings or a cozy night in, this dish combines the rich, savory flavors of chili with the slightly sweet and crumbly texture of cornbread.
It’s an all-in-one meal that warms the soul and fills the stomach, making it an ideal choice for those chilly evenings when you crave something satisfying and nostalgic.
The combination of ground beef, beans, and spices creates a robust chili base that perfectly complements the fluffy cornbread topping. The cornbread batter is poured directly over the chili, allowing the flavors to meld together as it bakes to golden perfection.
Each bite offers a delightful contrast between the spicy, hearty chili and the tender, slightly sweet cornbread. Whether you’re new to making casseroles or a seasoned pro, this recipe is sure to become a family favorite.
Ingredients (serves 4-6):
- 1 pound ground beef
- 1 medium onion, diced
- 2 cloves garlic, minced
- 1 can (15 oz) kidney beans, drained and rinsed
- 1 can (15 oz) black beans, drained and rinsed
- 1 can (15 oz) diced tomatoes
- 1 tablespoon chili powder
- 1 teaspoon cumin
- Salt and pepper to taste
- 1 cup cornmeal
- 1 cup all-purpose flour
- 1 tablespoon baking powder
- 1/2 teaspoon salt
- 1 cup milk
- 1/4 cup vegetable oil
- 1 large egg
Cooking Instructions:
- Preheat the Oven: Start by preheating your oven to 375°F (190°C) to guarantee it’s hot enough to bake the casserole evenly.
- Cook the Beef: In a large skillet over medium heat, add the ground beef. Cook until it’s browned all over, breaking it up with a spatula as it cooks. Drain any excess fat.
- Sauté the Vegetables: Add the diced onion and minced garlic to the skillet with the beef. Sauté until the onion becomes translucent, about 5 minutes.
- Prepare the Chili Base: Stir in the kidney beans, black beans, diced tomatoes, chili powder, cumin, salt, and pepper. Let the mixture simmer for about 10 minutes, allowing the flavors to meld.
- Transfer to Baking Dish: Pour the chili mixture into a greased 9×13 inch baking dish, spreading it evenly.
- Mix the Cornbread Batter: In a large mixing bowl, combine the cornmeal, flour, baking powder, and salt. In a separate bowl, whisk together the milk, vegetable oil, and egg. Pour the wet ingredients into the dry ingredients and mix until just combined.
- Add the Cornbread Topping: Carefully pour the cornbread batter over the chili mixture in the baking dish, spreading it out gently to cover the chili completely.
- Bake the Casserole: Place the baking dish in the preheated oven. Bake for 25-30 minutes, or until the cornbread topping is golden brown and a toothpick inserted into the center comes out clean.
- Serve and Enjoy: Allow the casserole to cool for a few minutes before serving. Serve warm, possibly with a side of sour cream or shredded cheese for extra flavor.
Extra Tips:
To enhance the richness of the chili, consider adding a tablespoon of tomato paste or a splash of beef broth during the simmering stage.
For a bit of heat, include a diced jalapeño with the onions. If you prefer a sweeter cornbread, add a tablespoon of sugar to the batter.
Leftovers can be stored in an airtight container in the refrigerator for up to 3 days and reheated in the oven or microwave.