

As the holiday season draws near, I can’t help but think about the cozy scent of gingerbread cookies baking and the delightful aroma of molasses wafting through the kitchen. These vintage recipes have been cherished in families for generations, turning simple ingredients into festive treats. They connect us to the past and make our celebrations even more special. Are you ready to explore these nostalgic flavors and memories? Let’s embark on this flavorful journey together.
Classic Gingerbread Cookies

Gingerbread cookies are a quintessential part of the holiday season, bringing warmth and festive cheer to any gathering. This classic recipe is perfect for creating delightful, aromatic cookies that are as fun to make as they’re to eat. With a blend of spices and a rich molasses flavor, these cookies are certain to become a beloved holiday tradition in your home.
Whether you choose to decorate them with icing or leave them plain, these gingerbread cookies are perfect for sharing with family and friends. Made with a combination of pantry staples and a few special ingredients, this recipe yields enough cookies for 4-6 people to enjoy. The dough is easy to work with, making it ideal for cutting out fun and festive shapes.
Once baked, the cookies have a slightly crisp edge with a tender, chewy center. Whether you’re a seasoned baker or a beginner, these classic gingerbread cookies are simple to make and perfect for holiday baking.
Ingredients (for 4-6 servings):
- 3 cups all-purpose flour
- 3/4 cup packed brown sugar
- 1 tablespoon ground ginger
- 1 tablespoon ground cinnamon
- 1/2 teaspoon ground cloves
- 1/2 teaspoon baking soda
- 1/4 teaspoon salt
- 3/4 cup unsalted butter, softened
- 3/4 cup molasses
- 1 large egg
- 1 teaspoon vanilla extract
Cooking Instructions:
- Prepare the Dough: In a large mixing bowl, combine the flour, brown sugar, ginger, cinnamon, cloves, baking soda, and salt. Use a whisk to verify the dry ingredients are well mixed.
- Mix Wet Ingredients: In a separate bowl, cream together the softened butter, molasses, egg, and vanilla extract until smooth and well combined. Gradually add the dry ingredients to the wet mixture, blending until a dough forms.
- Chill the Dough: Divide the dough into two discs, wrap them in plastic wrap, and refrigerate for at least 1-2 hours. Chilling the dough helps it to firm up, making it easier to roll out and cut into shapes.
- Preheat the Oven: Preheat your oven to 350°F (175°C). Line baking sheets with parchment paper to prevent sticking.
- Roll and Cut the Dough: On a lightly floured surface, roll out the dough to about 1/4 inch thickness. Use cookie cutters to cut out various shapes, transferring them to the prepared baking sheets with a small spatula.
- Bake the Cookies: Bake the cookies in the preheated oven for 8-10 minutes, or until the edges are firm and the centers are set. Keep a close eye to avoid overbaking.
- Cool and Decorate: Allow the cookies to cool on the baking sheets for a few minutes before transferring them to a wire rack to cool completely. Once cooled, decorate with icing if desired.
Extra Tips:
For best results, confirm all ingredients are at room temperature before beginning. This helps in achieving a smooth dough. If the dough becomes too sticky while rolling, dust it lightly with flour.
When decorating, let your creative side shine with icing, sprinkles, or candies, but remember to let any icing set before stacking or storing the cookies. Finally, storing the cookies in an airtight container will keep them fresh for up to a week, making them a perfect make-ahead holiday treat. Enjoy your festive baking!
Traditional Fruitcake
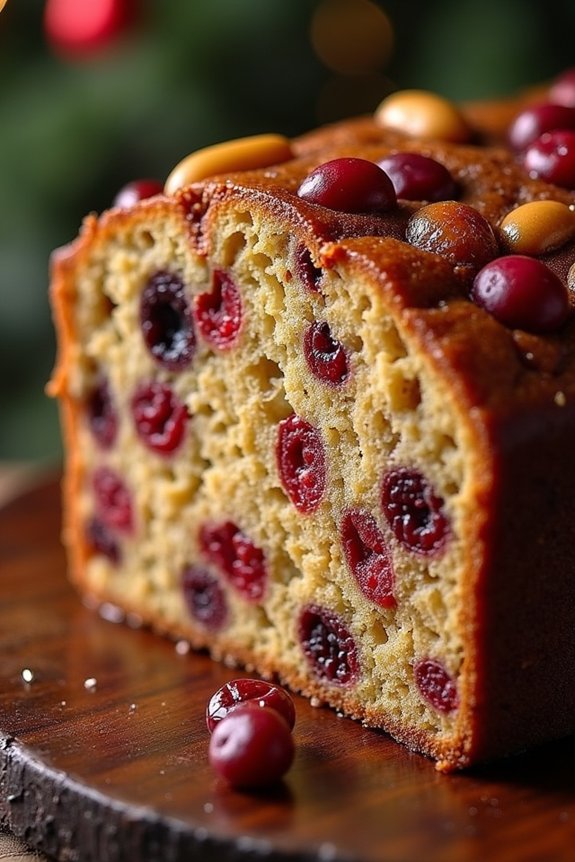
Traditional Fruitcake is a quintessential holiday treat that holds a special place in vintage Christmas baking. Known for its rich flavors and dense texture, this cake is packed with a variety of dried fruits, nuts, and spices, all soaked in spirits for an added depth of flavor.
The process of making a traditional fruitcake is a time-honored tradition, often started weeks in advance to allow the flavors to meld beautifully. This cake not only delights the palate but also fills the home with a warm, festive aroma that perfectly captures the holiday spirit.
Creating a Traditional Fruitcake requires careful preparation and the right blend of ingredients. This recipe will serve 4-6 people, making it perfect for small gatherings or as a gift for loved ones. It’s crucial to use quality dried fruits and nuts, as they’re the stars of the dish, providing texture and bursts of flavor in every bite.
The use of alcohol in the recipe is traditional but optional; it enhances the taste and extends the shelf life of the cake. Let’s explore the ingredients and steps needed to create this timeless dessert.
Ingredients for 4-6 servings:
- 1 cup mixed dried fruits (such as raisins, currants, and sultanas)
- 1/2 cup chopped nuts (such as almonds or walnuts)
- 1/4 cup candied peel
- 1/4 cup glacé cherries, halved
- 1/2 cup dark rum or brandy (optional)
- 1/2 cup unsalted butter, softened
- 1/2 cup brown sugar
- 2 large eggs
- 1 cup all-purpose flour
- 1/2 teaspoon baking powder
- 1/4 teaspoon salt
- 1/2 teaspoon ground cinnamon
- 1/4 teaspoon ground nutmeg
- 1/4 cup orange juice
- Zest of 1 lemon
Cooking Instructions:
- Prepare the Fruit Mixture: In a large bowl, combine the mixed dried fruits, chopped nuts, candied peel, and glacé cherries. Pour over the dark rum or brandy if using, and stir well to combine. Cover the bowl with plastic wrap and let it soak overnight to allow the flavors to meld.
- Preheat the Oven: The next day, preheat your oven to 300°F (150°C). Grease and line a loaf pan or a small cake tin with parchment paper to prevent sticking.
- Cream Butter and Sugar: In a separate large mixing bowl, cream together the softened butter and brown sugar until light and fluffy. This will take about 3-4 minutes using an electric mixer on medium speed.
- Add Eggs: Beat in the eggs one at a time, making sure each is fully incorporated before adding the next. This will help to maintain the cake’s structure.
- Combine Dry Ingredients: In another bowl, sift together the flour, baking powder, salt, cinnamon, and nutmeg. Gradually fold this dry mixture into the creamed butter and sugar, alternating with the orange juice and lemon zest, until just combined.
- Incorporate Fruit Mixture: Gently fold in the soaked fruit and nut mixture, ensuring even distribution throughout the batter.
- Bake the Cake: Pour the batter into the prepared pan, smoothing the top with a spatula. Bake in the preheated oven for about 1.5 to 2 hours, or until a skewer inserted into the center of the cake comes out clean. If the top of the cake browns too quickly, cover it loosely with aluminum foil.
- Cool and Store: Allow the fruitcake to cool in the pan for 15 minutes before transferring it to a wire rack to cool completely. If desired, brush the top with a little extra rum or brandy for added moisture and flavor.
Extra Tips: For an even more flavorful fruitcake, consider soaking the dried fruits a few weeks in advance, occasionally stirring them to make sure they soak evenly.
If you prefer a non-alcoholic version, substitute the rum or brandy with apple juice or tea. It’s best to store the fruitcake wrapped tightly in parchment paper and foil, allowing it to mature for a few days before serving. This resting period enhances its flavors and makes the cake more moist and delicious.
Enjoy your Traditional Fruitcake as a delightful holiday treat with a cup of tea or coffee.
Old-Fashioned Sugar Cookies
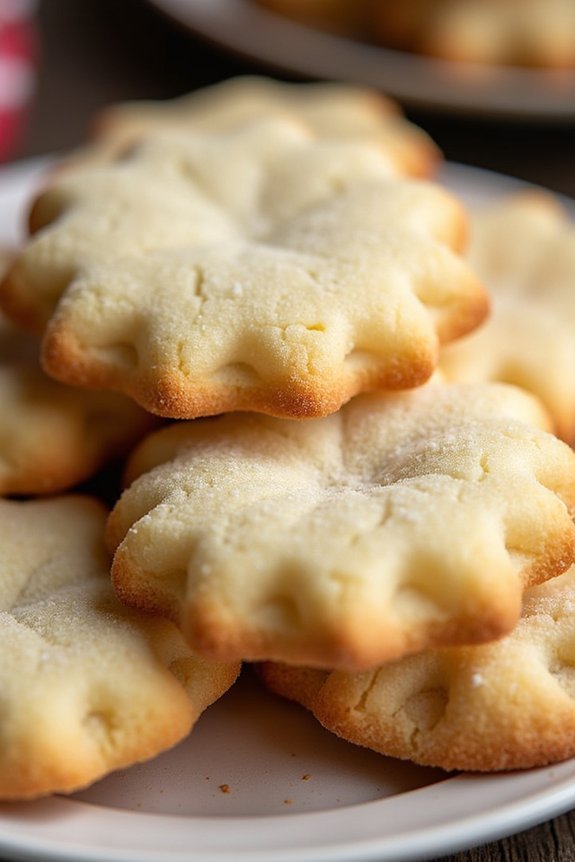
There’s nothing quite like the nostalgia of baking Old-Fashioned Sugar Cookies during the holiday season. These cookies are a timeless classic, bringing back fond memories of baking with family in warm kitchens filled with the scent of vanilla and sugar. Perfectly crisp on the edges with a soft and chewy center, these cookies are a staple in any Christmas baking repertoire.
Whether enjoyed on their own or decorated with icing and sprinkles, they’re sure to be a festive hit with both young and old.
This recipe for Old-Fashioned Sugar Cookies is designed to make enough cookies for 4-6 people, perfect for a small gathering or for sharing with loved ones. Simple yet delicious, this recipe requires ingredients that are likely already in your pantry, making it an easy and convenient choice for holiday baking.
Let’s explore the ingredients and steps needed to create these delightful treats.
Ingredients (Serves 4-6):
- 2 3/4 cups all-purpose flour
- 1 teaspoon baking soda
- 1/2 teaspoon baking powder
- 1 cup unsalted butter, softened
- 1 1/2 cups granulated sugar
- 1 egg
- 1 teaspoon vanilla extract
- 1/2 teaspoon almond extract
- 3 tablespoons sugar (for rolling)
Instructions:
- Preheat and Prepare: Preheat your oven to 375°F (190°C). Line two baking sheets with parchment paper or silicone baking mats to prevent cookies from sticking.
- Mix Dry Ingredients: In a medium bowl, whisk together the all-purpose flour, baking soda, and baking powder. This guarantees that the leavening agents are evenly distributed throughout the flour, which is essential for the cookies to rise properly.
- Cream Butter and Sugar: In a large mixing bowl, use an electric mixer to cream together the softened butter and granulated sugar. Beat on medium speed until the mixture is light and fluffy, about 3 to 4 minutes. This step is important for creating a tender cookie texture.
- Add Egg and Extracts: Beat in the egg, vanilla extract, and almond extract until well combined. The extracts add a lovely depth of flavor to the cookies.
- Combine Dry and Wet Ingredients: Gradually add the dry ingredients to the butter mixture, mixing on low speed until just combined. Avoid overmixing to prevent the cookies from becoming tough.
- Shape and Roll: Scoop tablespoon-sized portions of dough and roll them into balls. Roll each ball in the additional sugar to coat lightly, which will add a delightful crunch to the cookies’ exterior.
- Bake: Place the dough balls on the prepared baking sheets, spacing them about 2 inches apart to allow for spreading. Bake in the preheated oven for 8 to 10 minutes, or until the edges are just starting to turn golden. Be careful not to overbake, as the cookies will continue to firm up as they cool.
- Cool: Allow the cookies to cool on the baking sheets for 5 minutes before transferring them to wire racks to cool completely.
Extra Tips:
For the best results, confirm that your butter is at room temperature, as this will help it to cream more easily with the sugar.
If you want to add a personal touch, consider incorporating festive toppings such as colored sugar or edible glitter before baking. Additionally, if decorating with icing, wait until the cookies have completely cooled to avoid the icing running off.
Finally, storing these sugar cookies in an airtight container will help maintain their freshness, allowing you to savor their delightful taste throughout the holiday season.
Spiced Molasses Cookies
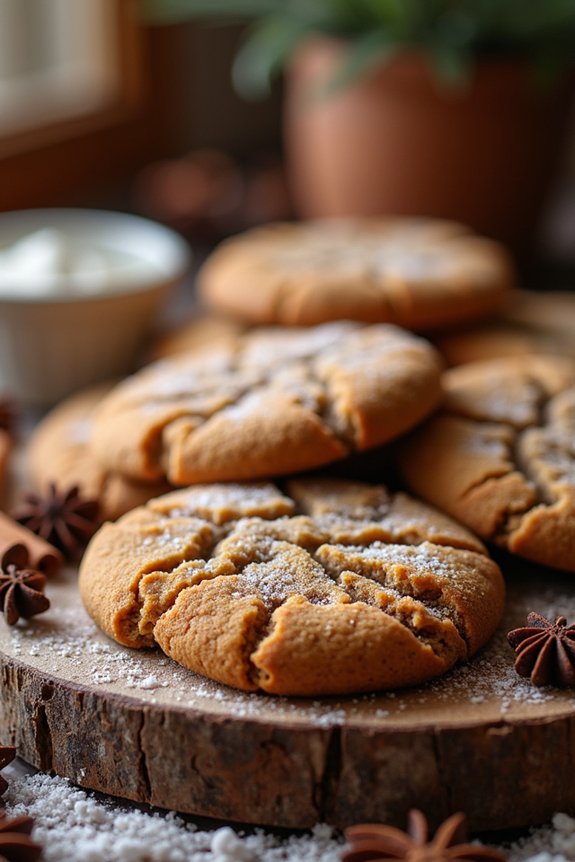
Spiced Molasses Cookies are a cherished vintage treat that invokes nostalgic memories of holiday warmth and cheer. These delightful cookies bring together the rich, robust flavor of molasses with a fragrant blend of spices, creating a perfect balance of sweetness and spice. Ideal for sharing with family and friends during festive gatherings, these cookies are a timeless addition to any Christmas baking repertoire.
The comforting aroma that fills your kitchen as these cookies bake is reminiscent of a cozy holiday evening spent by the fire. Their soft, chewy texture and beautifully spiced flavor are sure to make them a favorite for both young and old alike. Whether enjoyed with a glass of milk or a steaming mug of hot cocoa, these Spiced Molasses Cookies are the essence of holiday indulgence.
Ingredients (Serves 4-6 people)
- 2 cups all-purpose flour
- 1 teaspoon baking soda
- 1/2 teaspoon salt
- 1 teaspoon ground cinnamon
- 1 teaspoon ground ginger
- 1/2 teaspoon ground cloves
- 1/2 cup unsalted butter, softened
- 1/2 cup granulated sugar
- 1/2 cup dark brown sugar, packed
- 1 large egg
- 1/3 cup unsulfured molasses
- 1 teaspoon vanilla extract
- Additional granulated sugar for rolling
Cooking Instructions
- Preheat and Prepare: Preheat your oven to 350°F (175°C) and line two baking sheets with parchment paper. This guarantees that the cookies bake evenly and don’t stick to the pan.
- Mix Dry Ingredients: In a medium bowl, whisk together the flour, baking soda, salt, cinnamon, ginger, and cloves. This step is essential for evenly distributing the baking soda and spices throughout the dough.
- Cream Butter and Sugars: In a large bowl, beat the softened butter, granulated sugar, and brown sugar together until light and fluffy, about 2-3 minutes. This creaming process incorporates air, which helps the cookies to rise properly.
- Add Wet Ingredients: Beat in the egg, molasses, and vanilla extract until well combined. The mixture should be smooth and slightly glossy, indicating that the ingredients are well-incorporated.
- Combine Mixtures: Gradually add the dry ingredients to the wet mixture, mixing just until combined. Be careful not to overmix, as this can lead to tough cookies.
- Shape and Roll: Using a tablespoon, scoop the dough and roll it into balls. Roll each ball in granulated sugar to coat it completely. This adds a delightful crunch and sparkle to the finished cookies.
- Bake: Place the dough balls onto the prepared baking sheets, spacing them about 2 inches apart. Bake in the preheated oven for 10-12 minutes, or until the edges are set and the centers are puffed and cracked.
- Cool: Allow the cookies to cool on the baking sheets for 5 minutes before transferring them to a wire rack to cool completely. This helps them to firm up slightly, making them easier to handle.
Extra Tips
For the best result, verify that your butter is at room temperature before you start, as this helps in achieving a smooth and creamy batter. If you prefer a stronger molasses flavor, you can experiment with blackstrap molasses, though it will give a slightly bitter edge.
Also, chilling the dough for 30 minutes before baking can enhance the flavors and make the dough easier to handle. Finally, these cookies can be stored in an airtight container for up to a week, making them a perfect make-ahead treat for holiday parties.
Christmas Plum Pudding
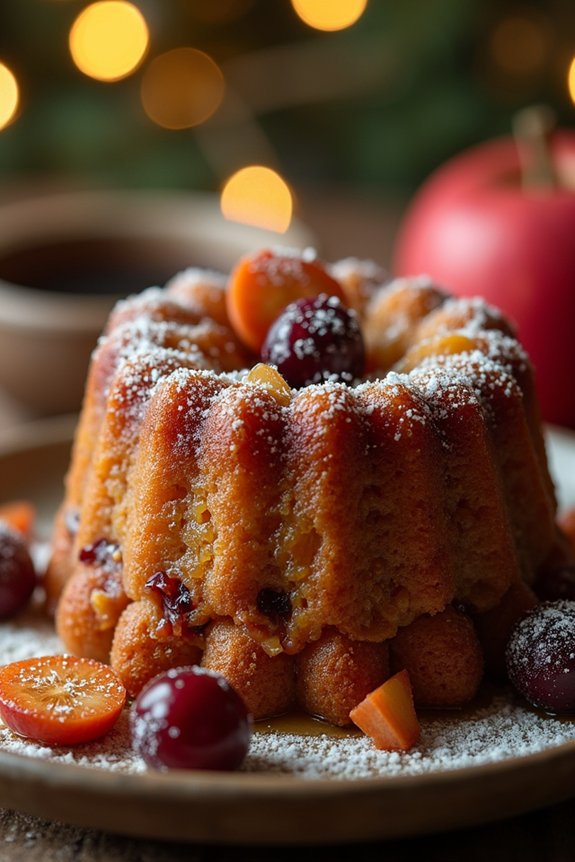
Christmas Plum Pudding is a classic holiday dessert that brings warmth and nostalgia to the festive season. This traditional treat, often associated with Victorian Christmas celebrations, is rich, dense, and packed with flavors from a variety of dried fruits, spices, and a hint of spirits. Often steamed rather than baked, the pudding requires a bit of time and patience but rewards with a taste that’s reminiscent of holidays past. Perfect for a family gathering, it’s typically served with a choice of sauces like brandy butter or custard.
The origins of Christmas Plum Pudding can be traced back to medieval England, where it was initially a savory dish known as “plum pottage.” Over time, the recipe evolved into the sweet and indulgent dessert we recognize today. Despite its name, it doesn’t actually contain plums; the term “plum” was once used to denote raisins or other dried fruits. The pudding’s deep, complex flavors are enhanced by letting it mature for several weeks before serving, allowing the ingredients to meld together beautifully, making it a cherished centerpiece of the holiday table.
Ingredients (serving size: 4-6 people):
- 1 cup all-purpose flour
- 1 teaspoon baking powder
- 1 teaspoon ground cinnamon
- 1 teaspoon ground nutmeg
- 1/2 teaspoon ground cloves
- 1/2 teaspoon salt
- 1 cup breadcrumbs
- 1 cup dark brown sugar
- 1/2 cup suet (or unsalted butter, if preferred)
- 1 cup raisins
- 1 cup currants
- 1/2 cup chopped mixed peel
- 1/2 cup almonds, chopped
- 1 apple, peeled, cored, and grated
- 1 carrot, peeled and grated
- 2 tablespoons dark molasses
- 3 eggs, beaten
- 1/4 cup dark rum or brandy
- 1/4 cup stout or dark ale
- Zest of 1 lemon
- Zest of 1 orange
Cooking Instructions:
- Prepare the Mixture: In a large mixing bowl, combine the flour, baking powder, cinnamon, nutmeg, cloves, and salt. Add the breadcrumbs, brown sugar, and suet, mixing until well combined.
- Incorporate the Fruits and Nuts: Stir in the raisins, currants, mixed peel, and chopped almonds. Add the grated apple and carrot, making sure everything is evenly distributed.
- Add Wet Ingredients: Pour in the dark molasses, beaten eggs, rum or brandy, stout or ale, and the lemon and orange zest. Mix thoroughly until all ingredients are well incorporated into a consistent batter.
- Prepare for Steaming: Grease a 1.5-liter pudding basin or heatproof bowl. Spoon the mixture into the basin, pressing down lightly to make it compact.
- Cover and Seal: Cover the pudding with a double layer of buttered parchment paper and a layer of aluminum foil, securing it tightly with string around the rim of the basin.
- Steam the Pudding: Place the pudding basin in a large pot. Fill the pot with water halfway up the sides of the basin. Cover the pot with a lid and steam the pudding for about 4-5 hours, checking periodically to confirm the water level remains halfway up the basin.
- Cool and Store: Once cooked, remove the pudding from the pot and allow it to cool. Replace the parchment and foil with fresh coverings and store in a cool, dry place for at least two weeks to mature the flavors.
- Reheat and Serve: Before serving, steam the pudding again for about 1-2 hours. Serve warm, optionally with brandy butter, custard, or cream.
Extra Tips:
For the best results, plan ahead and make the pudding several weeks or even months in advance to allow the flavors to develop fully. If you prefer a non-alcoholic version, substitute the rum or brandy and stout with orange juice and apple cider, respectively.
When steaming, make sure the pot doesn’t run dry by checking and refilling the water as needed. If you don’t have a pudding basin, any heatproof bowl with a similar volume will work. Finally, don’t skip the step of steaming the pudding again before serving; this guarantees it’s warm, moist, and delicious for your holiday feast.
Vintage Yule Log Cake
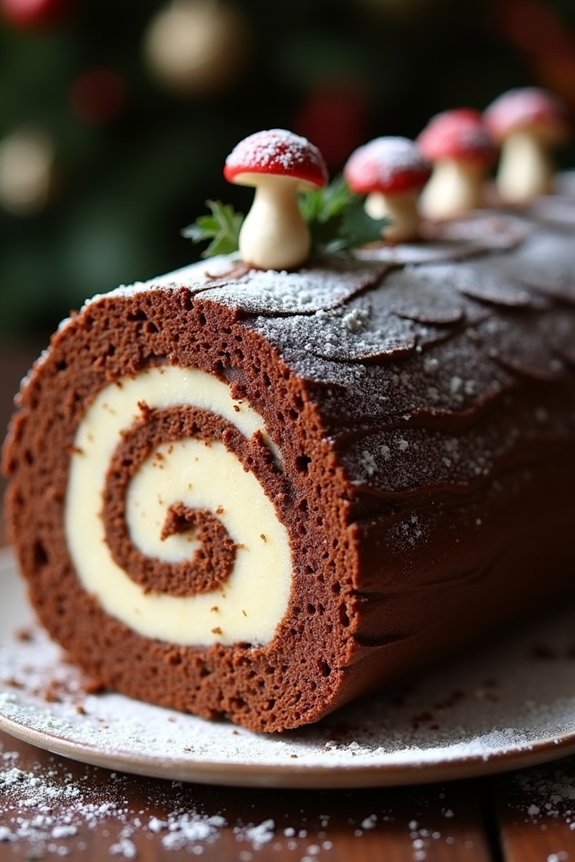
The Vintage Yule Log Cake, also known as Bûche de Noël, is a classic Christmas dessert that has been delighting families for generations. Originating from France, this cake is designed to resemble a yule log and is traditionally served during the holiday season. The cake is a delectable combination of a light sponge cake rolled with a rich, creamy filling, and topped with a chocolate icing that represents the bark of a festive log.
This dessert not only tastes heavenly but also makes for a stunning centerpiece on any Christmas table, bringing a touch of nostalgia and elegance to holiday celebrations.
To create this masterpiece, you’ll need a few key ingredients that come together to craft the sponge cake, filling, and icing. The recipe is tailored for serving 4-6 people, making it perfect for an intimate family gathering or a small festive party. While the process of making a Yule Log Cake may seem intricate, following the step-by-step instructions will guarantee a successful bake, allowing you to impress your guests with this vintage holiday treat.
Ingredients:
*For the Sponge Cake:*
- 5 large eggs, separated
- 1/2 cup granulated sugar
- 1/4 cup unsweetened cocoa powder
- 1 teaspoon vanilla extract
- 1/4 teaspoon salt
- 1/4 cup all-purpose flour
For the Filling:
- 1 cup heavy cream
- 2 tablespoons powdered sugar
- 1 teaspoon vanilla extract
For the Chocolate Icing:
- 1/2 cup heavy cream
- 8 ounces bittersweet chocolate, chopped
- 2 tablespoons unsalted butter
Instructions:
1. Preheat and Prepare the Pan: Preheat your oven to 350°F (175°C). Line a 15×10-inch jelly roll pan with parchment paper, making sure the paper extends over the sides for easy removal later.
2. Prepare the Sponge Batter: In a large mixing bowl, beat the egg yolks with half of the granulated sugar until the mixture is thick and pale. Stir in the cocoa powder, vanilla extract, and salt.
In a separate bowl, beat the egg whites until soft peaks form, gradually adding the remaining sugar until stiff peaks are achieved. Gently fold the egg whites into the yolk mixture, then sift the flour over the top and fold in until just combined.
3. Bake the Sponge Cake: Spread the batter evenly in the prepared pan. Bake for 12-15 minutes or until the cake springs back when lightly touched. Don’t overbake.
4. Roll the Cake: While the cake is still warm, turn it out onto a clean kitchen towel dusted lightly with powdered sugar. Peel off the parchment paper. Starting from a short side, carefully roll up the cake with the towel and let it cool completely.
5. Make the Filling: In a chilled bowl, whip the heavy cream with the powdered sugar and vanilla extract until stiff peaks form.
6. Unroll and Fill the Cake: Once the cake is completely cool, unroll it gently. Spread the whipped cream filling evenly over the surface, then re-roll the cake without the towel.
7. Prepare the Chocolate Icing: In a saucepan, heat the heavy cream until it just begins to simmer. Remove from heat and add the chopped chocolate and butter. Stir until smooth and glossy. Let it cool slightly until thickened but still spreadable.
8. Ice the Cake: Spread the chocolate icing over the rolled cake, using a spatula to create a bark-like texture. If desired, use a fork to add more texture to resemble tree bark.
9. Chill and Decorate: Refrigerate the cake for at least 1 hour before serving. Decorate with powdered sugar for a snowy effect or add marzipan mushrooms for a traditional touch.
Extra Tips:
To guarantee a smooth rolling process, make sure your sponge cake is pliable and not overbaked; this will prevent cracking. When spreading the filling, leave a small border around the edges to avoid overflow when rolling.
For an extra festive presentation, consider garnishing with fresh berries or holly leaves. Remember, the Yule Log Cake can be made a day in advance, allowing the flavors to meld beautifully together overnight.
Stollen Bread With Marzipan
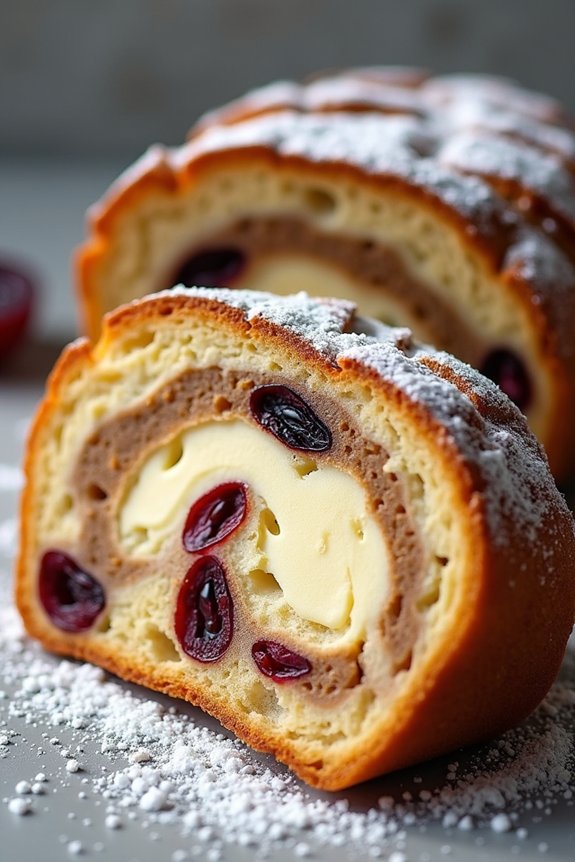
Stollen Bread with Marzipan is a traditional German Christmas bread that’s rich with flavors and textures. This festive bread is filled with dried fruits, nuts, and a delicious layer of marzipan running through the center, offering a surprise of sweetness with every bite. The bread is often dusted generously with powdered sugar, giving it a snowy appearance perfect for the holiday season. Stollen Bread is a wonderful addition to any Christmas breakfast or dessert table, inviting guests to enjoy a slice alongside a hot cup of coffee or tea.
The origins of Stollen date back to the early 15th century, and it has since become a beloved holiday treat across the world. The marzipan center is a luxurious touch that balances the tangy fruit and nut mixture. To make the perfect Stollen Bread with Marzipan, it’s important to plan ahead, as the dough requires time to rise and develop its flavors. The end result is a tender, aromatic bread with a delightful blend of sweet and nutty flavors that capture the essence of the holidays.
Ingredients for Stollen Bread with Marzipan (Serves 4-6):
- 4 cups all-purpose flour
- 1/4 cup granulated sugar
- 1/2 teaspoon salt
- 1 packet (2 1/4 teaspoons) active dry yeast
- 3/4 cup warm milk (around 110°F)
- 10 tablespoons unsalted butter, melted
- 1 teaspoon vanilla extract
- 1 teaspoon almond extract
- 1 teaspoon ground cinnamon
- 1/2 teaspoon ground cardamom
- 1 cup mixed dried fruits (raisins, currants, candied citrus peel)
- 1/2 cup chopped nuts (almonds or walnuts)
- 7 ounces marzipan
- 1/4 cup powdered sugar (for dusting)
- Additional melted butter for brushing
Cooking Instructions:
- Prepare the Dough: In a large mixing bowl, combine the flour, sugar, salt, and yeast. In a separate bowl, mix the warm milk, melted butter, vanilla extract, and almond extract. Pour the wet ingredients into the dry ingredients and mix until a dough begins to form.
- Knead the Dough: Transfer the dough to a lightly floured surface and knead it for about 8-10 minutes, until it becomes smooth and elastic.
- First Rise: Place the dough in a greased bowl, cover it with a damp cloth, and let it rise in a warm place for about 1-2 hours, or until it has doubled in size.
- Prepare the Filling: While the dough is rising, combine the dried fruits, nuts, cinnamon, and cardamom in a bowl. Set aside.
- Shape the Stollen: Once the dough has risen, roll it out on a floured surface into a rectangle about 12×16 inches. Spread the fruit and nut mixture evenly over the dough. Roll out the marzipan into a log slightly shorter than the length of the dough and place it along one long edge of the rectangle.
- Roll and Second Rise: Gently roll the dough over the marzipan, encasing it within the dough. Pinch the edges to seal. Place the rolled Stollen on a baking sheet lined with parchment paper, cover with a cloth, and let it rise for another 30-45 minutes.
- Bake the Stollen: Preheat your oven to 350°F (175°C). Bake the Stollen for 35-45 minutes, or until it’s golden brown and sounds hollow when tapped on the bottom.
- Finish the Bread: Remove the Stollen from the oven and immediately brush it with melted butter. Let it cool slightly before dusting generously with powdered sugar.
Extra Tips:
For best results, use high-quality marzipan and make sure your dried fruits are fresh and plump. You can soak the dried fruits in a little rum or brandy overnight for an additional depth of flavor.
Be patient with the rising times, as this allows the flavors to develop. Stollen can be made a week in advance and stored tightly wrapped in foil; it often tastes even better after a few days as the flavors meld together. Enjoy your Stollen Bread with Marzipan with a hot beverage for a truly festive experience.
Traditional Mince Pies
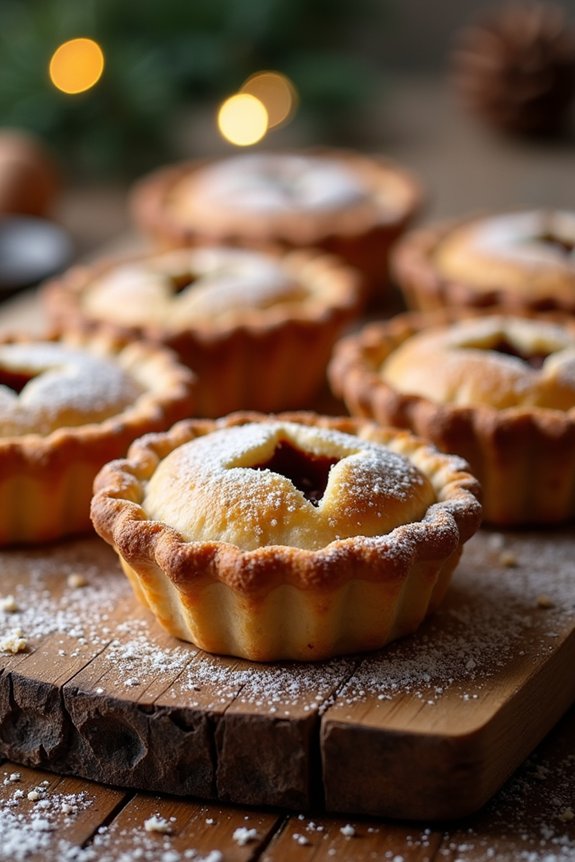
Mince pies are a classic holiday treat, deeply rooted in British Christmas traditions. These sweet, spiced pastries are filled with a rich mixture of dried fruits, spices, and sometimes a touch of brandy or rum, evoking the warmth and coziness of the festive season. While modern mince pies typically don’t include meat, they still carry the name from the original recipes that did.
Making mince pies from scratch can be a rewarding experience, filling your kitchen with the delightful aroma of spices and citrus. This recipe will guide you through the process of creating your own traditional mince pies, perfect for serving 4-6 people. The key to a great mince pie is the balance of flavors in the mincemeat filling and the flaky, buttery pastry that encases it. With a little patience and attention to detail, you can bring this vintage Christmas delight to your holiday table.
Ingredients for 4-6 servings:
*For the Pastry:*
- 2 cups all-purpose flour
- 1 cup unsalted butter, chilled and diced
- 2 tablespoons confectioners’ sugar
- 1 egg yolk
- 2-3 tablespoons cold water
For the Mincemeat Filling:
- 1 ½ cups mixed dried fruits (raisins, currants, sultanas)
- ½ cup brown sugar
- 1 apple, peeled and grated
- 1 teaspoon ground cinnamon
- ½ teaspoon ground nutmeg
- ½ teaspoon ground allspice
- Zest of 1 lemon
- Zest of 1 orange
- Juice of 1 lemon
- Juice of 1 orange
- 2 tablespoons brandy or rum
- 2 tablespoons melted butter
Cooking Instructions:
- Prepare the Mincemeat Filling:
- In a large bowl, combine the mixed dried fruits, brown sugar, grated apple, spices, lemon and orange zest, and juices. Stir well until all ingredients are evenly mixed.
- Add the brandy (or rum) and melted butter. Mix thoroughly. Cover the bowl and let it sit for at least an hour or overnight in the refrigerator to allow the flavors to meld.
- Make the Pastry:
- In a large mixing bowl, sift the flour and confectioners’ sugar together. Add the chilled, diced butter and rub it into the flour with your fingertips until the mixture resembles breadcrumbs.
- Add the egg yolk and 2 tablespoons of cold water. Mix until the dough comes together. If necessary, add the remaining tablespoon of water to bring the dough together. Knead gently until smooth, wrap in plastic wrap, and refrigerate for 30 minutes.
- Assemble the Mince Pies:
- Preheat your oven to 400°F (200°C). Grease a muffin tin or a pie tin.
- Roll out the pastry on a lightly floured surface to about 1/8 inch thick. Using a round cutter, cut out 12 circles and carefully press them into the prepared tin.
- Spoon the mincemeat filling into each pastry case, filling them just below the top.
- Use a smaller cutter to cut out lids for the pies. Place the lids on top of the filling, pressing the edges to seal. Make a small slit or star cut in the center of each lid for steam to escape.
- Bake the Pies:
- Bake the mince pies in the preheated oven for 20-25 minutes, or until the pastry is golden brown.
- Remove from the oven and let them cool in the tin for a few minutes before transferring to a wire rack to cool completely.
Extra Tips:
For an extra touch of holiday spirit, dust the cooled mince pies with a little confectioners’ sugar before serving. If you prefer a richer flavor, consider adding a tablespoon of finely chopped nuts to the mincemeat filling.
Additionally, if making the mincemeat filling in advance, it can be stored in an airtight container in the refrigerator for up to two weeks, allowing the flavors to develop even more. Enjoy these delightful treats with a warm mug of mulled wine or a comforting cup of tea.
Peppermint Bark
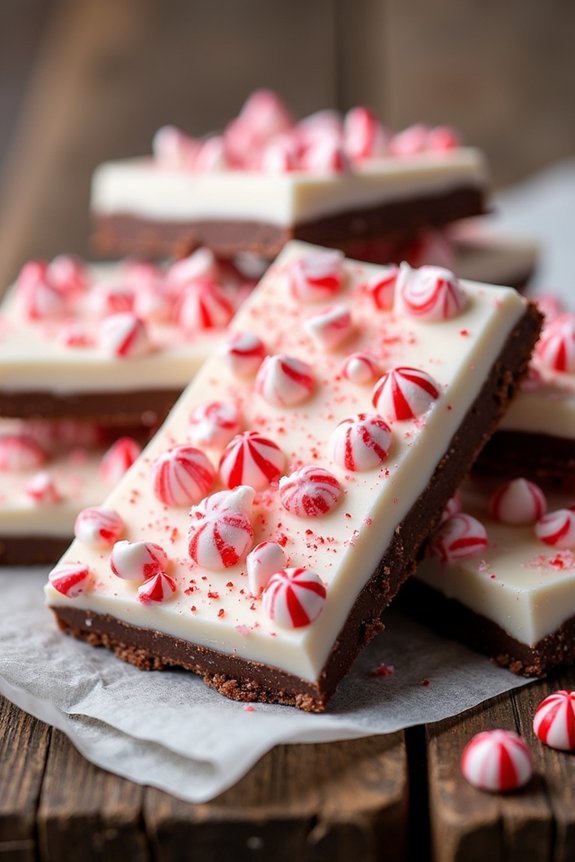
Peppermint Bark is a delightful holiday treat that perfectly combines the rich, creamy textures of chocolate with the invigorating zing of peppermint. This vintage recipe has been a festive favorite for generations, bringing a burst of holiday cheer to any dessert spread.
The two layers of chocolate, one dark and one white, are generously sprinkled with crushed peppermint candies, creating a visually appealing and deliciously crunchy experience. Ideal for gift-giving or as a sweet indulgence during holiday gatherings, Peppermint Bark is both easy to make and a joy to share.
Creating Peppermint Bark for 4-6 people requires minimal ingredients and can be prepared in just a few simple steps. This recipe captures the essence of Christmas with its festive appearance and delightful flavors.
Whether you’re a seasoned baker or a beginner looking to add a homemade touch to your holiday celebrations, this recipe is sure to impress. Gather your ingredients and follow the straightforward instructions to craft a batch of Peppermint Bark that will have everyone coming back for more.
Ingredients:
- 12 ounces of dark chocolate chips
- 12 ounces of white chocolate chips
- 1 teaspoon of peppermint extract
- 1 cup of crushed peppermint candies or candy canes
- Parchment paper
Cooking Instructions:
- Prepare the Baking Sheet: Line a baking sheet with parchment paper, making sure it covers the entire surface to prevent the chocolate from sticking. This will make it easier to remove the bark once it has set.
- Melt the Dark Chocolate: In a microwave-safe bowl, melt the dark chocolate chips by heating them in 30-second intervals. Stir between each interval until the chocolate is smooth and completely melted. Alternatively, use a double boiler if preferred.
- Spread the Dark Chocolate: Pour the melted dark chocolate onto the prepared baking sheet. Use a spatula to evenly spread the chocolate into a thin layer, approximately 1/4 inch thick. Allow it to set at room temperature for about 15 minutes or until it’s partially hardened.
- Melt the White Chocolate: While the dark chocolate is setting, melt the white chocolate chips using the same method as the dark chocolate. Once melted, stir in the peppermint extract until fully incorporated.
- Layer the White Chocolate: Carefully pour the melted white chocolate over the partially set dark chocolate layer. Use a spatula to spread it evenly, covering the dark chocolate completely.
- Add the Peppermint Topping: Immediately sprinkle the crushed peppermint candies over the top of the white chocolate layer. Press the candies gently with your hands to make sure they adhere to the chocolate.
- Set the Bark: Allow the bark to set at room temperature for about 2 hours, or until fully hardened. For faster setting, you can also place it in the refrigerator for about 30-45 minutes.
- Break and Serve: Once the bark is set, remove it from the parchment paper and break it into pieces of your desired size. Serve and enjoy, or package them for gifts.
Extra Tips:
When making Peppermint Bark, make sure that the chocolate layers aren’t too thick; this allows for an even texture and makes breaking the bark easier.
If you prefer a more intense peppermint flavor, you can increase the amount of peppermint extract in the white chocolate layer. Additionally, using a variety of peppermint candies, such as regular and chocolate-filled candy canes, can add an interesting twist to the flavor and texture.
Store any leftover bark in an airtight container to maintain its freshness and prevent the chocolate from absorbing any external odors.
Holiday Linzer Cookies
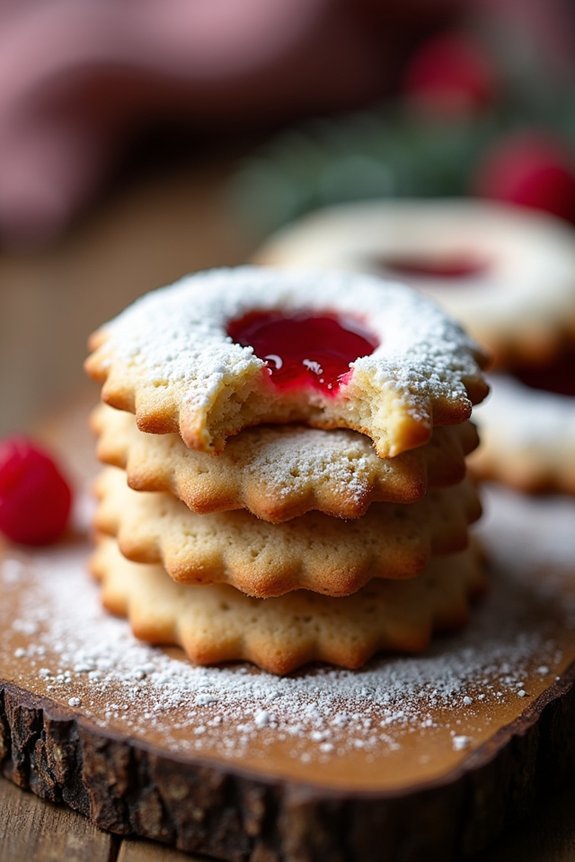
Transport yourself to a winter wonderland with the delightful aroma and taste of Holiday Linzer Cookies. These classic Austrian cookies are a festive treat, perfect for the holiday season. Characterized by their nutty, buttery dough and a sweet, tangy jam filling, Linzer cookies are both a visual and taste delight. Traditionally, these cookies are made with almonds or hazelnuts, providing a rich, nutty flavor that pairs beautifully with the sweet jam. The top layer of the cookie typically features a cutout, allowing the vibrant jam to peek through and add to the visual appeal.
Whether you’re an experienced baker or trying your hand at holiday baking for the first time, these cookies are bound to impress. Not only do they make a wonderful addition to your festive dessert table, but they also make for a thoughtful homemade gift. With a few simple ingredients and some festive cookie cutters, you can create these lovely cookies that taste as good as they look. Below is a recipe that yields 24-30 cookies, perfect for serving 4-6 people.
Ingredients:
- 1 cup unsalted butter, softened
- 3/4 cup granulated sugar
- 1 teaspoon vanilla extract
- 2 large egg yolks
- 2 cups all-purpose flour
- 1 cup ground almonds or hazelnuts
- 1/2 teaspoon ground cinnamon
- 1/4 teaspoon salt
- 1/2 cup raspberry jam (or any preferred jam)
- Powdered sugar for dusting
Instructions:
- Prepare the Dough: In a large mixing bowl, cream together the softened butter and granulated sugar until light and fluffy. This should take about 3 minutes. Add the vanilla extract and egg yolks, one at a time, beating well after each addition.
- Mix Dry Ingredients: In a separate bowl, whisk together the all-purpose flour, ground almonds or hazelnuts, ground cinnamon, and salt. Gradually add the dry mixture to the butter mixture, mixing until just combined. Be careful not to overmix to guarantee tender cookies.
- Chill the Dough: Divide the dough into two equal portions, flatten each into a disk, wrap in plastic wrap, and refrigerate for at least 1 hour. This helps the dough firm up, making it easier to roll out and cut.
- Preheat Oven: Preheat your oven to 350°F (175°C) and line two baking sheets with parchment paper.
- Shape Cookies: On a lightly floured surface, roll out one disk of dough to about 1/8-inch thickness. Use a round cookie cutter to cut out cookies. Using a smaller cookie cutter, cut out the centers of half of the cookies. These will be the tops of your Linzer cookies.
- Bake: Place cookies on prepared baking sheets, ensuring an even distance between them. Bake for 8-10 minutes or until the edges are lightly golden. Allow cookies to cool on the baking sheet for a few minutes before transferring them to a wire rack to cool completely.
- Assemble Cookies: Once cooled, spread about 1 teaspoon of raspberry jam on the flat side of each whole cookie. Dust the tops of the cut-out cookies with powdered sugar, then gently sandwich them together with the jam-covered cookies.
Extra Tips:
When making Linzer cookies, take care to roll the dough evenly to guarantee uniform baking. If the dough becomes too soft while rolling out, return it to the refrigerator for a few minutes to firm up.
Feel free to experiment with different jams such as apricot or strawberry for varied flavors. Additionally, consider keeping the dough chilled between batches to maintain its shape during baking. Store the finished cookies in an airtight container to keep them fresh and crisp for several days.
Classic Scottish Shortbread
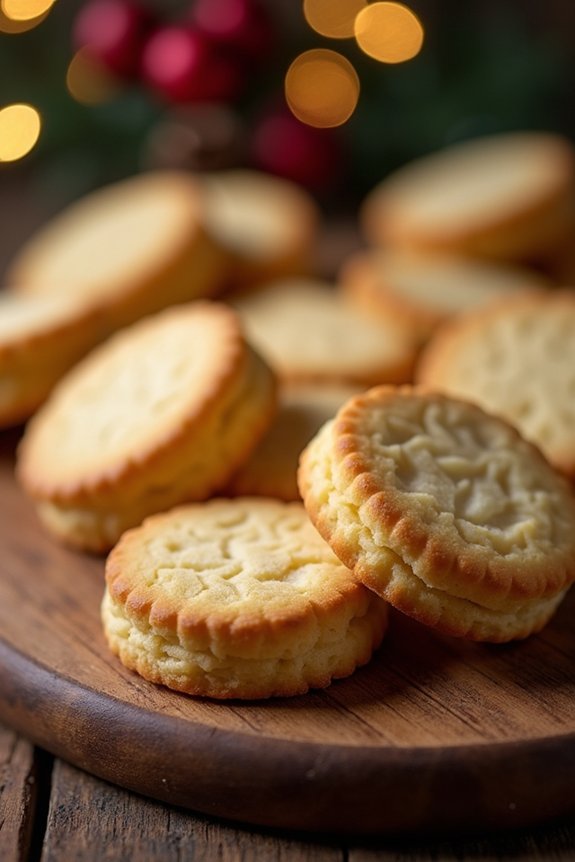
Classic Scottish Shortbread is a timeless treat that embodies the warmth and cheer of the holiday season. This rich, buttery biscuit, originating from Scotland, is known for its simplicity and the melt-in-your-mouth texture. Traditionally enjoyed during Christmas, this shortbread recipe will fill your home with a delightful aroma, making it the perfect accompaniment to a warm cup of tea or coffee. Its delicate sweetness and crumbly texture make it a favorite for both young and old, and it’s a must-have for any Christmas cookie platter.
The beauty of Classic Scottish Shortbread lies in its minimal ingredients and straightforward preparation. With just a few pantry staples, you can create a batch of these delicious cookies that will leave your guests craving for more. This recipe is designed to serve 4-6 people, making it ideal for intimate family gatherings or as a thoughtful gift for loved ones. Whether you’re a seasoned baker or a beginner, this shortbread is easy to master and sure to impress.
Ingredients for Classic Scottish Shortbread (Serves 4-6):
- 1 cup (2 sticks) unsalted butter, softened
- 1/2 cup granulated sugar
- 2 cups all-purpose flour
- 1/4 teaspoon salt
Cooking Instructions:
- Preheat the Oven: Begin by preheating your oven to 300°F (150°C). This low temperature is essential for baking shortbread slowly, ensuring a tender crumb.
- Prepare the Baking Pan: Lightly grease a 9-inch square or round baking pan. Alternatively, you can line it with parchment paper to make it easier to remove the shortbread after baking.
- Cream the Butter and Sugar: In a large mixing bowl, cream the softened butter and granulated sugar together until the mixture is light and fluffy. This should take about 3-5 minutes using an electric mixer on medium speed.
- Combine Dry Ingredients: In a separate bowl, whisk together the all-purpose flour and salt. Gradually add this to the creamed butter and sugar mixture, mixing just until a dough forms.
- Shape the Dough: Transfer the dough into the prepared baking pan. Use your hands or a spatula to press it evenly into the pan, ensuring the surface is smooth and even.
- Chill the Dough: For the best texture, cover the pan with plastic wrap and refrigerate the dough for about 20 minutes. This step helps the shortbread maintain its shape during baking.
- Score and Dock: Before baking, use a knife to lightly score the dough into 12-16 pieces (depending on your preferred size). Use a fork to gently prick the surface of the dough all over. This helps prevent the shortbread from puffing up.
- Bake: Place the pan in the preheated oven and bake for 45-50 minutes, or until the edges are lightly golden. The shortbread should remain pale and shouldn’t brown.
- Cool and Slice: Remove the pan from the oven and allow the shortbread to cool in the pan for about 10 minutes. Then, carefully transfer it to a cutting board and slice along the scored lines.
- Serve or Store: Once completely cooled, enjoy your Classic Scottish Shortbread immediately or store it in an airtight container for up to two weeks.
Extra Tips:
For a more authentic experience, consider using a Scottish shortbread mold to shape the dough. If you’re feeling adventurous, you can also add a hint of vanilla extract or a pinch of nutmeg to the dough for added flavor.
Be sure to use high-quality butter, as it greatly impacts the taste and texture of the shortbread. Finally, remember that shortbread is best enjoyed with a hot beverage, so make sure to have your favorite tea or coffee ready to complement this delightful holiday treat.
Cinnamon Star Cookies
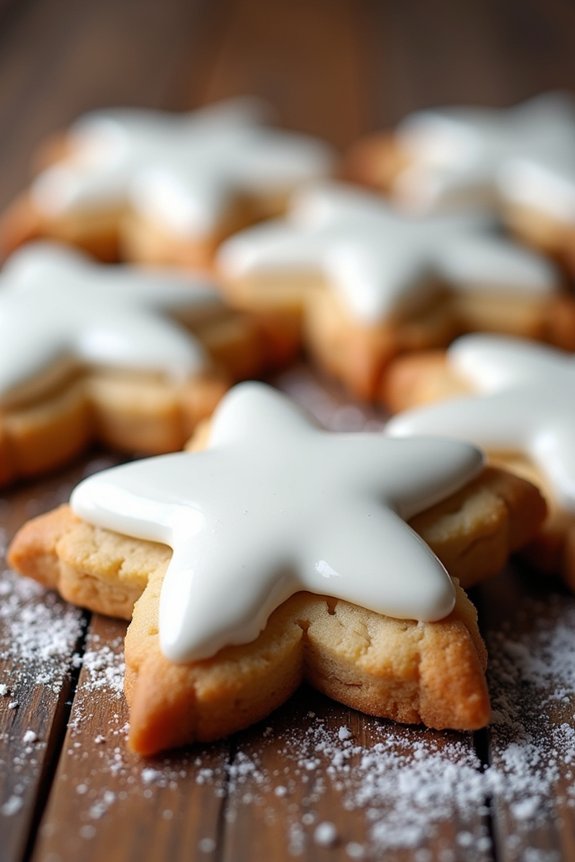
Cinnamon Star Cookies are a delightful holiday treat that brings warmth and cheer to any festive gathering. These cookies are a classic German delicacy known as “Zimtsterne,” which translates to “cinnamon stars.” They’re traditionally enjoyed during the Christmas season, offering a perfect blend of spicy cinnamon and sweet icing.
The cookies are characterized by their star shape and glossy white icing, making them not just delectable but also visually appealing on any holiday dessert table.
Making Cinnamon Star Cookies is a rewarding baking project that involves creating a dough rich with ground almonds and cinnamon, and then topping it with a sweet meringue icing. These cookies are gluten-free, as they don’t contain any flour, making them an excellent option for those with dietary restrictions.
The following recipe serves 4-6 people, providing enough cookies to share with family and friends or to enjoy as a personal indulgence during the holiday season.
Ingredients (Serves 4-6):
- 2 1/4 cups ground almonds
- 1 tablespoon ground cinnamon
- 1 teaspoon lemon zest
- 2 large egg whites
- 1 1/4 cups powdered sugar
- 1 teaspoon vanilla extract
- A pinch of salt
Instructions:
- Preheat and Prepare: Preheat your oven to 300°F (150°C). Line two baking sheets with parchment paper to prevent the cookies from sticking during baking.
- Combine Dry Ingredients: In a large mixing bowl, combine the ground almonds, ground cinnamon, and lemon zest. Mix well to guarantee that the cinnamon and zest are evenly distributed throughout the almond mixture.
- Make the Meringue: In a separate clean, dry bowl, beat the egg whites and a pinch of salt with an electric mixer until soft peaks form. Gradually add the powdered sugar, continuing to beat until the mixture is glossy and stiff peaks form. Reserve about 1/2 cup of this meringue for the icing.
- Create the Dough: Gently fold the dry almond mixture into the remaining meringue until a dough forms. Be careful not to overmix, as this can deflate the meringue and affect the texture of the cookies.
- Roll and Cut: Roll the dough out between two sheets of parchment paper to about 1/4-inch thickness. Use a star-shaped cookie cutter to cut out the cookies and place them on the prepared baking sheets.
- Ice the Cookies: Using a small spoon or a piping bag, spread or pipe the reserved meringue on top of each cookie. Confirm the icing covers the entire top surface for a shiny finish after baking.
- Bake: Bake the cookies in the preheated oven for 15-20 minutes. The cookies should be firm but not browned. Let them cool completely on a wire rack before serving.
Extra Tips: To guarantee the cookies maintain their shape, chill the dough for about 30 minutes before rolling it out. This will make it easier to handle and cut with the cookie cutter.
Additionally, make sure to use high-quality ground almonds for the best flavor and texture. If you find your dough too sticky, a light dusting of powdered sugar can help prevent it from sticking to the parchment paper or rolling pin. Enjoy these cookies with a warm cup of tea or coffee for a truly festive treat!