


I have painted rocks for my own garden over the years and they hold up well in all kinds of weather.
School gardens and outdoor learning areas seem like a natural place to try something similar.
The ideas here use basic supplies and simple steps that do not take much time.
Students can join in if the school wants to make it a group project.
I picked designs that stay practical while adding a bit of color to the space.
Chick Face Rock for School Garden Beds

A smooth oval stone painted solid yellow creates a simple chick design that stands out against dark garden soil. Two small black dots form the eyes while an orange triangle marks the beak, using basic color blocking that follows the rock’s curved surface. This animal rock idea works well because the egg-like shape already suggests a hatching chick without extra details.
What makes this idea useful is how quickly it can be painted with basic craft supplies for outdoor classroom projects. The same rounded stone and minimal face layout could be adapted into other birds or animals by swapping the beak color or adding wing lines. For garden decor, this type of painted rock sits naturally in soil or mulch and holds up well as a seasonal accent in planters or along paths.
Strawberry Painted Rock for Garden Beds

A strawberry painted rock turns an oval garden stone into a simple fruit marker by covering the surface in red, adding scattered white dots for seeds, and finishing the top with green leaf shapes. The rounded form of the stone helps the design read clearly as a strawberry without needing extra shaping. This fruit rock idea works as garden decor because the color areas stay bold and the dots follow the curve of the rock naturally. It fits the food-inspired rock category and stays easy to recognize from a short distance.
What makes this idea useful is how well it blends into school garden beds or outdoor learning paths. The small scale lets students paint several at once to mark different plant sections or activity spots. You could swap the seed dots for stripes to turn the same base into a different fruit or berry on a similar shaped stone. The basic color blocking keeps the project quick for group settings while still showing up nicely against soil or grass.
Ladybug Rocks for School Gardens

Ladybug rocks are created by painting rounded garden stones in bright red with black spots and a black head area marked by small white dots. The curved shape of each stone naturally forms the beetle body, so the design needs only simple color blocking and dot details to read clearly as a ladybug. This approach belongs to the bug rock or garden decor category and suits placement directly in soil or mulch beds.
What makes this idea useful is that the same red-and-black pattern works on stones of different sizes, letting you scatter a small group through a flower bed or along a school path. Kids can vary the number of spots or the size of the head section to match the rock they have on hand. The design also stays visible from a distance once the rocks sit among green plants, which helps them function as quick outdoor markers or counting tools during lessons.
Daisy Painted Rock for School Garden Beds

A daisy design painted on a rounded garden stone uses simple white brush strokes to form petals around a solid yellow center. The natural gray surface of the rock shows between the petals and gives the flower a textured, grounded look without extra layers. This keeps the project to basic color areas while creating a clear flower motif that blends into outdoor spaces.
What makes this idea useful is how easily it sits in mulch or along the edge of a raised bed in a school garden. The rounded stone shape lets the petals follow the curve without needing straight lines or templates. You could change the center color to match nearby blooms or scale the same layout down onto smaller stones for a matching set. The loose brushwork also makes it simple to produce several versions quickly for different learning areas.
Bumblebee Painted Rock

A smooth oval rock painted yellow with thick black stripes makes a clear bumblebee shape. The rounded end gets a black head section with two small antennae dots and a simple face using white paint for eyes and mouth. This bug rock idea fits the natural curve of the stone so the stripes stay even without extra shaping.
What makes this idea useful is how the basic stripe pattern and face can be repeated on any similar oval stone for school garden beds or planter borders. The small size lets kids place several bees among herbs or along paths without crowding the space. The same yellow and black color blocking works on flatter stones too if you want a version that sits steadier on mulch.
Frog Face Painted Rock

A smooth, rounded stone painted solid green serves as the base for a simple frog face using bold white eye circles, black pupils, and small red cheek patches. Black paint outlines the curved smile and adds two nostril dots, letting the natural curves of the rock shape the expression without extra details. This animal rock fits the funny face rock category and works as a quick garden accent because the large color blocks and basic outlines follow the stone’s form easily.
The rock shape does a lot of the work here since the rounded surface already suggests a frog head and needs only the face details to finish the idea. Place one along a school garden path or in a planter to mark a reading spot or nature corner without taking up much space. The same design adapts quickly to smaller pebbles for a group project or to different colors if you want to create a set of pond creatures.
Striped Arrow Rocks for Garden Paths
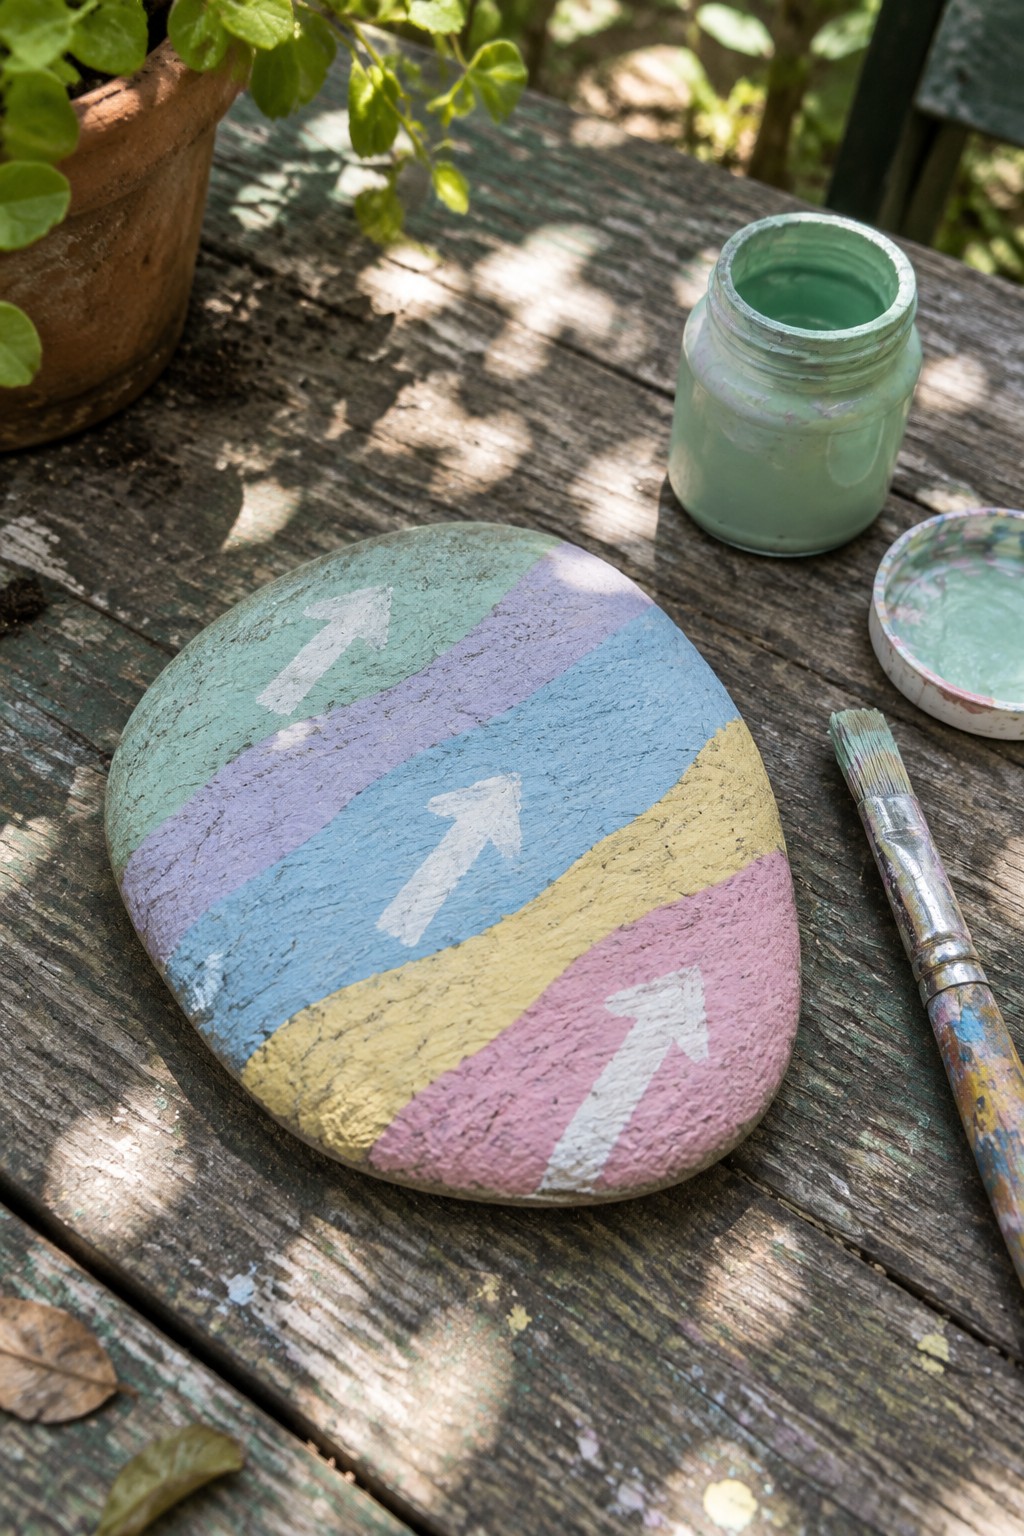
A smooth, rounded stone gets painted with wide diagonal bands of green, lavender, blue, yellow, and pink, each stripe holding a single white arrow that points the same direction. The arrows sit evenly across the surface so the design reads clearly from a short distance. This garden decor rock uses simple color blocking and repeated motifs to create an easy-to-spot directional marker.
What makes this idea useful is how the repeated arrows turn the rock into a path or station guide without any lettering. The same stripe-and-arrow layout adapts quickly to other oval stones by changing the color order or narrowing the bands to fit a smaller surface. For school gardens, this kind of painted rock works well along mulch paths or near raised beds where kids need visual cues. The rounded shape helps the design stay visible even when the stone sits partially in soil or among plants.
Smiling Sun Rock for Flower Beds

A round garden stone painted solid yellow with bold orange rays and a basic smiling face creates a simple sun rock that suits outdoor planting areas. The design relies on clear color blocking for the rays and small dots for the eyes and cheeks so the motif stays readable against soil and greenery. This garden decor rock category works well because the natural rounded shape and flat base let the stone sit steadily among plants without extra supports.
What makes this idea useful is how the sun motif pairs directly with sunflower beds or other bright flowers in school gardens. The small scale makes it easy to adapt by swapping the face for a different expression or using the same ray pattern on flatter stones for path edging. For garden decor this kind of painted rock stays visible in mulch or soil while keeping the craft quick to finish with basic brushes.
Tulip Painted Rock for Garden Beds

A smooth rounded stone gets a solid pink base coat before a tulip is added with overlapping pink petals, a green stem, and two simple leaves. The design uses clear color areas that follow the rock’s natural curve and stay visible even when the stone sits partly in soil. This flower rock belongs in the garden decor category and serves as a small accent rather than a plant marker.
What makes this idea useful is how the rounded shape keeps the tulip readable from different angles once placed in mulch or dirt. A painted rock like this works especially well as a border piece along school garden paths or inside raised beds. The same tulip motif could be simplified to just the flower head on a smaller pebble or repeated across several stones for a short row. For garden decor this type of painted rock stays practical because it needs no text and holds up outdoors without extra sealing.
Rainbow Caterpillar Rocks

Paint smooth, oval stones with wide horizontal stripes in bright colors to create caterpillar shapes. Place a simple face with round eyes and a curved mouth at one end of each rock so the stripes read as body segments. The rounded form of the stone already suggests the insect shape, so the design stays clear even with basic color blocking and minimal details. This bug rock idea works as a painted rock collection that suits garden paths or mulch beds.
What makes this idea useful is how easily the same stones can line a school garden walkway or sit inside a raised planter. The striped pattern adapts quickly to whatever paint colors you have on hand or to a class theme. You could shorten the stripes on smaller rocks to make different sizes of caterpillars or skip the faces if you want a faster version for a group project. For outdoor learning areas, these rocks add visual interest without taking up much space.
Ladybug Painted Rock for Garden Planters

A smooth rounded stone painted bright red with scattered black dots creates a simple ladybug design. The head area uses black paint with two small white circles for eyes and a thin curved line for the mouth. This bug rock fits garden settings because the rounded form follows the natural shape of the stone and the color blocking stays basic.
This painted rock works well tucked along the rim of a planter or scattered in mulch beds at a school garden. The dot pattern and two-tone color scheme make it easy to adjust for smaller or larger stones without extra tools. You can swap the red for other bright colors to create different insects or repeat the same layout on several rocks for a quick group project. The design stays visible from a short distance so it holds up in outdoor learning areas.
Seed Packet Painted Rocks

A smooth rounded stone works well as the base for this garden-themed design painted in white. The motif uses a simple rectangular packet outline with a sprouting plant icon and a line of dots below to represent seeds. This approach keeps the painted rock clearly decorative while making it easy to place among real seedlings in a tray or bed. The idea fits the category of garden decor rocks that use basic symbols rather than detailed scenes.
What makes this idea useful is how the packet shape scales across different stone sizes for marking rows in school garden beds or planters. You could change the sprout style to match specific plants like herbs or vegetables without altering the overall layout. The flat top area of the rock holds the design steady even after the stone settles into soil. This type of painted rock photographs clearly for project boards because the symbol reads as garden-related from a short distance.
Painted Snail Rock for Garden Paths

A smooth, elongated stone painted as a snail makes a simple garden accent. The shell uses a pink and blue spiral that follows the rock’s curve, with the head section left in a lighter tone and finished with basic lines for antennae and a face. This animal rock fits the garden theme because the compact size and natural shape let it sit among plants or along paths without extra props.
The rounded stone helps the spiral pattern wrap cleanly and keeps the finished piece stable when placed in soil or mulch. You can swap the pink and blue for school colors or simplify the stripes into wider bands if you want faster results. This kind of painted rock works well in school gardens because it adds a small, weather-resistant detail that students can make in one session and then tuck near flower beds or learning areas.
Owl Painted Rock for Nature Learning Areas

A rounded brown stone works as an owl by keeping the natural rock color as the main body and adding white eye patches with black centers for contrast. Brown brush strokes create feather details around the face while a small yellow triangle marks the beak. This animal rock idea uses the stone’s oval shape and rough texture to make the design sit naturally without extra outlining.
What makes this idea useful is how the large eye shapes stay visible even from a short distance in a garden bed or along a school path. The same basic layout can be adapted onto smaller or flatter stones by shrinking the eye size and skipping some of the feather lines. For outdoor learning areas this painted rock can sit near plants or signage to mark a nature spot without needing any lettering.
Garden Vegetable Painted Rocks
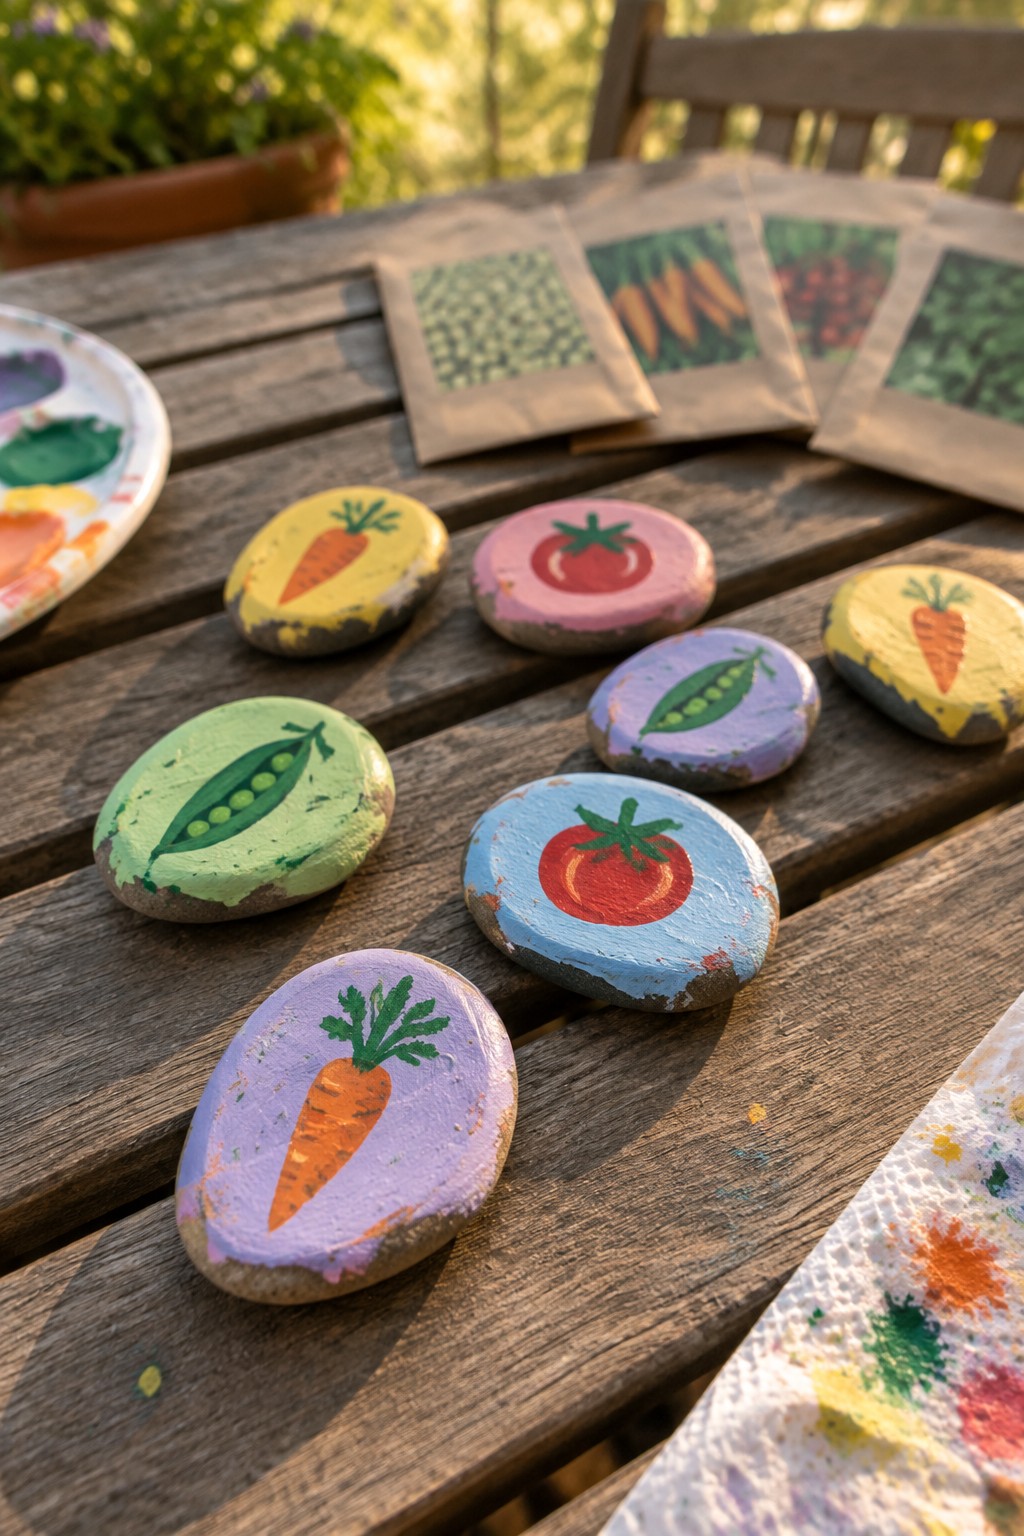
Smooth stones painted with basic vegetable shapes give school gardens a quick decorative boost. A base color covers most of the rock, then a simple carrot, tomato, or pea pod is added in the center using a few brush strokes and solid color blocks. The natural curve of the stone lets the design wrap slightly without extra effort, and the bold outlines keep each vegetable easy to recognize from a short distance.
These rocks sit nicely along the edges of raised beds or between rows of actual plants without taking up much space. The same approach works for other crops the class is growing, or the background color can be swapped to match a different garden theme. Because the shapes stay simple and the color areas stay large, the idea photographs clearly for sharing and needs only basic supplies to repeat.
Daisy Cluster Flat Stone for Garden Beds
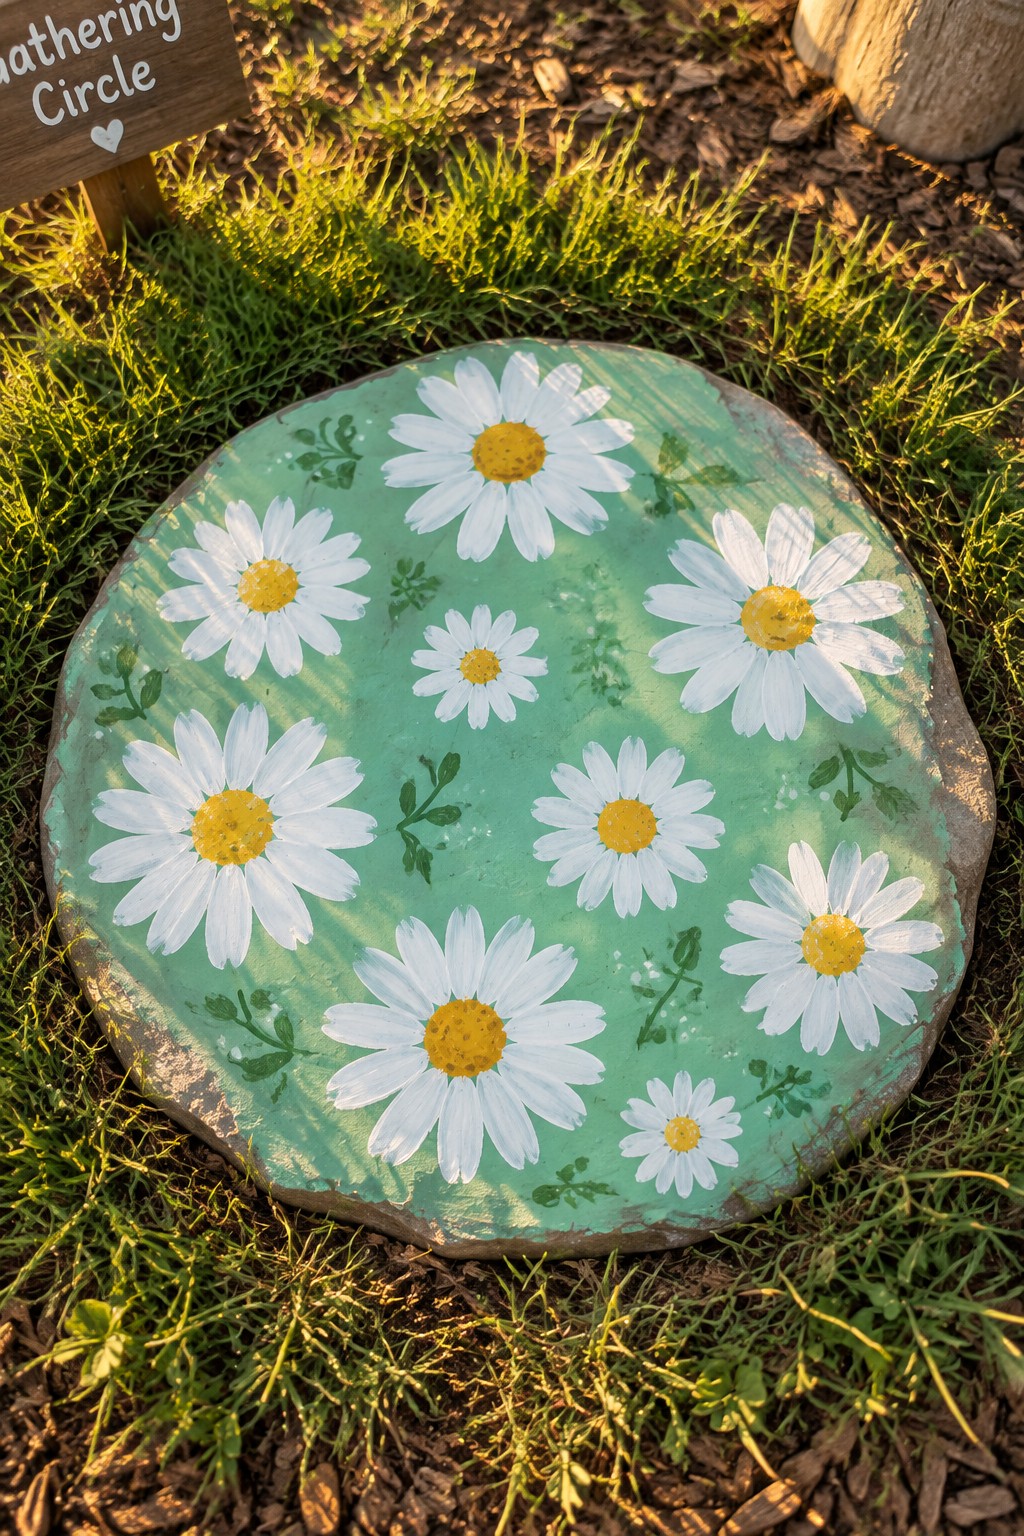
A large flat garden stone works well for this project because its smooth top surface gives plenty of room for multiple flowers without crowding. Paint the entire rock a solid green base color first, then add simple daisy shapes using white petals around yellow centers and scatter small green leaf sprigs between them. The design stays easy because the flowers use basic round shapes and loose brush strokes that follow the rock’s natural curve rather than needing perfect lines. This type of flower rock fits the garden decor category and blends into mulch or soil without looking out of place.
What makes this idea useful is how the flat shape lets the painted daisies read clearly from a short distance in a school garden. You can scale the same layout down to smaller stones or swap the daisies for other simple blooms like sunflowers or tulips depending on the season. For outdoor learning areas the green background helps the rock disappear into planting beds while the yellow centers add a quick pop of color that catches kids’ attention. The motif could easily be changed into a set of matching stones with different flower types placed along a path.
Painted Watermelon Wedges for Garden Beds

A triangular rock works well for this fruit-inspired project because its natural shape already suggests a watermelon slice. The top surface gets covered in pink paint with scattered white dots to stand in for seeds while a thick green band along the bottom edge creates the rind. The design stays simple with basic color areas and no fine details so it reads clearly even from a short distance in a garden setting.
What makes this idea useful is how the rock shape does most of the work and leaves only three paint colors to apply. A painted rock like this works especially well placed along the edge of a raised bed or tucked into mulch where it can mark a planting area without needing a label. The same wedge approach could be changed to other fruits by swapping the pink for orange or yellow and adjusting the seed pattern or rind color to match.
Red Spotted Mushroom Rocks

A mushroom rock uses a rounded stone for the cap and a second stone underneath to suggest the stem. Red paint covers the top surface while white dots are added in a simple scattered pattern to mimic the classic spotted look. The design stays easy because it relies on solid color blocking and basic dots rather than fine details.
What makes this idea useful is how the rounded stone shape already suggests a mushroom cap so little shaping is needed. These work well tucked into school garden beds or along paths where kids can spot them during outdoor lessons. The same red and white pattern can be scaled down to smaller pebbles for a cluster effect or switched to other colors to match different garden themes.
Butterfly Painted Rock for Pollinator Gardens
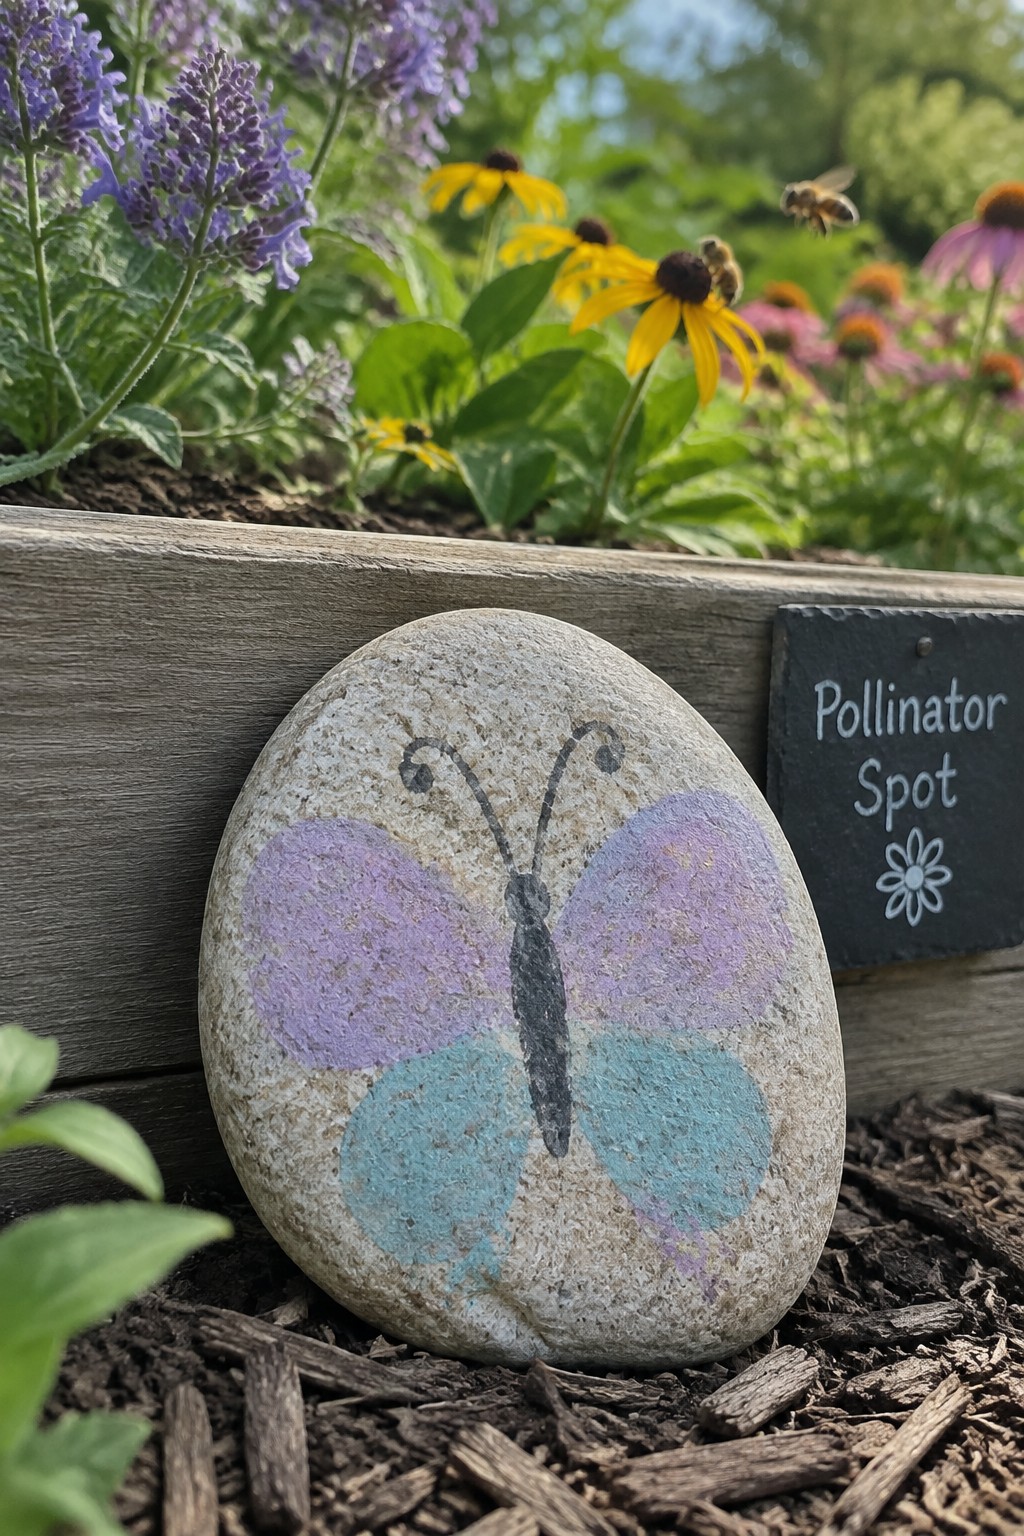
A smooth rounded stone works as the base for a butterfly design painted with broad color sections on the wings and simple black lines for the body and antennae. The oval shape lets the wings spread across the surface without extra shaping. This type of bug rock fits garden decor projects where the goal is marking a spot for bees and butterflies.
What makes this idea useful is the basic color blocking that works on any similar oval stone without needing tiny details. It adapts easily by changing the wing colors to match nearby flowers or scaling it down for path edges in a school bed. The small size makes it simple to place several rocks together as visual markers around a learning garden area.
Color Wheel Painted Rocks for Learning Gardens
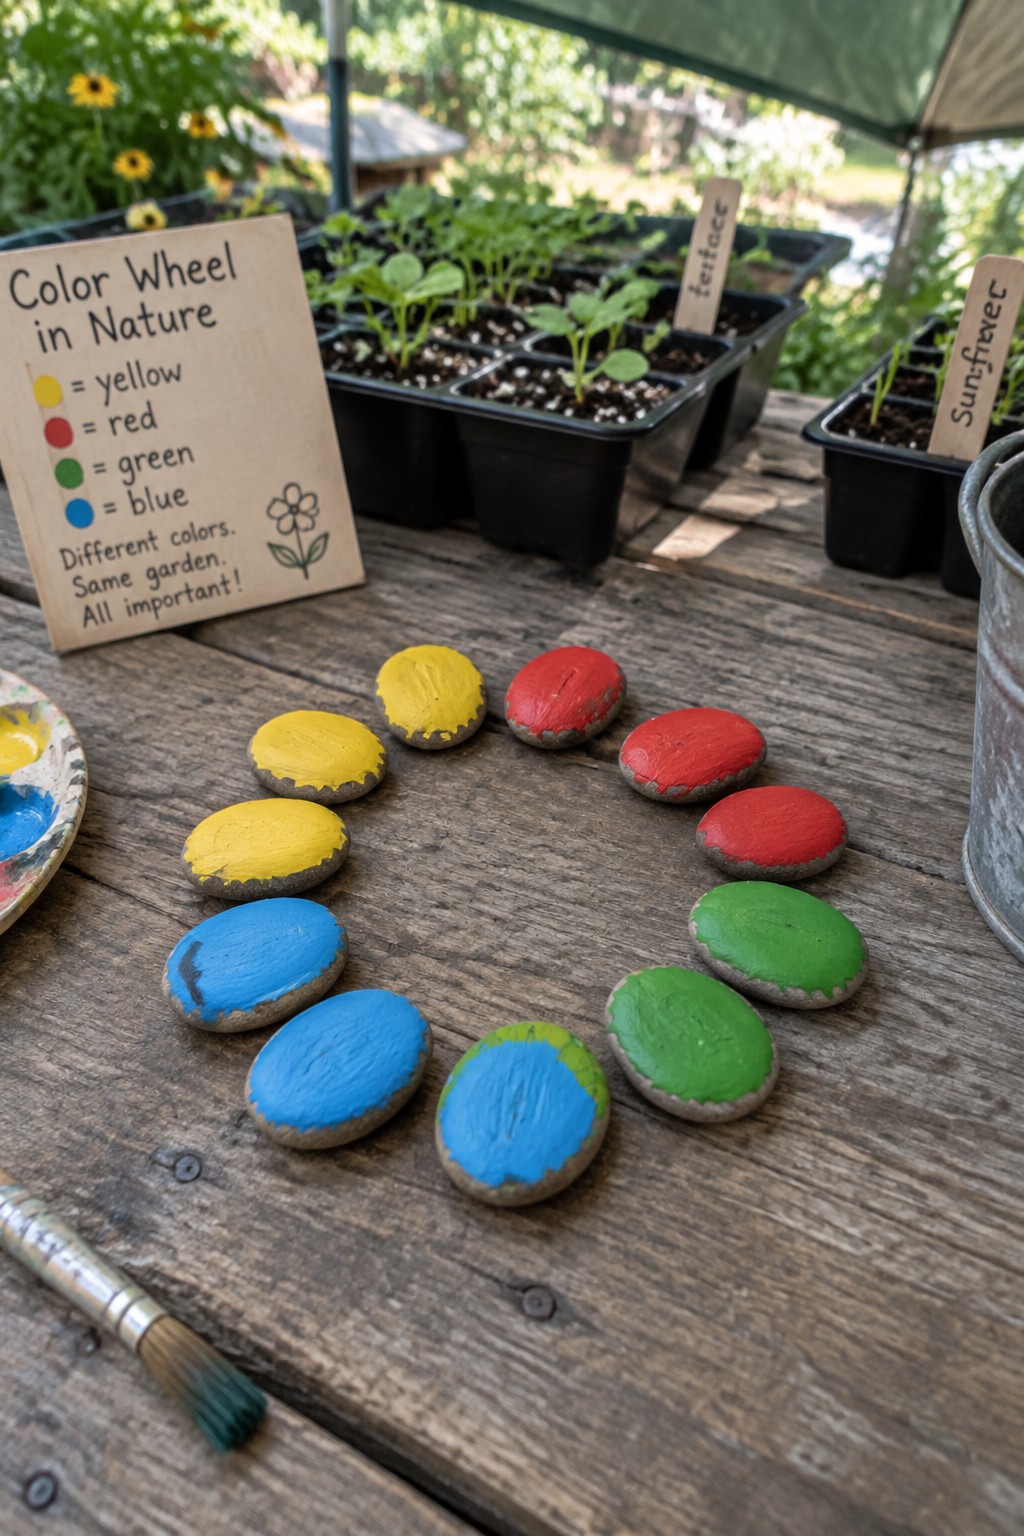
Smooth river rocks painted in solid blocks of yellow, red, green, and blue create a simple color wheel that can sit directly in a school garden bed or along a learning path. The rounded stones are arranged in a loose circle so the colors sit next to each other, showing how the same hues appear on flowers, leaves, and vegetables growing nearby. The flat tops of the stones give clean surfaces for even paint coverage, and the natural gray edges stay visible to keep the rocks clearly identifiable as garden markers rather than toys.
What makes this idea useful is that the same set of four colors can be repeated with any size stones found on site, so teachers can scale the wheel up for a large planter or keep it small for a windowsill display. The design works especially well in outdoor learning areas because the rocks can stay in place through the seasons without fading quickly when sealed. For a new class, the colors can be swapped for whatever plants are currently blooming, or extra stones can be added to show tints and shades the students notice in the garden that day.
Rainbow Striped Boulder for School Garden Seating Areas

A large rounded stone works well for this project because its smooth curved surface lets wide horizontal bands of color sit evenly without much prep. The design uses simple stripes in purple, blue, green, yellow, orange, and pink that follow the natural shape of the rock. This approach falls into the decorative stone craft category and stays easy to paint since it relies on broad color blocks rather than fine details. The finished rock sits directly on the ground as a colorful accent in an outdoor learning space.
What makes this idea useful is that the large scale lets the stripes read clearly from a distance in a garden setting. The same color blocking can be scaled down onto smaller rounded stones or river rocks for paths or planter borders. For school gardens, a painted rock like this marks gathering spots without needing text or extra signs. The stripe pattern can be reworked with fewer colors or different widths to match other classroom themes while keeping the same straightforward method.
Frequently Asked Questions
What supplies are needed to create painted rocks for outdoor school spaces?
Acrylic paints in various colors, smooth flat rocks collected from a local source, paintbrushes of different sizes, a primer if the rocks are very porous, and a clear outdoor sealant are the main items required. Gather everything in one spot before starting so the project flows smoothly without interruptions. Non-toxic options are ideal for school settings to keep the activity safe for all ages.
How do I make sure the painted rocks hold up in rain and sun?
Apply two or three thin coats of a waterproof outdoor sealant after the paint has fully dried for at least 24 hours. Choose a sealant labeled for exterior use and reapply it once a year during maintenance checks. Placing the rocks in sheltered garden spots rather than direct high-traffic paths also helps extend their life.
What educational benefits can painted rocks bring to outdoor learning areas?
Rocks can feature letters, numbers, shapes, or simple science images like leaves and insects to support lessons during recess or class activities. Students can use them as markers for plant identification or as counting tools in math games. This turns the garden into an interactive space that reinforces classroom topics through play.
How can students participate safely in painting the rocks?
Divide the class into small groups and assign age-appropriate tasks such as rock cleaning or base coat application while an adult handles any cutting or detailed work. Provide smocks and work in a well-ventilated area to avoid fumes. Set clear rules about not putting paint near the mouth and washing hands thoroughly afterward.
Where should the finished rocks be placed in a school garden?
Position them along pathways as stepping guides, near plant beds as labels, or in a designated quiet corner for reflection activities. Avoid areas with heavy mower traffic or places where they could be easily moved by wind or water. Check placement regularly to keep the garden organized and safe.
