

Comfort foods often bring back memories of meals made at home with simple ingredients. I collected these classic recipes so you can recreate them in your own kitchen without much fuss. Each one focuses on everyday items and steps that fit into a regular cooking routine. You can pick from options like hearty casseroles or slow cooked dishes that turn out reliable results.
Helpful Tips Before You Start
These tips will help you bring out the best flavors in classic comfort food recipes.
Check Your Pantry First
Stock up on basics like broth, flour, butter, and dried herbs. Having them ready keeps the cooking process smooth for multiple recipes.
Cook in Larger Batches
Many comfort dishes improve after a day in the fridge. Make extra portions and portion them out for quick meals later in the week.
Taste and Adjust Seasoning
Build flavor gradually as the dish simmers. Add salt and pepper in stages rather than all at once.
Choose Fresh Ingredients Where It Counts
Use good quality meat or dairy for dishes like casseroles and stews. These elements carry much of the flavor in homemade versions.
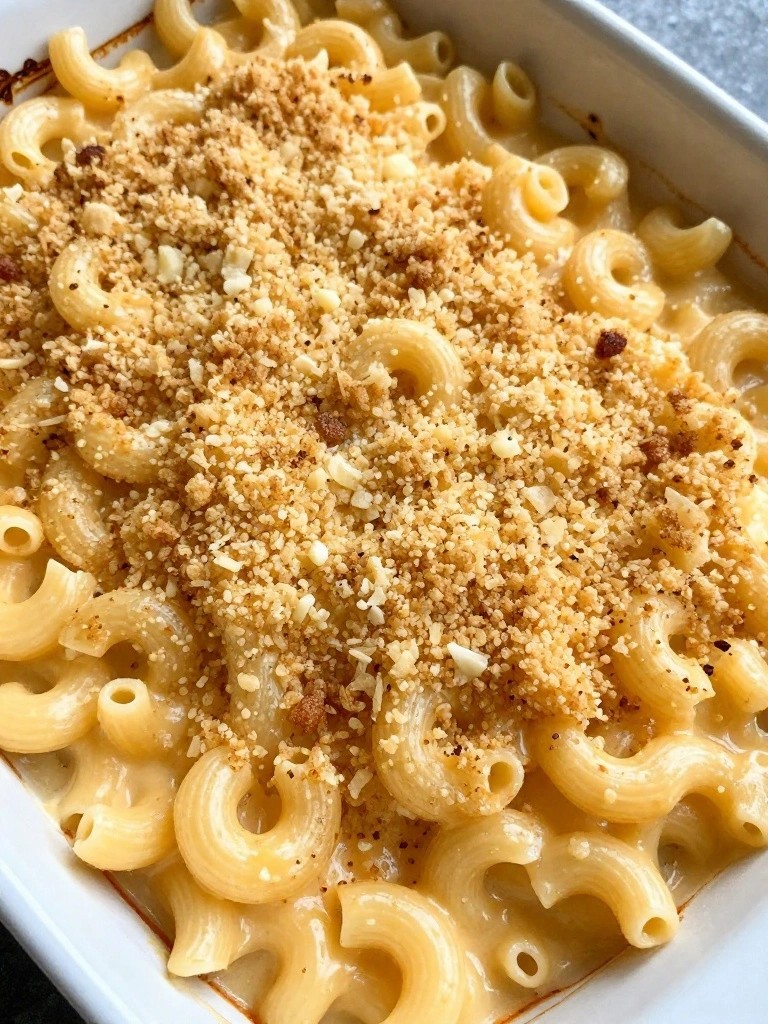
Creamy Baked Macaroni and Cheese with Crispy Breadcrumb Topping
This baked macaroni and cheese delivers a rich, creamy center with a golden, crunchy breadcrumb layer on top. It works well for weeknight dinners or casual gatherings when you want a reliable homemade dish that feels satisfying without much fuss.
The flavor stays mild and cheesy, while the texture balances tender pasta with a crisp finish. It pairs easily with simple sides like a green salad or roasted vegetables.

Equipment
- Large pot
- Medium saucepan
- Baking dish
- Whisk
Ingredients
- 8 ounces elbow macaroni
- 2 tablespoons unsalted butter
- 2 tablespoons all-purpose flour
- 2 cups whole milk
- 2 cups shredded sharp cheddar cheese
- 1/2 teaspoon salt
- 1/4 teaspoon black pepper
- 1/2 cup plain breadcrumbs
- 1 tablespoon unsalted butter, melted
Instructions
- Bring a large pot of salted water to a boil and cook the macaroni until just tender. Drain and set aside.
- In a medium saucepan, melt 2 tablespoons butter over medium heat. Whisk in the flour and cook for one minute to form a smooth paste.
- Slowly pour in the milk while whisking. Continue cooking and stirring until the sauce thickens enough to coat the back of a spoon.
- Remove the sauce from the heat. Stir in the shredded cheddar cheese, salt, and pepper until the cheese melts and the sauce turns smooth.
- Add the drained macaroni to the cheese sauce and stir until every piece is coated.
- Transfer the mixture to a greased baking dish. In a small bowl, combine the breadcrumbs with the melted tablespoon of butter, then sprinkle evenly over the top.
- Bake at 375°F for 20 to 25 minutes until the topping turns golden and the edges bubble. Let it rest for a few minutes before serving.
Notes
Cuisine: American
Equipment: Large pot, Medium saucepan, Baking dish, Whisk
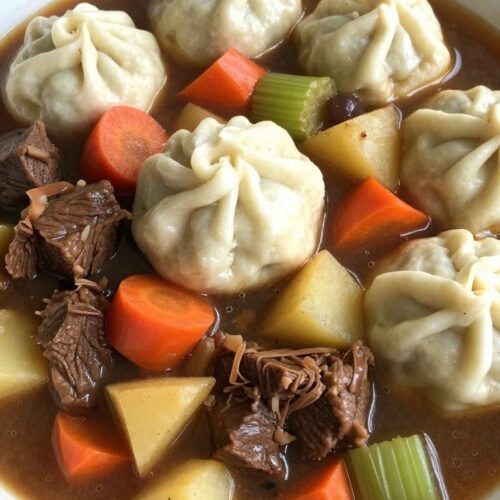
Hearty Beef Stew with Fluffy Buttermilk Dumplings
This beef stew combines tender chunks of meat and root vegetables in a savory broth. The buttermilk dumplings steam on top to create a light, soft finish that rounds out the meal.
It suits cold evenings or family dinners when you want a one-pot dish that feels filling without much fuss. The rich broth and pillowy dumplings give a nice contrast in texture and flavor.

Equipment
- Large Pot
- Mixing Bowl
- Measuring Cups
Ingredients
- 1.5 pounds beef stew meat, cut into 1-inch pieces
- 2 tablespoons vegetable oil
- 1 medium onion, diced
- 3 carrots, peeled and sliced
- 2 celery stalks, sliced
- 3 medium potatoes, peeled and cubed
- 4 cups beef broth
- 2 tablespoons all-purpose flour
- 1 teaspoon dried thyme
- 1 teaspoon salt
- 1/2 teaspoon black pepper
- 1.5 cups all-purpose flour
- 2 teaspoons baking powder
- 1/2 teaspoon salt
- 3/4 cup buttermilk
Instructions
- Heat the vegetable oil in a large pot over medium-high heat. Add the beef stew meat and brown it on all sides for about 5 minutes.
- Stir in the onion, carrots, and celery. Cook for 3 minutes until the onion softens.
- Sprinkle the 2 tablespoons of flour over the mixture and stir for 1 minute to coat everything.
- Pour in the beef broth, then add the potatoes, thyme, 1 teaspoon salt, and black pepper. Bring to a simmer, cover, and cook for 45 minutes until the beef is tender.
- While the stew simmers, mix the 1.5 cups flour, baking powder, and 1/2 teaspoon salt in a bowl. Stir in the buttermilk until a soft dough forms.
- Drop spoonfuls of the dough onto the simmering stew. Cover the pot and cook for 15 minutes without lifting the lid so the dumplings steam properly.
Notes
Cuisine: American
Equipment: Large Pot, Mixing Bowl, Measuring Cups
Classic Chicken Pot Pie with Golden Flaky Crust
This chicken pot pie offers a creamy filling packed with tender chicken and vegetables under a crisp, golden top. It works well for weeknight family meals or weekend gatherings when you want something hearty and familiar.
The dish delivers savory flavors from herbs and broth, balanced by the buttery layers of the flaky crust that brown nicely in the oven.


Equipment
- Oven
- Large Skillet
- 9-inch Pie Dish
Ingredients
- 2 tablespoons butter
- 1 small onion, diced
- 2 carrots, diced
- 2 celery stalks, diced
- 3 tablespoons all-purpose flour
- 2 cups chicken broth
- 1/2 cup heavy cream
- 2 cups cooked chicken, shredded
- 1 cup frozen peas
- 1 teaspoon dried thyme
- Salt and black pepper, to taste
- 1 sheet puff pastry
- 1 egg, beaten
Instructions
- Preheat the oven to 400°F and lightly grease a 9-inch pie dish or baking dish.
- Melt the butter in a large skillet over medium heat. Add the onion, carrots, and celery, then cook for 5 minutes until the vegetables begin to soften.
- Sprinkle the flour over the vegetables and stir for 1 minute to form a roux.
- Gradually whisk in the chicken broth and heavy cream. Continue stirring until the mixture thickens, about 3 minutes.
- Stir in the shredded chicken, frozen peas, and dried thyme. Season with salt and black pepper to taste, then remove the skillet from the heat.
- Pour the filling into the prepared dish. Lay the puff pastry sheet over the top and trim any excess edges. Cut a few small slits in the pastry for steam to escape.
- Brush the top of the pastry with the beaten egg. Bake for 25 minutes until the crust turns golden and the filling bubbles at the edges.
Notes
Cuisine: American
Equipment: Oven, Large Skillet, 9-inch Pie Dish
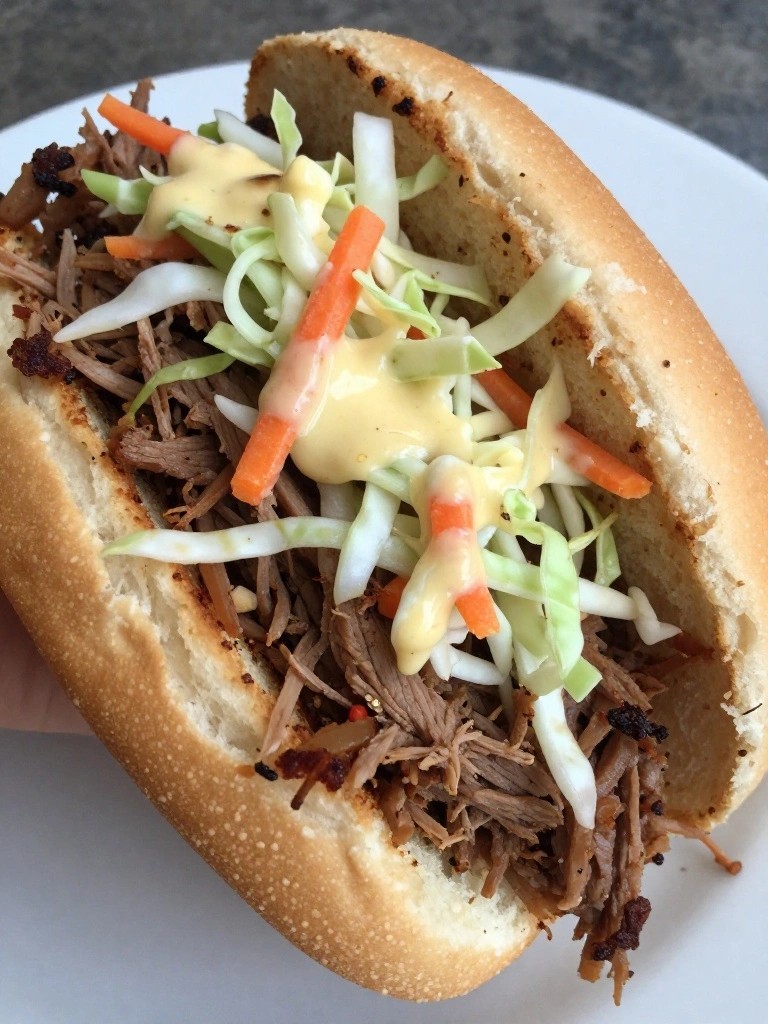
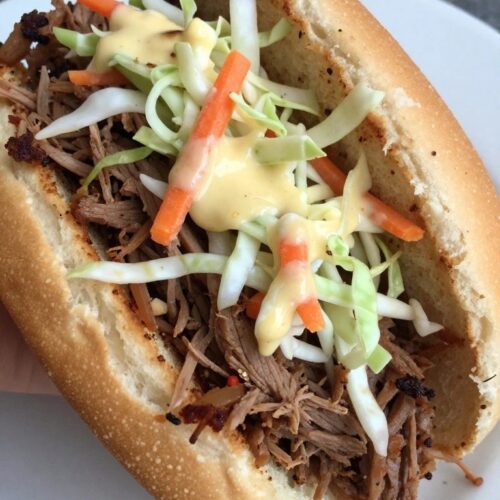
Slow-Cooked Pulled Pork Sandwiches with Tangy Coleslaw
This recipe turns a pork shoulder into tender, shreddable meat that soaks up simple seasonings during a long, low simmer. The tangy coleslaw brings crunch and a bright vinegar bite that balances the rich pork. It suits busy weekends or casual family meals when you want something hearty without much hands-on time.
The finished sandwiches hold up well for lunch boxes or game-day spreads. Each bite gives soft bread, juicy meat, and crisp slaw together.
Equipment
- Slow Cooker
- Mixing Bowl
- Forks
Ingredients
- 2 pounds pork shoulder, trimmed
- 1 cup chicken broth
- 1/4 cup apple cider vinegar
- 2 tablespoons brown sugar
- 1 tablespoon paprika
- 1 teaspoon garlic powder
- 1 teaspoon onion powder
- 1 teaspoon salt
- 1/2 teaspoon black pepper
- 4 sandwich buns
- 4 cups shredded green cabbage
- 1 large carrot, shredded
- 1/4 cup mayonnaise
- 2 tablespoons apple cider vinegar
- 1 tablespoon Dijon mustard
- 1 teaspoon sugar
- 1/2 teaspoon salt
- 1/4 teaspoon black pepper
Instructions
- Place the pork shoulder in the slow cooker. Add the chicken broth, 1/4 cup apple cider vinegar, brown sugar, paprika, garlic powder, onion powder, 1 teaspoon salt, and 1/2 teaspoon black pepper. Cover and cook on low for 8 hours until the meat shreds easily with a fork.
- Remove the pork from the slow cooker and shred it with two forks. Return the shredded meat to the cooker and stir it into the juices. Let it rest on warm while you prepare the coleslaw.
- In a large bowl, combine the shredded cabbage and carrot. In a small bowl, whisk together the mayonnaise, 2 tablespoons apple cider vinegar, Dijon mustard, sugar, 1/2 teaspoon salt, and 1/4 teaspoon black pepper. Pour the dressing over the cabbage mixture and toss until evenly coated.
- Split the sandwich buns and toast them lightly if desired. Pile the pulled pork onto the bottom halves, then top each with a generous scoop of coleslaw. Close the sandwiches and serve right away.
Notes
Cuisine: American
Equipment: Slow Cooker, Mixing Bowl, Forks
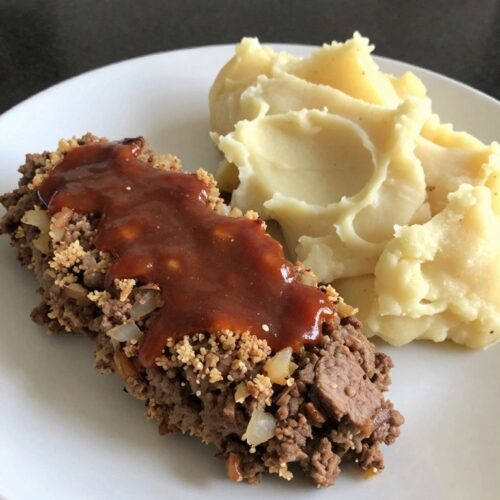
Traditional Meatloaf Served with Garlic Mashed Potatoes
This traditional meatloaf brings back the kind of hearty meal many grew up with. Ground beef is mixed with simple pantry staples and baked until it holds its shape but stays tender inside. The garlic mashed potatoes served alongside turn the plate into a complete, comforting dinner that works for both weeknights and weekend gatherings.
The meatloaf has a savory, lightly tangy flavor from the ketchup glaze, while the potatoes are smooth and creamy with a noticeable garlic taste. Together they make a filling dish that feels familiar without requiring fancy techniques or hard-to-find ingredients.

Equipment
- Loaf pan
- Large mixing bowl
- Large pot
- Potato masher
Ingredients
- 1 1/2 pounds ground beef
- 3/4 cup breadcrumbs
- 1 egg
- 1 small onion, finely chopped
- 2 cloves garlic, minced
- 1/4 cup milk
- 1/2 cup ketchup
- Salt and black pepper
- 2 pounds Yukon Gold potatoes, peeled and cut into chunks
- 4 tablespoons butter
- 1/2 cup milk
- 3 cloves garlic
Instructions
- Preheat the oven to 375°F and lightly grease a loaf pan.
- In a large bowl combine the ground beef, breadcrumbs, egg, onion, 2 cloves minced garlic, 1/4 cup milk, 2 tablespoons of the ketchup, and a pinch each of salt and pepper. Mix just until the ingredients are evenly distributed.
- Transfer the mixture to the prepared loaf pan and shape it into an even loaf. Spread the remaining ketchup over the top.
- Bake for 50 to 55 minutes until the internal temperature reaches 160°F. Let the meatloaf rest for 5 minutes before slicing.
- While the meatloaf bakes, place the potatoes and 3 whole garlic cloves in a large pot and cover with cold water. Add a generous pinch of salt and bring to a boil. Cook until the potatoes are fork-tender, about 15 minutes.
- Drain the potatoes and garlic. Return them to the pot, add the butter and 1/2 cup milk, and mash until smooth. Season with salt and pepper to taste.
Notes
Cuisine: American
Equipment: Loaf pan, Large mixing bowl, Large pot, Potato masher
Cheesy Tuna Noodle Casserole with Cracker Topping
This casserole brings together tender noodles, flaky tuna, and a creamy cheese sauce in one easy dish. It feels like a warm reminder of weeknight dinners from years past.
It works well on busy evenings when you want something filling without much fuss. The melted cheese blends with the sauce while the buttery cracker topping stays crisp on top.


Equipment
- Large pot
- 9×9 inch baking dish
- Mixing bowl
Ingredients
- 8 ounces egg noodles
- 2 (5-ounce) cans tuna in water, drained
- 1 (10.5-ounce) can condensed cream of mushroom soup
- 3/4 cup milk
- 1 cup shredded cheddar cheese
- 1 cup crushed butter crackers
- 2 tablespoons butter, melted
- 1/2 teaspoon salt
- 1/4 teaspoon black pepper
Instructions
- Preheat the oven to 375°F and lightly grease a 9×9 inch baking dish.
- Cook the egg noodles in a large pot of salted boiling water until just tender, then drain and set aside.
- In a large bowl, stir together the cream of mushroom soup, milk, salt, and black pepper until smooth.
- Add the drained tuna, shredded cheddar cheese, and cooked noodles to the bowl. Mix gently until everything is coated.
- Transfer the mixture to the prepared baking dish and spread it into an even layer.
- In a small bowl, toss the crushed crackers with the melted butter until evenly coated.
- Sprinkle the buttered cracker crumbs over the top of the casserole.
- Bake for 20 to 25 minutes until the edges bubble and the topping turns golden.
Notes
Cuisine: American
Equipment: Large pot, 9×9 inch baking dish, Mixing bowl
Beef and Bean Chili over Steamed White Rice
This hearty chili brings together ground beef and beans in a simple tomato base. It works well for weeknight dinners or weekend meal prep when you want something filling without much fuss. The chili has a thick texture and mild spice that pairs nicely with plain steamed rice to soak up the sauce.


Equipment
- Large pot
- Medium saucepan
- Wooden spoon
Ingredients
- 1 pound ground beef
- 1 medium onion, diced
- 2 cloves garlic, minced
- 2 cans (15 ounces each) kidney beans, drained and rinsed
- 1 can (14.5 ounces) diced tomatoes
- 2 tablespoons chili powder
- 1 teaspoon ground cumin
- 1 teaspoon salt
- 1/2 teaspoon black pepper
- 1 cup uncooked white rice
- 2 cups water
Instructions
- Heat a large pot over medium heat and add the ground beef. Cook until browned, breaking it up with a spoon as it cooks.
- Add the diced onion and minced garlic to the pot. Stir and cook for 3 to 4 minutes until the onion softens.
- Stir in the chili powder, cumin, salt, and black pepper. Cook for 1 minute to toast the spices.
- Add the drained kidney beans and diced tomatoes with their liquid. Stir everything together and bring to a simmer.
- Reduce heat to low, cover the pot, and let the chili cook for 20 minutes, stirring once or twice.
- While the chili simmers, place the white rice and water in a medium saucepan. Bring to a boil, then reduce heat to low, cover, and cook for 15 minutes until the rice is tender.
- Remove the rice from heat and let it sit covered for 5 minutes. Fluff with a fork before serving.
- Spoon the chili over portions of steamed rice.
Notes
Course: Main Course
Cuisine: American
Equipment: Large pot, Medium saucepan, Wooden spoon
Shepherd’s Pie with Lamb and Root Vegetable Filling
This version of shepherd’s pie keeps the focus on tender ground lamb paired with sweet carrots and earthy parsnips in the filling. The mashed potato topping turns golden in the oven and gives the dish a hearty, satisfying texture that feels right for cool evenings or family dinners.
The root vegetables add natural sweetness and depth without needing many extra seasonings. It comes together in one skillet before the final bake, making it practical for weeknights while still delivering classic comfort food flavor.


Equipment
- Large skillet
- Large pot
- Potato masher
- Baking dish
Ingredients
- 1 pound ground lamb
- 1 large onion, chopped
- 2 carrots, diced
- 2 parsnips, diced
- 2 cloves garlic, minced
- 2 tablespoons tomato paste
- 1 cup beef broth
- 1 teaspoon dried rosemary
- 4 large russet potatoes, peeled and cubed
- 4 tablespoons butter
- ½ cup milk
- Salt and black pepper to taste
Instructions
- Preheat the oven to 400°F. Place the cubed potatoes in a large pot, cover with water, and add a pinch of salt. Boil until the potatoes are fork-tender, about 15 minutes, then drain.
- Return the drained potatoes to the pot. Add the butter and milk, then mash until smooth. Season with salt and pepper to taste and set aside.
- While the potatoes cook, heat a large skillet over medium heat. Add the ground lamb and cook, breaking it up with a spoon, until browned. Drain excess fat if needed.
- Add the onion, carrots, parsnips, and garlic to the skillet. Cook for 5 to 7 minutes until the vegetables begin to soften.
- Stir in the tomato paste and rosemary. Cook for 1 minute, then pour in the beef broth. Simmer for 8 to 10 minutes until the liquid reduces slightly and the vegetables are tender. Season with salt and pepper.
- Spread the lamb and root vegetable mixture evenly in a baking dish. Spoon the mashed potatoes over the top and smooth with a spatula. Bake for 20 minutes until the topping is lightly golden.
Notes
Cuisine: British
Equipment: Large skillet, Large pot, Potato masher, Baking dish
Buttermilk Fried Chicken with Warm Biscuits and Gravy
This buttermilk fried chicken pairs crispy pieces with soft biscuits and creamy gravy. It makes a hearty meal that feels satisfying on a cool evening or during a family gathering.
The chicken stays juicy inside a seasoned crust. The biscuits add a tender bite while the gravy ties everything together with smooth texture and simple seasoning.


Equipment
- Large skillet
- Mixing bowls
- Baking sheet
Ingredients
- 4 bone-in, skin-on chicken thighs
- 2 cups buttermilk
- 2 1/2 cups all-purpose flour
- 2 teaspoons salt
- 1 teaspoon paprika
- 1 teaspoon garlic powder
- 1/2 teaspoon black pepper
- 1 tablespoon baking powder
- 1/2 cup cold unsalted butter
- 3/4 cup milk
- 2 cups milk
- Vegetable oil for frying
Instructions
- Place the chicken thighs in a bowl and pour the buttermilk over them. Let them soak for at least 30 minutes or up to a few hours in the fridge.
- In a large bowl mix 2 cups of the flour with 1 teaspoon of the salt, the paprika, garlic powder, and black pepper. Remove each chicken thigh from the buttermilk and coat it well in the seasoned flour.
- Heat 1 inch of vegetable oil in a large skillet over medium heat. Fry the chicken thighs for 6 to 8 minutes per side until golden and cooked through. Drain them on a paper towel lined plate.
- While the chicken cooks, make the biscuits. In a bowl stir together the remaining 1/2 cup flour, baking powder, and remaining 1 teaspoon salt. Cut in the cold butter until the mixture looks like coarse crumbs.
- Add the 3/4 cup milk and stir just until a soft dough forms. Drop spoonfuls onto a baking sheet and bake at 425 degrees for 12 to 15 minutes until lightly golden.
- For the gravy, pour off most of the oil from the skillet but leave the browned bits. Add the 2 cups milk and bring to a simmer. Whisk in any leftover seasoned flour from the coating bowl until the gravy thickens. Taste and adjust salt if needed.
Notes
Cuisine: American
Equipment: Large skillet, Mixing bowls, Baking sheet
Layered Lasagna with Ricotta, Meat Sauce, and Mozzarella
This lasagna brings back the cozy feeling of a homemade Sunday dinner with its layers of tender noodles, creamy ricotta, hearty meat sauce, and plenty of melted mozzarella. It works well for weeknight family meals or casual gatherings when you want something satisfying that feels special without much fuss. The result is rich tomato flavor balanced by mild cheese and a soft, sliceable texture.


Equipment
- Large pot
- Large skillet
- Mixing bowl
- 8×8 baking dish
Ingredients
- 8 lasagna noodles
- 1 pound ground beef
- 1 onion, finely chopped
- 2 garlic cloves, minced
- 3 cups marinara sauce
- 15 ounces ricotta cheese
- 1 large egg
- 2 cups shredded mozzarella cheese
- 1/2 cup grated Parmesan cheese
- 1 teaspoon dried oregano
- Salt and black pepper to taste
Instructions
- Bring a large pot of salted water to a boil and cook the lasagna noodles until al dente. Drain them and lay them flat on a tray to prevent sticking.
- Heat a large skillet over medium heat. Add the ground beef, chopped onion, and minced garlic. Cook until the meat is browned and the onion is soft. Drain any excess fat.
- Pour the marinara sauce into the skillet with the meat mixture. Add the oregano and a pinch of salt and pepper. Let it simmer for 5 minutes to blend the flavors.
- In a mixing bowl, stir together the ricotta cheese, egg, 1/4 cup of the Parmesan, and a little salt and pepper until smooth.
- Preheat the oven to 375°F. Spread a thin layer of meat sauce in the bottom of an 8×8 baking dish. Add a layer of noodles, then half the ricotta mixture, followed by a third of the mozzarella. Repeat the layers once more.
- Finish with the remaining meat sauce, the rest of the mozzarella, and the remaining Parmesan on top.
- Bake for 25 to 30 minutes until the cheese is bubbly and lightly golden. Let the lasagna rest for 10 minutes before slicing.
Notes
Cuisine: Italian
Equipment: Large pot, Large skillet, Mixing bowl, 8×8 baking dish
Spiced Apple Crisp Topped with Vanilla Bean Ice Cream
This spiced apple crisp brings together tender baked apples with a warm blend of cinnamon and nutmeg. The crunchy oat topping adds texture that contrasts nicely with the creamy vanilla bean ice cream served on top. It works well after a weeknight dinner or during a casual weekend gathering when you want a simple homemade dessert.
The flavor profile stays balanced with just enough sweetness and spice. The ice cream melts slightly over the warm crisp to create a comforting finish without extra effort.


Equipment
- Baking dish
- Mixing bowls
- Oven
Ingredients
- 4 medium apples, peeled, cored, and sliced
- 1/2 cup granulated sugar
- 1 teaspoon ground cinnamon
- 1/4 teaspoon ground nutmeg
- 1 tablespoon lemon juice
- 1 cup rolled oats
- 1/2 cup all-purpose flour
- 1/2 cup brown sugar
- 1/2 cup unsalted butter, melted
- 1 pint vanilla bean ice cream
Instructions
- Preheat the oven to 350 degrees F. In a mixing bowl, toss the sliced apples with granulated sugar, cinnamon, nutmeg, and lemon juice until evenly coated.
- Spread the apple mixture into an 8×8 inch baking dish and press it down lightly to create an even layer.
- In a separate bowl, combine the rolled oats, flour, and brown sugar. Pour the melted butter over the dry ingredients and stir until the mixture forms clumps.
- Sprinkle the oat topping evenly over the apples, covering them completely.
- Bake for 35 to 40 minutes until the topping turns golden brown and the apples bubble around the edges.
- Remove the dish from the oven and let it rest for 10 minutes. Scoop portions into bowls and top each serving with vanilla bean ice cream.
Notes
Cuisine: American
Equipment: Baking dish, Mixing bowls, Oven