

Sometimes after a long day you want a warm meal without spending hours cooking. These ideas focus on simple steps and basic ingredients that still turn out satisfying. You will find meals that work for busy evenings when energy is low. Most use one pan or the slow cooker to keep things easy. They deliver that comfort food taste without extra work.
Helpful Tips Before You Start
A few simple habits keep these meals fast and full of flavor.
Keep a Few Pantry Staples Ready
Onions, garlic, canned tomatoes, and broth turn basic proteins into rich dinners. They add comfort without extra shopping trips.
Choose One Pan or One Pot Recipes
Sheet pans and Dutch ovens cut down on cleanup. They also let sauces and seasonings blend evenly as everything cooks.
Lean on Rotisserie Chicken or Pre Ground Meat
These save time on busy nights. Shredded chicken or browned beef mixes quickly into pasta, rice, or casseroles.
Taste and Adjust Seasoning at the End
A pinch of salt or splash of vinegar can lift creamy or hearty dishes. Fresh black pepper or grated cheese adds the final layer of taste.
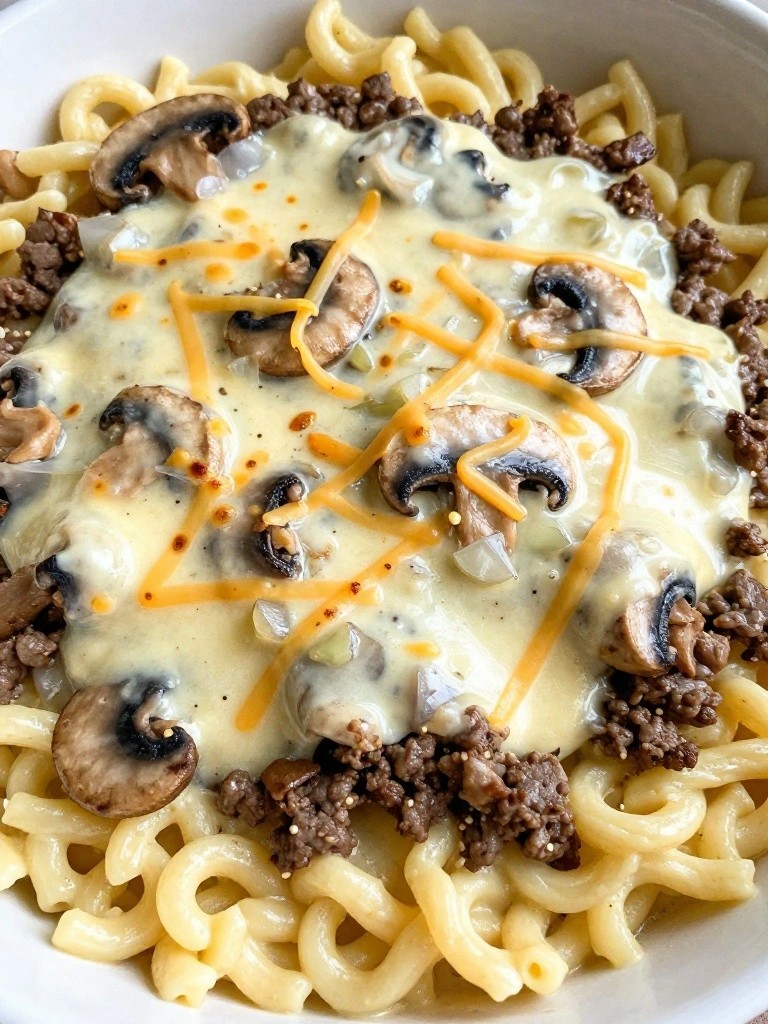
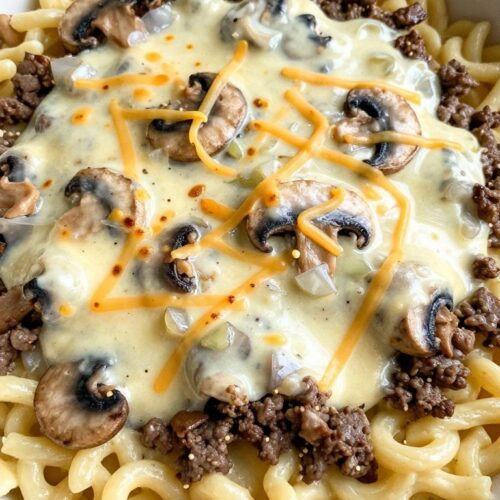
One-Pot Creamy Beef Stroganoff
This one-pot creamy beef stroganoff delivers the cozy satisfaction of a classic favorite with almost no cleanup. It works well on weeknights when you want a filling meal without multiple pans or long active cooking time.
The finished dish features tender beef and mushrooms in a smooth, savory sauce that coats the noodles nicely. The flavor stays rich and comforting without feeling heavy.


Equipment
- Large Pot
- Knife
- Cutting Board
Ingredients
- 1 lb ground beef
- 1 medium onion, finely chopped
- 3 cloves garlic, minced
- 8 oz cremini mushrooms, sliced
- 1 tbsp Worcestershire sauce
- 1 tsp paprika
- 4 cups beef broth
- 8 oz egg noodles
- 1/2 cup sour cream
- Salt and pepper to taste
- Fresh parsley, chopped (for garnish)
Instructions
- Place a large pot over medium-high heat and add the ground beef. Cook until fully browned, breaking it up with a spoon as it cooks. Drain off any excess fat.
- Add the onion, garlic, and mushrooms to the pot. Cook for about 5 minutes until the vegetables begin to soften.
- Stir in the Worcestershire sauce, paprika, salt, and pepper.
- Pour in the beef broth and bring the mixture to a boil. Add the egg noodles, reduce the heat to a simmer, and cook for 8 to 10 minutes, stirring occasionally, until the noodles are tender.
- Remove the pot from the heat. Stir in the sour cream until the sauce turns smooth and creamy.
- Sprinkle with fresh parsley right before serving.
Notes
Cuisine: American
Equipment: Large Pot, Knife, Cutting Board
Cheesy Sausage and Pepper Pasta Bake
This pasta bake brings together savory sausage and sweet peppers in a simple dish that feels like a warm hug after a long day. It works well on busy weeknights when you want something filling without much hands-on time. The result is tender pasta coated in sauce, with pockets of melty cheese and bits of browned sausage throughout.


Equipment
- Large skillet
- Large pot
- 9×13 baking dish
Ingredients
- 12 oz penne pasta
- 1 lb Italian sausage, casings removed
- 2 bell peppers, sliced
- 1 small onion, diced
- 2 cloves garlic, minced
- 2 cups marinara sauce
- 2 cups shredded mozzarella cheese
- 1/2 cup grated parmesan cheese
- 1 tbsp olive oil
- 1 tsp Italian seasoning
- Salt and black pepper to taste
Instructions
- Preheat the oven to 375°F and lightly grease a 9×13 baking dish.
- Cook the penne in a large pot of salted water until al dente, then drain and set aside.
- Heat the olive oil in a large skillet over medium heat. Add the sausage and cook until browned, breaking it up as it cooks.
- Add the sliced peppers, diced onion, and minced garlic to the skillet. Cook for 5 minutes until the vegetables soften.
- Stir in the marinara sauce, Italian seasoning, salt, and pepper. Simmer for 2 minutes.
- Combine the cooked pasta with the sausage mixture in the skillet or a large bowl.
- Transfer half the mixture to the baking dish and sprinkle with half the mozzarella and parmesan. Add the remaining mixture and top with the rest of the cheeses.
- Bake for 20 minutes until the cheese is bubbly and lightly browned on top.
Notes
Cuisine: Italian
Equipment: Large skillet, Large pot, 9×13 baking dish
Easy Chicken Pot Pie with Flaky Biscuit Topping
This version of chicken pot pie keeps things simple by skipping the pastry crust and using refrigerated biscuits instead. It relies on rotisserie chicken and frozen vegetables so you can pull it together with little chopping or prep. The result is a creamy, savory filling topped with golden, buttery biscuits that soak up the sauce.
It works well on weeknights when you want a filling dinner without standing at the stove for long. The texture balances soft vegetables and tender chicken with crisp biscuit tops.


Equipment
- Large Skillet
- 9×9 Baking Dish
- Oven
Ingredients
- 2 cups shredded rotisserie chicken
- 2 cups frozen mixed vegetables
- 1 can (10.5 oz) cream of chicken soup
- 1/2 cup chicken broth
- 1 teaspoon dried thyme
- Salt and black pepper to taste
- 1 can (8 count) refrigerated flaky biscuits
Instructions
- Preheat the oven to 400°F and lightly grease a 9×9-inch baking dish.
- In a large skillet, combine the shredded chicken, frozen mixed vegetables, cream of chicken soup, chicken broth, and dried thyme over medium heat.
- Stir in salt and black pepper to taste, then cook the mixture for 5 minutes until it is heated through and begins to bubble.
- Pour the filling into the prepared baking dish and spread it into an even layer.
- Arrange the refrigerated biscuits on top of the filling, spacing them evenly.
- Bake for 20 to 25 minutes until the biscuits are golden brown and the filling is bubbling around the edges.
Notes
Cuisine: American
Equipment: Large Skillet, 9×9 Baking Dish, Oven
Loaded Beef and Bean Burrito Casserole
This casserole turns classic burrito fillings into an easy layered bake. It delivers hearty beef, creamy beans, and plenty of melted cheese in every bite, making it a go-to when you want comfort without much effort.
It works well on busy weeknights or when you need a filling meal that pleases a crowd. The texture stays soft with crispy tortilla edges, while the flavors stay bold from simple spices and enchilada sauce.


Equipment
- Large Skillet
- 9×13 Baking Dish
- Oven
Ingredients
- 1 pound ground beef
- 1 medium onion, diced
- 2 cloves garlic, minced
- 1 can (15 oz) black beans, drained and rinsed
- 1 can (10 oz) red enchilada sauce
- 1 teaspoon chili powder
- 1 teaspoon ground cumin
- 1/2 teaspoon salt
- 4 large flour tortillas
- 2 cups shredded cheddar cheese
- 1/4 cup chopped green onions
Instructions
- Brown the ground beef in a large skillet over medium heat. Add the diced onion and minced garlic, then cook until the onion softens.
- Stir in the black beans, enchilada sauce, chili powder, cumin, and salt. Let the mixture simmer for 5 minutes so the flavors combine.
- Spread a thin layer of the beef mixture in the bottom of a greased 9×13 baking dish. Place two tortillas over the mixture, tearing them if needed to fit.
- Spoon half the remaining beef mixture over the tortillas and sprinkle with 1 cup of cheddar cheese. Repeat with the last two tortillas, the rest of the beef mixture, and the remaining cheese.
- Bake at 375°F for 20 minutes until the cheese melts and the edges turn golden. Remove from the oven and top with chopped green onions before serving.
Notes
Cuisine: Mexican
Equipment: Large Skillet, 9×13 Baking Dish, Oven
Skillet Turkey Shepherd’s Pie with Mashed Potato Crust
This skillet version of shepherd’s pie keeps things simple by building the filling right in one pan before adding a layer of mashed potatoes on top. It works well on busy weeknights when you want something warm and filling without a lot of cleanup or extra dishes. The result is a savory turkey and vegetable base with a golden, creamy potato crust that feels comforting but still comes together quickly.


Equipment
- Large oven-safe skillet
- Broiler
- Spatula
Ingredients
- 1 lb ground turkey
- 1 medium onion, diced
- 2 carrots, diced
- 2 cloves garlic, minced
- 1 cup frozen peas
- 2 tbsp all-purpose flour
- 1 cup chicken broth
- 1 tsp dried rosemary
- 1/2 tsp salt
- 1/4 tsp black pepper
- 3 cups prepared mashed potatoes
- 1 tbsp butter, melted
- 1/4 tsp paprika
Instructions
- Heat a large oven-safe skillet over medium heat and add the ground turkey. Cook until browned, breaking it up with a spoon as it cooks.
- Add the diced onion and carrots to the skillet. Cook for 5 minutes until the vegetables begin to soften.
- Stir in the minced garlic and cook for 1 minute until fragrant.
- Sprinkle the flour over the mixture and stir to coat everything evenly. Cook for 1 minute.
- Pour in the chicken broth and add the rosemary, salt, and pepper. Stir well and simmer for 3 minutes until the mixture thickens slightly.
- Stir in the frozen peas and remove the skillet from the heat.
- Spread the mashed potatoes evenly over the turkey mixture in the skillet. Use a spoon or spatula to create a smooth layer.
- Brush the top of the potatoes with melted butter and sprinkle with paprika.
- Place the skillet under the broiler for 3 to 5 minutes until the potato crust turns lightly golden.
Notes
Cuisine: American
Equipment: Large oven-safe skillet, Broiler, Spatula
Creamy Tomato Basil Tortellini Soup with Garlic Bread
This soup brings together a rich tomato base with tender cheese tortellini for a meal that feels hearty yet simple. It works well on weeknights when you want comfort without standing at the stove for long. The creamy texture pairs with the bright basil notes, while the garlic bread adds a crisp, buttery contrast on the side.


Equipment
- Large pot
- Baking sheet
Ingredients
- 2 tablespoons olive oil
- 1 medium onion, chopped
- 5 garlic cloves, minced
- 1 (28-ounce) can crushed tomatoes
- 4 cups vegetable broth
- 1/2 cup heavy cream
- 1/4 cup fresh basil, chopped
- 9 ounces fresh cheese tortellini
- 1/2 teaspoon salt
- 1/4 teaspoon black pepper
- 1 baguette
- 4 tablespoons butter, softened
- 2 tablespoons fresh parsley, chopped
- 1/4 cup grated Parmesan cheese
Instructions
- Heat the olive oil in a large pot over medium heat. Add the onion and cook for 3 minutes until it softens. Stir in 3 of the minced garlic cloves and cook for 1 minute more.
- Pour in the crushed tomatoes and vegetable broth. Bring the mixture to a simmer and cook for 10 minutes. Reduce the heat to low and stir in the heavy cream, fresh basil, salt, and black pepper. Add the tortellini and simmer for 5 minutes until the pasta is tender.
- While the soup simmers, slice the baguette in half lengthwise. Mix the softened butter with the remaining 2 minced garlic cloves, parsley, and Parmesan cheese. Spread the mixture over the cut sides of the bread. Place the bread on a baking sheet and broil for 2 to 3 minutes until the edges turn golden.
- Ladle the soup into bowls and serve with pieces of the warm garlic bread on the side.
Notes
Cuisine: Italian
Equipment: Large pot, Baking sheet
Baked Ham and Broccoli Macaroni and Cheese
This baked macaroni and cheese brings together tender pasta, savory ham, and bright broccoli in one dish. It comes together with basic steps and delivers a creamy base with a lightly crisp top. It works well on busy weeknights when you want a filling meal without extra fuss.
The flavors stay balanced, with the saltiness of the ham cutting through the rich cheese sauce and the broccoli adding a fresh note. The finished casserole feels hearty yet simple enough for regular rotation.


Equipment
- Large pot
- Medium saucepan
- Baking dish
- Oven
Ingredients
- 8 ounces elbow macaroni
- 2 cups broccoli florets
- 1 1/2 cups diced cooked ham
- 3 tablespoons butter
- 3 tablespoons all-purpose flour
- 2 cups milk
- 2 cups shredded cheddar cheese
- 1/2 cup panko breadcrumbs
- 1/2 teaspoon salt
- 1/4 teaspoon black pepper
Instructions
- Preheat the oven to 375 degrees and lightly grease a baking dish.
- Bring a large pot of salted water to a boil. Add the macaroni and cook for 6 minutes, then stir in the broccoli florets and cook for 2 more minutes. Drain and set aside.
- In a medium saucepan, melt the butter over medium heat. Whisk in the flour and cook for 1 minute. Slowly pour in the milk while whisking until the mixture thickens.
- Remove the saucepan from the heat and stir in the cheddar cheese, salt, and pepper until the sauce is smooth.
- Combine the drained pasta and broccoli with the diced ham in a large bowl. Pour the cheese sauce over the mixture and stir gently to coat everything evenly.
- Transfer the mixture to the prepared baking dish and sprinkle the panko breadcrumbs evenly over the top.
- Bake for 20 minutes, or until the topping is golden and the edges are bubbling. Let it rest for 5 minutes before serving.
Notes
Cuisine: American
Equipment: Large pot, Medium saucepan, Baking dish, Oven
Slow Cooker Honey Garlic Chicken Thighs over Rice
This slow cooker recipe delivers tender chicken thighs in a sweet and savory honey garlic sauce. It works well on busy evenings when you want a filling meal with little hands-on time.
The chicken stays juicy while the sauce thickens slightly around it. Paired with simple rice, the dish gives you soft textures and balanced flavors that feel comforting without much effort.


Equipment
- Slow Cooker
- Medium Pot
- Mixing Bowl
Ingredients
- 1 ½ pounds boneless skinless chicken thighs
- ⅓ cup honey
- ¼ cup soy sauce
- 4 garlic cloves, minced
- ½ teaspoon black pepper
- 2 cups uncooked white rice
- Chopped green onions for serving
Instructions
- Place the chicken thighs in the slow cooker.
- In a small bowl, stir together the honey, soy sauce, minced garlic, and black pepper until well combined.
- Pour the sauce over the chicken and turn the pieces to coat them evenly.
- Cover and cook on low for 5 to 6 hours until the chicken is tender.
- About 20 minutes before the chicken is done, cook the rice according to package directions in a medium pot.
- Shred or slice the chicken, then serve it over the cooked rice.
- Top each portion with chopped green onions before eating.
Notes
Cuisine: Asian
Equipment: Slow Cooker, Medium Pot, Mixing Bowl
Cheesy Enchilada Rice Skillet with Rotisserie Chicken
This one-pan meal brings the familiar flavors of enchiladas into an easy rice skillet that comes together fast. Rotisserie chicken keeps the prep minimal while still delivering tender bites throughout the dish. The result is a saucy, cheesy rice base with just enough spice to feel comforting on a busy evening.
It works well for weeknights when you want something hearty without multiple pots or long ingredient lists. The melted cheese binds the rice and chicken together, creating a cohesive texture that feels richer than the simple steps suggest.


Equipment
- Large Skillet
- Wooden Spoon
Ingredients
- 1 tablespoon olive oil
- 1 small onion, diced
- 2 cloves garlic, minced
- 2 cups cooked rice
- 2 cups shredded rotisserie chicken
- 1 (10-ounce) can red enchilada sauce
- 1 teaspoon ground cumin
- 1/2 teaspoon chili powder
- 1 1/2 cups shredded cheddar cheese
- Salt and pepper, to taste
- Chopped fresh cilantro, for serving
- Sliced green onions, for serving
- Sour cream, for serving
Instructions
- Heat the olive oil in a large skillet over medium heat. Add the diced onion and cook for 3 minutes until it softens. Stir in the minced garlic and cook for 30 seconds more.
- Add the cooked rice and shredded rotisserie chicken to the skillet. Pour in the enchilada sauce, then sprinkle in the cumin and chili powder. Stir everything together until the rice and chicken are evenly coated.
- Season with salt and pepper to taste. Let the mixture simmer for 4 to 5 minutes so the flavors combine and the sauce thickens slightly.
- Sprinkle 1 cup of the cheddar cheese over the top and stir until it melts into the rice. Scatter the remaining 1/2 cup cheese across the surface, cover the skillet, and cook for 2 minutes until the cheese melts.
- Remove from heat and serve with cilantro, green onions, and sour cream on the side.
Notes
Cuisine: Mexican
Equipment: Large Skillet, Wooden Spoon
Mushroom Swiss Burger Noodle Casserole
This Mushroom Swiss Burger Noodle Casserole turns the classic flavors of a mushroom Swiss burger into a simple baked dinner. It works well on weeknights when you want something filling and low effort that still feels like a treat.
The result is creamy egg noodles mixed with savory beef and mushrooms, all topped with melted Swiss cheese. The texture stays hearty and comforting without any complicated steps.
Equipment
- Large Skillet
- Large Pot
- 9×13 Baking Dish
Ingredients
- 1 pound ground beef
- 8 ounces sliced mushrooms
- 1 medium onion, diced
- 2 cloves garlic, minced
- 8 ounces egg noodles
- 1 can (10.5 ounces) cream of mushroom soup
- 1 cup beef broth
- 2 cups shredded Swiss cheese
- Salt and pepper
Instructions
- Preheat the oven to 350 degrees and lightly grease a 9 by 13 inch baking dish.
- Cook the egg noodles in a large pot according to package directions, then drain and set aside.
- In a large skillet over medium heat, brown the ground beef with the diced onion, minced garlic, and sliced mushrooms until the beef is cooked through and the vegetables are softened.
- Stir in the cream of mushroom soup and beef broth, then season with salt and pepper to taste. Simmer for 2 to 3 minutes until the mixture is well combined.
- Add the drained noodles to the skillet and stir until everything is evenly coated.
- Transfer the mixture to the prepared baking dish and sprinkle the shredded Swiss cheese evenly over the top.
- Bake for 20 minutes or until the cheese is melted and bubbly.
Notes
Cuisine: American
Equipment: Large Skillet, Large Pot, 9×13 Baking Dish
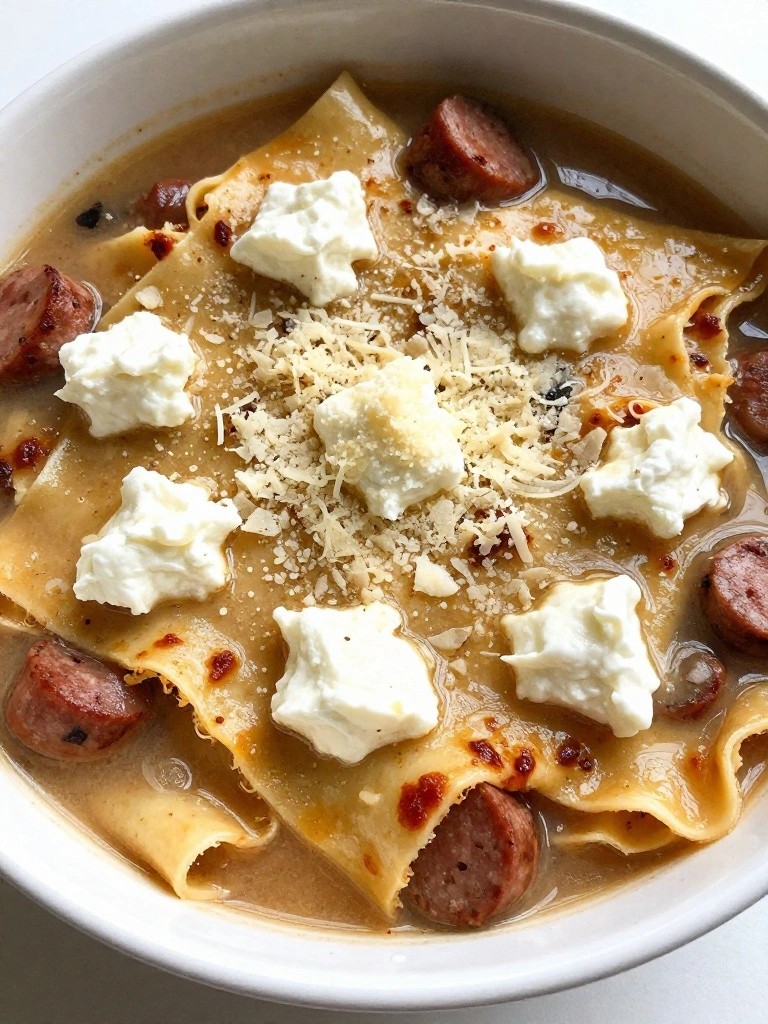
Lazy Lasagna Soup with Ricotta Dollops
This soup brings all the cozy flavors of lasagna into one pot without the layering or long bake time. It works well on weeknights when you want something hearty but do not feel like standing at the stove for hours. The broth stays light while the broken noodles and savory meat give it real substance, and the ricotta dollops melt into each bowl for a creamy finish.

Equipment
- Large pot
- Wooden spoon
- Small bowl
Ingredients
- 1 pound Italian sausage
- 1 medium onion, diced
- 3 cloves garlic, minced
- 1 jar (24 oz) marinara sauce
- 5 cups beef broth
- 8 lasagna noodles, broken into bite-size pieces
- 2 teaspoons Italian seasoning
- 1 cup ricotta cheese
- 1/2 cup grated Parmesan cheese
- Salt and black pepper
Instructions
- Brown the Italian sausage in a large pot over medium heat, breaking it up with a spoon as it cooks. Once it is no longer pink, add the diced onion and cook for three minutes until it softens.
- Stir in the minced garlic and cook for one minute until fragrant. Pour in the marinara sauce and beef broth, then add the Italian seasoning along with a pinch of salt and pepper.
- Bring the soup to a gentle boil. Add the broken lasagna noodles and reduce the heat to a simmer. Cook for 12 to 15 minutes, stirring now and then, until the noodles are tender.
- While the soup simmers, mix the ricotta and Parmesan in a small bowl. Taste and add a little salt if needed.
- Ladle the hot soup into bowls and drop generous spoonfuls of the ricotta mixture on top of each serving.
Notes
Cuisine: Italian
Equipment: Large pot, Wooden spoon, Small bowl
Sheet Pan Sausage, Potato, and Apple Dinner with Maple Drizzle
This one-pan meal brings together savory sausage, tender potatoes, and sweet apples for a comforting dinner with almost no cleanup. It works well on busy weeknights when you want something hearty without standing over the stove.
The flavors balance smoky and sweet, with crispy potato edges and soft roasted apples that soak up the maple at the end. Everything cooks together on a single sheet pan, making it ideal for cool evenings when you crave comfort food fast.


Equipment
- Baking Sheet
- Oven
- Mixing Bowl
Ingredients
- 1 lb smoked sausage links, sliced into 1-inch pieces
- 4 medium Yukon gold potatoes, cut into 1-inch cubes
- 2 firm apples, cored and cut into wedges
- 3 tablespoons olive oil
- 1 teaspoon salt
- 1/2 teaspoon black pepper
- 1/2 teaspoon dried thyme
- 1/4 cup pure maple syrup
Instructions
- Preheat the oven to 425 degrees F and line a large baking sheet with parchment paper or foil for easy cleanup.
- In a large bowl, toss the potato cubes with 2 tablespoons of the olive oil, salt, pepper, and thyme until evenly coated. Spread the potatoes in a single layer on the prepared baking sheet.
- Add the sausage slices and apple wedges to the same bowl. Drizzle with the remaining tablespoon of olive oil and toss to coat. Scatter the sausage and apples around the potatoes on the baking sheet.
- Roast for 25 to 30 minutes, stirring once halfway through, until the potatoes are golden and the sausage is browned at the edges.
- Remove the pan from the oven and drizzle the maple syrup evenly over everything. Toss gently on the pan to coat before serving.
Notes
Cuisine: American
Equipment: Baking Sheet, Oven, Mixing Bowl