

Low carb dinners can make a big difference when you want to feel good after your meal. These recipes use simple ingredients to keep things light without sacrificing flavor. You will find a mix of quick options and a few that take a little more time. They work well for weeknights when you need something reliable. Try them out and see which ones fit into your routine.
Helpful Tips Before You Start
These tips will help you keep the recipes simple while supporting a light and clean finish.
Choose Lean Proteins
Select chicken breast, fish, or turkey for most meals. These options cook quickly and avoid the heavier feel of fattier cuts.
Load Up on Vegetables
Fill half your plate with non starchy options like zucchini, broccoli, or spinach. They add volume and keep the carb count low without extra effort.
Skip Heavy Sauces
Use olive oil, fresh herbs, garlic, and lemon juice for flavor. This approach prevents hidden sugars that can weigh down a low carb dinner.
Prep Vegetables Ahead
Wash and slice produce right after shopping. Having them ready makes it easier to throw together quick meals that still feel fresh.
Lemon Garlic Grilled Chicken with Asparagus
This grilled chicken dish brings bright lemon and garlic flavors to a simple low carb dinner. The asparagus cooks alongside the chicken, picking up the same seasoning for an easy one-grill meal that feels fresh and light. It works well on busy weeknights or when you want something satisfying without feeling heavy.
The chicken stays juicy with a quick marinade, while the asparagus turns tender with a slight char. Together they create a clean plate of protein and vegetables that pairs nicely with a simple side salad or cauliflower rice.


Equipment
- Outdoor Grill
- Large Mixing Bowl
- Tongs
Ingredients
- 4 boneless skinless chicken breasts
- 1 pound fresh asparagus, trimmed
- 3 cloves garlic, minced
- Zest and juice of 2 lemons
- 3 tablespoons olive oil
- 1 teaspoon salt
- 1/2 teaspoon black pepper
- 2 tablespoons chopped fresh parsley
Instructions
- In a large bowl, combine the minced garlic, lemon zest, lemon juice, olive oil, salt, and black pepper. Add the chicken breasts and turn them to coat evenly. Let the chicken sit in the marinade for 15 minutes while you prepare the grill.
- Preheat an outdoor grill to medium-high heat. Place the chicken breasts on the grill and cook for 6 to 7 minutes per side until the internal temperature reaches 165°F. Remove the chicken and let it rest on a plate.
- While the chicken rests, add the trimmed asparagus to the same bowl and toss it in the remaining marinade. Place the asparagus directly on the grill grates and cook for 4 to 5 minutes, turning once, until it is tender with light char marks.
- Slice the rested chicken and arrange it on a serving platter with the grilled asparagus. Sprinkle everything with the chopped fresh parsley before serving.
Notes
Cuisine: American
Equipment: Outdoor Grill, Large Mixing Bowl, Tongs
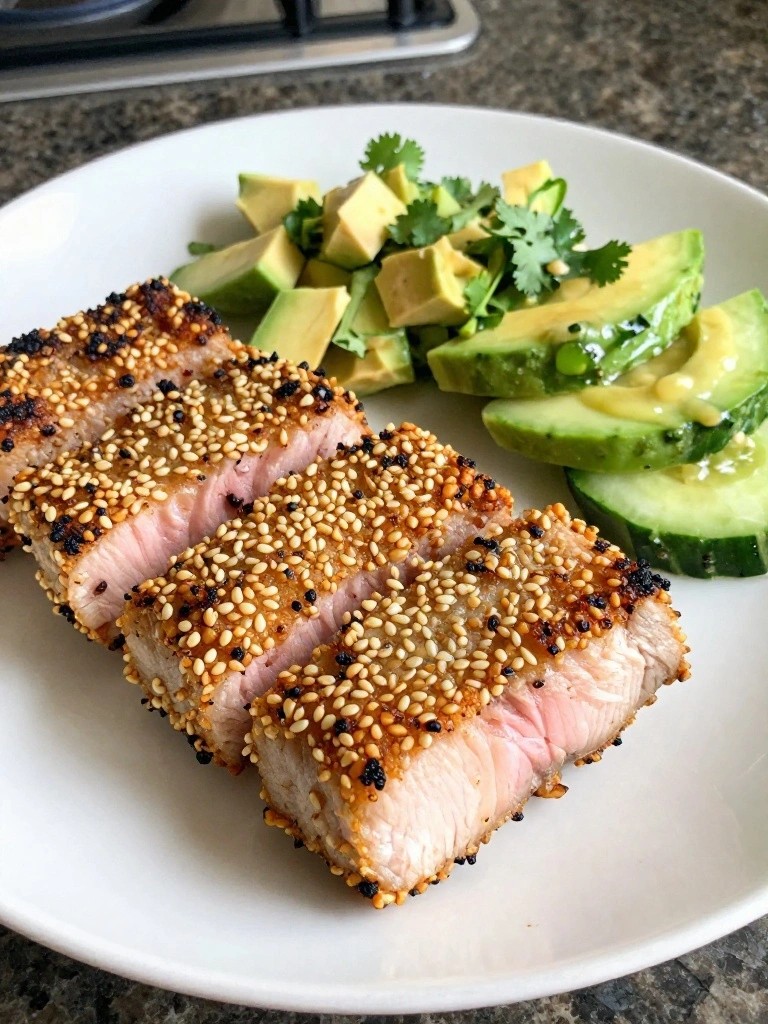
Sesame-Crusted Tuna with Cucumber Avocado Salad
This dish pairs quick-seared tuna with a crisp, creamy salad that keeps things light. The sesame coating adds a nutty crunch while the cucumber and avocado bring cool freshness to every bite. It works well on busy weeknights or warm evenings when you want something satisfying without feeling heavy.
The flavors stay simple and clean, with a light sesame and lime touch that complements the fish and vegetables. Tuna stays tender inside while the salad adds contrast in texture. Together they create a balanced plate that feels fresh and complete.

Equipment
- Large skillet
- Mixing bowl
- Sharp knife
Ingredients
- 4 tuna steaks, about 6 ounces each
- 1/4 cup sesame seeds
- 2 tablespoons sesame oil
- 2 cucumbers, thinly sliced
- 2 ripe avocados, diced
- Juice of 1 lime
- 1/4 cup fresh cilantro, chopped
- 1/2 teaspoon salt
- 1/4 teaspoon black pepper
Instructions
- Pat the tuna steaks dry and season both sides with salt and pepper. Press the sesame seeds onto both sides of each steak so they stick well.
- Heat the sesame oil in a large skillet over medium-high heat. Once hot, add the tuna steaks and sear for about 2 minutes per side for medium-rare. Remove from the heat and let them rest for a few minutes.
- While the tuna rests, combine the sliced cucumbers, diced avocados, lime juice, and chopped cilantro in a mixing bowl. Toss gently to coat everything without breaking up the avocado too much.
- Slice the tuna steaks and divide them among four plates. Spoon the cucumber avocado salad alongside each portion and serve right away.
Notes
Cuisine: Asian
Equipment: Large skillet, Mixing bowl, Sharp knife
Shrimp Zucchini Noodles in Light Tomato Basil Sauce
This dish brings together tender shrimp and crisp zucchini noodles in a fresh tomato sauce that stays light and bright. It works well on busy weeknights when you want something satisfying without feeling heavy. The flavors stay clean with garlic and basil leading the way while the shrimp adds a bit of sweetness.
The texture stays varied, with firm noodles and juicy tomatoes that never weigh the plate down. It fits easily into a low carb routine and comes together in one pan after the zucchini is spiralized.


Equipment
- Spiralizer
- Large Skillet
Ingredients
- 4 medium zucchini
- 1 pound large shrimp, peeled and deveined
- 2 tablespoons olive oil
- 3 garlic cloves, minced
- 1 pint cherry tomatoes, halved
- 1/4 cup fresh basil leaves, thinly sliced
- 1/2 teaspoon salt
- 1/4 teaspoon black pepper
Instructions
- Use a spiralizer to turn the zucchini into noodles. Set them aside in a large bowl while you prepare the rest of the dish.
- Heat the olive oil in a large skillet over medium heat. Add the minced garlic and cook for 30 seconds until fragrant.
- Add the shrimp to the skillet. Season with salt and pepper. Cook for 2 minutes per side until the shrimp turn pink and opaque.
- Stir in the halved cherry tomatoes. Cook for 3 to 4 minutes, pressing a few tomatoes lightly with the back of a spoon to release their juices and form a light sauce.
- Add the basil and stir everything together for 1 minute. Remove the skillet from the heat.
- Add the zucchini noodles to the skillet and toss gently until coated with the sauce. Serve right away.
Notes
Cuisine: Italian
Equipment: Spiralizer, Large Skillet
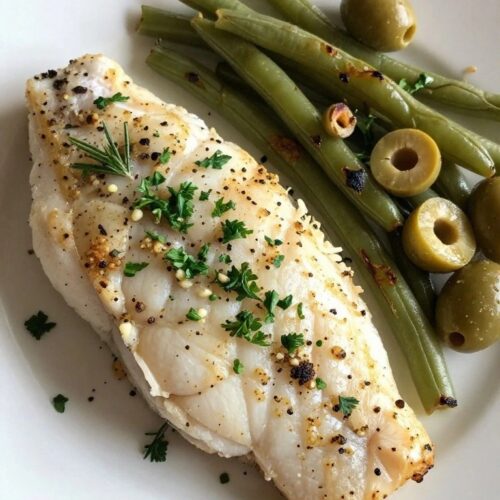
Herb-Crusted Baked Cod with Green Beans and Olives
This herb crusted baked cod pairs tender white fish with a simple seasoning of fresh herbs and garlic. Roasted green beans and olives add a savory, slightly salty contrast that keeps the whole plate light and fresh.
The recipe works well for weeknight dinners when you want minimal cleanup and a meal that still feels put together. The fish stays moist under its herb crust while the beans pick up a nice roasted edge from the oven.

Equipment
- Baking Sheet
- Oven
- Small Bowl
Ingredients
- 4 cod fillets (6 ounces each)
- 3 tablespoons olive oil, divided
- 1/4 cup chopped fresh parsley
- 1 tablespoon chopped fresh rosemary
- 2 garlic cloves, minced
- 1 pound green beans, trimmed
- 1/2 cup kalamata olives, pitted and halved
- Salt and black pepper to taste
Instructions
- Preheat the oven to 400 degrees F and line a large baking sheet with parchment paper.
- In a small bowl, combine 2 tablespoons olive oil with the parsley, rosemary, and minced garlic to form the herb crust mixture.
- Pat the cod fillets dry and season both sides with salt and pepper. Spread the herb mixture evenly over the top of each fillet.
- Place the green beans and olives on the prepared baking sheet. Drizzle with the remaining tablespoon of olive oil and toss to coat, then season with salt and pepper.
- Nestle the herb crusted cod fillets among the green beans and olives on the baking sheet.
- Bake for 15 to 18 minutes until the fish flakes easily with a fork and the green beans are tender with lightly browned edges.
Notes
Cuisine: Mediterranean
Equipment: Baking Sheet, Oven, Small Bowl
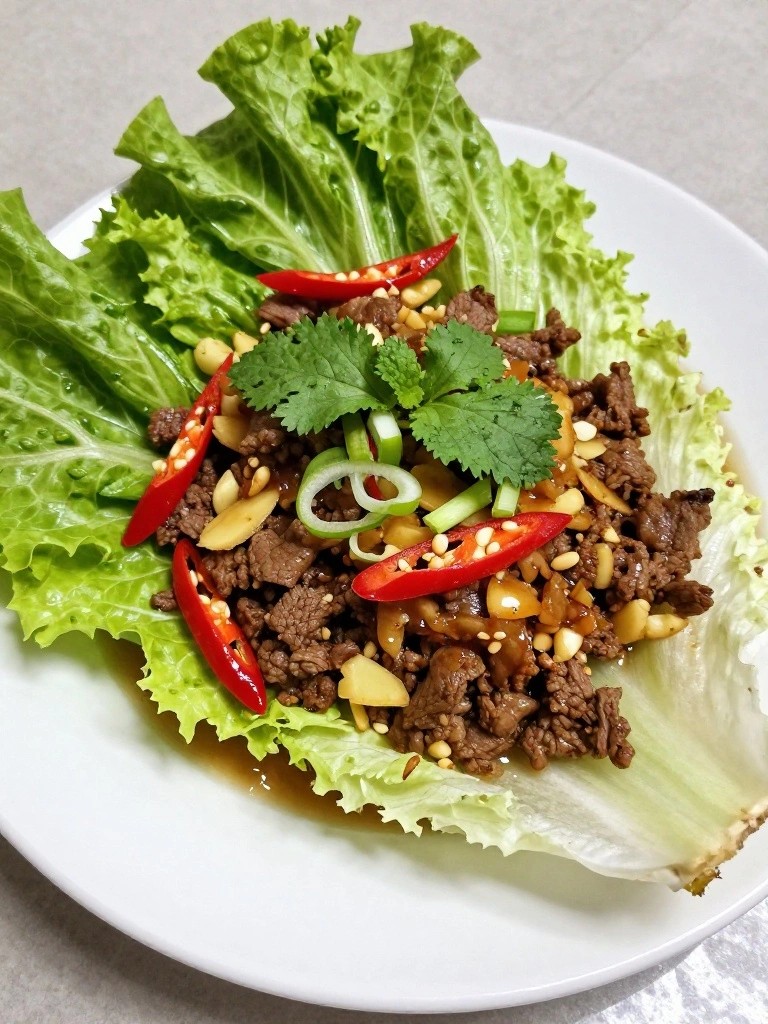
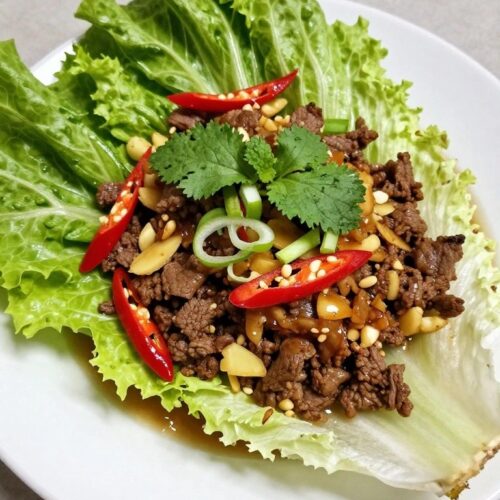
Spicy Thai Beef Lettuce Cups with Fresh Herbs
These lettuce cups deliver a bright mix of spicy, savory, and herbal notes in every bite. Lean ground beef cooks quickly with garlic, ginger, and chili, then gets tucked into crisp lettuce leaves for a meal that feels light but still fills you up. The fresh herbs cut through the heat and add a clean finish that works well on busy weeknights or warm evenings.
The recipe keeps things simple and low carb by skipping rice or noodles. You get plenty of protein and crunch from the lettuce and herbs, so the dish stays satisfying without feeling heavy.
Equipment
- Large skillet
- Knife
- Cutting board
Ingredients
- 1 pound lean ground beef
- 1 tablespoon avocado oil
- 3 garlic cloves, minced
- 1 tablespoon fresh ginger, grated
- 2 Thai red chilies, finely chopped
- 3 tablespoons fish sauce
- 2 tablespoons fresh lime juice
- 1 head butter lettuce, leaves separated and rinsed
- 1/4 cup fresh cilantro leaves
- 1/4 cup fresh mint leaves
- 3 green onions, thinly sliced
Instructions
- Heat the avocado oil in a large skillet over medium-high heat. Add the ground beef and cook, breaking it up with a spoon, until it is browned and no longer pink, about 6 minutes.
- Stir in the minced garlic, grated ginger, and chopped Thai chilies. Cook for 1 minute until the garlic is fragrant.
- Pour in the fish sauce and lime juice. Stir everything together and let it simmer for another minute so the flavors combine.
- Remove the skillet from the heat. Spoon the beef mixture into the prepared lettuce leaves and top each cup with cilantro, mint, and sliced green onions.
Notes
Cuisine: Thai
Equipment: Large skillet, Knife, Cutting board
Turkey and Mushroom Stuffed Bell Peppers
These turkey and mushroom stuffed bell peppers deliver a filling low carb dinner with simple ingredients. The ground turkey mixes with earthy mushrooms to create a savory base that contrasts nicely with the tender roasted peppers.
This recipe suits weeknight meals or light meal prep because it comes together in one skillet before going into the oven. The result tastes fresh and balanced without feeling heavy.


Equipment
- Large skillet
- Baking dish
- Oven
Ingredients
- 4 large bell peppers
- 1 pound ground turkey
- 8 ounces mushrooms, finely chopped
- 1 small onion, diced
- 2 garlic cloves, minced
- 1 tablespoon olive oil
- 1 teaspoon Italian seasoning
- 1/2 teaspoon salt
- 1/4 teaspoon black pepper
- 1/2 cup shredded mozzarella cheese
- 2 tablespoons chopped fresh parsley
Instructions
- Preheat the oven to 375 degrees. Cut the tops off the bell peppers and remove the seeds and membranes. Place the peppers upright in a baking dish.
- Heat the olive oil in a large skillet over medium heat. Add the diced onion and cook for 3 minutes until it softens.
- Add the minced garlic and chopped mushrooms to the skillet. Cook for 5 minutes, stirring often, until the mushrooms release their liquid and start to brown.
- Add the ground turkey to the skillet along with the Italian seasoning, salt, and black pepper. Break up the turkey with a spoon and cook for 8 minutes until it is no longer pink.
- Spoon the turkey and mushroom mixture evenly into the prepared bell peppers. Top each pepper with the shredded mozzarella cheese.
- Bake the peppers for 25 minutes until the cheese melts and the peppers are tender. Remove from the oven and sprinkle with the chopped parsley before serving.
Notes
Cuisine: American
Equipment: Large skillet, Baking dish, Oven
Greek Lamb Chops with Tzatziki and Arugula
This Greek-style meal pairs juicy lamb chops with cool tzatziki and crisp arugula for a dinner that feels fresh and light. It works well on busy evenings when you want something quick yet satisfying, and the flavors stay bright without any heavy sides.
The lamb picks up a simple garlic and herb seasoning while the creamy sauce balances the peppery greens underneath. Each bite gives a mix of tender meat, tangy yogurt, and fresh crunch that keeps the plate feeling clean.


Equipment
- Large Skillet
- Mixing Bowl
- Grater
Ingredients
- 8 bone-in lamb chops
- 3 tablespoons olive oil
- Juice of 1 lemon
- 3 garlic cloves, minced
- 1 tablespoon dried oregano
- 1 teaspoon salt
- 1/2 teaspoon black pepper
- 1 cup plain Greek yogurt
- 1/2 cucumber, grated and squeezed dry
- 2 tablespoons fresh dill, chopped
- 4 cups arugula
Instructions
- Pat the lamb chops dry and place them in a shallow dish. In a small bowl, stir together 2 tablespoons olive oil, lemon juice, 2 minced garlic cloves, oregano, salt, and pepper. Rub the mixture over both sides of the chops and let them sit at room temperature for 10 minutes.
- Heat the remaining tablespoon of olive oil in a large skillet over medium-high heat. Add the lamb chops and cook 3 to 4 minutes per side until browned and cooked to your preferred doneness. Remove the chops to a plate and let them rest for 5 minutes.
- While the lamb rests, make the tzatziki. In a medium bowl, combine the Greek yogurt, grated cucumber, remaining minced garlic clove, and chopped dill. Stir until smooth and season with a pinch of salt if needed.
- Divide the arugula among four plates. Place two lamb chops on each bed of greens and spoon tzatziki over the top or serve it on the side.
Notes
Cuisine: Mediterranean
Equipment: Large Skillet, Mixing Bowl, Grater
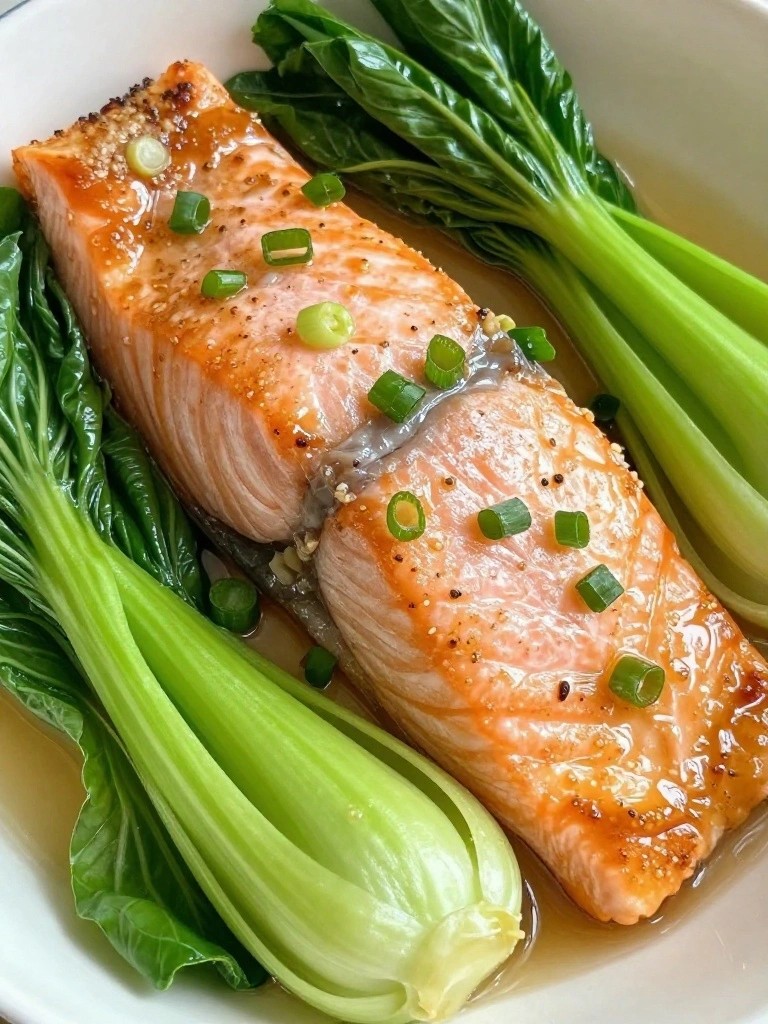
Ginger-Soy Glazed Salmon with Bok Choy
This salmon dish brings together flaky fish and crisp greens in one skillet for an easy dinner that still feels special. The ginger and soy create a light savory coating that keeps the meal tasting fresh without any heaviness.
It works well on busy weeknights when you want something ready in under 30 minutes yet still satisfying. The texture stays tender on the salmon while the bok choy adds a gentle crunch.

Equipment
- Large Skillet
- Small Bowl
- Tongs
Ingredients
- 4 salmon fillets (6 ounces each)
- 1 pound baby bok choy, halved lengthwise
- 3 tablespoons low-sodium soy sauce
- 2 tablespoons fresh ginger, grated
- 3 garlic cloves, minced
- 1 tablespoon avocado oil
- 1 tablespoon sesame oil
- 2 green onions, thinly sliced
- Salt and black pepper
Instructions
- Pat the salmon fillets dry and season both sides with salt and black pepper.
- Heat the avocado oil in a large skillet over medium heat. Place the salmon skin-side up and cook for 4 minutes until golden.
- Flip the fillets and cook 3 more minutes. In a small bowl, stir together the soy sauce, grated ginger, and half the minced garlic. Pour the mixture over the salmon and let it bubble for 1 minute while spooning it over the fish.
- Remove the salmon from the skillet and set aside. Add the sesame oil to the same pan along with the remaining garlic. Place the bok choy cut-side down and cook for 2 to 3 minutes until the stems soften slightly but the leaves stay bright.
- Return the salmon to the skillet for 30 seconds to warm through. Sprinkle with the sliced green onions before serving.
Notes
Cuisine: Asian
Equipment: Large Skillet, Small Bowl, Tongs
Creamy Tuscan Chicken with Spinach and Sun-Dried Tomatoes
This creamy Tuscan chicken brings together tender chicken breasts in a light garlic cream sauce with fresh spinach and tangy sun-dried tomatoes. It feels rich without weighing you down, making it a good choice for weeknight dinners when you want something satisfying yet light.
The flavors stay balanced with savory parmesan and herbs, while the spinach adds a fresh element. It works well as a low carb main that still feels complete on its own.


Equipment
- Large Skillet
Ingredients
- 4 boneless skinless chicken breasts
- 2 tablespoons olive oil
- 4 cloves garlic minced
- 1 cup heavy cream
- 1/2 cup chicken broth
- 1/2 cup grated Parmesan cheese
- 2 cups fresh spinach
- 1/2 cup sun-dried tomatoes chopped
- 1 teaspoon Italian seasoning
- Salt and pepper to taste
Instructions
- Season both sides of the chicken breasts with salt, pepper, and Italian seasoning.
- Heat the olive oil in a large skillet over medium heat. Add the chicken and cook for 6 to 7 minutes per side until golden and cooked through. Remove the chicken to a plate.
- In the same skillet, add the minced garlic and cook for 1 minute until fragrant.
- Pour in the heavy cream and chicken broth. Stir in the Parmesan cheese and let the sauce simmer for 2 to 3 minutes until it thickens slightly.
- Add the fresh spinach and chopped sun-dried tomatoes. Stir until the spinach wilts, about 2 minutes.
- Return the chicken to the skillet and spoon the sauce over the top. Let everything warm together for 1 minute before serving.
Notes
Cuisine: Italian
Equipment: Large Skillet
Blackened Tilapia with Cabbage Slaw and Lime
This recipe brings a quick, fresh dinner that feels light yet satisfying. The spiced crust on the fish pairs with crisp cabbage and bright lime for a clean plate that still delivers plenty of flavor. It works well on busy weeknights when you want something simple and low carb.
The slaw stays crunchy while the tilapia cooks fast in a hot pan. Lime juice ties everything together without extra sauces or heavy ingredients.


Equipment
- Large skillet
- Mixing bowl
- Small bowl
Ingredients
- 4 tilapia fillets (about 6 oz each)
- 2 tablespoons olive oil, divided
- 1 tablespoon paprika
- 1 teaspoon garlic powder
- 1/2 teaspoon cayenne pepper
- 1/2 teaspoon salt
- 1/4 teaspoon black pepper
- 4 cups shredded green cabbage
- 1/4 cup fresh cilantro, chopped
- Juice of 2 limes
- Lime wedges for serving
Instructions
- Stir together the paprika, garlic powder, cayenne, salt, and black pepper in a small bowl.
- Pat the tilapia fillets dry and brush them lightly with 1 tablespoon of olive oil.
- Sprinkle the spice mix evenly over both sides of each fillet.
- Heat the remaining tablespoon of olive oil in a large skillet over medium-high heat.
- Place the fillets in the skillet and cook for 3 to 4 minutes per side until the spices form a dark crust and the fish flakes easily.
- While the fish cooks, combine the shredded cabbage, cilantro, lime juice, and a pinch of salt in a large bowl. Toss well to coat.
- Serve each fillet topped with a portion of the cabbage slaw and a lime wedge on the side.
Notes
Cuisine: Cajun
Equipment: Large skillet, Mixing bowl, Small bowl
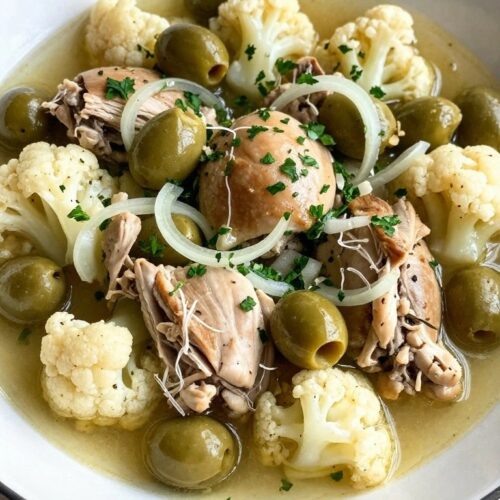
Moroccan Chicken Tagine with Cauliflower and Olives
This Moroccan chicken tagine brings bold spices and tender textures to a simple low carb dinner. Chicken thighs cook slowly with cauliflower and olives to create a light yet satisfying meal. It works well on weeknights when you want something warm without feeling heavy.
The dish offers earthy cumin and turmeric notes balanced by briny olives and a touch of lemon. Cauliflower softens just enough to soak up the flavors while staying firm. It pairs nicely with a simple green salad or a small portion of cauliflower rice.

Equipment
- Dutch Oven
- Cutting Board
- Knife
Ingredients
- 1.5 pounds boneless skinless chicken thighs, cut into chunks
- 1 medium head cauliflower, cut into florets
- 1 cup green olives, pitted
- 1 large onion, thinly sliced
- 3 garlic cloves, minced
- 2 tablespoons olive oil
- 1 teaspoon ground cumin
- 1 teaspoon ground turmeric
- 1/2 teaspoon ground cinnamon
- 1/2 teaspoon ground ginger
- 1 cup low sodium chicken broth
- Juice of 1 lemon
- 2 tablespoons fresh parsley, chopped
- Salt and black pepper to taste
Instructions
- Heat the olive oil in a large Dutch oven over medium heat. Add the sliced onion and cook until softened, about five minutes.
- Stir in the minced garlic, cumin, turmeric, cinnamon, and ginger. Cook for one minute until fragrant.
- Add the chicken chunks and season with salt and pepper. Brown the chicken on all sides for about six minutes.
- Pour in the chicken broth and lemon juice. Bring the mixture to a gentle simmer.
- Add the cauliflower florets and green olives. Cover and cook for 20 minutes until the cauliflower is tender and the chicken is cooked through.
- Remove the lid and simmer for another five minutes to thicken the sauce slightly. Sprinkle with fresh parsley before serving.
Notes
Cuisine: Moroccan
Equipment: Dutch Oven, Cutting Board, Knife
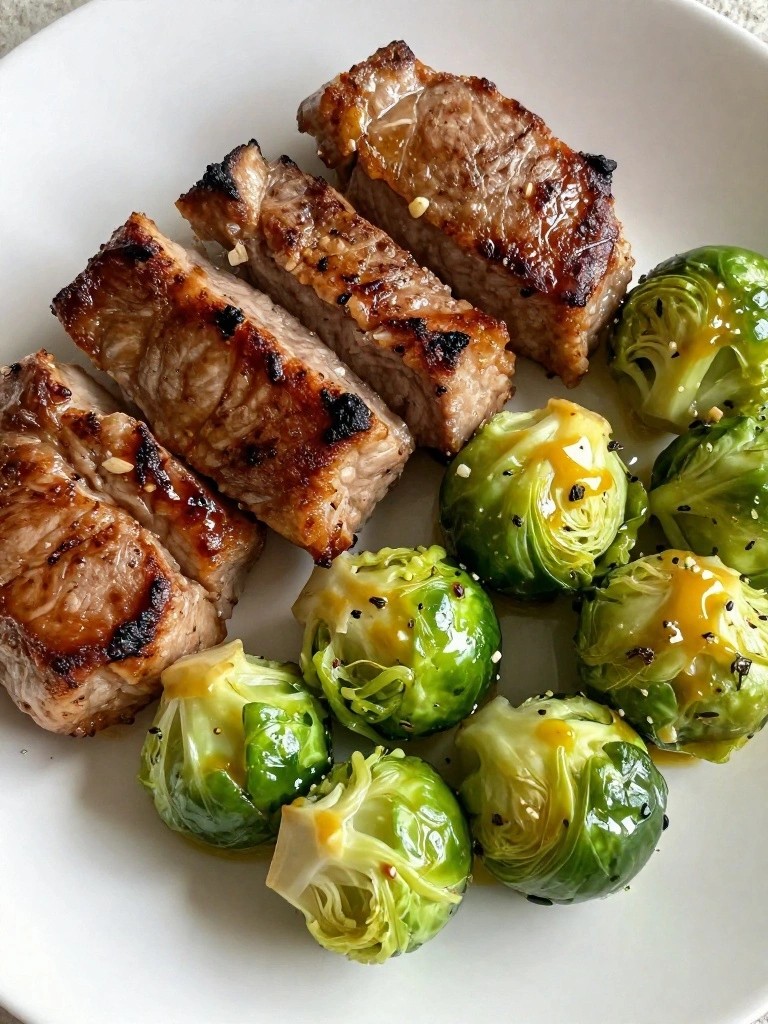
Pork Tenderloin Medallions with Dijon Brussels Sprouts
This recipe pairs quick-seared pork medallions with Brussels sprouts that pick up a light Dijon coating in the same pan. It delivers a clean, satisfying dinner that feels fresh and balanced without weighing you down.
The pork stays tender while the sprouts turn slightly crisp at the edges, all tied together by the sharp, savory mustard flavor. It works well for busy evenings when you want a low-carb meal that still tastes complete.

Equipment
- Large skillet
- Sharp knife
- Cutting board
Ingredients
- 1 pound pork tenderloin, sliced into 1/2-inch medallions
- 1 pound Brussels sprouts, trimmed and halved
- 3 tablespoons Dijon mustard
- 2 tablespoons olive oil, divided
- 2 garlic cloves, minced
- 1 teaspoon dried thyme
- Salt and black pepper, to taste
Instructions
- Season the pork medallions on both sides with salt, pepper, and thyme.
- Heat 1 tablespoon of olive oil in a large skillet over medium-high heat. Add the pork medallions and cook for 3 minutes per side until browned and just cooked through. Remove them to a plate.
- Lower the heat to medium and add the remaining tablespoon of olive oil to the skillet. Stir in the garlic and cook for 30 seconds until fragrant.
- Add the Brussels sprouts to the skillet. Cook for 6 to 8 minutes, stirring occasionally, until they are tender with some browned edges.
- Stir the Dijon mustard into the Brussels sprouts until evenly coated. Return the pork medallions to the skillet and toss everything together for 1 minute to warm through and combine flavors. Serve right away.
Notes
Cuisine: American
Equipment: Large skillet, Sharp knife, Cutting board
Scallop and Asparagus Stir-Fry with Garlic Butter
This recipe brings together sweet scallops and crisp asparagus in a simple garlic butter sauce. It feels light and fresh, making it a good choice for weeknights when you want something satisfying without heaviness. The quick cooking keeps the scallops tender and the asparagus bright.
The dish works well after a busy day or when you need a clean, low carb dinner that still tastes special. Butter and garlic create a rich coating while lemon adds a bright finish that balances the flavors.


Equipment
- Large Skillet
- Tongs
- Knife
Ingredients
- 1 pound sea scallops
- 1 bunch asparagus, trimmed and cut into 2-inch pieces
- 4 garlic cloves, minced
- 3 tablespoons unsalted butter
- 1 tablespoon olive oil
- Juice of 1 lemon
- Salt and black pepper, to taste
- 2 tablespoons fresh parsley, chopped
Instructions
- Pat the scallops dry with paper towels and season both sides with salt and pepper. Set them aside while you prepare the asparagus.
- Heat the olive oil in a large skillet over medium-high heat. Add the scallops in a single layer and cook for 2 minutes without moving them until a golden crust forms on the bottom.
- Flip the scallops and cook for 1 minute more, then remove them to a plate.
- Lower the heat to medium and add the butter to the same skillet. Once it melts, stir in the garlic and cook for 30 seconds until fragrant.
- Add the asparagus pieces to the skillet and cook for 4 to 5 minutes, stirring often, until they are bright green and just tender.
- Return the scallops to the skillet, pour in the lemon juice, and gently toss everything together for 1 minute to warm through.
- Remove from heat, sprinkle with the chopped parsley, and serve right away.
Notes
Course: Main Course
Cuisine: American
Equipment: Large Skillet, Tongs, Knife