

Finding dinners that picky kids will actually eat can feel like a daily challenge. These recipes focus on simple ingredients and flavors most children already enjoy. Each one comes from real family kitchens where parents have tried them with success. You will see options like easy pasta meals and mild chicken dishes that fit busy schedules. They aim to reduce mealtime stress without requiring special shopping trips.
Tips for Picky Eaters at Dinner Time
A few small changes can help turn dinner into something kids look forward to eating.
Let Kids Pick One Part of the Meal
Ask them to choose the veggie or sauce for the recipe. When they have a say they are more likely to taste the final dish.
Keep New Foods Next to Favorites
Place a small portion of something unfamiliar beside a food they already enjoy. This reduces pressure and makes trying it feel less risky.
Offer Build-Your-Own Options
Set out tortillas, rice, or pasta and let kids assemble their own plates. Control stays with them while the main recipe stays the same.
Cut Food into Small or Fun Shapes
Dice meat and vegetables into bite-size pieces or use simple cutters for flat items like quesadillas. Smaller pieces feel easier to manage and less overwhelming.
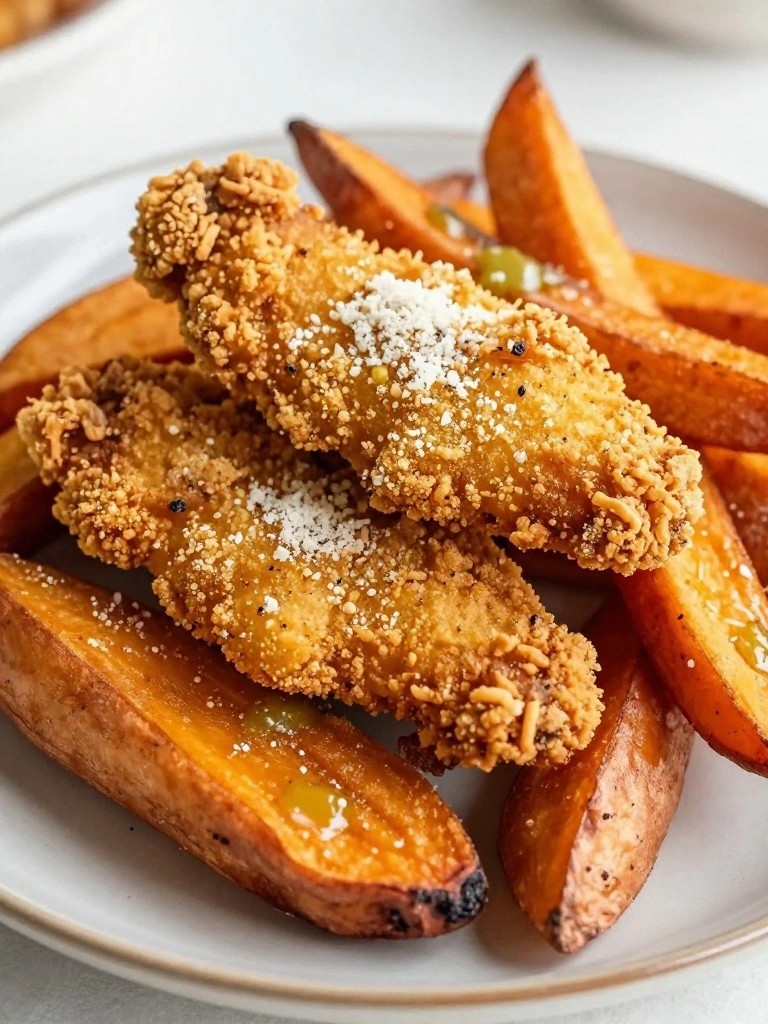
Crispy Baked Chicken Tenders with Sweet Potato Fries
This recipe turns a fast-food favorite into an easy weeknight dinner that kids actually ask for again. The chicken stays juicy inside while the coating turns golden and crunchy in the oven, and the sweet potato fries add a touch of natural sweetness that balances the savory breading.
It works well for busy evenings when you want something the whole family can eat together without complaints. The mild seasoning and familiar shapes make it approachable for picky eaters while still feeling like a treat.

Equipment
- Baking sheets
- Parchment paper
- Mixing bowls
- Oven
Ingredients
- 1 pound chicken tenders
- 1/4 cup all-purpose flour
- 2 large eggs
- 1 cup panko breadcrumbs
- 1/2 cup grated Parmesan cheese
- 1 teaspoon garlic powder
- 1 teaspoon paprika
- 1/2 teaspoon salt
- 1/4 teaspoon black pepper
- 2 large sweet potatoes
- 2 tablespoons olive oil
Instructions
- Preheat the oven to 425°F and line two baking sheets with parchment paper.
- Cut the sweet potatoes into thin fries. Place them in a bowl, drizzle with 1 tablespoon olive oil, and sprinkle with half the salt and pepper. Toss to coat evenly, then spread in a single layer on one baking sheet.
- Bake the sweet potato fries for 25 to 30 minutes, flipping halfway through, until they are tender and lightly browned at the edges.
- While the fries bake, set up three shallow dishes for the chicken. Place the flour in the first dish. Beat the eggs in the second dish. In the third dish, mix the panko breadcrumbs, Parmesan cheese, garlic powder, paprika, remaining salt, and remaining pepper.
- Pat the chicken tenders dry. Dredge each tender first in the flour, then dip in the beaten egg, and finally coat thoroughly in the breadcrumb mixture. Place the coated tenders on the second baking sheet.
- Drizzle the remaining tablespoon of olive oil over the chicken tenders. Bake for 18 to 22 minutes, flipping once halfway through, until the coating is golden and the chicken reaches 165°F inside.
Notes
Cuisine: American
Equipment: Baking sheets, Parchment paper, Mixing bowls, Oven
Cheesy Beef Tacos with Soft Shells and Corn
This recipe combines savory ground beef with sweet corn tucked inside soft tortillas and finished with a generous layer of melted cheese. Kids like the mild flavors and the way the cheese helps hold everything together without any hard shells to break apart.
It works well on weeknights when you want a quick dinner that feels fun rather than fussy. The corn adds a touch of natural sweetness that balances the beef and makes the tacos more appealing to picky eaters.


Equipment
- Large Skillet
- Spatula
Ingredients
- 1 pound ground beef
- 1 tablespoon olive oil
- 1 packet taco seasoning mix
- 2 cups frozen corn kernels
- 1 1/2 cups shredded cheddar cheese
- 8 soft flour tortillas
- Salt to taste
Instructions
- Heat the olive oil in a large skillet over medium heat. Add the ground beef and cook until it is fully browned, breaking it up with a spatula as it cooks.
- Stir in the taco seasoning mix and a pinch of salt. Add the frozen corn kernels and cook for another 4 to 5 minutes until the corn is heated through and the mixture is well combined.
- Reduce the heat to low and sprinkle the shredded cheddar cheese evenly over the beef and corn mixture. Cover the skillet for 1 to 2 minutes so the cheese melts.
- Warm the soft flour tortillas in a separate pan or in the microwave. Spoon the cheesy beef and corn filling into each tortilla and serve right away.
Notes
Cuisine: Mexican
Equipment: Large Skillet, Spatula
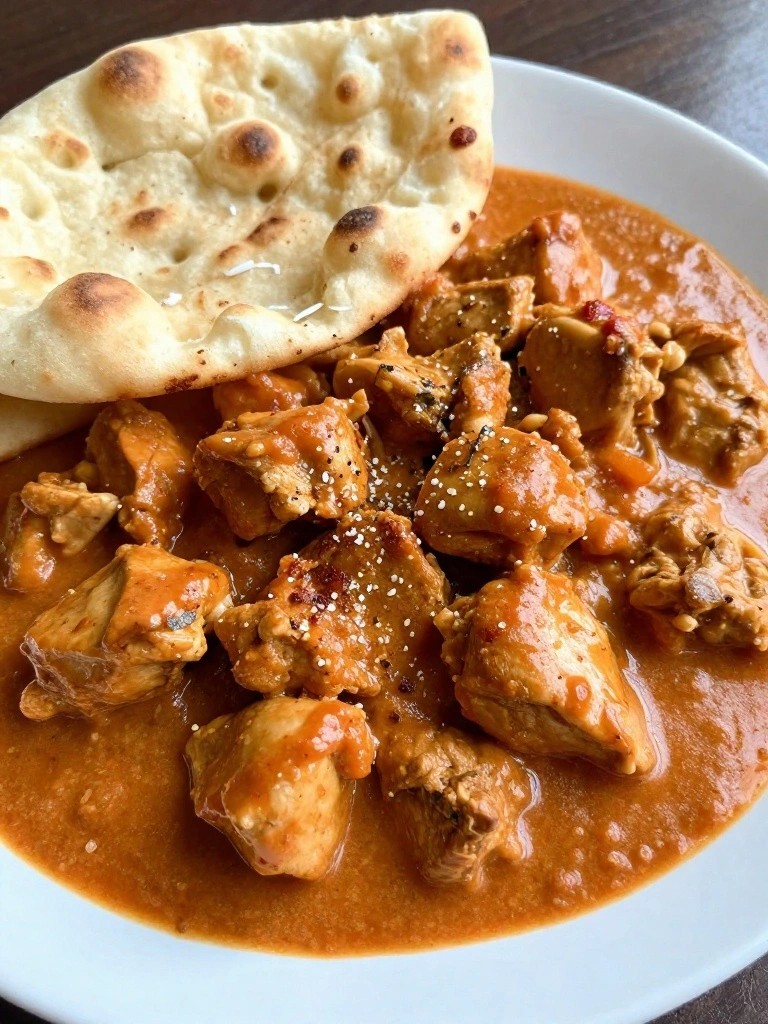
One-Pot Mild Butter Chicken with Naan
This one-pot mild butter chicken brings tender pieces of chicken in a creamy tomato sauce that tastes rich without any heat. Kids enjoy scooping it up with soft naan, and parents like that everything cooks in a single pot with little cleanup. The sauce stays smooth and lightly seasoned so even picky eaters accept it.
The dish works well on busy weeknights when you need a reliable dinner that still feels special. The chicken stays juicy while the sauce thickens just enough to coat the naan without being messy.

Equipment
- Large pot
- Knife
- Cutting board
Ingredients
- 1.5 pounds boneless, skinless chicken breasts, cut into bite-sized pieces
- 4 tablespoons butter
- 1 small onion, finely chopped
- 3 cloves garlic, minced
- 1 can (14 ounces) tomato sauce
- 1 cup heavy cream
- 1 teaspoon salt
- 1/2 teaspoon black pepper
- 1/2 teaspoon paprika
- 4 pieces naan bread, warmed for serving
Instructions
- Melt the butter in a large pot over medium heat. Add the chopped onion and cook for 3 minutes until it softens.
- Stir in the minced garlic and cook for 1 minute until fragrant.
- Add the chicken pieces to the pot. Sprinkle with salt, pepper, and paprika, then cook for 5 to 6 minutes until the chicken is no longer pink on the outside.
- Pour in the tomato sauce and heavy cream. Stir everything together until the sauce looks smooth and evenly mixed.
- Reduce the heat to low, cover the pot, and simmer for 15 minutes until the chicken is cooked through and the sauce has thickened slightly.
- Remove the pot from the heat. Serve the butter chicken with warmed naan bread on the side.
Notes
Cuisine: Indian
Equipment: Large pot, Knife, Cutting board
Turkey Meatball Subs with Marinara and Mozzarella
Turkey meatballs tucked into soft rolls with marinara and melted mozzarella create a sandwich that feels like a treat. Kids often like the familiar flavors and the way the cheese pulls apart. This meal works well on weeknights when you want something quick that still feels like a full dinner.
The meatballs stay tender and the sauce keeps everything moist. Mild seasoning lets the cheese and bread shine, so even selective eaters usually finish their portion.


Equipment
- Mixing Bowl
- Baking Sheet
- Skillet
- Oven
Ingredients
- 1 pound ground turkey
- 1/2 cup plain breadcrumbs
- 1 large egg
- 1 teaspoon garlic powder
- 1 teaspoon dried oregano
- 1/2 teaspoon salt
- 1/4 teaspoon black pepper
- 2 cups marinara sauce
- 4 hoagie rolls
- 1 1/2 cups shredded mozzarella cheese
Instructions
- Preheat the oven to 400 degrees. In a mixing bowl combine the ground turkey, breadcrumbs, egg, garlic powder, oregano, salt, and black pepper. Mix until evenly blended then shape into 16 small meatballs.
- Arrange the meatballs on a baking sheet and bake for 15 to 18 minutes until they reach an internal temperature of 165 degrees.
- While the meatballs cook, warm the marinara sauce in a skillet over medium heat until it begins to bubble.
- Split each hoagie roll and place four meatballs inside. Spoon warm marinara over the meatballs.
- Sprinkle mozzarella cheese on top of each sub and place them under the broiler for 2 to 3 minutes until the cheese melts and starts to brown.
Notes
Cuisine: Italian
Equipment: Mixing Bowl, Baking Sheet, Skillet, Oven
Sheet Pan Honey Garlic Chicken Thighs and Broccoli
This sheet pan dinner brings together juicy chicken thighs and broccoli in a simple sweet and savory glaze. The honey garlic flavor stays mild enough for kids while the roasted broccoli develops a bit of crispness that makes it more appealing than plain steamed vegetables. It comes together with minimal dishes, which helps on busy evenings when you want a reliable meal that everyone at the table will actually finish.
The chicken stays tender under the glaze and the broccoli soaks up just enough sauce to taste flavorful without becoming soggy. It works well for weeknight dinners because most of the work happens in the oven while you handle other tasks.


Equipment
- Sheet pan
- Mixing bowl
- Oven
Ingredients
- 1.5 pounds boneless skinless chicken thighs
- 4 cups broccoli florets
- 1/4 cup honey
- 3 garlic cloves, minced
- 2 tablespoons soy sauce
- 2 tablespoons olive oil
- 1/2 teaspoon salt
- 1/4 teaspoon black pepper
Instructions
- Preheat the oven to 400 degrees F and line a large sheet pan with parchment paper or foil for easy cleanup.
- In a bowl, stir together the honey, minced garlic, soy sauce, olive oil, salt, and black pepper until the mixture is smooth.
- Place the chicken thighs on the prepared sheet pan and spoon about half of the honey garlic mixture over them, turning the pieces so both sides are coated.
- Add the broccoli florets to the pan around the chicken and drizzle the remaining honey garlic mixture over the broccoli, tossing the florets gently to coat them.
- Bake for 25 to 30 minutes until the chicken reaches an internal temperature of 165 degrees F and the broccoli is tender with lightly browned edges.
Notes
Cuisine: American
Equipment: Sheet pan, Mixing bowl, Oven
Creamy Tomato Soup with Grilled Cheese Dippers
This creamy tomato soup offers a mild, smooth texture that appeals to kids who avoid chunky foods. The grilled cheese dippers add a crispy, cheesy element that makes the meal interactive and familiar, helping picky eaters warm up to the dish.
It works well for weeknight dinners when you want something quick and comforting without much fuss. The rich tomato base stays balanced and not too tangy, while the warm dippers provide a fun contrast in every bite.


Equipment
- Large pot
- Immersion blender
- Skillet
- Knife
Ingredients
- 2 tablespoons unsalted butter
- 1 small onion, diced
- 2 garlic cloves, minced
- 28 ounces crushed tomatoes
- 2 cups vegetable broth
- 1 teaspoon sugar
- 1/2 teaspoon dried oregano
- 1 cup heavy cream
- Salt and black pepper to taste
- 8 slices white bread
- 8 ounces cheddar cheese, sliced
- 3 tablespoons unsalted butter, softened
Instructions
- Melt 2 tablespoons butter in a large pot over medium heat. Add the diced onion and minced garlic, then cook for 4 to 5 minutes until the onion turns soft and clear.
- Pour in the crushed tomatoes, vegetable broth, sugar, and dried oregano. Bring the mixture to a gentle simmer and cook for 15 minutes, stirring now and then.
- Remove the pot from the heat and stir in the heavy cream. Season with salt and black pepper to taste. Use an immersion blender to puree the soup until it reaches a completely smooth consistency.
- Butter one side of each bread slice with the remaining 3 tablespoons softened butter. Place cheese slices between two pieces of bread to form four sandwiches, with the buttered sides facing out.
- Heat a skillet over medium heat and cook each sandwich for 2 to 3 minutes per side until the bread turns golden and the cheese melts. Cut the finished sandwiches into strips for dipping.
Notes
Cuisine: American
Equipment: Large pot, Immersion blender, Skillet, Knife
Veggie-Loaded Beef Lasagna Rolls
These rolls turn classic lasagna into small, easy-to-handle portions that kids can pick up with their hands. The beef and cheese help cover the taste of the grated vegetables tucked inside, so even picky eaters usually finish their plate.
They work well on weeknights when you want something that feels like comfort food but still packs in extra vegetables. Each roll stays soft and saucy with a light cheesy layer on top.


Equipment
- Large pot
- Skillet
- 9×13 inch baking dish
- Mixing bowl
Ingredients
- 8 lasagna noodles
- 1 lb ground beef
- 1 cup grated zucchini
- 1 cup chopped spinach
- 1 cup ricotta cheese
- 1 1/2 cups shredded mozzarella cheese
- 2 cups marinara sauce
- 1/4 cup grated Parmesan cheese
- 1 tsp dried oregano
- Salt and pepper
Instructions
- Bring a large pot of salted water to a boil and cook the lasagna noodles until just tender. Drain them and lay them flat on a clean surface to cool slightly.
- Heat a skillet over medium heat. Add the ground beef and cook until browned, breaking it up as it cooks. Stir in the grated zucchini and chopped spinach and cook for 3 minutes until the vegetables soften.
- Remove the skillet from the heat. Stir in the ricotta cheese, oregano, and a pinch of salt and pepper until everything is evenly mixed.
- Spread 1 cup of marinara sauce across the bottom of a 9×13 baking dish. Spoon the beef and vegetable mixture along each lasagna noodle, then roll them up and place them seam-side down in the dish.
- Pour the remaining marinara sauce over the rolls and sprinkle the mozzarella and Parmesan cheese on top. Bake at 375°F for 20 minutes until the cheese is melted and bubbly.
Notes
Cuisine: Italian
Equipment: Large pot, Skillet, 9×13 inch baking dish, Mixing bowl
Teriyaki Salmon Bites over Rice with Peas
This recipe turns salmon into small, easy-to-eat pieces coated in a mild sweet sauce. Kids often enjoy the bite-sized format and the simple mix of rice and peas alongside it. It comes together quickly on weeknights when you want a full meal without much fuss.
The finished dish has tender salmon with a light glaze, soft rice, and bright green peas. Everything stays mild enough for picky tastes while still giving a balanced plate.


Equipment
- Large skillet
- Microwave-safe bowl
- Small mixing bowl
Ingredients
- 1 pound salmon fillet, cut into 1-inch pieces
- 3 tablespoons soy sauce
- 2 tablespoons honey
- 1 tablespoon olive oil
- 1 teaspoon garlic powder
- 2 cups cooked white rice
- 1 cup frozen peas
- Sesame seeds for sprinkling
Instructions
- Stir the soy sauce, honey, and garlic powder together in a small bowl until the honey dissolves. Set the bowl aside.
- Heat the olive oil in a large skillet over medium heat. Add the salmon pieces in a single layer and cook for 2 to 3 minutes without moving them.
- Flip the salmon pieces and pour the soy sauce mixture over them. Cook for another 2 minutes, gently turning the pieces so the sauce coats everything evenly.
- While the salmon finishes, place the frozen peas in a microwave-safe bowl with a splash of water. Microwave for 2 minutes, then drain.
- Spoon the cooked rice into four bowls. Top each bowl with salmon bites and a scoop of peas. Sprinkle sesame seeds over the top before serving.
Notes
Cuisine: Asian
Equipment: Large skillet, Microwave-safe bowl, Small mixing bowl
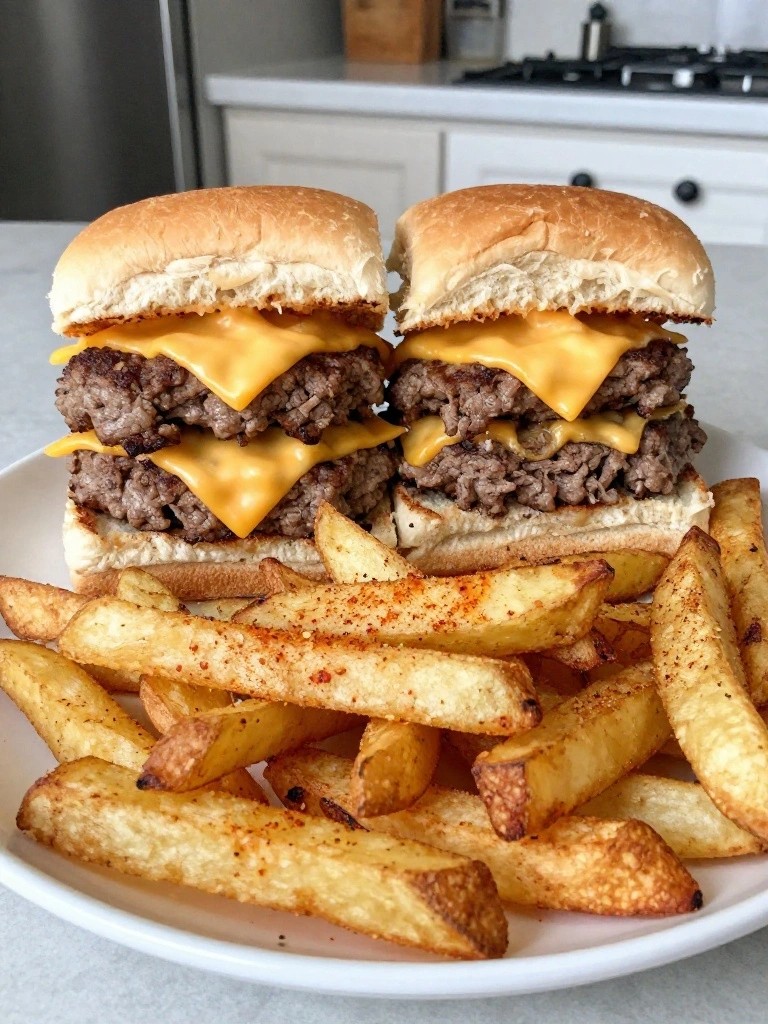
Cheeseburger Sliders with Oven Fries
These cheeseburger sliders give kids the familiar flavors they already like in a smaller size that fits little hands. The oven fries come out crispy on the outside and soft inside, so the whole plate feels like a fun dinner without extra effort on busy nights.
The beef stays juicy inside soft buns while the cheese melts right on top. Simple seasonings on the fries keep the taste mild and consistent, which helps picky eaters feel comfortable trying the meal.

Equipment
- Baking Sheet
- Large Skillet
- Mixing Bowl
Ingredients
- 1 pound ground beef
- 1 teaspoon salt
- 1/2 teaspoon black pepper
- 8 slider buns
- 8 slices American cheese
- 4 large russet potatoes
- 2 tablespoons vegetable oil
- 1 teaspoon paprika
- 1/2 teaspoon garlic powder
Instructions
- Preheat the oven to 425°F. Cut the potatoes into thin fry shapes and place them in a bowl.
- Add the vegetable oil, paprika, garlic powder, and half of the salt to the potatoes. Toss until evenly coated.
- Spread the potatoes in a single layer on a baking sheet. Bake for 25 to 30 minutes, flipping once halfway through, until golden and crisp.
- While the fries bake, divide the ground beef into 8 small patties. Sprinkle both sides with the remaining salt and black pepper.
- Heat a large skillet over medium heat. Cook the patties for 3 to 4 minutes per side until browned and cooked through.
- Place one slice of American cheese on each hot patty so it melts. Toast the slider buns lightly if desired, then assemble each slider with a cheesy patty.
- Serve the sliders right away with the hot oven fries on the side.
Notes
Cuisine: American
Equipment: Baking Sheet, Large Skillet, Mixing Bowl
Chicken Fried Rice with Scrambled Eggs and Carrots
This one-pan meal turns leftover rice into a family favorite that feels familiar without being boring. Kids often enjoy the soft scrambled eggs and sweet bites of carrot mixed with tender chicken. It comes together quickly on busy evenings when you need something everyone will actually eat.
The texture stays light and slightly chewy from the rice, while the mild flavors keep things simple. Carrots add a gentle sweetness that balances the savory chicken without any strong spices.


Equipment
- Large Skillet
- Cutting Board
- Knife
Ingredients
- 2 cups cooked white rice, preferably day-old
- 1 pound boneless skinless chicken breast, diced into small pieces
- 3 large eggs
- 2 medium carrots, peeled and diced
- 2 tablespoons soy sauce
- 1 tablespoon vegetable oil
- 1/2 teaspoon salt
- 1/4 teaspoon black pepper
Instructions
- Heat the vegetable oil in a large skillet over medium heat. Add the diced chicken and cook until no longer pink, about 5 to 6 minutes. Season with salt and pepper while it cooks.
- Push the chicken to one side of the skillet. Crack the eggs into the empty space and scramble them until just set, about 2 minutes.
- Add the diced carrots and stir everything together. Cook for 3 minutes until the carrots begin to soften.
- Stir in the cooked rice and break up any clumps. Pour the soy sauce over the mixture and toss until everything is evenly coated and heated through, about 3 to 4 minutes.
Notes
Cuisine: Asian
Equipment: Large Skillet, Cutting Board, Knife
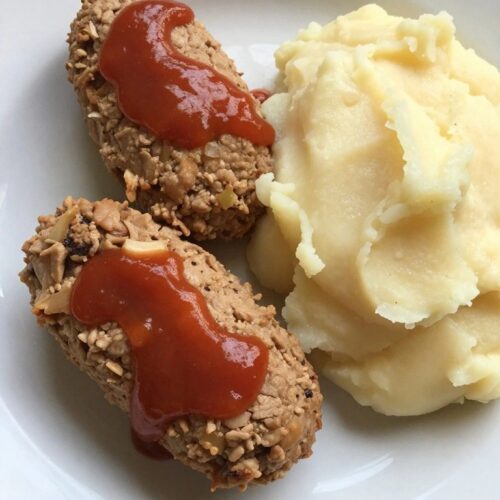
Mini Turkey Meatloaves with Mashed Potatoes
These mini turkey meatloaves give kids a familiar shape they can hold and dip. The mild seasoning and ketchup topping keep flavors simple while the creamy mashed potatoes turn the plate into a complete meal most picky eaters accept without fuss.
The meatloaves stay moist and tender thanks to the egg and ketchup in the mix. Paired with smooth potatoes, the meal feels comforting and balanced for weeknight dinners or casual family meals.

Equipment
- Baking sheet
- Mixing bowl
- Large pot
- Potato masher
Ingredients
- 1 pound ground turkey
- 1/2 cup plain breadcrumbs
- 1 large egg
- 1/4 cup ketchup, plus 2 tablespoons for topping
- 1/2 small onion, finely diced
- 1 teaspoon garlic powder
- 1/2 teaspoon salt
- 1/4 teaspoon black pepper
- 4 medium russet potatoes, peeled and cubed
- 1/2 cup milk
- 2 tablespoons butter
- 1/2 teaspoon salt
Instructions
- Preheat the oven to 400 degrees and line a baking sheet with parchment paper.
- In a large bowl, combine the ground turkey, breadcrumbs, egg, 1/4 cup ketchup, diced onion, garlic powder, salt, and pepper. Mix gently until everything is evenly distributed.
- Divide the mixture into four equal portions and shape each into a small loaf. Place the loaves on the prepared baking sheet and spread 2 tablespoons of ketchup over the tops.
- Bake the meatloaves for 20 to 25 minutes until they reach an internal temperature of 165 degrees.
- While the meatloaves bake, place the cubed potatoes in a large pot and cover with cold water. Add the 1/2 teaspoon salt and bring to a boil. Cook until the potatoes are fork-tender, about 15 minutes.
- Drain the potatoes and return them to the pot. Add the milk and butter, then mash until smooth and creamy. Serve the meatloaves alongside the mashed potatoes.
Notes
Cuisine: American
Equipment: Baking sheet, Mixing bowl, Large pot, Potato masher