


Halloween themed foods can add a nice touch to any gathering. These recipes are designed to be simple and use common ingredients. You can make them for parties or just for fun at home with the kids. I included a mix of sweet and savory options. Each recipe has clear steps to follow.
Helpful Tips Before You Start
These tips will help your Halloween foods look festive and stay practical for any gathering.
Choose easy bases
Pick simple recipes like dips, cookies, or skewers that you can adapt with minimal changes. They give you room to add themed touches without complex steps.
Prep components early
Make doughs, cut vegetables, or mix fillings the day before. This keeps assembly quick when you are ready to serve.
Add details at the end
Place candy eyes, sprinkles, or sauces right before serving. They stay bright and do not bleed or soften during storage.
Plan for variety
Include one savory option and one that works without common allergens. Guests with different needs can still enjoy the spread.
Mummy Hot Dogs in Crescent Rolls
This recipe turns everyday hot dogs into a fun Halloween treat by wrapping them in strips of crescent roll dough. It works well for parties, school events, or casual family meals when you want something quick and themed without much fuss.
The finished mummies have a flaky golden crust on the outside and a savory, juicy hot dog inside. Small dots of mustard give them simple faces and add a light tangy flavor that pairs with the dough.


Equipment
- Baking sheet
- Knife
- Oven
Ingredients
- 8 hot dogs
- 1 package (8 oz) crescent roll dough
- 2 tablespoons yellow mustard
Instructions
- Preheat the oven to 375°F and line a baking sheet with parchment paper.
- Unroll the crescent roll dough on a flat surface and use a knife to cut it into thin strips about 1/2 inch wide.
- Wrap the dough strips around each hot dog in a crisscross pattern, leaving small gaps near the top for the face.
- Place the wrapped hot dogs on the prepared baking sheet and bake for 12 to 15 minutes until the dough is golden brown.
- Remove from the oven and let them cool for 2 minutes. Use a small amount of mustard to add two dots as eyes on each mummy.
Notes
Cuisine: American
Equipment: Baking sheet, Knife, Oven
Jack-O’-Lantern Stuffed Bell Peppers
These carved bell peppers bring a playful touch to Halloween meals. The orange peppers act as edible lanterns while the savory filling makes them a satisfying option for parties or weeknight dinners.
The finished dish offers soft roasted peppers with a hearty, cheesy center that holds its shape well on the plate.


Equipment
- Large skillet
- Baking dish
- Sharp knife
Ingredients
- 4 large orange bell peppers
- 1 tablespoon olive oil
- 1 small onion, finely diced
- 2 garlic cloves, minced
- 1 pound ground turkey
- 1 cup cooked white rice
- 1 (14 oz) can diced tomatoes, drained
- 1 teaspoon paprika
- 1/2 teaspoon salt
- 1/4 teaspoon black pepper
- 1 cup shredded cheddar cheese
Instructions
- Preheat the oven to 375°F. Slice the tops off each bell pepper and remove the seeds and membranes. Use a small knife to carve simple jack-o’-lantern faces into the sides of the peppers.
- Heat the olive oil in a large skillet over medium heat. Add the diced onion and cook for 3 minutes until it softens. Stir in the minced garlic and cook for 1 minute more.
- Add the ground turkey to the skillet. Cook, breaking it up with a spoon, until it is no longer pink. Stir in the cooked rice, drained diced tomatoes, paprika, salt, and black pepper. Cook for 2 minutes to combine.
- Remove the skillet from the heat and mix in half of the shredded cheddar cheese. Spoon the filling evenly into the carved bell peppers.
- Place the stuffed peppers in a baking dish. Sprinkle the remaining cheese over the tops. Bake for 25 minutes until the peppers are tender and the cheese is melted.
Notes
Cuisine: American
Equipment: Large skillet, Baking dish, Sharp knife
Ghostly White Chicken Lasagna
This white chicken lasagna keeps things simple with layers of tender noodles, shredded chicken, and a smooth cream sauce. The pale color gives it a fun ghostly look that fits right into a Halloween spread without any extra fuss.
It works well for family dinners or small parties where you want something hearty but not heavy on spice. The texture stays creamy from the cheese and sauce, while the chicken adds a mild savory note that pairs easily with the noodles.


Equipment
- Large Pot
- Saucepan
- Mixing Bowl
- 8×8 Baking Dish
Ingredients
- 8 lasagna noodles
- 2 cups cooked shredded chicken
- 3 tablespoons butter
- 3 tablespoons flour
- 2 cups milk
- 2 cloves garlic, minced
- 1 cup ricotta cheese
- 1 1/2 cups shredded mozzarella cheese
- 1/2 cup grated parmesan cheese
- Salt and pepper to taste
- Fresh parsley for garnish
Instructions
- Cook the lasagna noodles in a large pot of salted water until al dente. Drain and set aside.
- Melt the butter in a saucepan over medium heat. Add the minced garlic and cook for one minute until fragrant.
- Whisk in the flour and cook for another minute. Slowly pour in the milk while whisking to avoid lumps. Season with salt and pepper and stir until the sauce thickens.
- In a mixing bowl, combine the shredded chicken with the ricotta cheese and half of the parmesan.
- Spread a thin layer of the white sauce in the bottom of an 8×8 baking dish. Add a layer of noodles, then half the chicken mixture, followed by more sauce and a sprinkle of mozzarella.
- Repeat the layers once more, ending with noodles, remaining sauce, mozzarella, and the rest of the parmesan on top.
- Bake at 375 degrees for 25 minutes until the cheese is melted and lightly golden. Let it rest for five minutes before slicing.
- Garnish with fresh parsley before serving.
Notes
Cuisine: Italian
Equipment: Large Pot, Saucepan, Mixing Bowl, 8×8 Baking Dish
Witch’s Cauldron Beef Chili with Cornbread Dippers
This hearty beef chili comes together in one pot and pairs with warm cornbread pieces made for dipping. It suits Halloween parties or casual fall gatherings where guests want something filling and easy to share.
The chili has a thick texture with beans and tomatoes, while the cornbread adds a lightly sweet contrast that holds up well when dipped.


Equipment
- Large pot
- Mixing bowl
- 8-inch square pan
Ingredients
- 1 pound ground beef
- 1 medium onion, diced
- 2 garlic cloves, minced
- 1 can (15 oz) black beans, drained and rinsed
- 1 can (14.5 oz) diced tomatoes
- 2 tablespoons chili powder
- 1 teaspoon ground cumin
- 1 cup beef broth
- 1 cup cornmeal
- 1 cup all-purpose flour
- 1 tablespoon baking powder
- 1 cup milk
- 1 large egg
- 2 tablespoons melted butter
- 1/2 teaspoon salt
Instructions
- Brown the ground beef in a large pot over medium heat, breaking it up as it cooks. Add the diced onion and minced garlic, then cook until the onion softens.
- Stir in the chili powder and cumin. Cook for one minute to toast the spices. Add the black beans, diced tomatoes, and beef broth. Bring the mixture to a simmer and cook for 20 minutes, stirring now and then.
- While the chili simmers, heat the oven to 400°F. In a mixing bowl, combine the cornmeal, flour, baking powder, and salt. Whisk in the milk, egg, and melted butter until a batter forms.
- Pour the batter into a greased 8-inch square pan. Bake for 15 to 18 minutes until the top turns golden. Let the cornbread cool slightly, then cut it into strips for dipping.
Notes
Cuisine: American
Equipment: Large pot, Mixing bowl, 8-inch square pan
Spiderweb Black Bean Quesadillas
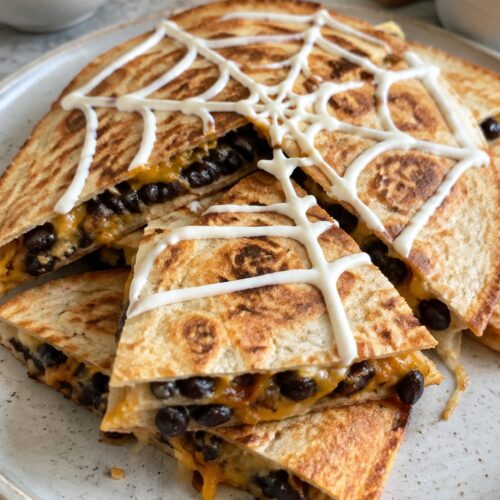
These Spiderweb Black Bean Quesadillas bring a simple Halloween detail to a familiar dish. Black beans and cheese fill the tortillas, which cook until crisp, while sour cream piped on top forms the web pattern. They suit casual parties or weeknight meals when you want something themed but still easy to eat by hand.
The result has a savory, lightly spiced filling with a creamy topping and crunchy edges. The black beans keep the inside hearty without needing extra meat.

Equipment
- Large skillet
- Mixing bowl
- Fork
- Spatula
- Zip-top bag
Ingredients
- 8 medium flour tortillas
- 1 (15 oz) can black beans, drained and rinsed
- 1 1/2 cups shredded cheddar cheese
- 2 teaspoons ground cumin
- 1 teaspoon chili powder
- 1/2 teaspoon salt
- 1/2 cup sour cream
- 1 tablespoon olive oil
Instructions
- Place the black beans in a mixing bowl and mash them with a fork until most are broken down but some chunks remain. Stir in the cumin, chili powder, and salt until evenly combined.
- Lay four tortillas on a work surface. Spread the bean mixture evenly over each one, then sprinkle the shredded cheddar cheese on top. Cover with the remaining four tortillas to form quesadillas.
- Heat the olive oil in a large skillet over medium heat. Cook each quesadilla for 2 to 3 minutes per side until the tortillas turn golden and the cheese melts. Work in batches if needed to avoid crowding the pan.
- Transfer the cooked quesadillas to a cutting board. Spoon the sour cream into a zip-top bag, snip off one corner, and pipe concentric circles on each quesadilla. Drag a knife from the center outward in several lines to create the web pattern. Slice and serve.
Notes
Cuisine: Mexican
Equipment: Large skillet, Mixing bowl, Fork, Spatula, Zip-top bag
Pumpkin-Shaped Cheese Ball with Crackers
This cheese ball adds a fun seasonal touch to any fall gathering. Shaped like a small pumpkin, it stands out on a snack table and gives guests something simple to spread on crackers.
The blend of cheddar and light herbs keeps the flavor savory without being heavy. It works well for casual parties or family get-togethers where finger foods are welcome.


Equipment
- Mixing Bowl
- Plastic Wrap
- Serving Plate
Ingredients
- 8 ounces cream cheese, softened
- 2 cups shredded cheddar cheese
- 1/4 cup chopped chives
- 1 teaspoon garlic powder
- 1/2 teaspoon salt
- 1 tablespoon paprika
- 1 pretzel stick
- Assorted crackers for serving
Instructions
- Place the softened cream cheese, shredded cheddar, chopped chives, garlic powder, and salt in a mixing bowl. Stir until the mixture is evenly combined and smooth.
- Lay a sheet of plastic wrap on the counter. Scoop the cheese mixture onto the wrap and form it into a round ball. Gently press the sides to create ridges that resemble a pumpkin.
- Sprinkle the paprika over the entire surface and roll the ball lightly so the coating sticks evenly.
- Insert the pretzel stick into the top center to act as the stem. Wrap the cheese ball again and chill it for at least 30 minutes to firm up.
- Unwrap and place the cheese ball on a serving plate with the assorted crackers arranged around it.
Notes
Cuisine: American
Equipment: Mixing Bowl, Plastic Wrap, Serving Plate
Bloody Mary Tomato Soup with Grilled Cheese Dippers
This soup brings the bold, tangy flavors of a classic Bloody Mary into a warm bowl of tomato soup. The spicy notes and hint of horseradish make it stand out at fall gatherings or Halloween parties where guests want something savory and a little different.
The grilled cheese dippers turn it into a fun, hands-on meal. They add a crispy, melty contrast that pairs well with the smooth soup.


Equipment
- Large pot
- Large skillet
Ingredients
- 2 cans (28 oz each) crushed tomatoes
- 2 cups vegetable broth
- 1/4 cup vodka
- 2 tbsp Worcestershire sauce
- 1 tbsp hot sauce
- 1 tsp celery salt
- 1 tsp prepared horseradish
- Juice of 1 lemon
- 8 slices white bread
- 8 slices cheddar cheese
- 4 tbsp butter
- 4 celery sticks
Instructions
- Combine the crushed tomatoes, vegetable broth, vodka, Worcestershire sauce, hot sauce, celery salt, horseradish, and lemon juice in a large pot. Stir well and bring to a simmer over medium heat. Cook for 15 minutes, stirring occasionally, until the flavors blend.
- While the soup simmers, assemble the sandwiches. Place two slices of cheddar cheese between two pieces of bread to make four sandwiches total.
- Heat a large skillet over medium heat. Spread butter on the outside of each sandwich. Cook two sandwiches at a time for 3 to 4 minutes per side until the bread is golden and the cheese melts.
- Remove the sandwiches from the skillet and cut each one into four strips to create dippers.
- Ladle the soup into bowls and serve with the grilled cheese dippers and a celery stick on the side.
Notes
Cuisine: American
Equipment: Large pot, Large skillet
Monster Green Deviled Eggs
These Monster Green Deviled Eggs bring a fun color twist to a classic party bite. The bright green filling stands out on any table and works well for Halloween gatherings or casual get-togethers with friends. The texture stays creamy while the flavor stays familiar with a light savory note.
This recipe serves 4 people. – 6 large eggs – 1 ripe avocado – 2 tablespoons mayonnaise – 1 teaspoon lime juice – 1/2 teaspoon garlic powder – 1/4 teaspoon salt – 1/4 teaspoon black pepper – 1/4 teaspoon paprika – 8 black olive slices
### Instructions 1. Place the eggs in a large pot and cover them with cold water. Bring the water to a boil over medium-high heat, then turn off the heat and let the eggs sit covered for 12 minutes. 2. Drain the hot water and move the eggs to a bowl of ice water. Let them cool for 5 minutes, then peel and slice each egg in half lengthwise. 3. Scoop the yolks into a mixing bowl and add the avocado, mayonnaise, lime juice, garlic powder, salt, and black pepper. Mash everything together until the mixture is smooth and evenly green. 4. Spoon or pipe the green filling back into the egg white halves. Sprinkle each egg with a pinch of paprika. 5. Top two eggs with black olive slices to create simple monster faces if desired. Serve right away.
### Extra Tips Mash the avocado right before mixing so the filling keeps its bright color. If the mixture seems too thick, add a tiny bit more mayonnaise. These eggs taste best the same day but can be stored covered in the fridge for up to one day.
Course: Appetizer Cuisine: American Equipment: Large pot, Mixing bowl, Knife

Serves 4 people.
Instructions
- Place the eggs in a large pot and cover them with cold water. Bring the water to a boil over medium-high heat, then turn off the heat and let the eggs sit covered for 12 minutes.
- Drain the hot water and move the eggs to a bowl of ice water. Let them cool for 5 minutes, then peel and slice each egg in half lengthwise.
- Scoop the yolks into a mixing bowl and add the avocado, mayonnaise, lime juice, garlic powder, salt, and black pepper. Mash everything together until the mixture is smooth and evenly green.
- Spoon or pipe the green filling back into the egg white halves. Sprinkle each egg with a pinch of paprika.
- Top two eggs with black olive slices to create simple monster faces if desired. Serve right away.
Extra Tips
Mash the avocado right before mixing so the filling keeps its bright color. If the mixture seems too thick, add a tiny bit more mayonnaise. These eggs taste best the same day but can be stored covered in the fridge for up to one day.Course: Appetizer Cuisine: American Equipment: Large pot, Mixing bowl, Knife
Caramel Apple Nachos with Pretzel Broomsticks
These caramel apple nachos turn fresh apple slices into a shareable treat that feels festive without extra effort. The mix of crisp fruit, warm caramel, and crunchy pretzels works well for Halloween parties, fall gatherings, or any casual get-together where guests want something sweet and easy to pick up.
The flavor balances tart apple with rich caramel and a salty crunch from the pretzels. Texture comes from the firm apple slices against the smooth sauce and the snap of the broomstick handles.


Equipment
- Sharp knife
- Microwave-safe bowl
- Serving platter
Ingredients
- 4 medium apples
- ½ cup caramel sauce
- 20 pretzel sticks
- ¼ cup mini chocolate chips
- 2 tablespoons chopped pecans
- 1 tablespoon Halloween sprinkles
Instructions
- Core the apples and cut them into thin wedges. Arrange the slices in a single overlapping layer on a large serving platter.
- Warm the caramel sauce in a microwave-safe bowl for 20 seconds, then drizzle it evenly over the apple slices.
- Scatter the mini chocolate chips and chopped pecans across the top.
- Sprinkle the Halloween sprinkles over everything for color.
- Place the pretzel sticks along one edge of the platter to stand in as broomsticks.
Notes
Cuisine: American
Equipment: Sharp knife, Microwave-safe bowl, Serving platter
Vampire Bat Chicken Wings with Blue Cheese Dip
These chicken wings bring a fun Halloween touch to any party spread. The dark seasoning gives them a bold look that fits the theme, while the wings stay crispy on the outside and juicy inside. The cool blue cheese dip balances the spice with a creamy, tangy finish that works well for casual gatherings or themed dinners.
This recipe serves 4 people.
– 2 pounds chicken wings, split into drumettes and flats – 2 tablespoons olive oil – 1 tablespoon smoked paprika – 1 teaspoon garlic powder – 1 teaspoon salt – 1/2 teaspoon black pepper – 1 cup blue cheese crumbles – 1/2 cup sour cream – 1/4 cup mayonnaise – 1 tablespoon fresh lemon juice – 1 teaspoon Dijon mustard
### Instructions 1. Preheat the oven to 400 degrees F and line a baking sheet with parchment paper. 2. Place the chicken wings in a large bowl and toss them with the olive oil until evenly coated. 3. Sprinkle the smoked paprika, garlic powder, salt, and black pepper over the wings, then mix until every piece is seasoned. 4. Spread the wings in a single layer on the prepared baking sheet. 5. Bake for 40 to 45 minutes, turning once halfway through, until the skin is crisp and the meat is cooked through. 6. While the wings bake, combine the blue cheese crumbles, sour cream, mayonnaise, lemon juice, and Dijon mustard in a medium bowl. Stir until the mixture is smooth but still chunky. 7. Remove the wings from the oven and let them rest for 5 minutes before serving with the blue cheese dip on the side.
### Extra Tips Arrange the cooked wings on a dark platter with the flats positioned to look like bat wings for a quick visual effect. If you want less heat, reduce the smoked paprika by half and add an extra pinch of salt. Leftovers keep in an airtight container in the fridge for up to three days and reheat best in a 350 degree F oven for 10 minutes to restore crispness.
Course: Appetizer Cuisine: American Equipment: Baking sheet, Large bowl, Medium bowl

Serves 4 people.
Instructions
- Preheat the oven to 400 degrees F and line a baking sheet with parchment paper.
- Place the chicken wings in a large bowl and toss them with the olive oil until evenly coated.
- Sprinkle the smoked paprika, garlic powder, salt, and black pepper over the wings, then mix until every piece is seasoned.
- Spread the wings in a single layer on the prepared baking sheet.
- Bake for 40 to 45 minutes, turning once halfway through, until the skin is crisp and the meat is cooked through.
- While the wings bake, combine the blue cheese crumbles, sour cream, mayonnaise, lemon juice, and Dijon mustard in a medium bowl. Stir until the mixture is smooth but still chunky.
- Remove the wings from the oven and let them rest for 5 minutes before serving with the blue cheese dip on the side.
Extra Tips
Arrange the cooked wings on a dark platter with the flats positioned to look like bat wings for a quick visual effect. If you want less heat, reduce the smoked paprika by half and add an extra pinch of salt. Leftovers keep in an airtight container in the fridge for up to three days and reheat best in a 350 degree F oven for 10 minutes to restore crispness.Course: Appetizer Cuisine: American Equipment: Baking sheet, Large bowl, Medium bowl
Graveyard Taco Salad with Tortilla Chip Tombstones
This graveyard taco salad brings a playful Halloween touch to a familiar favorite. The base is a hearty taco salad that feels satisfying for a crowd, while the tortilla chip tombstones turn the dish into a simple themed centerpiece for parties or family dinners.
The mix delivers classic taco flavors with seasoned beef, crisp lettuce, and fresh toppings. The chips stay crunchy on top, and a bit of sour cream lets you add quick details that make the tombstones stand out.


Equipment
- Large skillet
- Mixing bowl
- Serving dish
Ingredients
- 1 pound ground beef
- 2 tablespoons taco seasoning
- 6 cups chopped romaine lettuce
- 2 large tomatoes, diced
- 1 can (15 oz) black beans, drained and rinsed
- 1 1/2 cups shredded cheddar cheese
- 1 cup salsa
- 20-24 sturdy tortilla chips
- 1/2 cup sour cream
Instructions
- Cook the ground beef in a large skillet over medium heat until browned. Drain excess fat, stir in the taco seasoning, and cook for 2 more minutes until the meat is evenly coated. Set aside to cool slightly.
- In a large mixing bowl, combine the romaine lettuce, diced tomatoes, black beans, and 1 cup of the shredded cheddar cheese. Add the cooled beef and toss gently to distribute everything.
- Spoon the salsa over the salad and toss once more so the flavors blend without making the lettuce soggy.
- Transfer the salad to a serving dish. Select 8 to 10 of the sturdiest tortilla chips to use as tombstones. Pipe or spread a small amount of sour cream on each chip to create simple “RIP” letters or crosses.
- Insert the decorated chips upright into the salad so they stand like gravestones. Sprinkle the remaining cheddar cheese over the top to resemble loose dirt around the base of the chips.
Notes
Cuisine: Mexican
Equipment: Large skillet, Mixing bowl, Serving dish
