

One pot meals help when you want comfort food without spending extra time on dishes.
These recipes use simple ingredients that cook together in one pan or pot.
You can make them on busy weeknights or slower weekends at home.
Each idea focuses on hearty flavors with minimal cleanup at the end.
Helpful Tips Before You Start
A little prep work upfront keeps these one-pot comfort meals simple and the cleanup even lighter.
Gather and Prep Ingredients First
Chop all vegetables and measure spices before heating the pot. This way you can add everything in sequence without extra bowls or pauses.
Pick the Right Pot Size
Use a pot that gives ingredients room to simmer without crowding. Too small leads to uneven cooking and more stuck bits on the bottom.
Brown in Batches if Needed
Cook meat or aromatics in small portions at the start. It builds flavor in the same pot and avoids steaming everything at once.
Skip Extra Dishes for Garnishes
Keep toppings like cheese or herbs in small prep bowls you can reuse later. This cuts down on washing while still adding fresh finishes at the table.
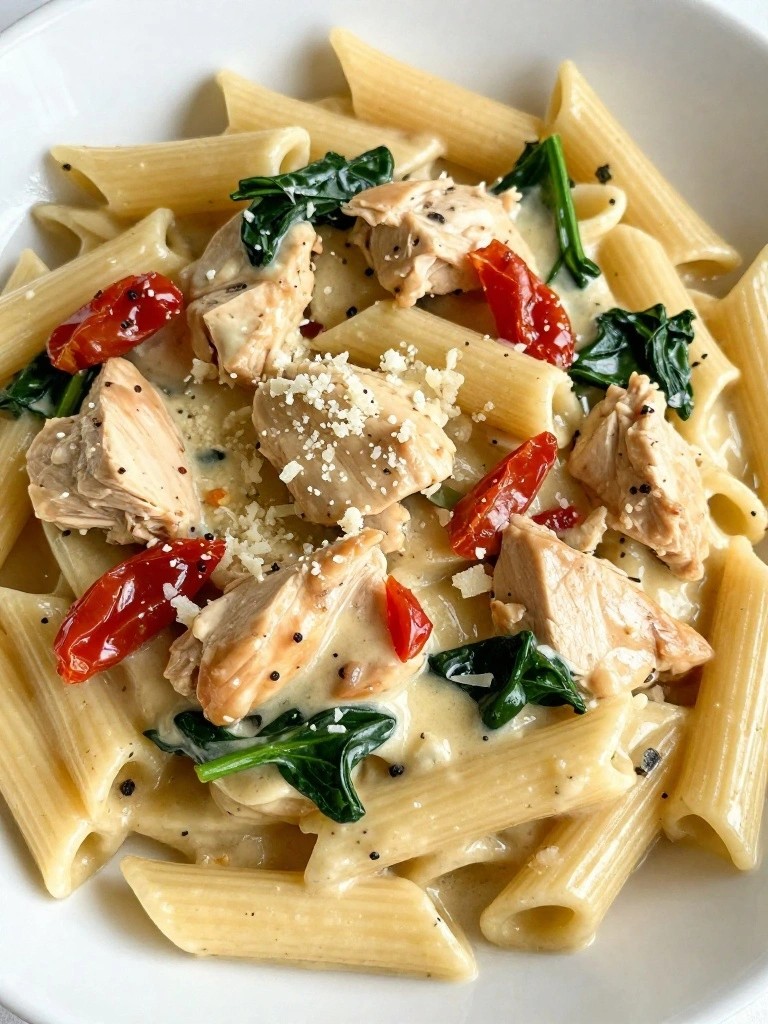
One-Pot Creamy Tuscan Chicken Pasta
This one-pot meal brings together tender chicken, pasta, and a rich cream sauce with sun-dried tomatoes and spinach. It works well on busy weeknights when you want a full dinner without multiple pans or long cleanup.
The result is a creamy dish with savory garlic notes, a bit of tang from the tomatoes, and fresh green flecks from the spinach. Everything cooks together so the pasta absorbs the flavors of the broth and cream.

Equipment
- Large Pot
- Wooden Spoon
- Knife
- Cutting Board
Ingredients
- 1 lb boneless skinless chicken breast, cut into bite-sized pieces
- 8 oz penne pasta
- 2 tbsp olive oil
- 3 cloves garlic, minced
- 1 tsp Italian seasoning
- 1 1/2 cups chicken broth
- 1 cup heavy cream
- 1/2 cup grated Parmesan cheese
- 1/2 cup sun-dried tomatoes, chopped
- 2 cups fresh spinach
- Salt and black pepper to taste
Instructions
- Heat the olive oil in a large pot over medium heat. Add the chicken pieces and season with salt and pepper. Cook until the chicken is lightly browned on all sides.
- Stir in the minced garlic and Italian seasoning. Cook for about 30 seconds until the garlic becomes fragrant.
- Pour in the chicken broth and heavy cream. Add the penne pasta and bring the mixture to a gentle simmer.
- Cover the pot and cook for 12 to 15 minutes, stirring occasionally, until the pasta is tender and most of the liquid has been absorbed.
- Remove the pot from the heat. Stir in the Parmesan cheese, sun-dried tomatoes, and fresh spinach until the spinach wilts and everything is evenly combined.
Notes
Cuisine: Italian
Equipment: Large Pot, Wooden Spoon, Knife, Cutting Board
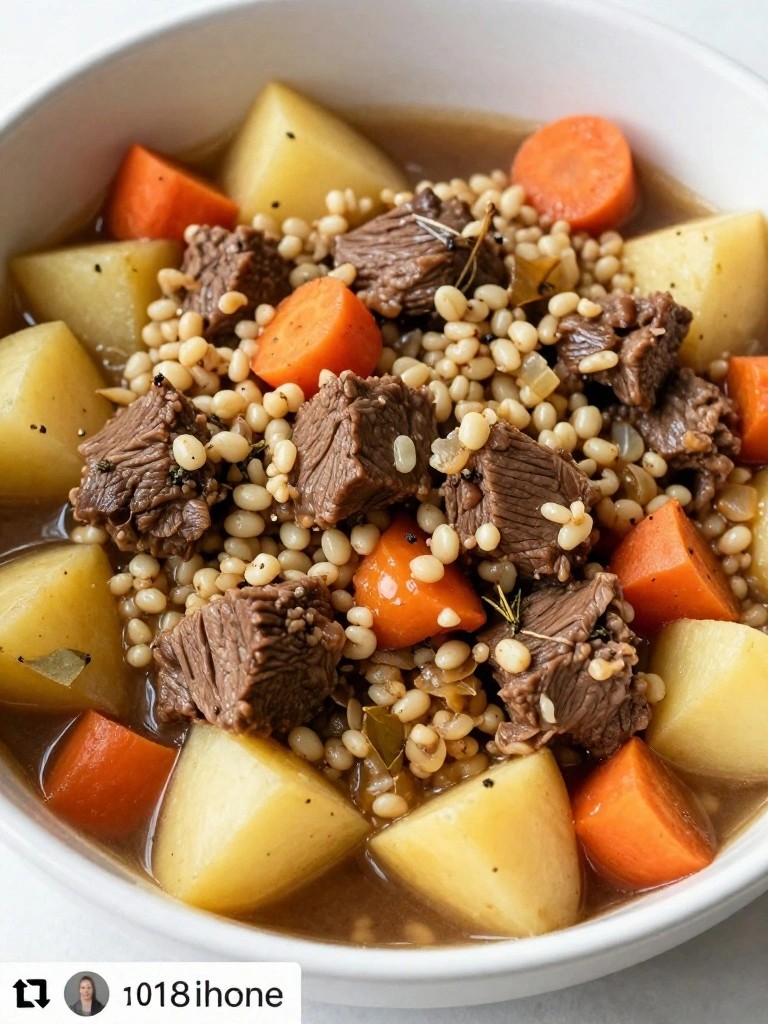
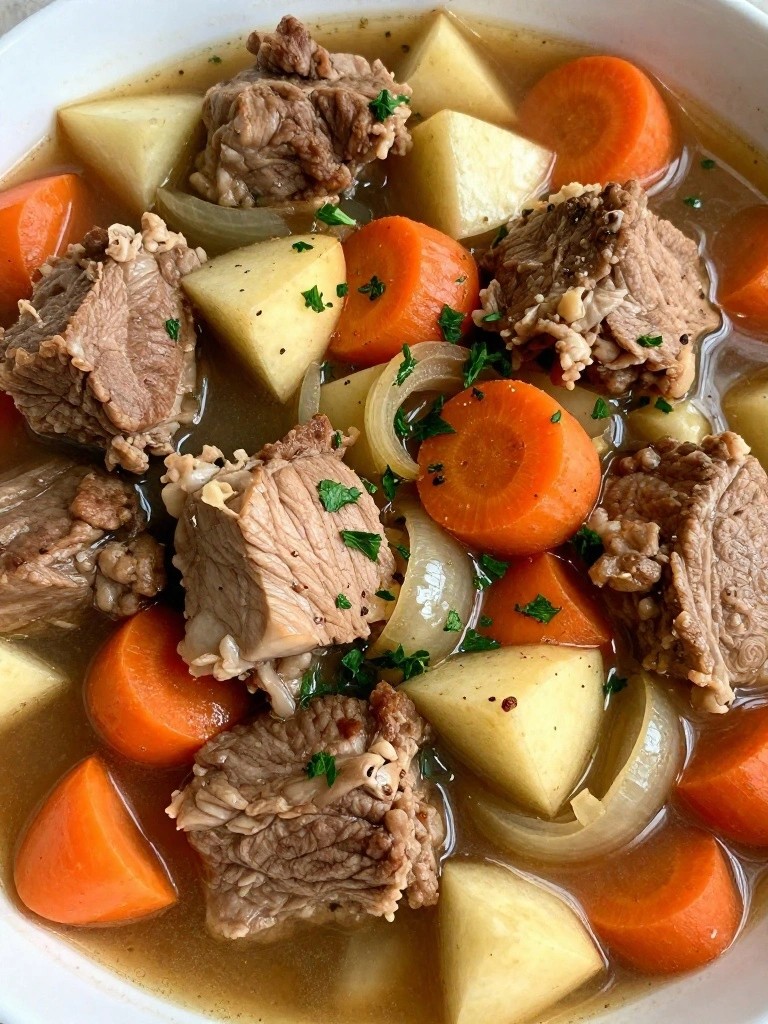
Hearty Beef Barley Stew with Root Vegetables
This stew brings together tender chunks of beef, chewy barley, and sweet root vegetables in a single pot. It works well on cold evenings when you want a filling meal that does not require much hands-on time or extra dishes.
The broth turns rich and savory as everything simmers together, while the barley gives the stew a pleasant texture that feels substantial without being heavy.

Equipment
- Large pot
- knife
- cutting board
Ingredients
- 1 pound beef stew meat, cut into bite-sized pieces
- 2 tablespoons olive oil
- 1 large onion, diced
- 3 carrots, peeled and sliced
- 2 parsnips, peeled and sliced
- 2 potatoes, cubed
- 3/4 cup pearl barley
- 6 cups beef broth
- 2 bay leaves
- 1 teaspoon dried thyme
- Salt and pepper to taste
Instructions
- Heat the olive oil in a large pot over medium heat. Add the beef and cook until it browns on all sides.
- Add the onion, carrots, and parsnips to the pot. Stir and cook for a few minutes until the onion softens.
- Stir in the potatoes, barley, beef broth, bay leaves, and thyme.
- Bring the mixture to a boil, then lower the heat and let it simmer uncovered for about 45 minutes. Stir occasionally until the barley is tender and the beef is cooked through.
- Taste and add salt and pepper as needed. Remove the bay leaves before serving.
Notes
Cuisine: American
Equipment: Large pot, knife, cutting board
One-Pot Sausage Jambalaya with Shrimp
This one-pot jambalaya brings together smoky sausage and tender shrimp with classic Cajun flavors in a single pot. It works well for busy weeknights when you want a hearty meal without multiple pans to wash. The rice absorbs the seasoned broth while the vegetables stay tender, creating a balanced dish with a bit of spice and plenty of comfort.
The finished result has fluffy rice, juicy shrimp, and slices of sausage in a lightly tomato-based sauce. It comes together with basic pantry items and stays satisfying on cooler evenings.


Equipment
- Large pot
- Cutting board
- Knife
Ingredients
- 12 ounces smoked sausage, sliced into rounds
- 1 pound large shrimp, peeled and deveined
- 1 cup long-grain white rice
- 1 medium onion, diced
- 1 green bell pepper, diced
- 2 celery stalks, diced
- 3 garlic cloves, minced
- 1 can (14.5 ounces) diced tomatoes with juice
- 2 cups chicken broth
- 1 tablespoon Cajun seasoning
- 2 green onions, sliced
- Salt and black pepper to taste
Instructions
- Heat a large pot over medium heat and add the sliced sausage. Cook for 5 minutes until the edges brown and some fat renders out.
- Add the onion, green bell pepper, and celery to the pot. Stir and cook for 4 minutes until the vegetables soften. Stir in the garlic and cook for 1 minute more.
- Add the rice, diced tomatoes with their juice, chicken broth, and Cajun seasoning. Stir to combine and bring the mixture to a simmer. Cover the pot, reduce the heat to low, and cook for 20 minutes until the rice is tender and most of the liquid is absorbed.
- Scatter the shrimp over the top of the rice. Cover again and cook for 5 minutes until the shrimp turn pink and opaque. Remove the pot from the heat and let it rest for 3 minutes. Stir gently, taste, and add salt or black pepper if needed. Sprinkle the green onions over the top before serving.
Notes
Cuisine: Cajun
Equipment: Large pot, Cutting board, Knife
Cheesy Broccoli Cheddar Orzo Bake
This one-pot meal brings together tender orzo, fresh broccoli, and plenty of melted cheddar for a simple dinner that feels like a hug in a bowl. It comes together with minimal dishes, making it a reliable choice for busy weeknights when you want comfort without the extra cleanup.
The finished dish has a creamy texture with just enough chew from the pasta and soft bites of broccoli throughout. The sharp cheddar gives it a rich, savory flavor that pairs well with the mild vegetables.


Equipment
- Large oven-safe pot
- Wooden spoon
- Measuring cups
Ingredients
- 2 tablespoons butter
- 1 small onion, diced
- 2 cloves garlic, minced
- 1 cup orzo pasta
- 3 cups chicken broth
- 3 cups broccoli florets
- 1 1/2 cups shredded cheddar cheese
- 1/2 cup milk
- 1/2 teaspoon salt
- 1/4 teaspoon black pepper
Instructions
- Preheat the oven to 375 degrees. In a large oven-safe pot or Dutch oven, melt the butter over medium heat on the stovetop.
- Add the diced onion and cook for 3 minutes until it softens. Stir in the minced garlic and cook for 1 minute more.
- Add the orzo and stir to coat it in the butter. Pour in the chicken broth and bring the mixture to a boil.
- Reduce the heat to a simmer, cover the pot, and cook for 8 minutes, stirring once halfway through.
- Stir in the broccoli florets, salt, and pepper. Cover and cook for 4 more minutes until the broccoli is tender.
- Remove the pot from the heat and stir in the milk and 1 cup of the shredded cheddar until the cheese melts and the mixture turns creamy.
- Sprinkle the remaining 1/2 cup of cheddar evenly over the top. Transfer the pot to the oven and bake uncovered for 10 minutes until the cheese is bubbly and lightly golden.
Notes
Cuisine: American
Equipment: Large oven-safe pot, Wooden spoon, Measuring cups
Lemon Garlic Chicken and Rice Skillet
This one-skillet meal brings together tender pieces of chicken and fluffy rice cooked in a bright lemon garlic sauce. It comes together in a single pan, making it a good choice for weeknight dinners when you want something warm and satisfying without a pile of dishes afterward.
The flavors stay simple and balanced, with savory garlic and fresh lemon cutting through the richness of the chicken and rice. It works well for family meals or for making a few portions to enjoy later in the week.


Equipment
- Large Skillet with Lid
- Knife
- Cutting Board
Ingredients
- 1 pound boneless skinless chicken thighs, cut into bite-sized pieces
- 1 tablespoon olive oil
- 1 small onion, diced
- 4 garlic cloves, minced
- 1 cup long-grain white rice
- 2 cups chicken broth
- Zest and juice of 1 large lemon
- 1 teaspoon dried thyme
- 1/2 teaspoon salt
- 1/4 teaspoon black pepper
- 2 tablespoons chopped fresh parsley
Instructions
- Heat the olive oil in a large skillet over medium heat. Add the chicken pieces and cook until lightly browned on all sides, about 5 minutes.
- Add the diced onion and minced garlic to the skillet. Stir and cook for 2 minutes until the onion softens.
- Stir in the rice and let it toast for 1 minute while mixing with the chicken and aromatics.
- Pour in the chicken broth, lemon zest, lemon juice, dried thyme, salt, and black pepper. Stir once to combine everything evenly.
- Bring the mixture to a low boil, then reduce the heat to a simmer. Cover the skillet and cook for 18 to 20 minutes until the rice is tender and the liquid is absorbed.
- Remove the skillet from the heat and let it sit covered for 5 minutes. Fluff the rice with a fork and sprinkle with fresh parsley before serving.
Notes
Cuisine: American
Equipment: Large Skillet with Lid, Knife, Cutting Board
Spicy Three-Bean Chili with Cornbread Topping
This one-pot chili brings together three kinds of beans in a spicy tomato base. The cornbread batter goes right on top and bakes into a golden crust, so you get both the hearty filling and the soft topping without extra pans.
It works well for busy weeknights when you want a filling meal with little cleanup. The flavor is bold and smoky with a steady heat that builds, while the cornbread adds a mild sweetness that balances the spice.


Equipment
- Large oven-safe pot
- Mixing bowls
Ingredients
- 1 tablespoon olive oil
- 1 medium onion, diced
- 2 cloves garlic, minced
- 1 green bell pepper, diced
- 1 can (15 oz) black beans, drained and rinsed
- 1 can (15 oz) kidney beans, drained and rinsed
- 1 can (15 oz) pinto beans, drained and rinsed
- 1 can (14.5 oz) fire-roasted diced tomatoes
- 2 tablespoons chili powder
- 1 teaspoon ground cumin
- 1/2 teaspoon cayenne pepper
- 1/2 teaspoon salt
- 1 cup cornmeal
- 1/2 cup all-purpose flour
- 1 tablespoon sugar
- 2 teaspoons baking powder
- 3/4 cup milk
- 1 large egg
- 2 tablespoons butter, melted
Instructions
- Heat the olive oil in a large oven-safe pot over medium heat. Add the onion, garlic, and bell pepper. Cook for 5 minutes until the vegetables soften.
- Stir in the chili powder, cumin, cayenne, and salt. Cook for 1 minute until the spices smell fragrant.
- Add the black beans, kidney beans, pinto beans, and diced tomatoes. Bring the mixture to a gentle simmer and cook for 10 minutes, stirring now and then.
- While the chili simmers, mix the cornmeal, flour, sugar, and baking powder in a bowl. In a separate bowl, whisk the milk, egg, and melted butter together. Combine the wet and dry ingredients until just mixed.
- Drop spoonfuls of the cornbread batter over the simmering chili. Use the back of a spoon to spread it into an even layer.
- Transfer the pot to a 400°F oven and bake for 20 minutes until the cornbread is golden and a toothpick inserted in the center comes out clean.
Notes
Cuisine: American
Equipment: Large oven-safe pot, Mixing bowls
One-Pot Bacon Macaroni and Cheese
This one-pot bacon macaroni and cheese turns a few basic ingredients into a hearty meal with almost no cleanup. It works well on weeknights when you want something filling and familiar but do not have time for multiple pots or a long sink session.
The finished dish gives you tender pasta in a light cheese sauce with smoky bacon pieces mixed in. The bacon adds a savory crunch that balances the creamy texture without overpowering it.


Equipment
- Large Pot
- Wooden Spoon
- Measuring Cups
Ingredients
- 6 slices bacon, chopped
- 8 ounces elbow macaroni
- 2 1/2 cups milk
- 1 1/2 cups water
- 2 cups shredded sharp cheddar cheese
- 1/2 teaspoon garlic powder
- Salt and black pepper to taste
Instructions
- Place a large pot over medium heat and add the chopped bacon. Cook until the bacon is crisp, then remove it with a slotted spoon and set it aside, leaving the fat in the pot.
- Add the macaroni, milk, water, garlic powder, salt, and pepper to the pot. Stir to combine and bring the mixture to a gentle simmer.
- Cook for 10 to 12 minutes, stirring often, until the macaroni is tender and most of the liquid has been absorbed.
- Remove the pot from the heat and stir in the shredded cheddar until the sauce is smooth and creamy.
- Return the cooked bacon to the pot and stir it through the macaroni before serving.
Notes
Cuisine: American
Equipment: Large Pot, Wooden Spoon, Measuring Cups
Thai Coconut Curry Beef and Noodles
This one pot meal brings tender beef and rice noodles together in a creamy coconut curry sauce. It works well on busy weeknights when you want a warm bowl of comfort without a pile of dishes at the end. The flavors lean savory and lightly sweet with a gentle spice that builds as you eat.
The texture stays hearty from the beef and soft noodles while the sauce coats everything evenly. It feels like takeout made simple at home.


Equipment
- Large Pot
Ingredients
- 1 lb beef sirloin, thinly sliced
- 8 oz rice noodles
- 1 can (14 oz) coconut milk
- 3 tbsp red curry paste
- 1 onion, thinly sliced
- 3 garlic cloves, minced
- 1 tbsp fresh ginger, grated
- 1 red bell pepper, sliced
- 2 tbsp fish sauce
- 1 tbsp brown sugar
- 1 cup beef broth
- Juice of 1 lime
- Fresh cilantro, for garnish
Instructions
- Heat a large pot over medium high heat. Add the sliced beef and cook until browned on both sides. Remove the beef and set it aside.
- Add the onion, garlic, and ginger to the same pot. Cook for two minutes until fragrant. Stir in the red curry paste and let it cook for one minute.
- Pour in the coconut milk and beef broth. Add the fish sauce and brown sugar. Bring the mixture to a simmer.
- Add the rice noodles and red bell pepper. Stir gently so the noodles soften in the sauce. Cook for five to seven minutes until the noodles are tender.
- Return the beef to the pot. Stir in the lime juice and let everything warm through for two minutes.
- Serve in bowls topped with fresh cilantro.
Notes
Cuisine: Thai
Equipment: Large Pot
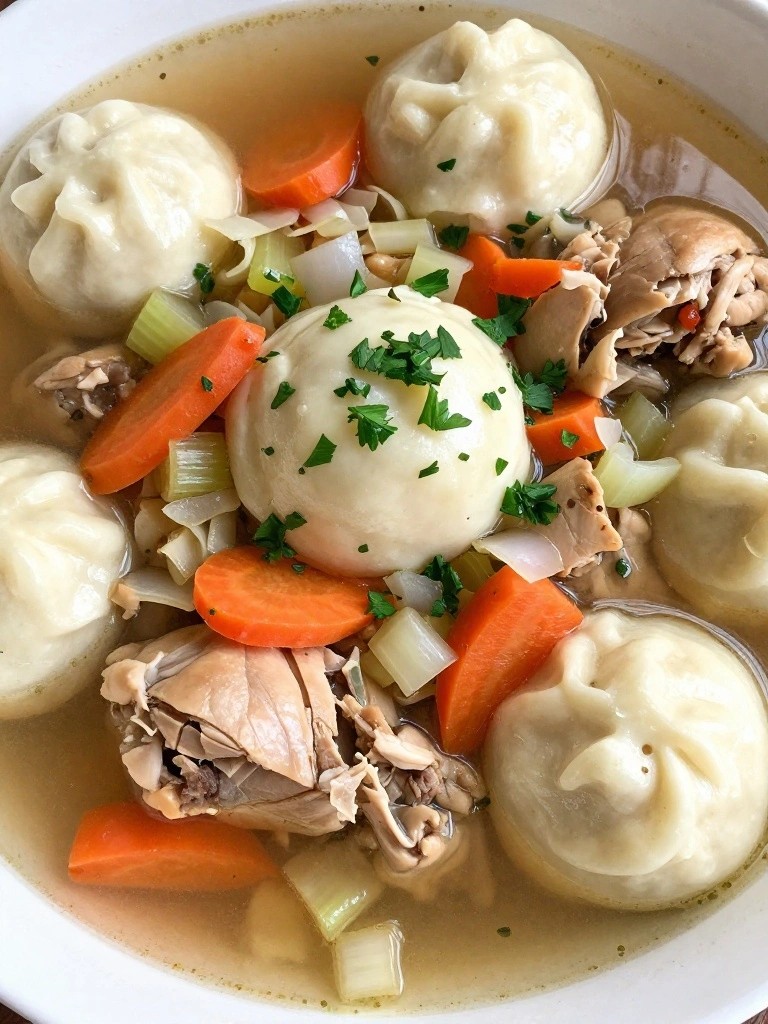
Classic Chicken and Dumplings
This one-pot chicken and dumplings brings tender chicken and vegetables together in a savory broth with soft, pillowy dumplings on top. It works well on busy weeknights or relaxed weekends when you want a filling meal without juggling multiple pans. The result is a thick, comforting stew with simple flavors that feel familiar and satisfying.
The dish keeps cleanup easy since everything cooks in the same pot from start to finish. Chicken thighs stay moist during simmering while the dumplings steam gently on the surface.

Equipment
- Dutch Oven
- Mixing Bowl
- Knife
Ingredients
- 2 tablespoons olive oil
- 1 pound boneless skinless chicken thighs, cut into bite-size pieces
- 1 medium onion, diced
- 3 carrots, sliced
- 2 celery stalks, chopped
- 4 cups chicken broth
- 1 teaspoon dried thyme
- 1 teaspoon salt
- 1/2 teaspoon black pepper
- 1 cup all-purpose flour
- 2 teaspoons baking powder
- 1/2 cup milk
- 2 tablespoons chopped fresh parsley
Instructions
- Heat the olive oil in a large Dutch oven over medium heat. Add the chicken pieces and cook until lightly browned on all sides.
- Stir in the onion, carrots, and celery. Cook for 5 minutes until the vegetables begin to soften.
- Pour in the chicken broth and add the thyme, salt, and pepper. Bring the mixture to a simmer and let it cook for 15 minutes.
- While the broth simmers, stir together the flour, baking powder, and milk in a bowl to form a thick dumpling batter.
- Drop spoonfuls of the batter directly into the simmering broth. Cover the pot and cook for 12 minutes without lifting the lid so the dumplings steam through.
- Remove the pot from the heat and sprinkle the chopped parsley over the top before serving.
Notes
Cuisine: American
Equipment: Dutch Oven, Mixing Bowl, Knife
Mushroom Stroganoff with Egg Noodles
This one-pot Mushroom Stroganoff with Egg Noodles delivers creamy comfort with earthy mushrooms and tender noodles in a single vessel. It comes together quickly and leaves you with almost no cleanup afterward.
The dish tastes rich and savory with a light tang from sour cream and a touch of warmth from paprika. It suits chilly evenings or simple weeknight dinners when you want something filling without extra pots.


Equipment
- Large Pot
- Wooden Spoon
Ingredients
- 2 tablespoons butter
- 1 medium onion, chopped
- 3 cloves garlic, minced
- 16 ounces cremini mushrooms, sliced
- 1 teaspoon paprika
- 4 cups vegetable broth
- 8 ounces egg noodles
- 1 cup sour cream
- Salt and pepper to taste
- 2 tablespoons fresh parsley, chopped
Instructions
- Melt the butter in a large pot over medium heat. Add the onion and garlic and cook for 3 minutes until the onion softens.
- Stir in the mushrooms and paprika. Cook for 6 minutes until the mushrooms turn golden and release their liquid.
- Pour in the vegetable broth and bring the mixture to a boil. Add the egg noodles and stir to submerge them.
- Reduce heat to medium-low and simmer for 8 minutes, stirring now and then, until the noodles are tender and most of the liquid is absorbed.
- Remove the pot from the heat. Stir in the sour cream until the sauce turns smooth and creamy. Season with salt and pepper.
- Sprinkle with fresh parsley before serving.
Notes
Cuisine: American
Equipment: Large Pot, Wooden Spoon
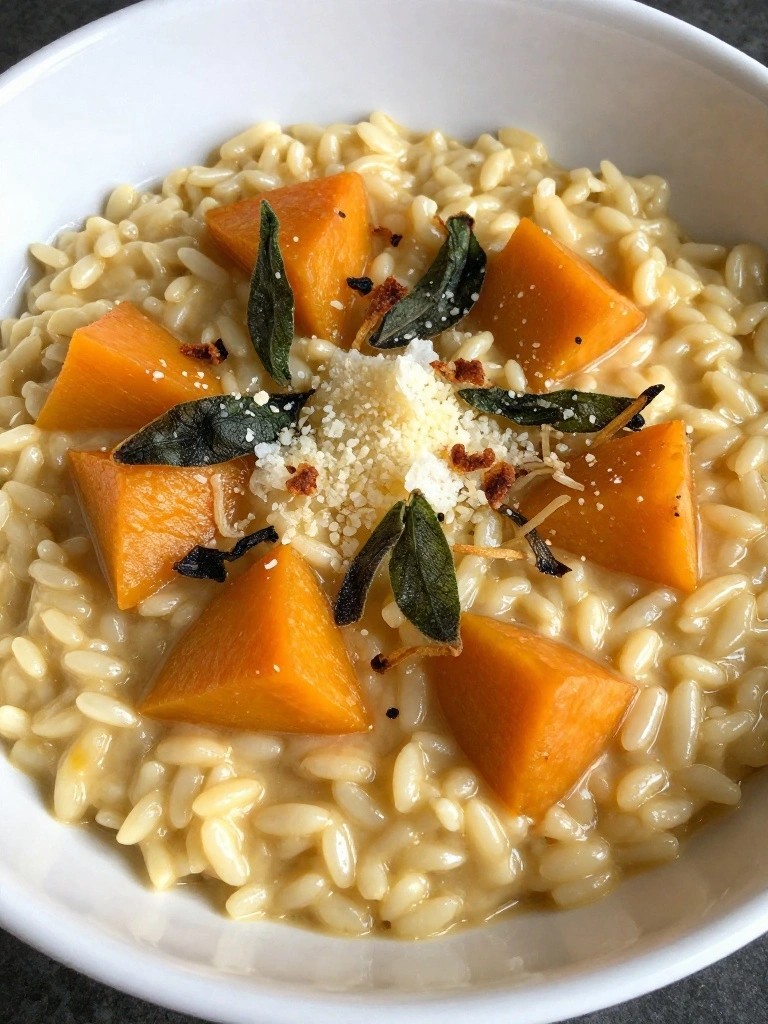
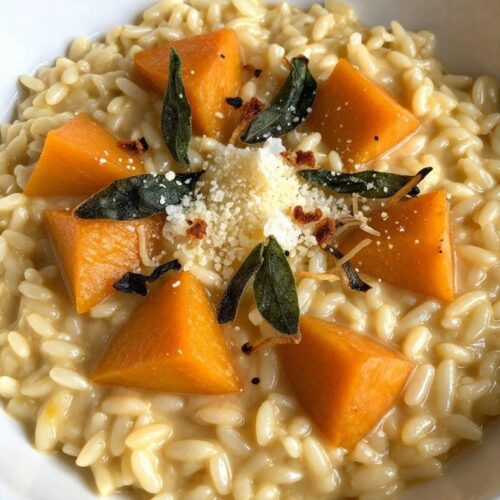
Butternut Squash Risotto with Crispy Sage
This butternut squash risotto comes together in a single pot for an easy weeknight meal. It works well on cool evenings when you want something warm and filling without a stack of dishes at the end. The rice turns creamy while the squash adds natural sweetness, and the fried sage leaves give a light crunch that balances each bite.
The finished dish has a smooth texture with savory depth from the cheese and broth. It makes a satisfying main course on its own or pairs nicely with a simple green salad on the side.
Equipment
- Large Pot
- Wooden Spoon
- Ladle
Ingredients
- 1 medium butternut squash, peeled and cut into 1/2-inch cubes
- 1 1/2 cups Arborio rice
- 4 cups vegetable broth, warmed
- 1 small onion, diced
- 2 garlic cloves, minced
- 20 fresh sage leaves
- 1/2 cup grated Parmesan cheese
- 3 tablespoons butter
- 1/2 teaspoon salt
- 1/4 teaspoon black pepper
Instructions
- Melt 1 tablespoon of butter in a large pot over medium heat. Add the sage leaves and cook for 1 to 2 minutes until crisp. Remove the leaves with a slotted spoon and set them aside on a paper towel.
- Add the diced onion to the same pot and cook for 3 minutes until softened. Stir in the garlic and cook for 30 seconds more.
- Add the cubed butternut squash and cook for 5 minutes, stirring occasionally. Stir in the Arborio rice and cook for 1 minute to toast it lightly.
- Pour in 1 cup of the warmed broth and stir until mostly absorbed. Continue adding broth 1/2 cup at a time, stirring often, until the rice is tender and creamy, about 20 minutes total.
- Remove the pot from the heat. Stir in the remaining 2 tablespoons of butter, the Parmesan cheese, salt, and pepper until well combined.
- Divide the risotto among bowls and top each serving with the crispy sage leaves.
Notes
Cuisine: Italian
Equipment: Large Pot, Wooden Spoon, Ladle
Smoky Pork and Apple Cider Stew
This one-pot stew brings together tender pork and the natural sweetness of apple cider for a comforting meal that feels special without extra work. It works well on busy weeknights or relaxed weekends when you want something warm and filling with minimal cleanup afterward.
The dish has a balanced smoky flavor from paprika that pairs nicely with the bright notes of cider and soft chunks of apple. The result is a thick, savory stew with tender meat and vegetables that hold their shape.

Equipment
- Large Dutch oven
- Wooden spoon
- Knife
Ingredients
- 1.5 pounds pork shoulder, cut into 1-inch cubes
- 2 tablespoons olive oil
- 1 large onion, diced
- 3 cloves garlic, minced
- 2 carrots, sliced into rounds
- 2 apples, peeled and cut into chunks
- 2 teaspoons smoked paprika
- 2 cups apple cider
- 3 cups chicken broth
- 1 teaspoon dried thyme
- 1 teaspoon salt
- 1/2 teaspoon black pepper
- 2 tablespoons chopped fresh parsley, for serving
Instructions
- Heat the olive oil in a large Dutch oven over medium-high heat. Add the pork cubes and cook until browned on all sides, about 6 to 8 minutes. Remove the pork to a plate and set aside.
- Add the onion and carrots to the same pot. Cook for 4 minutes until the onion starts to soften. Stir in the garlic and cook for 1 minute more.
- Return the pork to the pot. Sprinkle in the smoked paprika and stir to coat everything evenly. Pour in the apple cider and chicken broth. Add the apple chunks, thyme, salt, and pepper.
- Bring the mixture to a boil, then reduce the heat to low. Cover and simmer for 45 minutes, stirring occasionally, until the pork is tender and the stew has thickened slightly.
- Ladle into bowls and top with fresh parsley before serving.
Notes
Cuisine: American
Equipment: Large Dutch oven, Wooden spoon, Knife
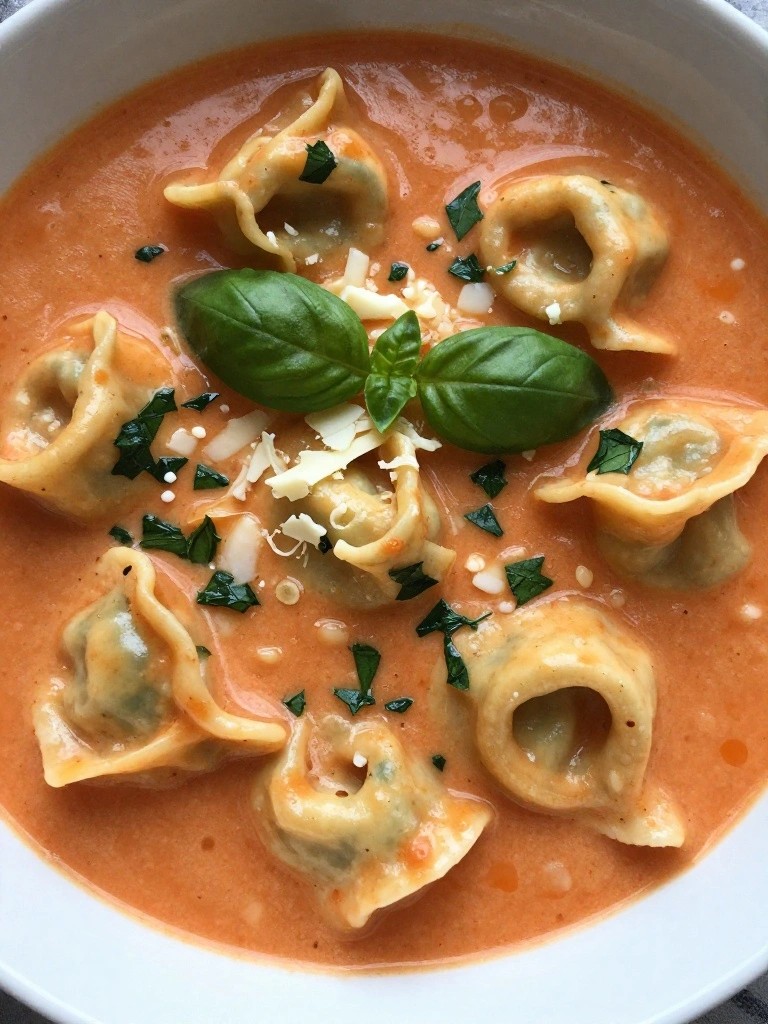
Creamy Tomato Basil Tortellini Soup
This one-pot soup brings together tender cheese tortellini and a rich tomato broth for an easy weeknight meal. The cream adds body while fresh basil keeps the flavor bright and balanced. It works well on busy evenings or chilly days when you want something warm without multiple pots to wash.
The finished soup has a smooth tomato base with soft pasta bites and subtle herb notes. Everything cooks in a single pot, which keeps cleanup simple while still delivering a satisfying bowl.

Equipment
- Large Pot
- Wooden Spoon
- Ladle
Ingredients
- 1 tablespoon olive oil
- 1 small onion, diced
- 3 cloves garlic, minced
- 1 (28-ounce) can crushed tomatoes
- 4 cups vegetable broth
- 1 teaspoon salt
- 1/2 teaspoon black pepper
- 9 ounces fresh cheese tortellini
- 1/2 cup heavy cream
- 1/4 cup chopped fresh basil, plus extra leaves for garnish
- Grated Parmesan cheese, for serving
Instructions
- Heat the olive oil in a large pot over medium heat. Add the diced onion and cook for 3 minutes until it softens. Stir in the minced garlic and cook for 30 seconds more.
- Pour in the crushed tomatoes and vegetable broth. Add the salt and black pepper, then bring the mixture to a gentle simmer. Let it cook for 10 minutes to blend the flavors.
- Add the fresh tortellini directly to the pot. Simmer for 5 to 7 minutes until the pasta is tender. Reduce the heat to low and stir in the heavy cream along with the chopped basil. Heat through for 2 minutes without boiling.
- Ladle the soup into bowls and top each serving with extra basil leaves and grated Parmesan.
Notes
Cuisine: Italian
Equipment: Large Pot, Wooden Spoon, Ladle
Loaded Baked Potato Soup with Cheddar and Chives
This soup turns the classic loaded baked potato into a creamy one-pot meal that feels both hearty and simple. It works well on busy weeknights or cold weekends when you want minimal dishes and maximum comfort.
The texture is thick and velvety from the potatoes, while the flavors come from savory bacon, sharp cheddar, and fresh chives. Everything builds in a single pot for easy cleanup.


Equipment
- Large pot
- Potato masher
Ingredients
- 4 slices bacon, chopped
- 1 medium onion, diced
- 3 garlic cloves, minced
- 4 large russet potatoes, peeled and cubed
- 4 cups chicken broth
- 1 cup milk
- 1 1/2 cups shredded cheddar cheese
- 1/4 cup chopped fresh chives
- Salt and black pepper to taste
Instructions
- Cook the chopped bacon in a large pot over medium heat until crispy. Remove the bacon with a slotted spoon and set it aside, leaving the fat in the pot.
- Add the diced onion to the pot and cook in the bacon fat until softened. Stir in the minced garlic and cook for one more minute.
- Add the cubed potatoes and chicken broth to the pot. Bring the mixture to a boil, then reduce the heat and simmer until the potatoes are fork-tender.
- Use a potato masher to break down some of the potatoes in the pot, leaving a few chunks for texture. Stir in the milk and heat through.
- Remove the pot from the heat and stir in 1 cup of the shredded cheddar cheese until melted. Season with salt and black pepper.
- Ladle the soup into bowls and top each serving with the reserved bacon, remaining cheddar cheese, and chopped chives.
Notes
Cuisine: American
Equipment: Large pot, Potato masher