


Hosting a potluck does not have to mean spending the whole day in the kitchen right before guests arrive. These recipes can all be made a day or two ahead so the day of the event stays calm. I focused on dishes that hold up well after transport and reheating. Each one uses basic ingredients and straightforward steps that work with a regular schedule. Here are ten ideas to help you plan without extra pressure.
Helpful Tips Before You Start
A bit of planning keeps potluck day calm and organized.
Pick Dishes That Travel Well
Choose recipes that stay stable at room temperature or reheat easily once you arrive. Avoid anything delicate that needs last minute assembly.
Break Prep Across Two Days
Chop vegetables and cook sauces one day. Assemble or bake the full dish the next. This keeps the workload light and reduces errors.
Portion Into Oven Ready Containers
Use foil pans or freezer safe dishes that go straight from your kitchen to the event oven. Skip anything that needs transferring at the host’s house.
Add Clear Reheating Notes
Write simple instructions on each container. Include oven temperature, time, and whether to cover or uncover so anyone can finish the dish without questions.
Three-Cheese Baked Ziti with Sausage
This baked ziti combines tender pasta with savory sausage and a mix of ricotta, mozzarella, and Parmesan. It delivers a creamy center and a lightly browned top that travels well to gatherings.
The dish suits make-ahead potlucks because you can assemble everything ahead and bake it just before serving or reheat it on site. It stays satisfying without needing last-minute attention.


Equipment
- Large Pot
- Large Skillet
- Baking Dish
Ingredients
- 8 ounces ziti pasta
- 12 ounces Italian sausage, casings removed
- 1 tablespoon olive oil
- 2 cloves garlic, minced
- 2 cups marinara sauce
- 1 cup ricotta cheese
- 1 1/2 cups shredded mozzarella cheese
- 1/2 cup grated Parmesan cheese
- 1 teaspoon dried oregano
- Salt and black pepper, to taste
- Fresh basil leaves, for garnish
Instructions
- Bring a large pot of salted water to a boil. Add the ziti and cook until al dente. Drain and set aside.
- Heat the olive oil in a large skillet over medium heat. Add the sausage and cook, breaking it up with a spoon, until browned.
- Stir in the minced garlic and oregano. Cook for one minute, then add the marinara sauce. Season with salt and pepper. Simmer for five minutes.
- Remove the skillet from heat and stir the drained ziti into the sauce until evenly coated.
- Spread half the ziti mixture into a baking dish. Dollop the ricotta over the top in small spoonfuls. Add the remaining ziti mixture.
- Sprinkle the mozzarella and Parmesan evenly over the surface. Bake at 375°F for 25 minutes until the cheese is melted and lightly golden.
- Let the dish rest for five minutes, then scatter fresh basil leaves on top before serving.
Notes
Cuisine: Italian
Equipment: Large Pot, Large Skillet, Baking Dish
Tangy BBQ Pulled Chicken Sliders with Coleslaw
These sliders bring bold tangy flavors and a satisfying crunch that travel well to any gathering. The pulled chicken stays moist after reheating, while the coleslaw holds its texture when kept separate until serving. They work especially well for potlucks because both main components can be prepared a day ahead.


Equipment
- Slow Cooker
- Mixing Bowl
- Forks
Ingredients
- 1 pound boneless skinless chicken breasts
- 1 cup tangy barbecue sauce
- 2 cups coleslaw mix
- 1/4 cup mayonnaise
- 1 tablespoon apple cider vinegar
- 1 teaspoon sugar
- 1/2 teaspoon celery seed
- 8 slider buns
Instructions
- Place the chicken breasts in a slow cooker and pour the barbecue sauce over them. Cook on low for 4 hours until the chicken shreds easily with two forks.
- Remove the chicken from the slow cooker and shred it directly in the sauce. Stir to coat evenly and let it rest while you prepare the coleslaw.
- In a medium bowl, combine the coleslaw mix, mayonnaise, apple cider vinegar, sugar, and celery seed. Toss until the vegetables are evenly coated.
- Split the slider buns and divide the pulled chicken among the bottoms. Top each with a generous spoonful of coleslaw and add the bun tops.
Notes
Cuisine: American
Equipment: Slow Cooker, Mixing Bowl, Forks
Greek Orzo Salad with Chickpeas, Feta, and Olives
This orzo salad travels well and holds up nicely at room temperature, which makes it a reliable choice for potlucks. You can prepare it the day before and simply give it a quick toss before serving. It brings together tender pasta, creamy cheese, and briny olives in one bowl.
The flavors are bright and tangy from lemon and olives, with a mix of soft orzo, crisp vegetables, and salty feta. It feels fresh without being fussy and pairs easily with grilled meats or other salads on a buffet table.


Equipment
- Large pot
- Colander
- Large mixing bowl
Ingredients
- 1 cup orzo
- 1 (15-ounce) can chickpeas, drained and rinsed
- 1 cup cherry tomatoes, halved
- 1 cucumber, diced
- 1/4 cup red onion, finely diced
- 1/2 cup Kalamata olives, pitted and sliced
- 1/2 cup crumbled feta cheese
- 2 tablespoons olive oil
- 2 tablespoons fresh lemon juice
- 2 tablespoons chopped fresh parsley
- 1/2 teaspoon salt
- 1/4 teaspoon black pepper
Instructions
- Bring a large pot of salted water to a boil and cook the orzo according to package directions until al dente. Drain in a colander and rinse under cold water to stop the cooking.
- In a large mixing bowl, combine the cooled orzo, chickpeas, cherry tomatoes, cucumber, and red onion.
- Add the olive oil, lemon juice, salt, and black pepper to the bowl. Stir gently until everything is evenly coated.
- Fold in the Kalamata olives and chopped parsley.
- Sprinkle the crumbled feta over the top just before serving so it stays in distinct pieces.
Notes
Cuisine: Mediterranean
Equipment: Large pot, Colander, Large mixing bowl
Creamy Wild Mushroom and Leek Lasagna
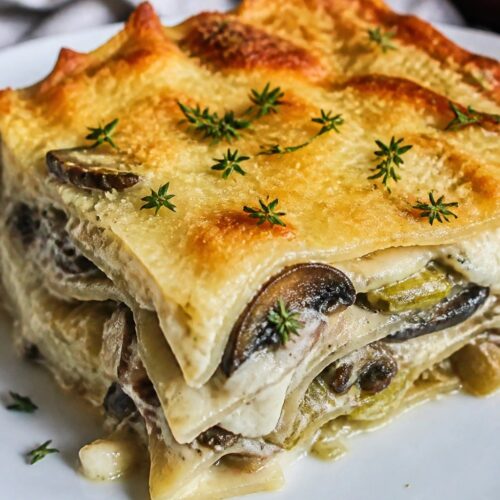
This lasagna layers tender noodles with sauteed wild mushrooms and leeks in a rich cream sauce. It works well for potlucks because you can assemble the whole dish ahead of time and bake it on site or reheat it without losing quality.
The filling tastes earthy and slightly sweet from the leeks, balanced by the creamy cheeses and herbs. The finished texture stays soft with golden edges on top.

Equipment
- Large Skillet
- 9×9 Baking Dish
- Large Pot
Ingredients
- 8 no-boil lasagna noodles
- 12 oz mixed wild mushrooms, sliced
- 2 medium leeks, cleaned and sliced
- 3 cloves garlic, minced
- 3 tablespoons butter
- 1 1/2 cups heavy cream
- 1 cup ricotta cheese
- 1 1/2 cups shredded mozzarella cheese
- 1/2 cup grated Parmesan cheese
- 1 tablespoon fresh thyme leaves
- Salt and black pepper to taste
Instructions
- Preheat the oven to 375 degrees F. Lightly grease a 9×9 inch baking dish.
- Melt 2 tablespoons of the butter in a large skillet over medium heat. Add the sliced leeks and cook until softened, about 5 minutes.
- Add the remaining tablespoon of butter along with the mushrooms and garlic. Cook until the mushrooms release their liquid and begin to brown, about 8 minutes.
- Stir in the heavy cream, thyme, salt, and pepper. Simmer for 3 minutes until slightly thickened, then remove from heat.
- Spread a thin layer of the mushroom mixture in the bottom of the baking dish. Top with 4 noodles, half the ricotta, and one third of the mozzarella.
- Repeat with another layer of mushroom mixture, the remaining noodles, the rest of the ricotta, and half the remaining mozzarella.
- Finish with the last of the mushroom mixture and the remaining mozzarella and Parmesan.
- Cover the dish tightly with foil and bake for 25 minutes. Remove the foil and bake 10 more minutes until the top is golden.
Notes
Cuisine: Italian
Equipment: Large Skillet, 9×9 Baking Dish, Large Pot
Sweet Potato and Black Bean Enchilada Casserole
This casserole combines roasted sweet potatoes with hearty black beans in a simple enchilada-style bake. It travels well to gatherings and reheats without losing texture. The layers stay firm enough to slice into portions that hold up on a buffet table.
The flavors balance earthy sweet potato with cumin-spiced beans and tangy sauce. Cheese on top turns golden during baking. It works as a vegetarian main that still feels filling for a potluck spread.


Equipment
- Large Skillet
- 9×9 Baking Dish
- Mixing Bowl
Ingredients
- 2 medium sweet potatoes, peeled and diced
- 1 can (15 oz) black beans, drained and rinsed
- 1 can (10 oz) red enchilada sauce
- 8 corn tortillas
- 1 1/2 cups shredded cheddar cheese
- 1 small onion, diced
- 2 cloves garlic, minced
- 1 teaspoon ground cumin
- 1 tablespoon olive oil
- 1/4 teaspoon salt
- 2 tablespoons chopped cilantro
Instructions
- Preheat the oven to 375°F. Heat the olive oil in a large skillet over medium heat. Add the diced onion and cook for 3 minutes until it softens. Stir in the garlic and cumin, then cook for 1 minute more.
- Add the diced sweet potatoes and salt to the skillet. Cook for 8 to 10 minutes, stirring often, until the potatoes begin to soften. Remove the skillet from the heat and stir in the black beans.
- Spread a few tablespoons of enchilada sauce in the bottom of a 9×9 baking dish. Layer 4 tortillas over the sauce, tearing them to fit as needed. Top with half the sweet potato mixture, then drizzle with more sauce and sprinkle with half the cheese. Repeat the layers with the remaining tortillas, filling, sauce, and cheese.
- Bake for 25 minutes until the cheese melts and the edges bubble. Let the casserole rest for 5 minutes before sprinkling with chopped cilantro.
Notes
Cuisine: Mexican
Equipment: Large Skillet, 9×9 Baking Dish, Mixing Bowl
Sesame Ginger Noodle Salad with Shredded Chicken and Crunchy Vegetables
This noodle salad travels well and holds up nicely at room temperature, which makes it a reliable choice for potlucks. You can cook the noodles and shred the chicken a day ahead, then toss everything together before you leave. The result is a dish with chewy noodles, tender chicken, and plenty of crisp vegetables coated in a savory sesame ginger dressing.


Equipment
- Large pot
- Colander
- Large mixing bowl
- Small bowl
Ingredients
- 8 ounces rice noodles
- 2 cups cooked shredded chicken
- 2 large carrots, julienned
- 1 cup shredded purple cabbage
- 1 red bell pepper, thinly sliced
- 1 cucumber, julienned
- 3 green onions, sliced
- 1/4 cup soy sauce
- 3 tablespoons sesame oil
- 2 tablespoons rice vinegar
- 1 tablespoon fresh ginger, grated
- 1 tablespoon honey
- 2 tablespoons sesame seeds
- 1/4 cup chopped peanuts
Instructions
- Bring a large pot of water to a boil and cook the rice noodles according to package directions. Drain and rinse under cold water to stop the cooking.
- In a small bowl, whisk together the soy sauce, sesame oil, rice vinegar, grated ginger, and honey until the honey dissolves.
- Place the shredded chicken, julienned carrots, shredded cabbage, sliced bell pepper, julienned cucumber, and sliced green onions in a large mixing bowl.
- Add the cooled noodles to the bowl with the chicken and vegetables.
- Pour the dressing over the noodle mixture and toss until everything is evenly coated.
- Sprinkle the sesame seeds and chopped peanuts over the top just before serving.
Notes
Cuisine: Asian
Equipment: Large pot, Colander, Large mixing bowl, Small bowl
Hearty Beef Chili with Cornbread Topping
This chili brings a filling main dish to any potluck without last-minute work. The beef simmers into a thick, spiced base that travels well in a covered dish, and the cornbread layer bakes right on top for easy serving. It stays satisfying even after reheating, with tender meat, beans, and a golden, slightly sweet crust that balances the heat.
The recipe works best when prepared the day before. Guests can scoop it straight from the pan or keep it warm in a slow cooker at the event. The texture stays hearty from the ground beef and beans, while the cornbread topping adds a soft, crumbly contrast that holds up during transport.


Equipment
- Large pot
- Mixing bowl
- 8×8-inch baking dish
Ingredients
- 1 lb ground beef
- 1 medium onion, diced
- 2 cloves garlic, minced
- 1 green bell pepper, diced
- 1 can (14 oz) diced tomatoes
- 1 can (15 oz) kidney beans, drained and rinsed
- 2 tbsp chili powder
- 1 tsp ground cumin
- 1 cup beef broth
- 1 tsp salt
- 1/2 tsp black pepper
- 1 cup cornmeal
- 1 cup all-purpose flour
- 1 tbsp baking powder
- 1 cup milk
- 1 large egg
- 2 tbsp butter, melted
Instructions
- Brown the ground beef in a large pot over medium heat, breaking it up with a spoon until no pink remains. Drain excess fat if needed.
- Add the diced onion, minced garlic, and bell pepper to the pot. Cook for 5 minutes until the vegetables soften.
- Stir in the diced tomatoes, kidney beans, chili powder, cumin, beef broth, salt, and black pepper. Bring the mixture to a simmer and cook for 15 minutes, stirring occasionally, until the chili thickens.
- Preheat the oven to 400°F. In a mixing bowl, combine the cornmeal, flour, and baking powder. Whisk in the milk, egg, and melted butter until a smooth batter forms.
- Pour the chili into a greased 8×8-inch baking dish. Spoon the cornbread batter evenly over the top, spreading it gently to cover the surface.
- Bake for 20 minutes until the cornbread topping is golden and a toothpick inserted in the center comes out clean. Let the dish rest for 5 minutes before serving.
Notes
Cuisine: American
Equipment: Large pot, Mixing bowl, 8×8-inch baking dish
Spinach Artichoke Stuffed Shells with Marinara
These stuffed shells bring a creamy spinach and artichoke filling inside tender pasta, all topped with marinara for a hearty dish that travels well. They work especially well for potlucks because you can assemble everything the day before and bake it at the event or right before serving. The result is a balanced mix of savory cheese, tender vegetables, and bright tomato sauce.
This recipe keeps things simple while delivering familiar flavors that appeal to a crowd. The make-ahead steps reduce stress on the day of the gathering, and the baked shells hold up nicely during transport.


Equipment
- Large Pot
- Mixing Bowl
- Baking Dish
Ingredients
- 12 jumbo pasta shells
- 1 cup ricotta cheese
- 1 cup chopped spinach, thawed and drained if frozen
- 1/2 cup chopped artichoke hearts
- 1/2 cup shredded mozzarella cheese
- 1/4 cup grated Parmesan cheese
- 2 cups marinara sauce
- 1 clove garlic, minced
- 1 teaspoon Italian seasoning
- Salt and pepper to taste
Instructions
- Bring a large pot of salted water to a boil and cook the jumbo pasta shells according to package directions until just al dente. Drain and rinse under cold water to stop the cooking, then set aside.
- In a mixing bowl, combine the ricotta cheese, chopped spinach, chopped artichoke hearts, minced garlic, Italian seasoning, and half of the Parmesan cheese. Add salt and pepper to taste and stir until evenly mixed.
- Spread 1 cup of marinara sauce across the bottom of a baking dish. Spoon the spinach artichoke filling into each cooked shell and arrange the filled shells in a single layer over the sauce.
- Pour the remaining cup of marinara sauce over the tops of the shells. Sprinkle the shredded mozzarella and the remaining Parmesan evenly across the surface.
- Cover the dish tightly with foil and refrigerate until ready to bake. When ready, bake at 375°F for 25 to 30 minutes until the cheese is melted and the sauce is bubbling. Remove the foil for the last 5 minutes if you want a lightly browned top.
Notes
Cuisine: Italian
Equipment: Large Pot, Mixing Bowl, Baking Dish
Roasted Butternut Squash and Kale Salad with Goat Cheese and Pecans
This salad travels well to potlucks because the roasted squash and sturdy kale hold up after sitting for a few hours. You can roast the squash and toast the pecans the day before, then toss everything together right before serving so the textures stay fresh.
The flavors balance sweet roasted squash with earthy kale, tangy goat cheese, and crunchy pecans. A light balsamic dressing ties it together without overpowering the main ingredients.


Equipment
- Baking sheet
- Large bowl
- Skillet
- Whisk
Ingredients
- 1 medium butternut squash, peeled and cut into 1-inch cubes
- 3 tablespoons olive oil, divided
- 1/2 teaspoon salt
- 1/4 teaspoon black pepper
- 1 bunch kale, stems removed and leaves chopped
- 4 ounces goat cheese, crumbled
- 1/2 cup pecans
- 2 tablespoons balsamic vinegar
- 1 teaspoon honey
Instructions
- Preheat the oven to 400 degrees F. Toss the butternut squash cubes with 2 tablespoons olive oil, salt, and black pepper on a baking sheet. Spread in a single layer and roast for 25 to 30 minutes until tender and lightly browned. Let cool to room temperature.
- While the squash roasts, place the pecans in a dry skillet over medium heat. Toast for 4 to 5 minutes, shaking the pan often, until fragrant. Remove from heat and set aside.
- In a small bowl, whisk together the remaining 1 tablespoon olive oil, balsamic vinegar, and honey until combined.
- Place the chopped kale in a large bowl. Add the cooled roasted squash and drizzle with the dressing. Toss well to coat the kale and squash.
- Sprinkle the crumbled goat cheese and toasted pecans over the top just before serving.
Notes
Cuisine: American
Equipment: Baking sheet, Large bowl, Skillet, Whisk
Lemon Herb Farro Bowls with Grilled Halloumi and Vegetables
This lemon herb farro bowl combines chewy grains with salty grilled halloumi and smoky vegetables. It holds up well for potlucks and can be served at room temperature, which cuts down on last-minute work.
The dish offers bright citrus and herb notes against the rich cheese and tender farro. Grilled vegetables add a light char that keeps the texture interesting even after chilling.


Equipment
- Large pot
- Grill pan
- Mixing bowl
Ingredients
- 1 cup uncooked farro
- 8 ounces halloumi cheese, cut into 1/2-inch slices
- 2 medium zucchini, sliced lengthwise
- 1 red bell pepper, seeded and quartered
- 1 cup cherry tomatoes
- 3 tablespoons olive oil, divided
- 2 lemons, juiced and zested
- 2 garlic cloves, minced
- 1/4 cup chopped fresh parsley
- 2 tablespoons chopped fresh mint
- 1/2 teaspoon salt
- 1/4 teaspoon black pepper
Instructions
- Cook the farro in a large pot of salted water until tender, about 20 minutes. Drain and rinse under cold water, then transfer to a large bowl.
- In a small bowl, whisk together 2 tablespoons olive oil, the lemon juice, lemon zest, minced garlic, parsley, mint, salt, and black pepper to make the dressing.
- Pour half the dressing over the cooled farro and toss to coat. Set the remaining dressing aside.
- Heat a grill pan over medium-high heat and brush with the remaining tablespoon of olive oil. Grill the zucchini slices and red bell pepper quarters until lightly charred, about 3 to 4 minutes per side. Grill the halloumi slices for 1 to 2 minutes per side until golden.
- Add the cherry tomatoes to the farro. Slice the grilled vegetables into bite-size pieces and arrange them over the farro along with the grilled halloumi. Drizzle with the remaining dressing just before serving.
Notes
Cuisine: Mediterranean
Equipment: Large pot, Grill pan, Mixing bowl
