

Finding dinners that are high in protein and keep you satisfied can be tricky sometimes. Here are 12 recipes that focus on simple ingredients and straightforward steps. Each one is designed to help you feel full for longer after eating. You can pick and choose based on what you have on hand or what sounds good for the week. These ideas aim to make your evening meals both nourishing and practical.
Helpful Tips Before You Start
These tips will help you get the most staying power from each high protein dinner.
Choose Lean Protein Sources
Opt for chicken breast, turkey, fish, or Greek yogurt to hit high protein targets without extra calories that can slow you down.
Add Fiber to Every Plate
Serve the main dish with broccoli, spinach, or lentils to increase volume and keep hunger away for hours.
Prep Proteins in Advance
Cook and portion chicken or ground turkey at the start of the week so assembly takes minutes on busy nights.
Include a Small Amount of Healthy Fat
A few slices of avocado or a teaspoon of olive oil helps the meal feel more complete and satisfying.
Build Balanced Portions
Aim for half the plate as protein, one quarter as fiber rich vegetables, and one quarter as whole grains to stay full until bedtime.
Herb-Crusted Salmon with Quinoa Pilaf and Steamed Broccoli
This recipe pairs salmon with a simple herb coating that turns crisp in the oven. The quinoa pilaf and broccoli round it out into a filling plate that supports steady energy after dinner.
It suits weeknight cooking or weekend prep because most steps happen at the same time. Fresh herbs keep the flavor bright while the grains and vegetables give a satisfying chew.


Equipment
- Baking Sheet
- Medium Saucepan
- Steamer Basket
Ingredients
- 4 salmon fillets (6 ounces each)
- 3 tablespoons olive oil, divided
- 1/4 cup fresh parsley, chopped
- 2 tablespoons fresh dill, chopped
- 1 teaspoon lemon zest
- 1 1/2 cups quinoa
- 3 cups vegetable broth
- 1 small onion, finely chopped
- 4 cups broccoli florets
- 1/2 teaspoon salt
- 1/4 teaspoon black pepper
- Lemon wedges for serving
Instructions
- Rinse the quinoa under cold water. Place it in a medium saucepan with the vegetable broth, onion, and half the salt. Bring to a boil, then reduce heat, cover, and simmer for 15 minutes until the liquid is absorbed. Remove from heat and let it rest.
- While the quinoa cooks, heat the oven to 400 degrees. Line a baking sheet with parchment paper. Stir together the parsley, dill, lemon zest, remaining salt, pepper, and 2 tablespoons olive oil in a small bowl.
- Pat the salmon fillets dry and place them on the baking sheet. Spread the herb mixture evenly over the top of each fillet. Drizzle with the remaining tablespoon of olive oil.
- Bake the salmon for 12 to 14 minutes until it flakes easily and the herb crust is lightly golden.
- While the salmon bakes, set a steamer basket over a pot of simmering water. Add the broccoli florets, cover, and steam for 5 to 6 minutes until bright green and tender.
- Fluff the quinoa with a fork. Divide the pilaf among four plates, add a salmon fillet to each, and serve with steamed broccoli and lemon wedges on the side.
Notes
Cuisine: Mediterranean
Equipment: Baking Sheet, Medium Saucepan, Steamer Basket
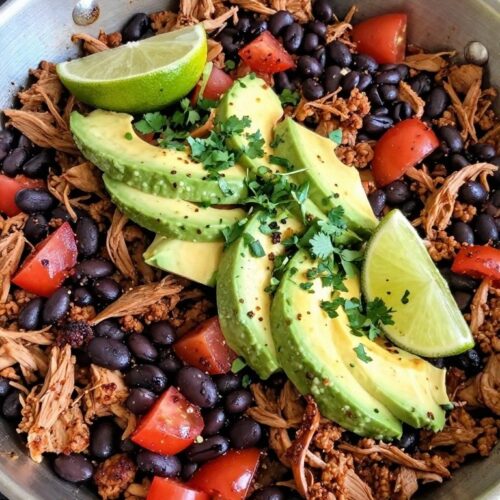
Spicy Turkey Taco Skillet with Black Beans and Avocado
This one-pan meal brings bold taco flavors to a simple skillet dinner. Lean ground turkey and black beans team up for plenty of protein that helps you stay satisfied through the evening. The creamy avocado cools the spice just enough while adding a nice texture contrast.
It works well on busy weeknights when you want something fast but filling. The dish tastes savory with a steady heat from the spices and stays hearty without feeling heavy.

Equipment
- Large Skillet
- Wooden Spoon
- Knife
Ingredients
- 1 tablespoon olive oil
- 1 small onion, diced
- 2 cloves garlic, minced
- 1 pound ground turkey
- 1 tablespoon chili powder
- 1 teaspoon ground cumin
- 1/2 teaspoon cayenne pepper
- 1/2 teaspoon salt
- 1 can (15 ounces) black beans, drained and rinsed
- 1 cup diced tomatoes with their juices
- 2 avocados, sliced
- 2 tablespoons chopped fresh cilantro
- Lime wedges for serving
Instructions
- Heat the olive oil in a large skillet over medium heat. Add the onion and cook for 3 minutes until it softens. Stir in the garlic and cook for 30 seconds more.
- Add the ground turkey to the skillet. Break it up with a spoon and cook until it is no longer pink, about 6 minutes. Sprinkle in the chili powder, cumin, cayenne, and salt. Stir well to coat the meat.
- Pour in the black beans and diced tomatoes. Let the mixture simmer for 5 minutes so the flavors blend and the sauce thickens slightly.
- Remove the skillet from the heat. Top with the sliced avocados and chopped cilantro. Serve with lime wedges on the side.
Notes
Cuisine: Mexican
Equipment: Large Skillet, Wooden Spoon, Knife
Slow-Cooked Beef and Barley Stew with Root Vegetables
This slow-cooked stew brings together chunks of beef, chewy barley, and earthy root vegetables in one pot. The combination of protein from the beef and fiber from the barley creates a filling meal that holds up well through a long evening.
The dish develops a thick, savory broth as it cooks low and slow. Root vegetables add natural sweetness while the barley thickens the stew just enough to feel substantial without needing extra thickeners.


Equipment
- Slow Cooker
- Large Skillet
- Cutting Board
Ingredients
- 1.5 pounds beef stew meat, cut into 1-inch pieces
- 1 cup pearl barley
- 2 carrots, peeled and sliced
- 2 parsnips, peeled and sliced
- 1 large russet potato, diced
- 1 medium onion, diced
- 3 cloves garlic, minced
- 4 cups beef broth
- 2 tablespoons tomato paste
- 1 teaspoon dried thyme
- 2 tablespoons olive oil
- 1 teaspoon salt
- 1/2 teaspoon black pepper
Instructions
- Heat the olive oil in a large skillet over medium-high heat. Add the beef stew meat and brown on all sides for about 5 minutes. Transfer the meat to the slow cooker.
- Add the onion and garlic to the same skillet and cook for 2 minutes until softened. Stir in the tomato paste and cook for another minute.
- Transfer the onion mixture to the slow cooker. Add the carrots, parsnips, potato, pearl barley, beef broth, thyme, salt, and black pepper.
- Stir everything together, cover the slow cooker, and cook on low for 7 to 8 hours or on high for 4 hours until the beef is tender and the barley is cooked through.
- Taste and adjust salt and pepper if needed before serving.
Notes
Cuisine: American
Equipment: Slow Cooker, Large Skillet, Cutting Board
Grilled Chicken Thighs with Chickpea Salad and Roasted Peppers
This dinner combines juicy grilled chicken thighs with a fresh chickpea salad and sweet roasted peppers. It works well for busy weeknights when you want a filling meal that stays satisfying for hours. The dish offers smoky grilled flavor, creamy chickpeas, and bright vegetables in one plate.
The chicken stays moist from a simple seasoning while the salad adds crunch and the peppers bring natural sweetness. Together they create a balanced plate that feels both hearty and fresh.


Equipment
- Grill
- Baking sheet
- Mixing bowl
Ingredients
- 8 boneless, skinless chicken thighs (about 2 pounds)
- 2 cans (15 ounces each) chickpeas, drained and rinsed
- 2 large red bell peppers
- 1 cucumber, diced
- 1/4 red onion, thinly sliced
- 1/4 cup fresh parsley, chopped
- 3 tablespoons olive oil, divided
- 2 tablespoons lemon juice
- 1 teaspoon garlic powder
- 1/2 teaspoon salt
- 1/2 teaspoon black pepper
Instructions
- Heat a grill to medium-high heat. Pat the chicken thighs dry and rub them with 1 tablespoon olive oil, garlic powder, salt, and black pepper.
- Place the red bell peppers directly on the grill or on a baking sheet under a broiler. Turn them until the skin is charred on all sides, about 10 minutes total. Remove and let them cool in a covered bowl before peeling off the skin and slicing into strips.
- Grill the seasoned chicken thighs for 6 to 7 minutes per side until the internal temperature reaches 165°F. Let the chicken rest for 5 minutes before slicing.
- In a large bowl, combine the chickpeas, diced cucumber, sliced red onion, chopped parsley, lemon juice, and remaining 2 tablespoons olive oil. Season with a pinch of salt and pepper and toss gently.
- Divide the chickpea salad among four plates. Top each with sliced grilled chicken thighs and a portion of the roasted pepper strips.
Notes
Cuisine: Mediterranean
Equipment: Grill, Baking sheet, Mixing bowl
Baked Cod Parcels with Lentils and Sautéed Kale
This recipe wraps flaky cod in parchment packets with lemon and herbs so it stays moist and flavorful. Earthy lentils and garlicky kale round out the plate and deliver the protein and fiber that help you stay satisfied through the evening.
It works especially well on weeknights when you want a hands-off dinner that still feels fresh. The method keeps the cod tender while the lentils provide a hearty base and the kale adds a slight chew.


Equipment
- Baking sheet
- Parchment paper
- Medium saucepan
- Large skillet
Ingredients
- 4 (6-ounce) cod fillets
- 1 cup dried green lentils, rinsed
- 2 cups vegetable broth
- 1 large bunch kale, stems removed and leaves chopped
- 3 tablespoons olive oil, divided
- 3 garlic cloves, minced
- 1 lemon, thinly sliced
- 2 tablespoons chopped fresh parsley
- Salt and black pepper
Instructions
- Preheat the oven to 400°F. Place each cod fillet on a square of parchment paper. Drizzle with 1 tablespoon olive oil, season with salt and pepper, and top with lemon slices and half the parsley. Fold the parchment into sealed parcels and set them on a baking sheet.
- Bake the parcels for 12 to 15 minutes until the cod flakes easily with a fork.
- While the cod bakes, combine the lentils and vegetable broth in a medium saucepan. Bring to a boil, then reduce to a simmer and cook for 20 minutes until the lentils are tender. Drain any excess liquid if needed.
- Heat the remaining 2 tablespoons olive oil in a large skillet over medium heat. Add the garlic and cook for 30 seconds until fragrant. Add the kale and cook, stirring often, for 5 to 7 minutes until it wilts and turns bright green. Season with salt and pepper.
- Remove the cod parcels from the oven and carefully open them. Serve the fish over the lentils with the sautéed kale on the side. Sprinkle the remaining parsley on top.
Notes
Cuisine: Mediterranean
Equipment: Baking sheet, Parchment paper, Medium saucepan, Large skillet
Ginger Pork Stir-Fry with Snow Peas and Brown Rice
This stir-fry brings together lean pork and crisp snow peas in a simple ginger sauce. It sits over brown rice for a balanced plate that stays satisfying through the evening. The meal comes together fast, making it useful after work or on nights when you want a home-cooked dinner without much fuss.
The flavor is savory with a bright ginger note and a light sesame finish. Textures contrast nicely between the tender pork, crunchy snow peas, and chewy rice. It keeps portions hearty while still feeling fresh.


Equipment
- Large Skillet
- Knife
- Cutting Board
Ingredients
- 1 pound pork tenderloin, sliced into thin strips
- 3 tablespoons low-sodium soy sauce
- 2 tablespoons fresh ginger, grated
- 2 cloves garlic, minced
- 2 tablespoons canola oil
- 2 cups snow peas, trimmed
- 4 cups cooked brown rice
- 2 green onions, thinly sliced
Instructions
- Heat 1 tablespoon of canola oil in a large skillet over medium-high heat. Add the pork strips and cook for 4 to 5 minutes, stirring often, until the meat is browned and cooked through. Remove the pork to a plate and set aside.
- Add the remaining tablespoon of oil to the skillet. Stir in the grated ginger and minced garlic and cook for 30 seconds until fragrant. Add the snow peas and cook for 2 to 3 minutes, stirring frequently, until they turn bright green but stay crisp.
- Return the pork to the skillet. Pour in the soy sauce and stir everything together for 1 minute so the sauce coats the meat and vegetables evenly.
- Spoon the brown rice into four bowls. Divide the stir-fry over the rice and top each serving with sliced green onions.
Notes
Cuisine: Asian
Equipment: Large Skillet, Knife, Cutting Board
Chicken Tikka Masala with Cauliflower and Basmati Rice
This version of chicken tikka masala uses lean chicken breast and Greek yogurt to create a high-protein meal that still feels comforting. Roasted cauliflower adds texture and bulk so the dish keeps you full without needing large portions of rice. The sauce stays creamy and spiced while the basmati rice soaks up the flavors.
It works well for busy weeknights or meal prep because the components come together in one skillet and one baking sheet. The result is tender chicken in a lightly spiced tomato sauce with sweet roasted cauliflower and fragrant rice on the side.


Equipment
- Large skillet
- Baking sheet
- Mixing bowl
- Pot
Ingredients
- 1.5 pounds boneless skinless chicken breast, cut into 1-inch cubes
- 1 cup plain Greek yogurt
- 2 tablespoons garam masala
- 1 teaspoon ground cumin
- 1 teaspoon turmeric
- 1 teaspoon paprika
- 3 garlic cloves, minced
- 1 tablespoon fresh ginger, grated
- 1 tablespoon olive oil
- 1 medium onion, diced
- 1 15-ounce can crushed tomatoes
- 1/2 cup water
- 1 medium head cauliflower, cut into florets
- 1.5 cups basmati rice
- 1/4 cup fresh cilantro, chopped
Instructions
- In a bowl, mix the chicken cubes with 1/2 cup Greek yogurt, 1 tablespoon garam masala, cumin, turmeric, paprika, half the garlic, and half the ginger. Let it sit while you prepare the other ingredients.
- Preheat the oven to 425°F. Toss the cauliflower florets with 1 teaspoon olive oil and a pinch of salt. Spread them on a baking sheet and roast for 20 minutes until edges are browned.
- While the cauliflower roasts, heat the remaining olive oil in a large skillet over medium heat. Add the diced onion and cook until softened, about 5 minutes.
- Stir in the remaining garlic and ginger, then add the marinated chicken. Cook for 6-8 minutes until the chicken is no longer pink on the outside.
- Pour in the crushed tomatoes, water, and remaining 1 tablespoon garam masala. Simmer for 10 minutes until the sauce thickens and the chicken is cooked through.
- Stir the remaining 1/2 cup Greek yogurt into the sauce and remove from heat. Cook the basmati rice according to package directions.
- Serve the chicken tikka masala over the rice and top with the roasted cauliflower and chopped cilantro.
Notes
Cuisine: Indian
Equipment: Large skillet, Baking sheet, Mixing bowl, Pot
Lean Steak Fajitas with Bell Peppers and Whole-Wheat Tortillas
These lean steak fajitas combine thin slices of beef with colorful bell peppers for a quick skillet meal that delivers solid protein. Whole-wheat tortillas add extra fiber, making the dish a practical choice for weeknight dinners when you need to stay full.
The seasoning brings a smoky, mildly spiced flavor that pairs well with the natural sweetness of the peppers. Tender steak and crisp-tender vegetables create a balanced texture inside soft tortillas.


Equipment
- Large skillet
- Sharp knife
- Cutting board
- Tongs
Ingredients
- 1 pound lean flank steak, thinly sliced against the grain
- 2 red bell peppers, sliced into strips
- 1 large onion, sliced
- 2 tablespoons olive oil
- 1 teaspoon ground cumin
- 1 teaspoon chili powder
- 1 teaspoon garlic powder
- 1/2 teaspoon salt
- 1/4 teaspoon black pepper
- Juice of 1 lime
- 8 whole-wheat tortillas
- 2 tablespoons chopped fresh cilantro
Instructions
- Heat 1 tablespoon of olive oil in a large skillet over medium-high heat. Add the sliced flank steak and cook for 3 to 4 minutes until browned but still slightly pink inside. Remove the steak to a plate and set it aside.
- Add the remaining tablespoon of olive oil to the same skillet. Place the sliced bell peppers and onion in the pan. Cook for 5 to 6 minutes, stirring occasionally, until the vegetables soften and start to char at the edges.
- Return the steak to the skillet. Sprinkle in the cumin, chili powder, garlic powder, salt, and black pepper. Stir everything together and cook for 2 more minutes so the spices coat the meat and vegetables evenly.
- Remove the skillet from the heat and drizzle the lime juice over the mixture. Stir once to combine.
- Warm the whole-wheat tortillas in a dry skillet or microwave for 20 seconds. Spoon the steak and vegetable mixture into each tortilla and top with chopped fresh cilantro before serving.
Notes
Cuisine: Mexican
Equipment: Large skillet, Sharp knife, Cutting board, Tongs
Turkey Bolognese over Spaghetti Squash with Parmesan
This recipe swaps pasta for spaghetti squash to create a lighter yet satisfying dinner. The ground turkey simmers into a hearty sauce that pairs well with the mild, slightly sweet strands of squash. It works especially well on busy weeknights when you want something warm and filling without much fuss.
The finished dish offers a nice contrast between the tender squash and the thick tomato sauce. Parmesan adds a salty finish that brings everything together. It is the kind of meal that feels comforting while still supporting your protein goals.


Equipment
- Baking sheet
- Large skillet
- Sharp knife
Ingredients
- 1 large spaghetti squash
- 1 tablespoon olive oil
- 1 pound ground turkey
- 1 medium onion, finely chopped
- 3 garlic cloves, minced
- 1 can (28 ounces) crushed tomatoes
- 1 teaspoon dried oregano
- 1/2 teaspoon salt
- 1/4 teaspoon black pepper
- 1/2 cup grated Parmesan cheese
Instructions
- Preheat the oven to 400 degrees. Cut the spaghetti squash in half lengthwise and scoop out the seeds. Place the halves cut side down on a baking sheet and bake for 35 to 40 minutes until the flesh is tender.
- While the squash bakes, heat the olive oil in a large skillet over medium heat. Add the chopped onion and cook for 4 minutes until it softens.
- Add the minced garlic and ground turkey to the skillet. Cook for 6 to 8 minutes, breaking up the turkey with a spoon until it is no longer pink.
- Stir in the crushed tomatoes, oregano, salt, and black pepper. Lower the heat and let the sauce simmer for 15 minutes, stirring occasionally.
- Remove the squash from the oven and let it cool slightly. Use a fork to scrape the flesh into strands and divide them among four plates.
- Spoon the turkey sauce over the squash and sprinkle each serving with the grated Parmesan cheese.
Notes
Cuisine: Italian
Equipment: Baking sheet, Large skillet, Sharp knife
Garlic Shrimp with Zucchini Noodles and Cherry Tomatoes
This dish brings together tender shrimp and fresh vegetables in a light garlic sauce that still feels satisfying. The zucchini noodles add volume without heaviness, while the shrimp supplies plenty of protein to help you stay full through the evening. It comes together quickly, making it a good choice for busy weeknights when you want something fresh but uncomplicated.
The flavor is bright and savory, with juicy cherry tomatoes that burst as they cook and a touch of lemon to lift everything. The texture stays crisp-tender thanks to quick cooking, so nothing gets soggy or overdone.


Equipment
- Large Skillet
- Spiralizer
Ingredients
- 1.5 pounds large shrimp, peeled and deveined
- 4 medium zucchini, spiralized into noodles
- 2 cups cherry tomatoes, halved
- 4 garlic cloves, minced
- 2 tablespoons olive oil
- 1/2 teaspoon red pepper flakes
- 1/2 teaspoon salt
- 1/4 teaspoon black pepper
- 2 tablespoons fresh lemon juice
- 1/4 cup fresh parsley, chopped
Instructions
- Heat the olive oil in a large skillet over medium heat. Add the minced garlic and red pepper flakes and cook for about 30 seconds until fragrant.
- Add the shrimp to the skillet in a single layer. Season with salt and black pepper. Cook for 2 minutes on one side, then flip and cook for another 1 to 2 minutes until the shrimp turn pink and opaque. Remove the shrimp to a plate and set aside.
- Add the halved cherry tomatoes to the same skillet. Cook for 2 to 3 minutes until they begin to soften and release some juices.
- Add the zucchini noodles to the skillet. Toss gently with the tomatoes and cook for 2 minutes until just warmed through but still firm. Return the shrimp to the skillet, drizzle with lemon juice, and toss everything together.
- Remove from heat and sprinkle with the chopped parsley before serving.
Notes
Cuisine: Mediterranean
Equipment: Large Skillet, Spiralizer
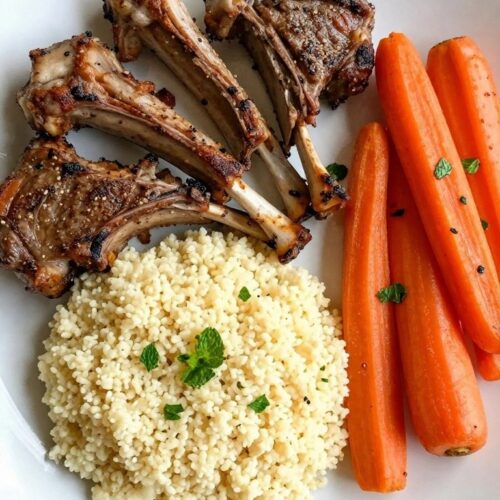
Moroccan-Spiced Lamb Chops with Couscous and Roasted Carrots
This dish brings together tender lamb chops coated in warm Moroccan spices with fluffy couscous and sweet roasted carrots. The combination creates a balanced plate that feels special enough for guests yet simple enough for a weeknight. High protein from the lamb helps keep you satisfied for hours.
It works well when you want something a little different from plain grilled meat but still easy to prepare. The spices give the lamb a gentle heat while the carrots add natural sweetness and the couscous soaks up the flavors on the plate.

Equipment
- Baking sheet
- Large skillet
- Small saucepan
Ingredients
- 8 lamb chops
- 3 tablespoons olive oil
- 2 teaspoons ground cumin
- 1 teaspoon ground coriander
- 1/2 teaspoon ground cinnamon
- 1 teaspoon paprika
- 1 teaspoon salt
- 1/2 teaspoon black pepper
- 4 large carrots, peeled and cut into 2-inch sticks
- 1 cup couscous
- 1 1/4 cups vegetable broth
- 2 garlic cloves, minced
- Fresh mint leaves for garnish
Instructions
- Preheat the oven to 425 degrees. Toss the carrot sticks with 1 tablespoon olive oil, 1/2 teaspoon cumin, and a pinch of salt on a baking sheet. Roast for 20 minutes until the edges start to brown.
- While the carrots roast, mix the remaining cumin, coriander, cinnamon, paprika, salt, and pepper in a small bowl. Rub the lamb chops with 1 tablespoon olive oil and the spice blend on both sides.
- Heat the remaining tablespoon of olive oil in a large skillet over medium-high heat. Cook the lamb chops for 3 to 4 minutes per side until they reach your preferred doneness. Remove them from the pan and let them rest.
- Bring the vegetable broth and minced garlic to a boil in a small saucepan. Stir in the couscous, cover, and remove from heat. Let it sit for 5 minutes, then fluff with a fork.
- Divide the couscous among four plates. Add the roasted carrots and two lamb chops to each plate. Scatter fresh mint leaves over the top before serving.
Notes
Cuisine: Moroccan
Equipment: Baking sheet, Large skillet, Small saucepan
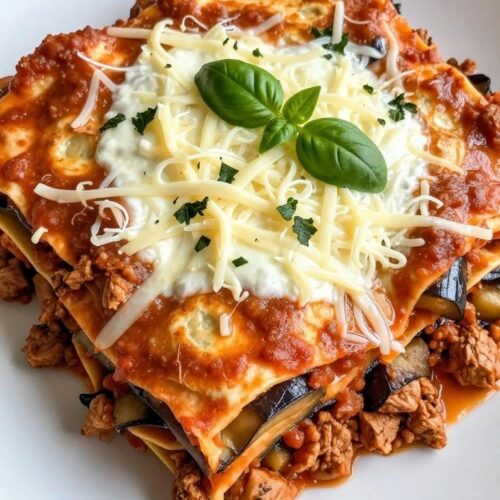
Ground Turkey and Eggplant Skillet Lasagna with Ricotta
This one-pan meal packs lean ground turkey and hearty eggplant into a lasagna-style dish that feels comforting without much effort. It works well for busy weeknights when you want something filling that still supports higher protein goals and keeps hunger in check until morning.
The flavors stay familiar with tomato sauce, herbs, and creamy ricotta, while the eggplant adds soft texture and extra volume. Everything cooks together in the skillet so the noodles soak up the sauce and the ricotta melts into warm pockets on top.

Equipment
- Large Skillet
- Wooden Spoon
- Measuring Spoons
Ingredients
- 1 lb ground turkey
- 1 large eggplant, diced into 1-inch pieces
- 1 medium onion, diced
- 3 cloves garlic, minced
- 1 (24 oz) jar marinara sauce
- 6 lasagna noodles, broken into 2-inch pieces
- 1 cup ricotta cheese
- 1/2 cup shredded mozzarella cheese
- 2 tbsp olive oil
- 1 tsp Italian seasoning
- 1/2 tsp salt
- 1/4 tsp black pepper
- Fresh basil leaves for garnish
Instructions
- Heat the olive oil in a large skillet over medium heat. Add the ground turkey and cook until it is no longer pink, breaking it up with a spoon as it browns.
- Stir in the diced onion and cook for 3 minutes until it softens. Add the minced garlic and cook for 1 minute more.
- Add the diced eggplant, Italian seasoning, salt, and black pepper. Cook for 5 minutes, stirring occasionally, until the eggplant starts to soften.
- Pour in the marinara sauce and add the broken lasagna noodles. Stir everything together, then bring the mixture to a simmer. Cover the skillet and cook for 15 minutes, stirring once or twice, until the noodles are tender.
- Remove the lid and drop spoonfuls of ricotta across the top. Sprinkle the shredded mozzarella over everything. Cover again and let it sit for 3 minutes until the cheeses melt.
- Garnish with fresh basil leaves before serving.
Notes
Cuisine: Italian
Equipment: Large Skillet, Wooden Spoon, Measuring Spoons