

Cooking family dinners can feel simple when you start with easy recipes. These ideas use basic ingredients and clear steps that work well for beginners. You can try them one at a time to get more comfortable making meals at home. Each recipe turns out reliably and feeds the whole family without much stress. They also leave room to adjust based on what you already have in your kitchen.
Helpful Tips Before You Start
These tips will help you stay organized and calm while cooking beginner friendly family dinners.
Read the Full Recipe First
Look over every step before you begin cooking. This prevents last minute surprises with timing or ingredients.
Prep Ingredients Ahead
Chop vegetables, measure spices, and gather tools before you start the stove. Having everything ready keeps the process steady.
Choose One New Technique
Focus on recipes that add just one skill, such as browning meat or simmering sauce. Small wins build confidence quickly.
Keep Sides Familiar
Serve new mains with simple sides your family already likes, like rice or steamed vegetables. This reduces overall pressure.
Taste and Adjust as You Go
Sample sauces and seasonings while cooking instead of waiting until the end. Small tweaks improve results without stress.
One-Pot Lemon Herb Chicken and Rice
This recipe brings together tender chicken and fluffy rice in a single pot, making it a reliable choice for weeknight family meals. The lemon and herbs keep the flavors bright without requiring extra steps or equipment.
It works well when you need a complete dinner that feels fresh but stays simple. The finished dish has soft rice that absorbs the savory broth and a light citrus note that balances the herbs.


Equipment
- Large Pot
- Cutting Board
- Knife
Ingredients
- 4 boneless skinless chicken thighs (about 1 lb)
- 1 tablespoon olive oil
- 1 small onion, diced
- 2 cloves garlic, minced
- 1 cup long grain white rice
- 2 cups chicken broth
- Zest and juice of 1 lemon
- 1 teaspoon dried thyme
- 1 teaspoon dried oregano
- 1/2 teaspoon salt
- 1/4 teaspoon black pepper
- 2 tablespoons chopped fresh parsley
Instructions
- Pat the chicken thighs dry and season both sides with salt and pepper.
- Heat the olive oil in a large pot over medium heat. Add the chicken and cook for 4 minutes per side until lightly browned. Remove the chicken to a plate.
- Add the onion to the same pot and cook for 3 minutes until softened. Stir in the garlic and cook for 30 seconds.
- Add the rice, thyme, and oregano. Stir for 1 minute to coat the rice.
- Pour in the chicken broth, lemon zest, and lemon juice. Return the chicken to the pot.
- Bring the mixture to a boil, then reduce the heat to low. Cover and simmer for 20 minutes until the rice is tender and the liquid is absorbed.
- Remove the pot from the heat. Let it rest covered for 5 minutes. Sprinkle with fresh parsley before serving.
Notes
Cuisine: American
Equipment: Large Pot, Cutting Board, Knife
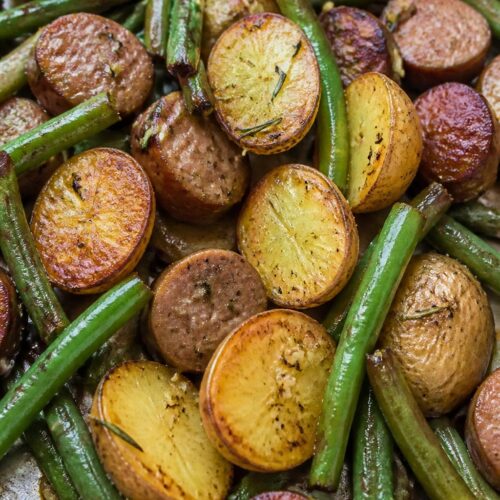
Sheet Pan Sausage, Potatoes, and Green Beans
This one-pan meal brings together savory sausage with tender potatoes and crisp green beans for a simple dinner that feels hearty without much effort. It works well on busy weeknights when you want minimal cleanup and reliable results that the whole family will eat. The flavors stay straightforward with garlic and herbs, while the textures range from soft roasted vegetables to lightly browned sausage edges.

Equipment
- Baking sheet
- Large bowl
- Oven
Ingredients
- 1 pound smoked sausage, sliced into rounds
- 1.5 pounds baby potatoes, halved
- 12 ounces fresh green beans, trimmed
- 2 tablespoons olive oil
- 1 teaspoon garlic powder
- 1 teaspoon dried rosemary
- 1/2 teaspoon salt
- 1/4 teaspoon black pepper
Instructions
- Preheat the oven to 425 degrees and line a large baking sheet with parchment paper or foil for easy cleanup.
- Place the halved potatoes in a large bowl and drizzle with 1 tablespoon of olive oil. Add the garlic powder, rosemary, salt, and pepper. Toss until the potatoes are evenly coated.
- Spread the potatoes in a single layer on the prepared baking sheet. Roast for 15 minutes so they begin to soften and brown.
- Remove the pan from the oven. Add the sliced sausage and green beans to the same bowl. Drizzle with the remaining tablespoon of olive oil and toss to coat.
- Arrange the sausage and green beans around the potatoes on the baking sheet in a single layer. Return the pan to the oven and roast for another 15 to 20 minutes until the potatoes are fork-tender and the sausage is heated through.
Notes
Cuisine: American
Equipment: Baking sheet, Large bowl, Oven
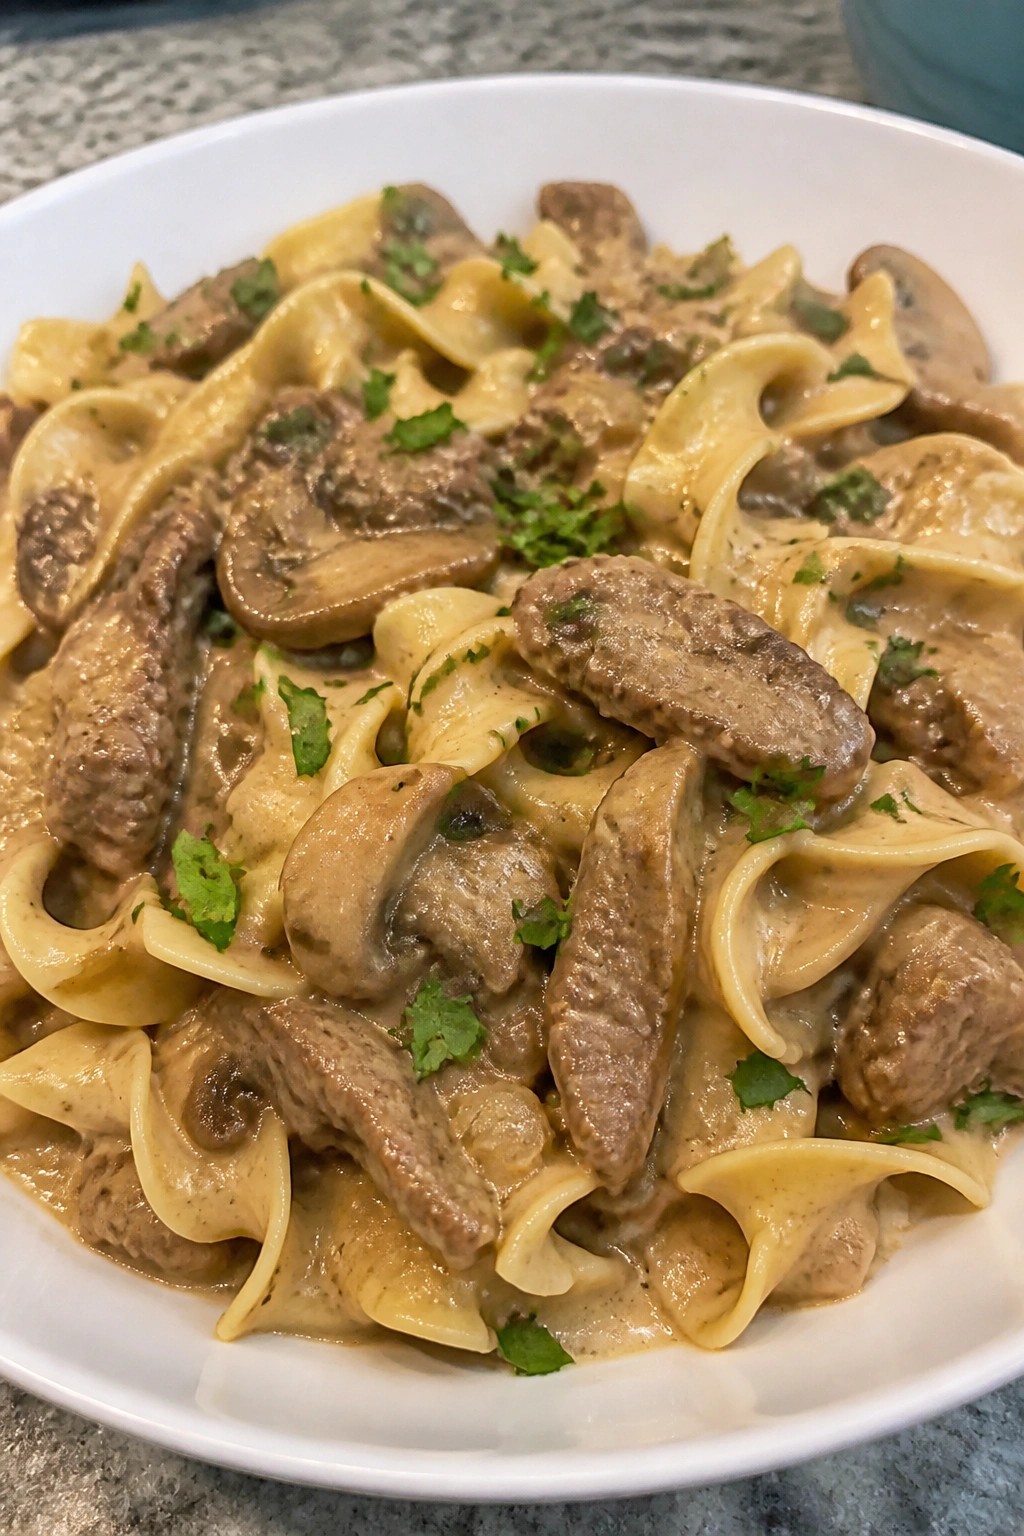
Easy Beef Stroganoff with Egg Noodles
This beef stroganoff comes together in one pan with tender strips of beef and a creamy mushroom sauce. It works well for busy weeknights when you need a filling meal that feels special without extra steps.
The egg noodles carry the sauce nicely and give the dish a soft, hearty texture. Families like it because the flavors stay mild and familiar while still tasting rich.

Equipment
- Large Skillet
- Large Pot
Ingredients
- 1 pound beef sirloin, thinly sliced
- 8 ounces egg noodles
- 1 medium onion, chopped
- 8 ounces mushrooms, sliced
- 2 cloves garlic, minced
- 2 tablespoons butter
- 2 tablespoons all-purpose flour
- 2 cups beef broth
- 1 cup sour cream
- Salt and black pepper, to taste
- 2 tablespoons chopped fresh parsley (for garnish)
Instructions
- Bring a large pot of salted water to a boil and cook the egg noodles according to package directions. Drain and set aside.
- Melt the butter in a large skillet over medium heat. Add the sliced beef and cook until browned on both sides. Remove the beef from the skillet and set it aside.
- Add the chopped onion and sliced mushrooms to the same skillet. Cook until the onion softens and the mushrooms release their liquid.
- Stir in the minced garlic and cook for one minute. Sprinkle the flour over the vegetables and stir to coat everything evenly.
- Slowly pour in the beef broth while stirring. Let the mixture simmer until it thickens slightly.
- Return the beef to the skillet. Lower the heat and stir in the sour cream. Season with salt and black pepper. Heat gently without letting the sauce boil.
- Serve the beef and sauce over the cooked egg noodles. Sprinkle with chopped parsley.
Notes
Cuisine: American
Equipment: Large Skillet, Large Pot
Baked Ziti with Ground Turkey and Spinach
This baked ziti brings together lean ground turkey and fresh spinach in a simple pasta bake. It works well for weeknight family dinners when you want something hearty without much fuss. The dish has a saucy tomato base, tender pasta, and a cheesy top layer that holds everything together.
It feels comforting but lighter than traditional beef versions. The spinach adds color and a mild green note that blends into the sauce during baking.


Equipment
- Large pot
- Large skillet
- 9×13 baking dish
Ingredients
- 8 ounces ziti pasta
- 1 tablespoon olive oil
- 1 pound ground turkey
- 1 small onion, diced
- 2 cloves garlic, minced
- 24 ounces marinara sauce
- 5 ounces fresh spinach
- 1 cup ricotta cheese
- 2 cups shredded mozzarella cheese
- 1/2 cup grated Parmesan cheese
- 1 teaspoon Italian seasoning
- Salt and pepper to taste
Instructions
- Preheat the oven to 375 degrees and lightly grease a 9×13 baking dish. Cook the ziti in a large pot of salted boiling water until just al dente, then drain and set aside.
- Heat the olive oil in a large skillet over medium heat. Add the ground turkey and cook until no longer pink, breaking it up as it browns.
- Stir in the diced onion and minced garlic. Cook for 3 to 4 minutes until the onion softens.
- Pour in the marinara sauce and add the Italian seasoning, salt, and pepper. Stir in the fresh spinach and let it wilt for 2 minutes.
- Remove the skillet from heat. Mix the cooked ziti and ricotta cheese into the sauce until evenly combined.
- Spread the mixture into the prepared baking dish. Sprinkle the mozzarella and Parmesan evenly over the top.
- Bake for 20 to 25 minutes until the cheese is melted and lightly golden. Let it rest for 5 minutes before serving.
Notes
Cuisine: Italian
Equipment: Large pot, Large skillet, 9×13 baking dish
Honey Garlic Glazed Salmon with Roasted Broccoli
This recipe pairs flaky salmon with a sticky honey garlic glaze and simple roasted broccoli. It works well for weeknight dinners when you want a complete meal without many steps or special tools.
The glaze brings sweet and savory notes that coat the fish nicely, while the broccoli turns tender with slightly crisp edges. It helps new cooks practice roasting vegetables and glazing protein in one session.


Equipment
- Baking sheet
- Large skillet
- Mixing bowl
- Small bowl
Ingredients
- 4 salmon fillets (6 ounces each)
- 1/4 cup honey
- 3 garlic cloves, minced
- 2 tablespoons soy sauce
- 2 tablespoons olive oil, divided
- 4 cups broccoli florets
- 1/2 teaspoon salt
- 1/4 teaspoon black pepper
- Lemon wedges, for serving
Instructions
- Preheat the oven to 400°F. In a large bowl, toss the broccoli florets with 1 tablespoon olive oil, 1/4 teaspoon salt, and the black pepper. Spread the broccoli on a baking sheet and place it in the oven to roast for 18 to 20 minutes.
- While the broccoli roasts, stir together the honey, minced garlic, soy sauce, and remaining 1 tablespoon olive oil in a small bowl to make the glaze.
- Pat the salmon fillets dry and sprinkle them with the remaining 1/4 teaspoon salt. Heat a large skillet over medium heat. Add the salmon and cook for 4 minutes on the first side.
- Flip the salmon and pour the glaze into the skillet. Spoon the glaze over the fillets as they cook for another 3 to 4 minutes, until the fish flakes easily and the glaze thickens slightly.
- Remove the broccoli from the oven. Serve the salmon with the roasted broccoli and lemon wedges on the side.
Notes
Cuisine: American
Equipment: Baking sheet, Large skillet, Mixing bowl, Small bowl
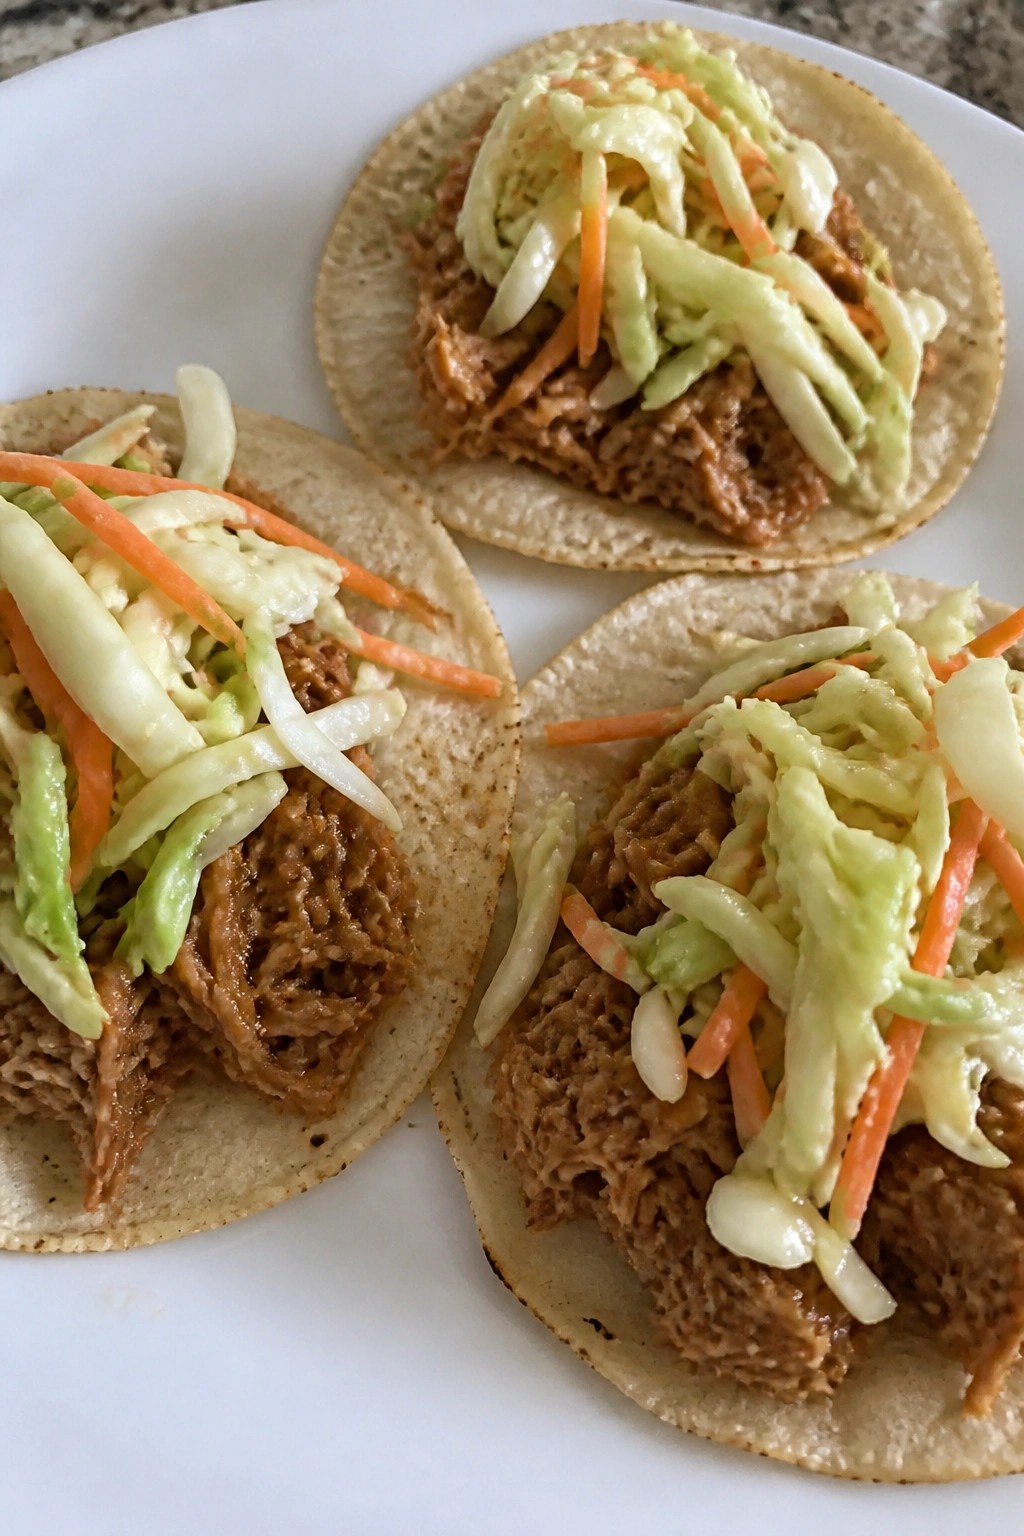
Slow Cooker Pulled Pork Tacos with Slaw
This slow cooker recipe lets the appliance handle the work while the pork turns tender and full of flavor. It works well on busy weeknights when you want a low-effort meal that still feels like a proper family dinner.
The finished tacos combine juicy pulled pork with a crisp, tangy slaw that adds freshness and crunch. Kids and adults can each assemble their own, which keeps things simple and relaxed at the table.

Equipment
- Slow Cooker
- Mixing Bowl
- Forks
Ingredients
- 2 pounds pork shoulder, trimmed
- 1 large onion, sliced
- 4 garlic cloves, minced
- 1 cup chicken broth
- 2 tablespoons chili powder
- 1 teaspoon ground cumin
- 1 teaspoon salt
- 1/2 teaspoon black pepper
- 8 small corn tortillas
- 3 cups shredded green cabbage
- 1 large carrot, shredded
- 1/4 cup mayonnaise
- 2 tablespoons apple cider vinegar
- 1 tablespoon honey
Instructions
- Place the sliced onion and minced garlic in the bottom of the slow cooker. Set the pork shoulder on top.
- In a small bowl, stir together the chicken broth, chili powder, cumin, salt, and black pepper. Pour the mixture over the pork.
- Cover and cook on low for 8 hours or until the pork shreds easily with two forks.
- While the pork cooks, make the slaw. In a medium bowl, whisk together the mayonnaise, apple cider vinegar, and honey. Add the shredded cabbage and carrot, then toss until everything is coated. Cover and refrigerate until serving.
- When the pork is done, remove it from the slow cooker and shred it on a cutting board. Return the shredded meat to the slow cooker and stir it into the juices.
- Warm the corn tortillas. Fill each tortilla with pulled pork and top with a spoonful of slaw.
Notes
Cuisine: Mexican
Equipment: Slow Cooker, Mixing Bowl, Forks
Creamy Mushroom and Pea Risotto
This risotto brings together earthy mushrooms and sweet peas in a creamy rice dish that feels special without much fuss. It works well for weeknight family dinners because the steps are straightforward and the result tastes like something from a restaurant. The texture is rich and velvety while the flavors stay mild and comforting.
It is a good recipe for beginners who want to practice one new skill, like gradual broth addition, and end up with a complete meal everyone will eat.


Equipment
- Large skillet
- saucepan
- wooden spoon
- ladle
Ingredients
- 1 1/2 cups Arborio rice
- 8 ounces cremini mushrooms, sliced
- 1 cup frozen peas
- 1 medium onion, diced
- 2 garlic cloves, minced
- 4 1/2 cups vegetable broth
- 1/2 cup grated Parmesan cheese
- 2 tablespoons butter
- 1 tablespoon olive oil
- 1/2 teaspoon salt
- 1/4 teaspoon black pepper
- 2 tablespoons chopped fresh parsley
Instructions
- Warm the vegetable broth in a saucepan over low heat and keep it gently simmering while you cook.
- Heat the olive oil and 1 tablespoon of butter in a large skillet over medium heat. Add the diced onion and cook for 3 minutes until it softens.
- Stir in the minced garlic and sliced mushrooms. Cook for 5 minutes until the mushrooms release their liquid and start to brown.
- Add the Arborio rice and stir for 2 minutes so the grains are coated and lightly toasted.
- Ladle in about 1 cup of warm broth. Stir often until the liquid is mostly absorbed. Repeat with the remaining broth, one cup at a time, waiting until each addition is absorbed before adding more.
- When the rice is tender and creamy, stir in the frozen peas, salt, and black pepper. Cook for 2 minutes until the peas are heated through.
- Remove the skillet from the heat. Stir in the remaining tablespoon of butter and the grated Parmesan until everything is melted and combined.
- Sprinkle with chopped parsley before serving.
Notes
Cuisine: Italian
Equipment: Large skillet, saucepan, wooden spoon, ladle
Turkey Meatball Marinara over Polenta
This recipe brings together soft turkey meatballs in a steady marinara sauce with a bowl of creamy polenta. It gives you a full plate that feels filling and balanced without needing advanced skills.
It works well on busy weeknights when you want a warm meal the whole family will eat. The sauce keeps the meatballs moist while the polenta adds a gentle, spoonable base.


Equipment
- Large skillet
- Medium saucepan
- Mixing bowl
Ingredients
- 1 pound ground turkey
- 1/2 cup breadcrumbs
- 1 large egg
- 1 teaspoon garlic powder
- 1 teaspoon dried oregano
- 1/2 teaspoon salt
- 1/4 teaspoon black pepper
- 3 cups marinara sauce
- 1 cup instant polenta
- 4 cups water
- 2 tablespoons butter
- 1/2 cup grated Parmesan cheese
- 2 tablespoons chopped fresh parsley
Instructions
- Place the ground turkey, breadcrumbs, egg, garlic powder, oregano, salt, and black pepper in a mixing bowl. Mix with your hands until the ingredients are evenly combined.
- Shape the mixture into 16 meatballs roughly the size of golf balls and set them on a plate.
- Heat a large skillet over medium heat. Add the meatballs and cook, turning every few minutes, until they are browned on all sides.
- Pour the marinara sauce into the skillet. Lower the heat, cover, and let the meatballs simmer in the sauce for 15 minutes.
- While the meatballs simmer, bring the water to a boil in a medium saucepan. Slowly whisk in the instant polenta and cook according to package directions, usually 3 to 5 minutes.
- Remove the polenta from heat and stir in the butter until it melts and the texture turns smooth.
- Spoon the polenta into bowls. Top each serving with meatballs and sauce, then finish with Parmesan cheese and parsley.
Notes
Cuisine: Italian
Equipment: Large skillet, Medium saucepan, Mixing bowl
Vegetarian Black Bean and Sweet Potato Enchiladas
This recipe turns simple pantry staples into a filling dinner that feels special without extra effort. It works well on weeknights when you want a meatless option that still satisfies everyone at the table. The sweet potatoes bring a soft, slightly sweet base while the black beans add heartiness and the enchilada sauce keeps each bite savory.
The finished dish has tender vegetables wrapped in soft tortillas with a light cheese topping that melts during baking. It is straightforward enough for new cooks yet reliable enough to become a regular family meal.


Equipment
- Baking sheet
- Skillet
- 9×13 baking dish
- Mixing bowl
Ingredients
- 2 medium sweet potatoes, peeled and diced into ½-inch pieces
- 1 tablespoon olive oil
- 1 small onion, diced
- 2 cloves garlic, minced
- 1 teaspoon ground cumin
- 1 teaspoon chili powder
- ½ teaspoon salt
- 1 can (15 oz) black beans, drained and rinsed
- 8 corn tortillas
- 1 can (10 oz) red enchilada sauce
- 1 cup shredded cheddar cheese
- Fresh cilantro, chopped (for serving)
Instructions
- Preheat the oven to 400°F and lightly grease a 9×13 baking dish.
- Toss the diced sweet potatoes with the olive oil on a baking sheet and roast for 20 minutes until they are fork-tender.
- While the sweet potatoes roast, heat a skillet over medium heat and cook the onion for 3 minutes until it softens.
- Add the garlic, cumin, chili powder, and salt to the skillet and stir for 1 minute until fragrant.
- Remove the skillet from heat and stir in the roasted sweet potatoes and black beans until evenly mixed.
- Warm the tortillas briefly so they are flexible, then spoon about ⅓ cup of the filling into each tortilla, roll them, and place them seam-side down in the baking dish.
- Pour the enchilada sauce evenly over the rolled tortillas and sprinkle the shredded cheese on top.
- Bake for 15 minutes until the cheese is melted and the edges are lightly browned.
- Remove from the oven and let the enchiladas rest for 5 minutes before serving with chopped cilantro.
Notes
Cuisine: Mexican
Equipment: Baking sheet, Skillet, 9×13 baking dish, Mixing bowl
Garlic Butter Shrimp and Zucchini Noodles
This recipe turns simple ingredients into a light dinner that feels special without extra effort. It works well on weeknights when you want a meal that comes together fast and leaves little cleanup. The garlic butter coats the shrimp while the zucchini noodles stay fresh and crisp.
Families like it because the flavors are familiar and the portions fill everyone up without feeling heavy. You can adjust the seasoning right before serving so each plate suits different tastes.


Equipment
- Large Skillet
- Spiralizer
Ingredients
- 1 pound large shrimp, peeled and deveined
- 4 medium zucchinis, spiralized into noodles
- 4 tablespoons butter
- 4 cloves garlic, minced
- 1/2 teaspoon salt
- 1/4 teaspoon black pepper
- 1 tablespoon lemon juice
- 2 tablespoons fresh parsley, chopped
Instructions
- Pat the shrimp dry with paper towels and set them aside. This helps them cook evenly in the butter.
- Melt the butter in a large skillet over medium heat. Add the minced garlic and stir for 30 seconds until fragrant but not browned.
- Add the shrimp to the skillet along with the salt and black pepper. Cook for 2 to 3 minutes per side until the shrimp turn pink and opaque.
- Stir in the lemon juice and remove the skillet from the heat. Add the zucchini noodles and toss gently for 1 minute so they warm slightly but stay crisp.
- Sprinkle the chopped parsley over the top and serve right away.
Notes
Cuisine: American
Equipment: Large Skillet, Spiralizer
Oven-Baked Chicken Parmesan with Side Salad
This oven-baked version of chicken parmesan gives you crispy breaded cutlets without the mess of frying. The chicken stays juicy inside while the cheese melts into the marinara, and the simple side salad keeps the meal fresh and balanced. It works well on weeknights when you want a complete dinner with minimal cleanup.
The texture comes from a light breadcrumb coating that browns in the oven, paired with cool crisp greens and juicy tomatoes on the side. Families enjoy it because the flavors are familiar and the steps stay straightforward.


Equipment
- Baking sheet
- Parchment paper
- Shallow bowls
- Large mixing bowl
Ingredients
- 4 boneless skinless chicken breasts
- 1 cup Italian breadcrumbs
- ½ cup grated Parmesan cheese, divided
- 1 large egg
- 2 cups marinara sauce
- 1 cup shredded mozzarella cheese
- 6 cups mixed salad greens
- 1 pint cherry tomatoes, halved
- 1 cucumber, sliced
- 2 tablespoons olive oil
- 1 tablespoon balsamic vinegar
- ½ teaspoon salt
- ¼ teaspoon black pepper
Instructions
- Preheat the oven to 400°F and line a baking sheet with parchment paper.
- Pound the chicken breasts to even thickness, then season both sides with salt and pepper.
- Beat the egg in a shallow bowl. In another bowl, mix the breadcrumbs with ¼ cup of the Parmesan.
- Dip each chicken breast in the egg, then coat it in the breadcrumb mixture and place it on the prepared baking sheet.
- Bake the chicken for 20 minutes. Remove the sheet from the oven and spoon marinara sauce over each piece.
- Sprinkle the mozzarella and remaining Parmesan over the sauce. Return the sheet to the oven and bake 10 more minutes until the cheese melts and bubbles.
- While the chicken finishes baking, place the mixed greens, cherry tomatoes, and cucumber in a large bowl.
- Drizzle the salad with olive oil and balsamic vinegar, then toss gently to coat.
- Serve each chicken piece with a portion of the side salad on the plate.
Notes
Cuisine: Italian
Equipment: Baking sheet, Parchment paper, Shallow bowls, Large mixing bowl