

Feeding a family on a budget often means finding ways to use what is already in the pantry. This post shares 12 dinner ideas built around affordable proteins like ground beef, chicken thighs, and canned beans. Each recipe is written out fully with simple steps and common ingredients. You will see meals that come together quickly and still feel like real family dinners. These options focus on keeping costs low while making sure everyone gets a satisfying plate.
Helpful Tips Before You Start
These ideas will help you get the most value from pantry staples and affordable proteins.
Check What You Already Own
Walk through your pantry and fridge first. Note any canned beans, rice, pasta, or spices on hand so you only buy what you truly need.
Stretch Proteins with Pantry Items
Use beans, rice, or pasta to bulk up smaller amounts of meat or eggs. This keeps portions filling without raising the cost per serving.
Cook Extra Staples at the Start
Make a double batch of rice or dried beans early in the week. Store them in the fridge to pull into multiple dinners without extra prep time.
Use Simple Seasoning Combos
Rely on dried herbs, garlic powder, and vinegar or soy sauce from the pantry. These add flavor to basic proteins without needing fresh add-ins each night.
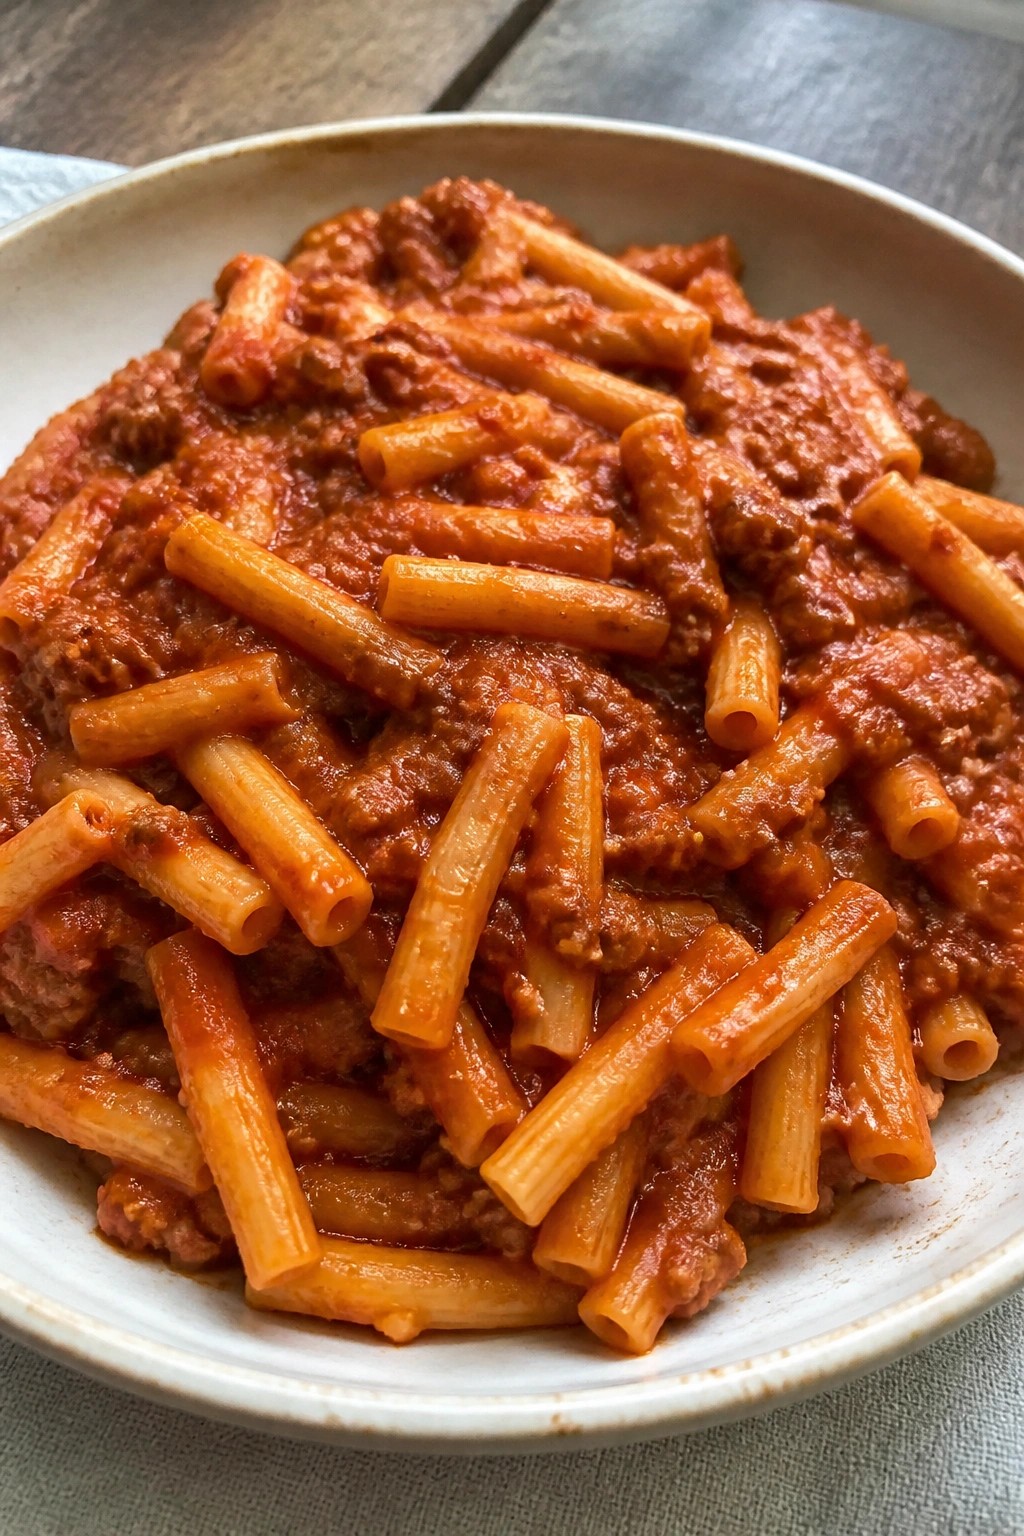
One-Pot Beef and Tomato Pasta
This one-pot meal turns basic pantry items and a pound of ground beef into a filling dinner the whole family will eat without complaints. It works well on busy weeknights when you want minimal cleanup and still need something hearty on the table. The finished dish has a savory tomato sauce that clings to the pasta with tender bits of beef throughout.

Equipment
- Large pot
- Wooden spoon
Ingredients
- 1 tablespoon olive oil
- 1 pound ground beef
- 1 medium onion, diced
- 2 cloves garlic, minced
- 1 can (14 ounces) diced tomatoes
- 2 cups beef broth
- 8 ounces dry pasta
- 1 teaspoon Italian seasoning
- 1/2 teaspoon salt
- 1/4 teaspoon black pepper
- Grated parmesan cheese for serving
Instructions
- Heat the olive oil in a large pot over medium heat. Add the ground beef and cook until browned, breaking it up with a spoon as it cooks.
- Add the diced onion and minced garlic to the pot. Cook for 3 to 4 minutes until the onion softens.
- Pour in the diced tomatoes and beef broth. Stir in the Italian seasoning, salt, and black pepper.
- Add the dry pasta and bring the mixture to a boil. Reduce the heat to a simmer, cover the pot, and cook for 12 to 15 minutes. Stir once or twice during cooking until the pasta is tender and most of the liquid has been absorbed.
- Remove the pot from the heat. Serve the pasta hot with grated parmesan cheese on top.
Notes
Cuisine: Italian
Equipment: Large pot, Wooden spoon
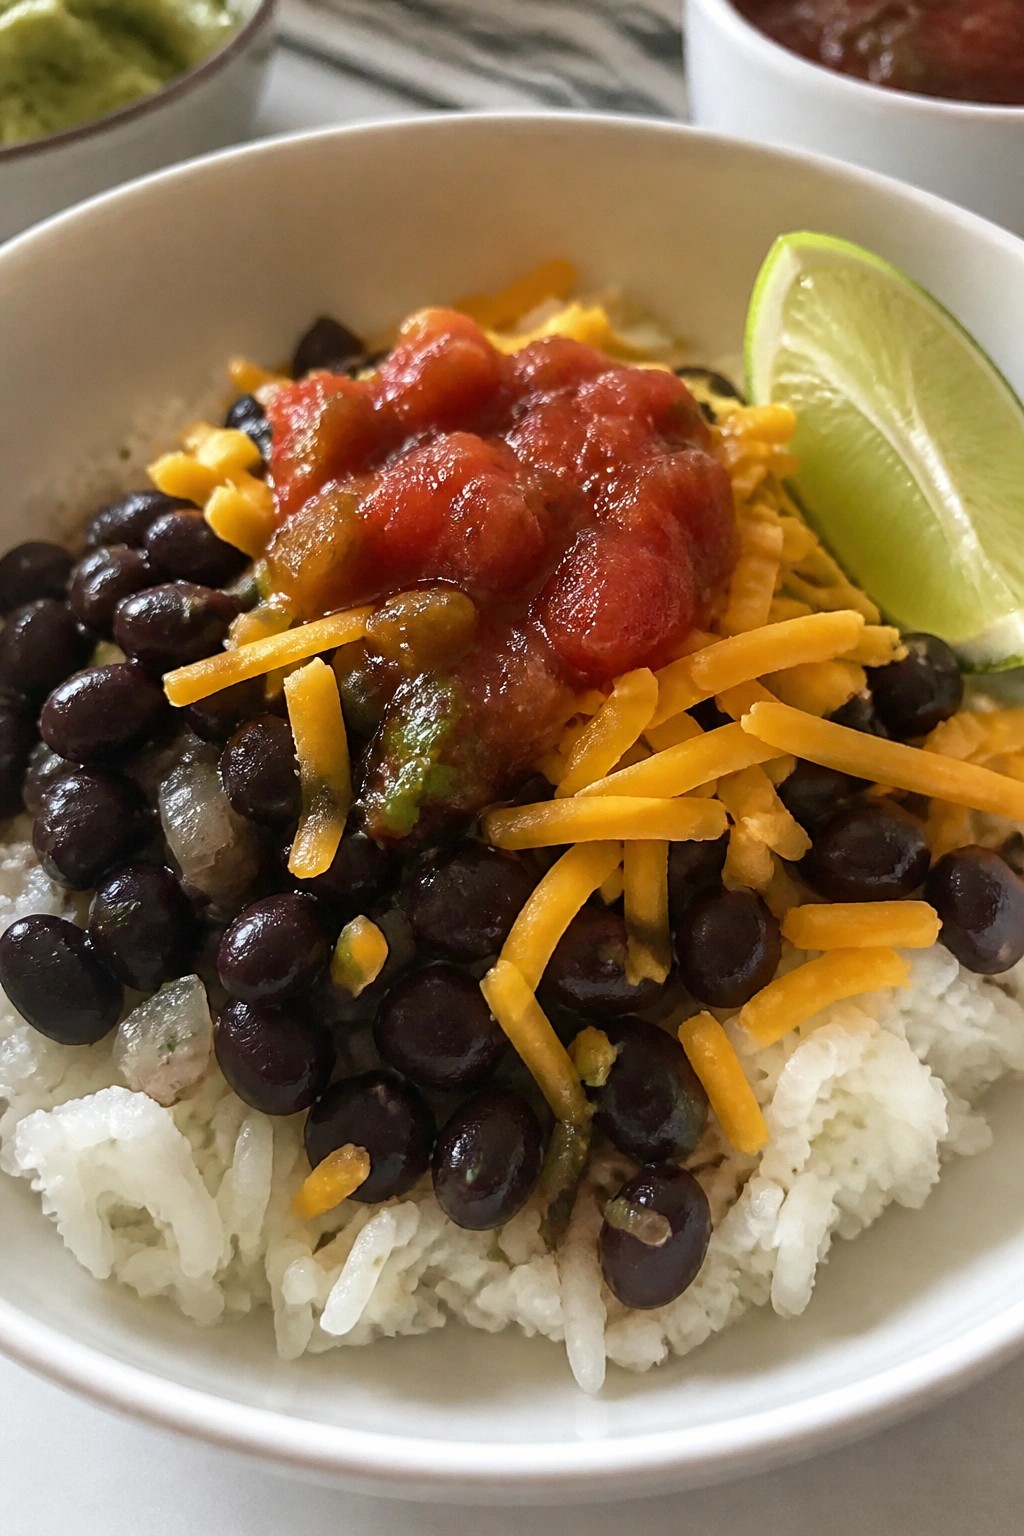
Black Bean Burrito Bowls with Rice
This recipe turns basic pantry items into a filling dinner that works on busy weeknights or when grocery budgets are tight. It relies on rice and canned black beans for protein and bulk, so you can stretch a few dollars across four servings.
The finished bowls offer a mix of fluffy rice, seasoned beans, and simple toppings that add freshness without extra cost. Families can customize portions at the table to suit different appetites.

Equipment
- Medium saucepan
- Large skillet
- Fork
Ingredients
- 1 cup long-grain white rice
- 2 cans (15 oz each) black beans, drained and rinsed
- 1 medium onion, diced
- 2 cloves garlic, minced
- 1 tablespoon vegetable oil
- 1 teaspoon ground cumin
- 1 teaspoon chili powder
- 1/2 teaspoon salt
- 2 cups water
- 1 cup prepared salsa
- 1 cup shredded cheddar cheese
- Lime wedges for serving
Instructions
- Place the rice and water in a medium saucepan. Bring to a boil over medium-high heat, then reduce to low, cover, and simmer for 18 minutes until the water is absorbed.
- While the rice cooks, heat the oil in a large skillet over medium heat. Add the diced onion and cook for 4 minutes until it softens.
- Stir in the minced garlic, cumin, chili powder, and salt. Cook for 1 minute until fragrant.
- Add the drained black beans to the skillet. Stir and cook for 5 minutes until the beans are heated through and coated with spices.
- Remove the rice from the heat and fluff it with a fork. Divide the rice among four bowls.
- Spoon the black bean mixture over the rice in each bowl. Top each serving with salsa and shredded cheese. Serve with lime wedges on the side.
Notes
Cuisine: Mexican
Equipment: Medium saucepan, Large skillet, Fork
Hearty Lentil and Vegetable Stew
This stew is an easy way to turn pantry staples into a filling family meal. It works well on weeknights when you want something warming without extra shopping or high costs.
The lentils become soft and the vegetables add a pleasant bite. A few simple spices create a savory flavor that feels comforting without being heavy.


Equipment
- Large pot
- Knife
- Cutting board
Ingredients
- 1 tablespoon olive oil
- 1 onion, chopped
- 2 carrots, chopped
- 2 celery stalks, chopped
- 3 cloves garlic, minced
- 1 teaspoon ground cumin
- 1 teaspoon smoked paprika
- 1 cup dried brown lentils, rinsed
- 1 can (14.5 oz) diced tomatoes
- 4 cups vegetable broth
- Salt and black pepper to taste
- 2 tablespoons chopped fresh parsley
Instructions
- Heat the olive oil in a large pot over medium heat. Add the onion, carrots, and celery. Cook for 5 minutes until the vegetables start to soften.
- Stir in the garlic, cumin, and smoked paprika. Cook for 1 minute until the spices smell fragrant.
- Add the rinsed lentils, diced tomatoes, and vegetable broth to the pot. Stir everything together.
- Bring the mixture to a boil, then reduce the heat to low. Cover and simmer for 30 minutes, stirring occasionally, until the lentils are tender.
- Taste and add salt and black pepper as needed. Stir in the chopped parsley just before serving.
Notes
Cuisine: Mediterranean
Equipment: Large pot, Knife, Cutting board
Garlic Chicken Thighs with Roasted Potatoes
This one-pan meal turns simple chicken thighs and potatoes into a satisfying dinner. It works well on busy weeknights when you need something filling without much hands-on time. The garlic seasons both the chicken and the potatoes, while the roasting creates crispy edges on the potatoes and tender meat.
The finished dish has juicy chicken with a savory garlic coating and potatoes that soak up the same flavors. It relies on ingredients most kitchens already have on hand.


Equipment
- Baking sheet
- Large bowl
- Oven
Ingredients
- 8 bone-in, skin-on chicken thighs (about 2 pounds)
- 1.5 pounds potatoes, cut into 1-inch chunks
- 5 garlic cloves, minced
- 1/4 cup olive oil
- 1 teaspoon dried thyme
- 1 teaspoon salt
- 1/2 teaspoon black pepper
- 1 lemon, cut into wedges
Instructions
- Heat the oven to 425 degrees and line a large baking sheet with foil or parchment for easy cleanup.
- In a large bowl, combine the minced garlic, olive oil, dried thyme, salt, and black pepper.
- Add the chicken thighs to the bowl and toss until each piece is coated on all sides.
- Place the potatoes in the same bowl and stir to coat them with the remaining garlic mixture.
- Spread the potatoes in a single layer on the baking sheet, then nestle the chicken thighs among them, skin side up.
- Roast for 35 to 40 minutes until the chicken reaches 165 degrees internally and the potatoes are golden and tender.
- Remove from the oven and let rest for 5 minutes before serving with lemon wedges on the side.
Notes
Cuisine: American
Equipment: Baking sheet, Large bowl, Oven
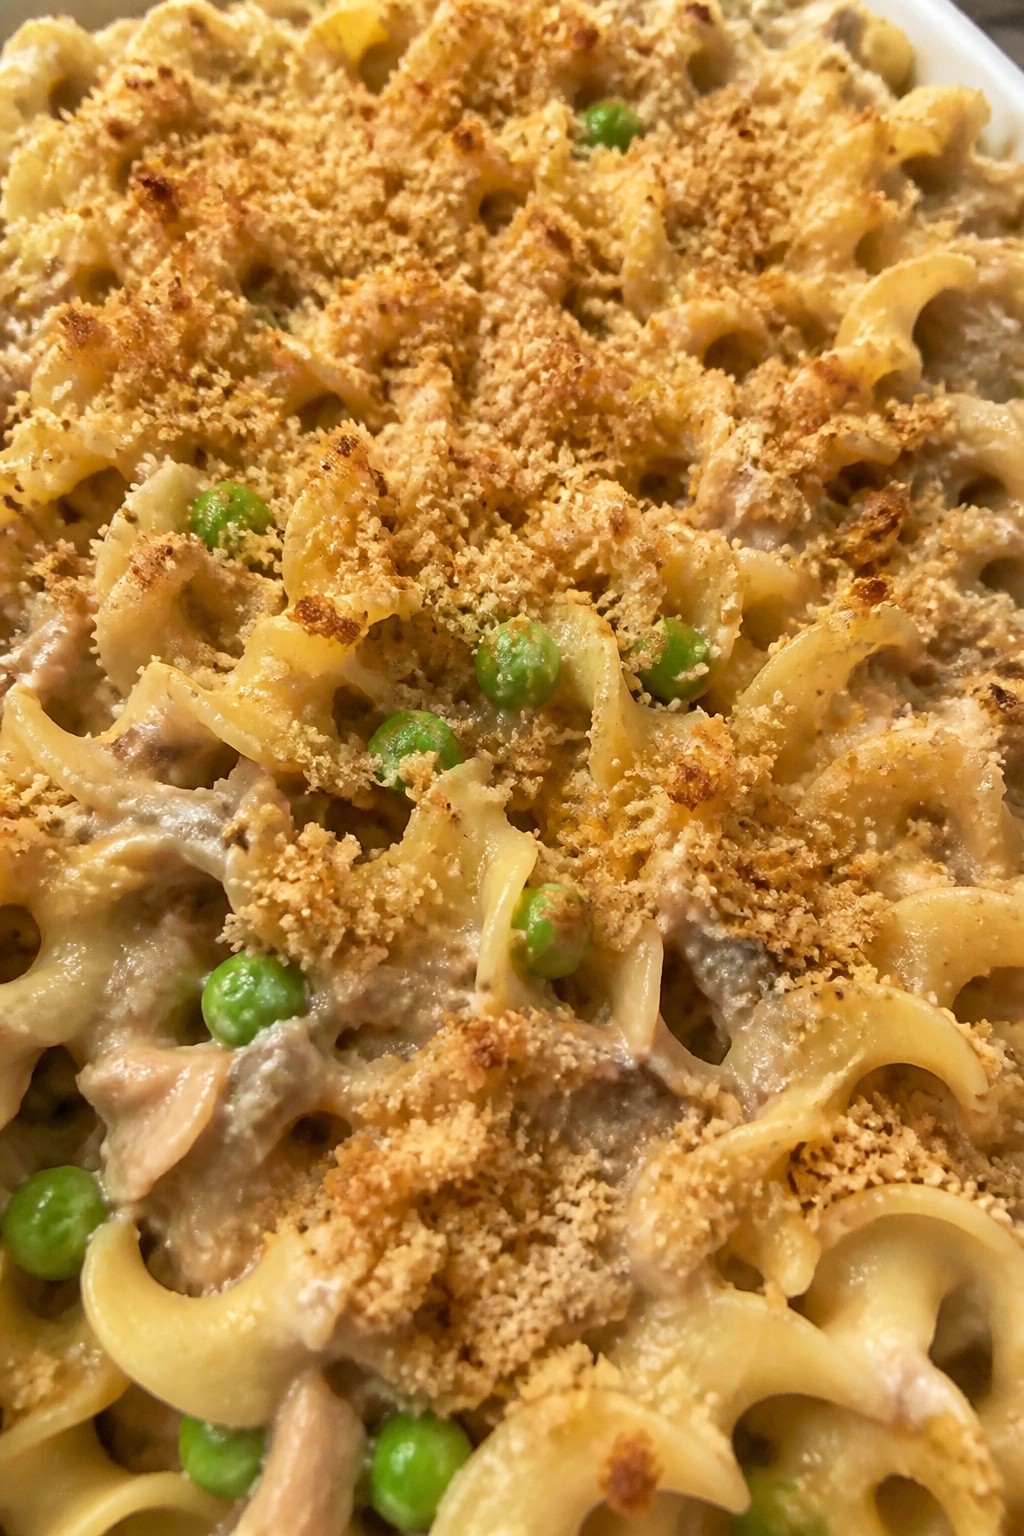
Tuna Noodle Casserole with Peas
Tuna noodle casserole with peas is a reliable weeknight option that turns basic pantry items into a filling meal. It delivers a creamy sauce, soft noodles, and gentle pops of sweetness from the peas, all balanced by mild tuna flavor.
This recipe shines when time and budget are tight. It uses affordable canned tuna and frozen peas to stretch a simple sauce into enough portions for the whole family.

Equipment
- Large Pot
- Mixing Bowl
- Baking Dish
Ingredients
- 8 ounces egg noodles
- 2 (5-ounce) cans tuna, drained
- 1 cup frozen peas
- 1 (10.5-ounce) can condensed cream of mushroom soup
- 1/2 cup milk
- 1/2 cup breadcrumbs
- 1/2 teaspoon salt
- 1/4 teaspoon black pepper
Instructions
- Preheat the oven to 375°F and lightly grease a medium baking dish.
- Bring a large pot of water to a boil. Add the egg noodles and cook until just tender, then drain and return them to the pot.
- Stir the cream of mushroom soup and milk into the noodles until the mixture is smooth and evenly coated.
- Add the drained tuna, frozen peas, salt, and black pepper. Mix gently until everything is combined.
- Transfer the mixture to the prepared baking dish and spread it into an even layer.
- Sprinkle the breadcrumbs evenly over the top.
- Bake for 20 minutes until the sauce is bubbling and the breadcrumbs are lightly golden.
Notes
Cuisine: American
Equipment: Large Pot, Mixing Bowl, Baking Dish
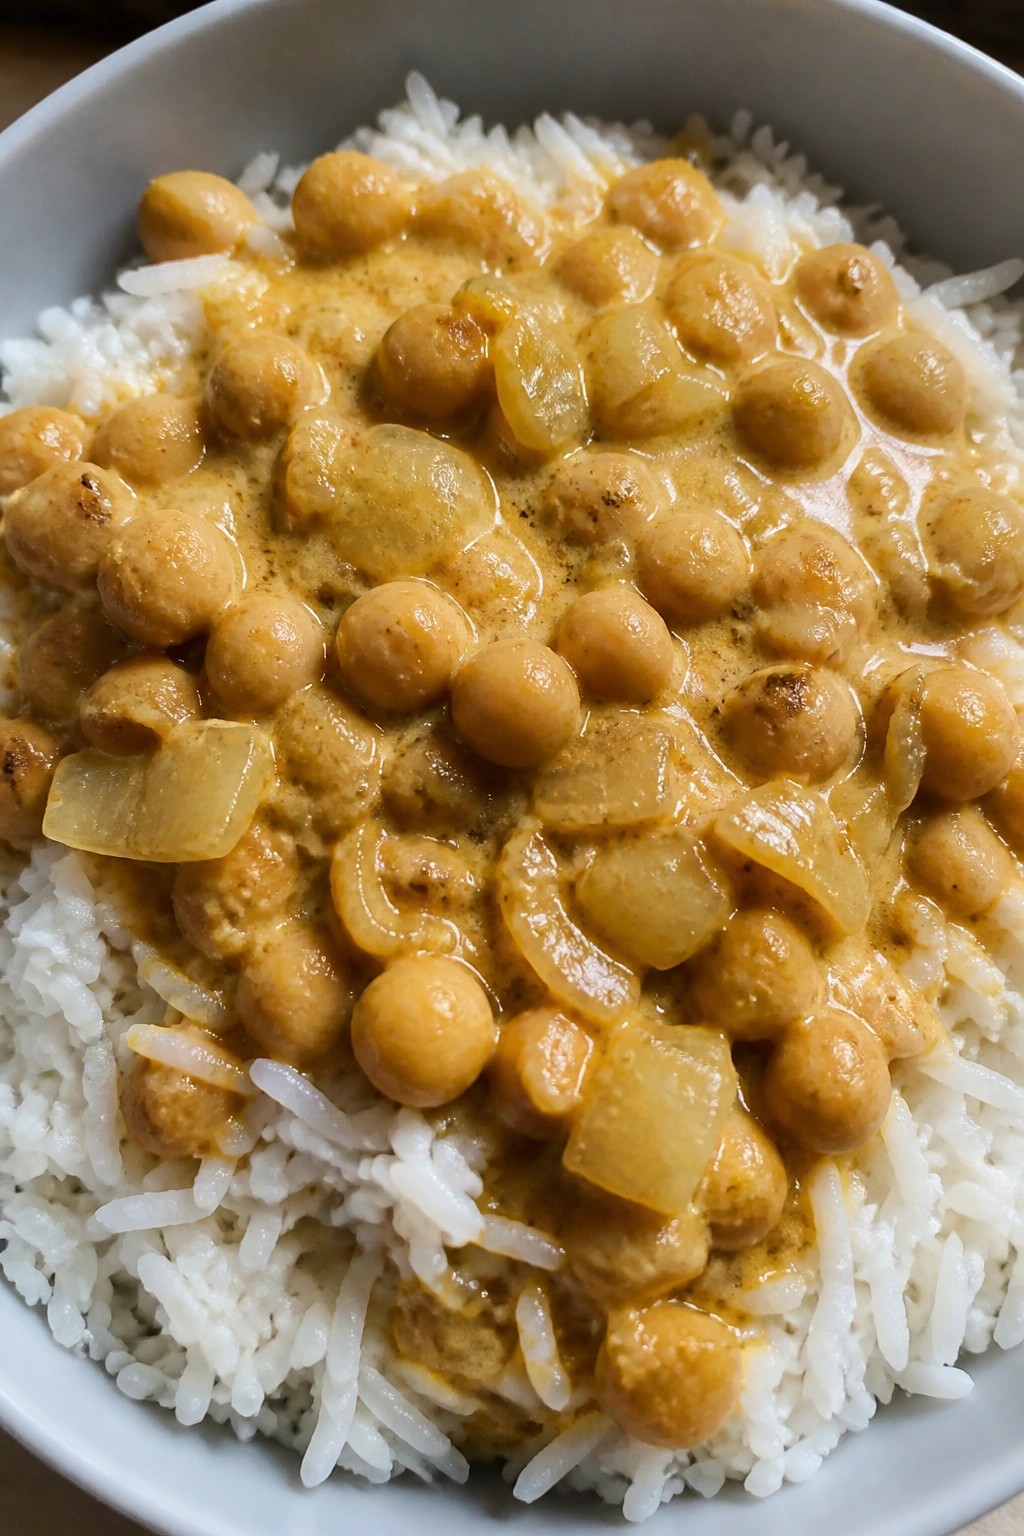
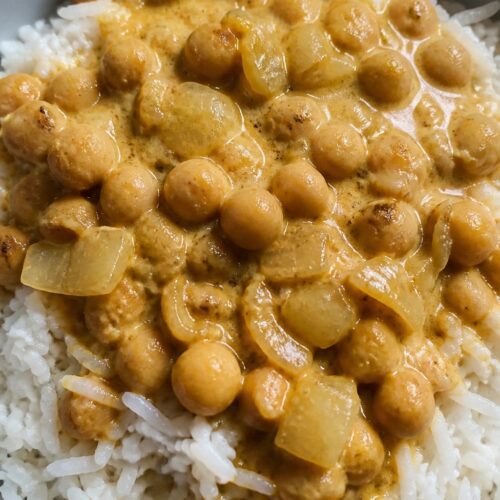
Chickpea Coconut Curry over Rice
This chickpea coconut curry turns basic pantry items into a creamy, filling dinner that feels special without extra cost. It suits busy weeknights when you need a meatless option the whole family will eat. The sauce tastes gently spiced and rich, while the chickpeas stay tender against fluffy rice.
It works well when you have canned goods and rice on hand but want something different from plain beans. The one-pan curry keeps cleanup simple and stretches two cans of chickpeas into four solid servings.
Equipment
- Large skillet
- Medium saucepan
Ingredients
- 1 1/2 cups long grain white rice
- 2 tablespoons vegetable oil
- 1 medium onion, diced
- 3 garlic cloves, minced
- 2 cans (15 ounces each) chickpeas, drained and rinsed
- 1 can (13.5 ounces) coconut milk
- 2 tablespoons curry powder
- 1 teaspoon ground cumin
- 1/2 teaspoon salt
- 1/4 teaspoon black pepper
Instructions
- Cook the rice according to package directions in a medium saucepan and set aside.
- Heat the vegetable oil in a large skillet over medium heat. Add the diced onion and cook until it softens and turns translucent.
- Stir in the minced garlic and cook for one minute until fragrant.
- Add the curry powder, ground cumin, salt, and black pepper. Stir for 30 seconds to toast the spices.
- Pour in the drained chickpeas and the full can of coconut milk. Bring the mixture to a gentle simmer.
- Cook uncovered for 10 minutes, stirring occasionally, until the sauce thickens slightly around the chickpeas.
- Spoon the curry over the cooked rice and serve.
Notes
Cuisine: Indian
Equipment: Large skillet, Medium saucepan
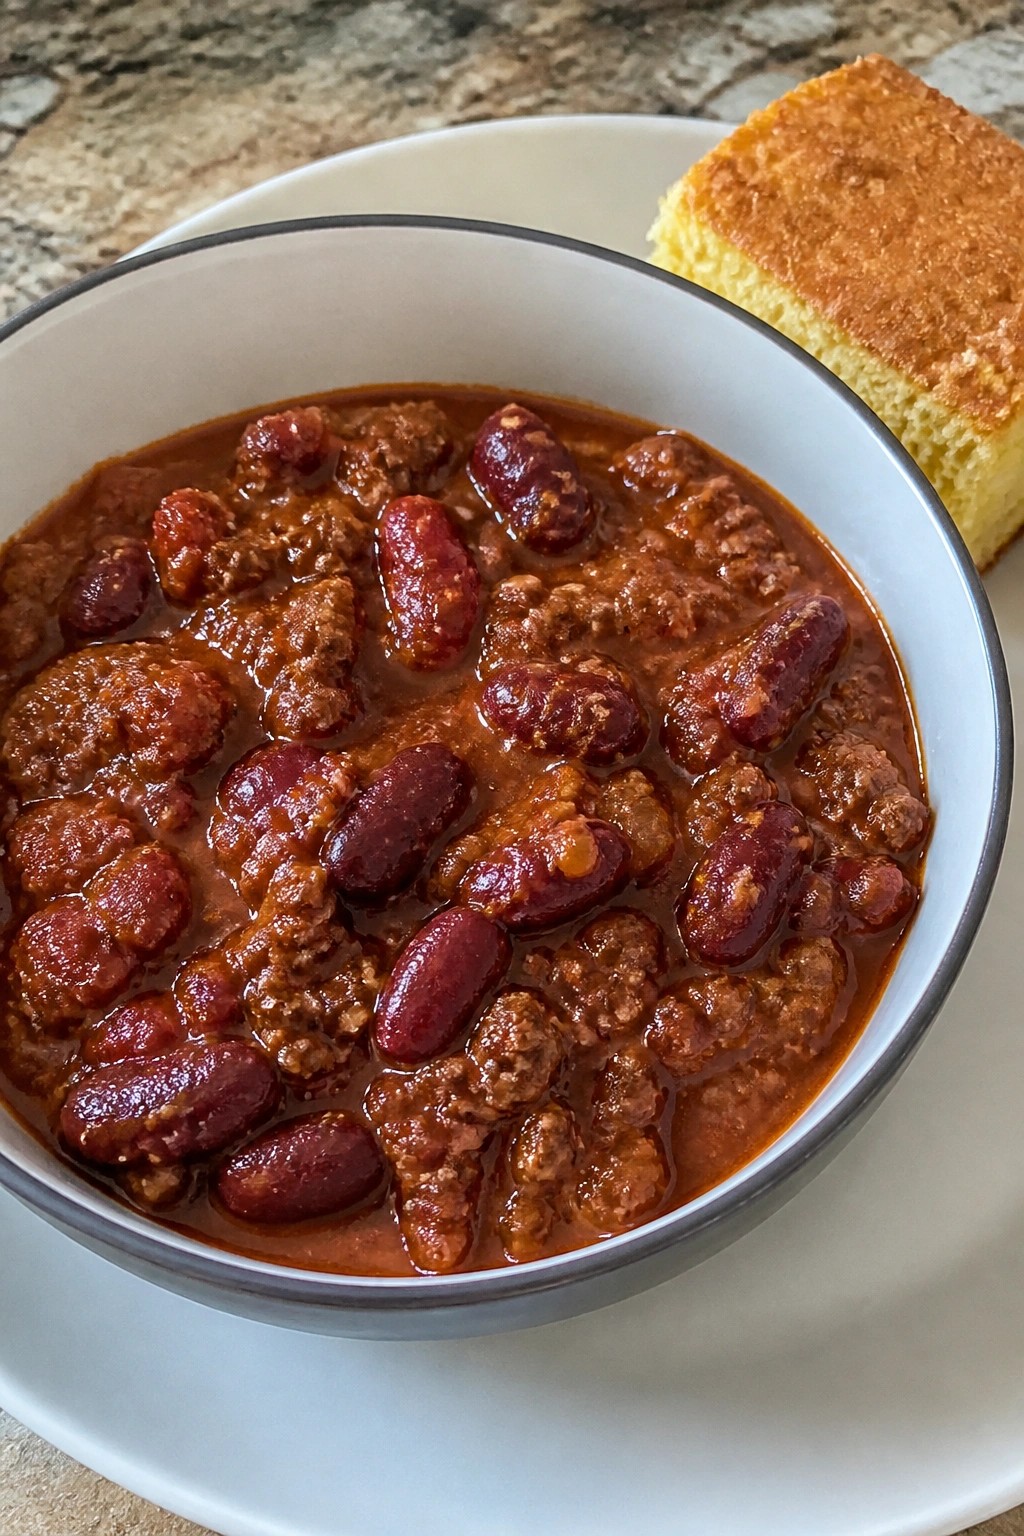
Beef and Bean Chili with Cornbread
This beef and bean chili turns basic pantry items and ground beef into a filling meal that stretches to feed a family. The cornbread bakes alongside in the same oven window, giving you a warm, crumbly side without extra work.
The chili cooks down into a thick, spiced stew with tender beans and rich tomato flavor. The cornbread offers a mild, slightly sweet balance that soaks up the broth nicely.

Equipment
- Large pot
- Mixing bowl
- Baking pan
Ingredients
- 1 pound ground beef
- 1 onion, diced
- 2 cloves garlic, minced
- 1 can (15 oz) kidney beans, drained and rinsed
- 1 can (14.5 oz) diced tomatoes
- 2 tablespoons chili powder
- 1 teaspoon ground cumin
- 1 teaspoon salt
- 1/2 teaspoon black pepper
- 1 cup cornmeal
- 1 cup all-purpose flour
- 1 tablespoon baking powder
- 1 cup milk
- 1 large egg
- 1/4 cup vegetable oil
Instructions
- Heat a large pot over medium heat. Add the ground beef, diced onion, and minced garlic. Cook until the beef is browned and the onion softens, breaking up the meat as it cooks.
- Stir in the kidney beans, diced tomatoes, chili powder, cumin, salt, and black pepper. Bring the mixture to a simmer, then reduce the heat to low and cook uncovered for 20 minutes, stirring occasionally.
- While the chili simmers, preheat the oven to 400°F. In a mixing bowl, whisk together the cornmeal, flour, and baking powder.
- In a separate bowl, whisk the milk, egg, and vegetable oil. Pour the wet ingredients into the dry ingredients and stir just until combined.
- Pour the cornbread batter into a greased 8-inch square baking pan. Bake for 20 minutes, or until the top is golden and a toothpick inserted in the center comes out clean.
- Let the cornbread cool for a few minutes, then cut into squares and serve alongside the chili.
Notes
Cuisine: American
Equipment: Large pot, Mixing bowl, Baking pan
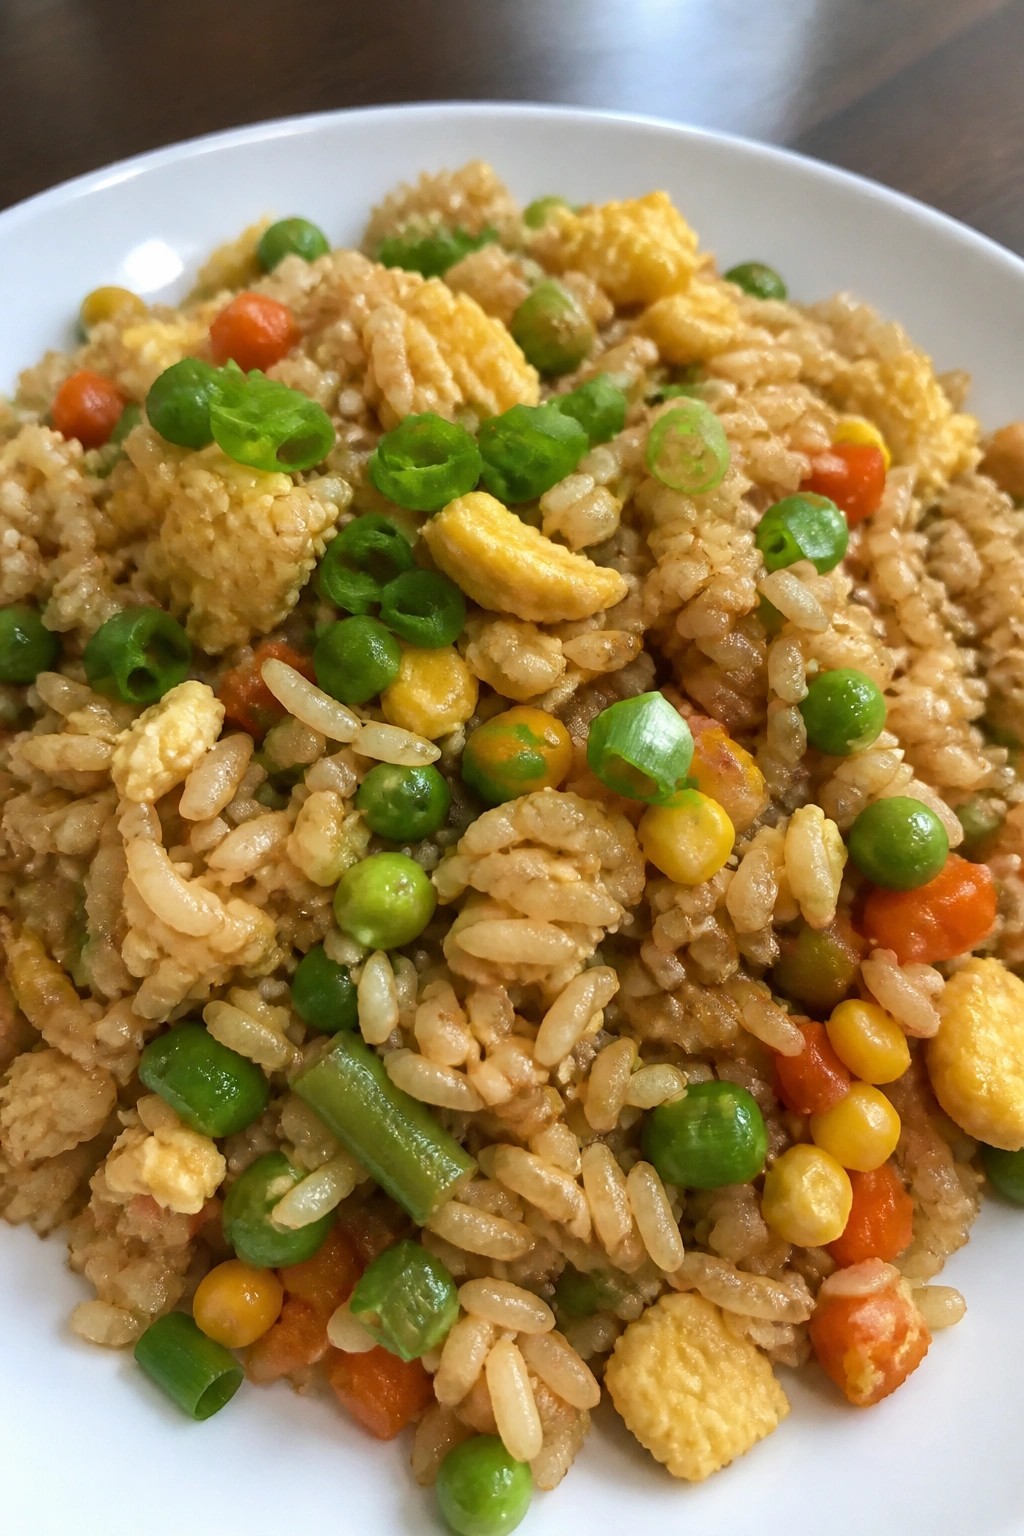
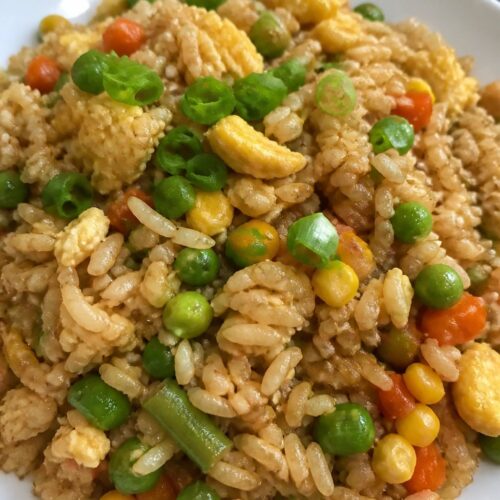
Vegetable Egg Fried Rice
This Vegetable Egg Fried Rice turns leftover rice and a few basic items into a filling dinner the whole family will enjoy. It works especially well on weeknights when you want something fast that still feels like a complete meal. The finished dish has savory notes from the soy sauce, soft scrambled eggs, and a mix of tender and slightly crisp vegetables in every bite.
Equipment
- Large Skillet
Ingredients
- 4 cups cooked day-old rice
- 4 large eggs
- 2 cups frozen mixed vegetables
- 3 tablespoons soy sauce
- 2 tablespoons vegetable oil
- 4 green onions, sliced
- 1/2 teaspoon salt
- 1/4 teaspoon black pepper
Instructions
- Heat the vegetable oil in a large skillet over medium heat. Crack the eggs into the skillet and scramble them until just set, then push them to one side.
- Add the frozen mixed vegetables to the empty side of the skillet. Cook for 3 to 4 minutes, stirring occasionally, until the vegetables are warmed through.
- Add the cooked rice to the skillet along with the soy sauce, salt, and black pepper. Stir everything together so the rice and vegetables are evenly coated.
- Cook for another 4 to 5 minutes, stirring now and then, until the rice is heated and starts to pick up a bit of color.
- Stir in the sliced green onions and remove the skillet from the heat.
Notes
Cuisine: Asian
Equipment: Large Skillet
Baked Sausage, Potato, and Cabbage Hash
This baked hash brings together affordable sausage with pantry potatoes and cabbage for a filling one-pan dinner. It works well on busy weeknights when you want minimal cleanup and a meal that stretches a small amount of protein. The result is savory with crispy potato edges and tender cabbage that soaks up the seasoning.


Equipment
- Baking Sheet
- Large Mixing Bowl
- Oven
Ingredients
- 1 pound smoked sausage, sliced into rounds
- 4 medium potatoes, cut into 1-inch cubes
- 4 cups chopped green cabbage
- 1 medium onion, sliced
- 2 tablespoons olive oil
- 1 teaspoon paprika
- 1/2 teaspoon garlic powder
- 1/2 teaspoon salt
- 1/4 teaspoon black pepper
Instructions
- Preheat the oven to 425 degrees and line a large baking sheet with parchment paper.
- In a large bowl, combine the potato cubes, sliced onion, and chopped cabbage.
- Drizzle the olive oil over the vegetables and sprinkle with paprika, garlic powder, salt, and black pepper. Toss until everything is evenly coated.
- Spread the vegetable mixture in a single layer on the prepared baking sheet.
- Nestle the sausage slices among the vegetables on the baking sheet.
- Bake for 30 to 35 minutes, stirring once halfway through, until the potatoes are tender and the edges are browned.
- Remove from the oven and serve hot.
Notes
Cuisine: American
Equipment: Baking Sheet, Large Mixing Bowl, Oven
Cheesy Chicken and Broccoli Rice Bake
This cheesy chicken and broccoli rice bake turns basic pantry staples into a filling meal the whole family will eat. It works especially well on weeknights when you want to use up rice and frozen vegetables without extra shopping.
The finished dish has tender rice coated in a light cheese sauce, pieces of chicken, and bright broccoli throughout. A layer of melted cheese on top gives it a simple golden crust.


Equipment
- Large skillet
- 9×13 baking dish
- Mixing bowl
Ingredients
- 1 pound boneless skinless chicken thighs
- 1 cup uncooked long grain white rice
- 2 cups frozen broccoli florets
- 2 cups shredded cheddar cheese, divided
- 1 can (10.5 oz) cream of chicken soup
- 1 cup milk
- 1 teaspoon garlic powder
- 1 tablespoon olive oil
- Salt and black pepper to taste
Instructions
- Preheat the oven to 375°F and lightly grease a 9×13 baking dish.
- Heat the olive oil in a large skillet over medium heat. Cut the chicken thighs into bite-size pieces, season with salt, pepper, and garlic powder, then cook until no longer pink, about 6 to 7 minutes. Remove from heat.
- In a mixing bowl, stir together the cream of chicken soup, milk, and 1 cup of the shredded cheddar until smooth.
- Add the uncooked rice, frozen broccoli florets, and cooked chicken to the bowl. Stir until everything is evenly coated.
- Pour the mixture into the prepared baking dish and spread it into an even layer. Sprinkle the remaining 1 cup of cheddar over the top.
- Cover tightly with foil and bake for 35 minutes. Remove the foil and bake 10 minutes more until the cheese is melted and the rice is tender.
Notes
Cuisine: American
Equipment: Large skillet, 9×13 baking dish, Mixing bowl
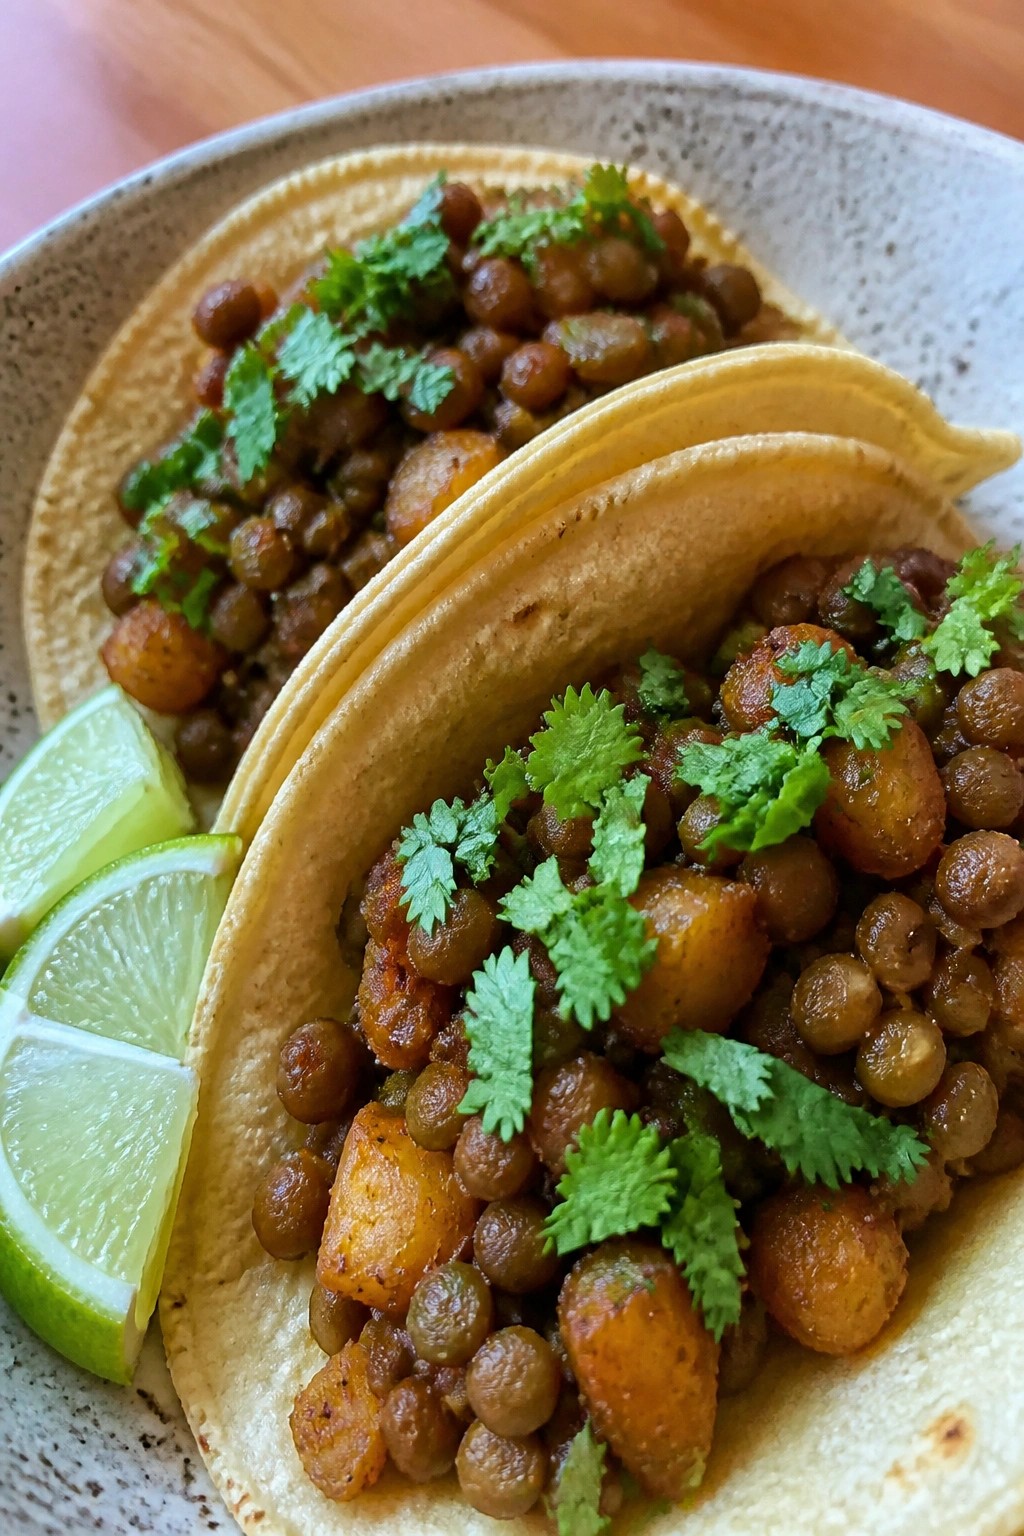
Mexican Lentil and Potato Tacos
These tacos make good use of lentils and potatoes to create a filling dinner that feels satisfying without costing much. They work well for weeknights when you want something quick that still uses items already in the pantry.
The lentils turn soft while the potatoes hold a bit of bite, and warm spices give the mix a savory, lightly smoky taste that works inside corn tortillas.

Equipment
- Medium pot
- Large skillet
- Knife
- Cutting board
Ingredients
- 1 cup dry brown lentils
- 3 medium potatoes, peeled and diced
- 1 yellow onion, diced
- 3 garlic cloves, minced
- 2 tablespoons vegetable oil
- 1 teaspoon ground cumin
- 1 teaspoon chili powder
- 1/2 teaspoon smoked paprika
- 1/2 teaspoon salt
- 8 corn tortillas
- 1/4 cup chopped fresh cilantro
- Lime wedges for serving
Instructions
- Place the lentils in a medium pot and cover with 3 cups of water. Bring to a boil, then reduce to a simmer and cook for 20 minutes until tender. Drain any remaining liquid and set the lentils aside.
- Heat the vegetable oil in a large skillet over medium heat. Add the diced onion and cook for 3 minutes until it starts to soften.
- Stir in the minced garlic, diced potatoes, cumin, chili powder, smoked paprika, and salt. Cook for 10 minutes, stirring often, until the potatoes are tender and lightly browned at the edges.
- Add the cooked lentils to the skillet and stir everything together. Cook for another 3 minutes so the flavors combine.
- Warm the corn tortillas in a dry skillet or over a low flame for 20 seconds on each side.
- Spoon the lentil and potato mixture into the tortillas. Top with chopped cilantro and serve with lime wedges on the side.
Notes
Cuisine: Mexican
Equipment: Medium pot, Large skillet, Knife, Cutting board
White Bean Tomato Soup with Grilled Cheese
This soup turns basic pantry items into a filling dinner that feels special without extra cost. White beans bring protein and body, while canned tomatoes create a bright base that simmers into a smooth, comforting bowl.
It comes together quickly on busy weeknights and pairs naturally with warm grilled cheese for dipping. The result is a creamy soup with gentle herb flavor and a crisp, melty sandwich on the side.


Equipment
- Large pot
- immersion blender
- skillet
Ingredients
- 2 tablespoons olive oil
- 1 medium onion, diced
- 3 garlic cloves, minced
- 2 cans (15 oz each) white beans, drained and rinsed
- 1 can (28 oz) crushed tomatoes
- 4 cups vegetable broth
- 1 teaspoon dried oregano
- Salt and pepper to taste
- 8 slices sandwich bread
- 8 slices cheddar cheese
- 2 tablespoons butter
Instructions
- Heat the olive oil in a large pot over medium heat. Add the diced onion and cook until softened, about 5 minutes.
- Stir in the minced garlic and cook for 1 minute until fragrant.
- Add the white beans, crushed tomatoes, vegetable broth, and oregano. Season with salt and pepper.
- Bring the mixture to a simmer and cook for 15 minutes, stirring occasionally.
- Use an immersion blender to puree the soup until mostly smooth, leaving a few beans for texture. Alternatively, transfer half the soup to a blender, puree, and return it to the pot.
- While the soup simmers, heat a skillet over medium heat. Butter one side of each bread slice.
- Place 4 bread slices butter-side down in the skillet. Top each with 2 cheese slices and another bread slice, butter-side up.
- Cook the sandwiches until golden on both sides and the cheese melts, about 3 minutes per side. Slice and serve with the soup.
Notes
Cuisine: American
Equipment: Large pot, immersion blender, skillet