

Feeding picky eaters on weeknights often means finding meals that everyone will actually eat. These recipes focus on simple ingredients and basic steps that fit into a regular routine. You will see ideas that use foods kids already like while keeping prep time short. Each one aims to reduce the usual dinner stress without adding extra work. They offer practical options to try when you need something reliable.
Helpful Tips Before You Start
A few small changes can help these meals appeal to kids without adding extra work.
Let Kids Assemble Their Own Plates
Set out toppings or components in bowls. Kids often eat more when they build their own tacos, bowls, or pizzas.
Serve Sauces on the Side
Keep dressings, cheese, or dips separate from the main dish. This lets picky eaters control flavors and textures.
Use Familiar Shapes and Colors
Cut foods into strips or bite-size pieces they already like. Bright vegetables next to familiar proteins increase the chance they will try something new.
Prep One Element Ahead
Chop vegetables or cook a batch of grains on the weekend. Weeknight assembly then takes under 20 minutes.
Offer Two Simple Sides
Pair the main dish with one vegetable and one starch they usually accept. This keeps the meal balanced without overwhelming choices.
Crispy Baked Chicken Tenders with Roasted Potato Wedges
This recipe turns two family favorites into one easy sheet-pan meal. The chicken gets a crunchy coating without frying, while the potatoes roast alongside until golden and tender. It works well on busy weeknights when you want something simple that still feels like a treat.
Kids like the crispy outside and mild flavor, and parents like that everything cooks on one pan. The texture stays satisfying even after a quick reheat, making it practical for leftovers too.


Equipment
- Baking sheet
- Parchment paper
- Mixing bowls
Ingredients
- 1 pound chicken tenders
- 1 cup panko breadcrumbs
- 1/4 cup grated Parmesan cheese
- 1 teaspoon garlic powder
- 1 teaspoon paprika
- 1/2 teaspoon salt, divided
- 1/4 teaspoon black pepper, divided
- 2 large eggs
- 4 medium russet potatoes, cut into wedges
- 2 tablespoons olive oil
Instructions
- Preheat the oven to 425 degrees and line a large baking sheet with parchment paper.
- In a shallow bowl, mix the panko breadcrumbs, Parmesan cheese, garlic powder, paprika, 1/4 teaspoon salt, and 1/8 teaspoon black pepper.
- In a second bowl, whisk the eggs until smooth.
- Dip each chicken tender in the egg, then coat it in the breadcrumb mixture. Place the coated tenders on one half of the prepared baking sheet.
- In a large bowl, toss the potato wedges with olive oil, the remaining 1/4 teaspoon salt, and the remaining 1/8 teaspoon black pepper. Spread them on the other half of the baking sheet.
- Bake for 20 to 25 minutes, flipping the tenders and potatoes halfway through, until the chicken is cooked through and the potatoes are golden at the edges.
Notes
Cuisine: American
Equipment: Baking sheet, Parchment paper, Mixing bowls
Cheesy Beef Taco Skillet Served with Soft Tortillas
This cheesy beef taco skillet keeps flavors mild and familiar so picky eaters stay happy. The beef stays tender and the melted cheese pulls everything together. Soft tortillas on the side let kids build their own small tacos or simply dip.
It works well on busy weeknights because the whole dish cooks in one pan and needs almost no chopping. Leftovers reheat easily for lunch the next day.


Equipment
- Large Skillet
Ingredients
- 1 pound ground beef
- 1 packet taco seasoning mix
- ½ cup water
- 2 cups shredded cheddar cheese
- 8 soft flour tortillas
Instructions
- Place the ground beef in a large skillet over medium heat. Break it up with a spatula and cook until no pink remains.
- Drain any excess fat from the skillet. Return the pan to the heat.
- Sprinkle the taco seasoning over the beef and pour in the water. Stir well and let the mixture simmer for 3 to 4 minutes until the liquid thickens slightly.
- Sprinkle the shredded cheddar cheese evenly over the beef. Cover the skillet with a lid and cook for 1 to 2 minutes until the cheese melts completely.
- Remove the skillet from the heat. Serve the cheesy beef with the soft tortillas on the side so everyone can scoop and wrap their own portions.
Notes
Cuisine: Mexican
Equipment: Large Skillet
Mild Chicken and Cheese Enchilada Casserole
This casserole layers soft tortillas with tender chicken and plenty of mild cheese. It comes together quickly and bakes into a comforting dish that picky eaters usually accept without complaint.
It works well on busy weeknights when you need a reliable dinner that reheats nicely. The flavors stay gentle and the texture stays soft, with melted cheese throughout every bite.


Equipment
- 9×13 Inch Baking Dish
- Mixing Bowl
Ingredients
- 2 cups cooked shredded chicken
- 3 cups shredded cheddar cheese, divided
- 8 small corn tortillas
- 1 (10-ounce) can mild enchilada sauce
- 1/2 cup sour cream
Instructions
- Preheat the oven to 350 degrees and lightly grease a 9×13 inch baking dish.
- In a mixing bowl, stir together the shredded chicken, sour cream, and 1 cup of the cheddar cheese.
- Pour a thin layer of mild enchilada sauce into the bottom of the baking dish.
- Place four tortillas over the sauce, overlapping them slightly to cover the bottom.
- Spread half of the chicken mixture evenly over the tortillas.
- Drizzle half of the remaining enchilada sauce over the chicken layer.
- Sprinkle 1 cup of cheddar cheese over the sauce.
- Repeat the layers with the remaining four tortillas, chicken mixture, enchilada sauce, and final cup of cheddar cheese.
- Bake uncovered for 25 minutes until the cheese is fully melted and the edges are lightly golden.
Notes
Cuisine: Mexican
Equipment: 9×13 Inch Baking Dish, Mixing Bowl
Sweet Teriyaki Meatballs over Steamed Rice with Pineapple
This recipe turns simple meatballs into a weeknight favorite that kids actually ask for again. The sweet teriyaki glaze pairs with juicy pineapple to create familiar flavors that feel special without extra effort. It comes together quickly and works well for busy evenings when you need dinner on the table fast.
The meatballs stay tender inside with a lightly sticky coating on the outside. Pineapple adds bursts of sweetness that balance the savory sauce, while the rice underneath soaks up every bit of flavor. It is a reliable option when you want something that pleases both picky eaters and adults at the same table.


Equipment
- Mixing bowl
- Baking sheet
- Large skillet
Ingredients
- 1 pound ground turkey
- 1/2 cup panko breadcrumbs
- 1 large egg
- 3/4 cup teriyaki sauce, divided
- 2 cups cooked white rice
- 1 cup fresh pineapple chunks
- 2 green onions, sliced
- 1 tablespoon sesame seeds
Instructions
- Preheat the oven to 400 degrees and line a baking sheet with parchment paper. In a large bowl, combine the ground turkey, panko breadcrumbs, egg, and 1/4 cup of the teriyaki sauce. Mix until the ingredients are evenly distributed, then shape the mixture into 16 meatballs and place them on the prepared baking sheet.
- Bake the meatballs for 15 minutes until they are cooked through and lightly browned. While the meatballs bake, warm the remaining 1/2 cup teriyaki sauce in a large skillet over medium heat. Add the pineapple chunks and let them simmer for 3 minutes so the sauce thickens slightly.
- Remove the meatballs from the oven and add them to the skillet. Gently toss everything together so the meatballs are coated in the sauce and pineapple. Spoon the meatballs and pineapple over the cooked white rice. Finish with sliced green onions and sesame seeds before serving.
Notes
Cuisine: Asian
Equipment: Mixing bowl, Baking sheet, Large skillet
Pepperoni Pizza Quesadillas with Hidden Carrot Puree
These quesadillas turn pizza flavors into a quick dinner that kids actually want to eat. The carrot puree mixes into the sauce so it stays hidden while still giving the meal a little extra nutrition. They cook up crispy on the outside with gooey cheese and pepperoni inside, making them a reliable choice for weeknights when appetites are small.
The recipe works well for busy evenings because it uses simple ingredients and one skillet. Each bite delivers familiar pizza taste with a soft, melty texture that picky eaters tend to accept.


Equipment
- Large Skillet
- Mixing Bowl
- Spatula
Ingredients
- 8 large flour tortillas
- 2 cups shredded mozzarella cheese
- 1 cup pepperoni slices, chopped
- 1/2 cup pizza sauce
- 3/4 cup carrot puree
- 2 tablespoons olive oil
- 1 teaspoon Italian seasoning
Instructions
- Stir the carrot puree into the pizza sauce until fully blended.
- Lay out four tortillas on a clean surface and spread the sauce mixture evenly over each one.
- Sprinkle the mozzarella cheese and chopped pepperoni over the sauce, then add a light dusting of Italian seasoning.
- Top each with a second tortilla and press down gently so the fillings stay in place.
- Heat 1 tablespoon of olive oil in a large skillet over medium heat.
- Cook one quesadilla at a time for 2 to 3 minutes per side until the tortillas turn golden and the cheese melts.
- Repeat with the remaining quesadillas, adding the second tablespoon of oil as needed.
- Slice each quesadilla into wedges before serving.
Notes
Cuisine: American
Equipment: Large Skillet, Mixing Bowl, Spatula
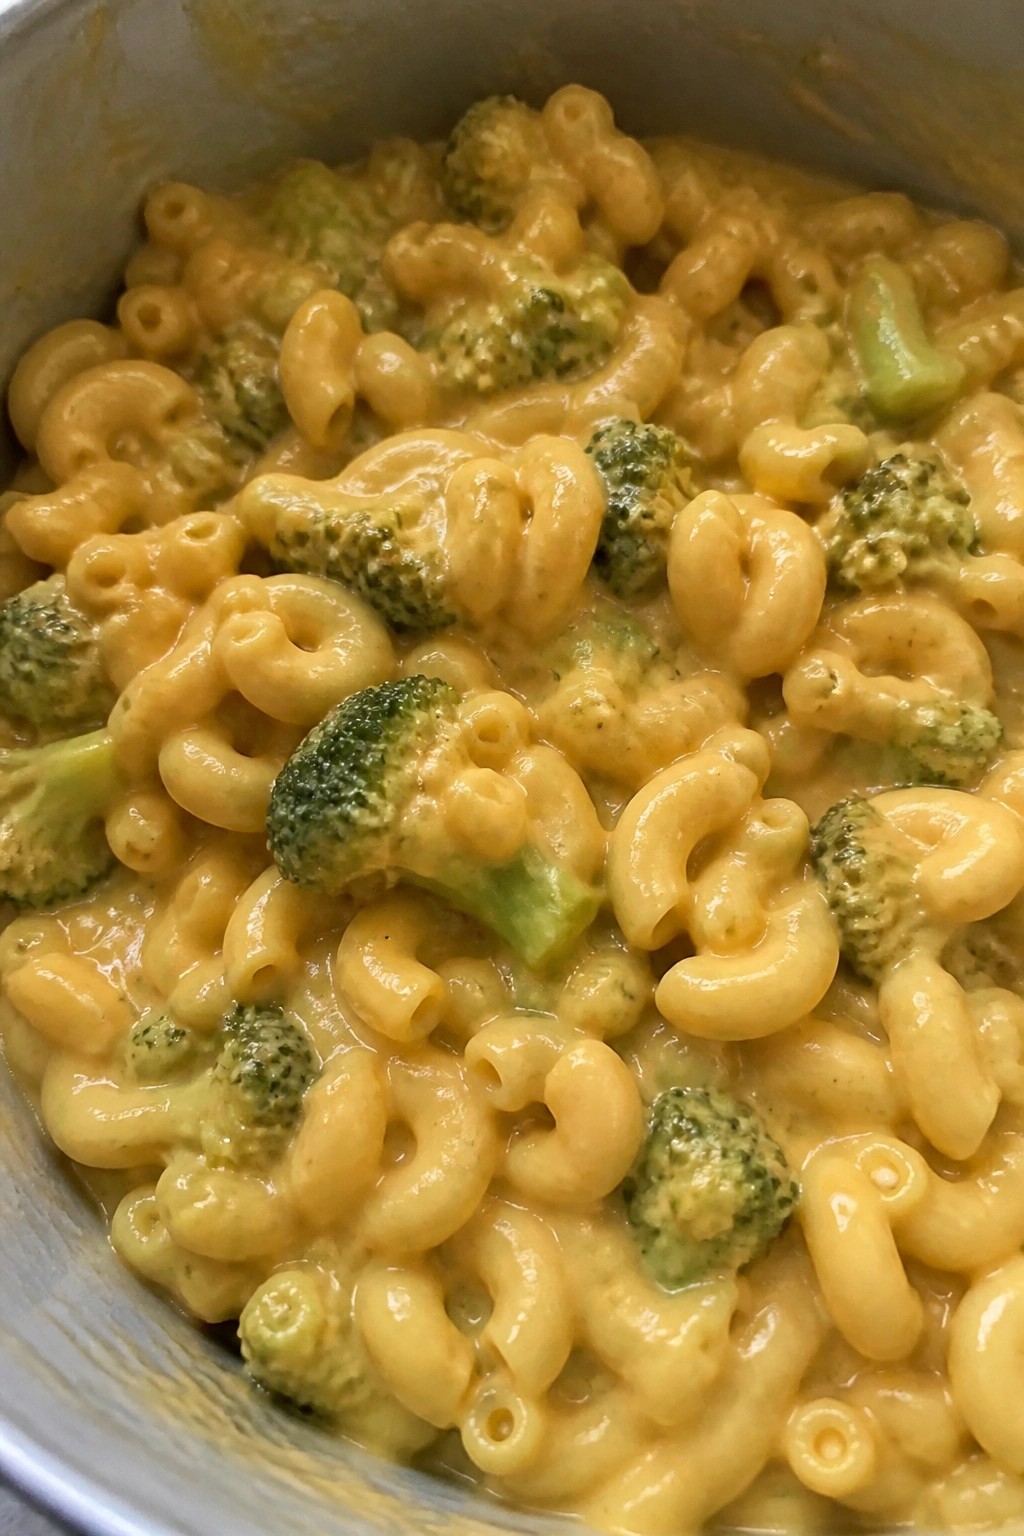
Creamy One-Pot Macaroni and Cheese with Broccoli Florets
This one-pot macaroni and cheese brings broccoli florets right into the creamy sauce so kids get a vegetable without a separate side. It works well on weeknights when you want minimal cleanup and a meal that still feels familiar and comforting.
The finished dish has tender pasta coated in a smooth cheese sauce with soft, mild broccoli pieces throughout. The flavor stays mild and cheesy while the texture stays creamy rather than chunky.

Equipment
- Large pot
- Wooden spoon
- Measuring cups
Ingredients
- 2 cups elbow macaroni
- 2 cups broccoli florets
- 2 1/2 cups milk
- 2 cups shredded cheddar cheese
- 3 tablespoons butter
- 1 teaspoon salt
- 1/2 teaspoon garlic powder
- 1/4 teaspoon black pepper
Instructions
- Place the macaroni, milk, butter, salt, garlic powder, and black pepper in a large pot. Stir once and bring the mixture to a gentle boil over medium heat.
- Reduce the heat to low and simmer uncovered for 8 minutes, stirring often so the pasta does not stick to the bottom.
- Add the broccoli florets to the pot and continue simmering for 4 more minutes until the pasta is tender and most of the liquid has thickened into a sauce.
- Remove the pot from the heat. Add the shredded cheddar cheese a handful at a time, stirring until the cheese melts and the sauce turns smooth and creamy.
Notes
Cuisine: American
Equipment: Large pot, Wooden spoon, Measuring cups
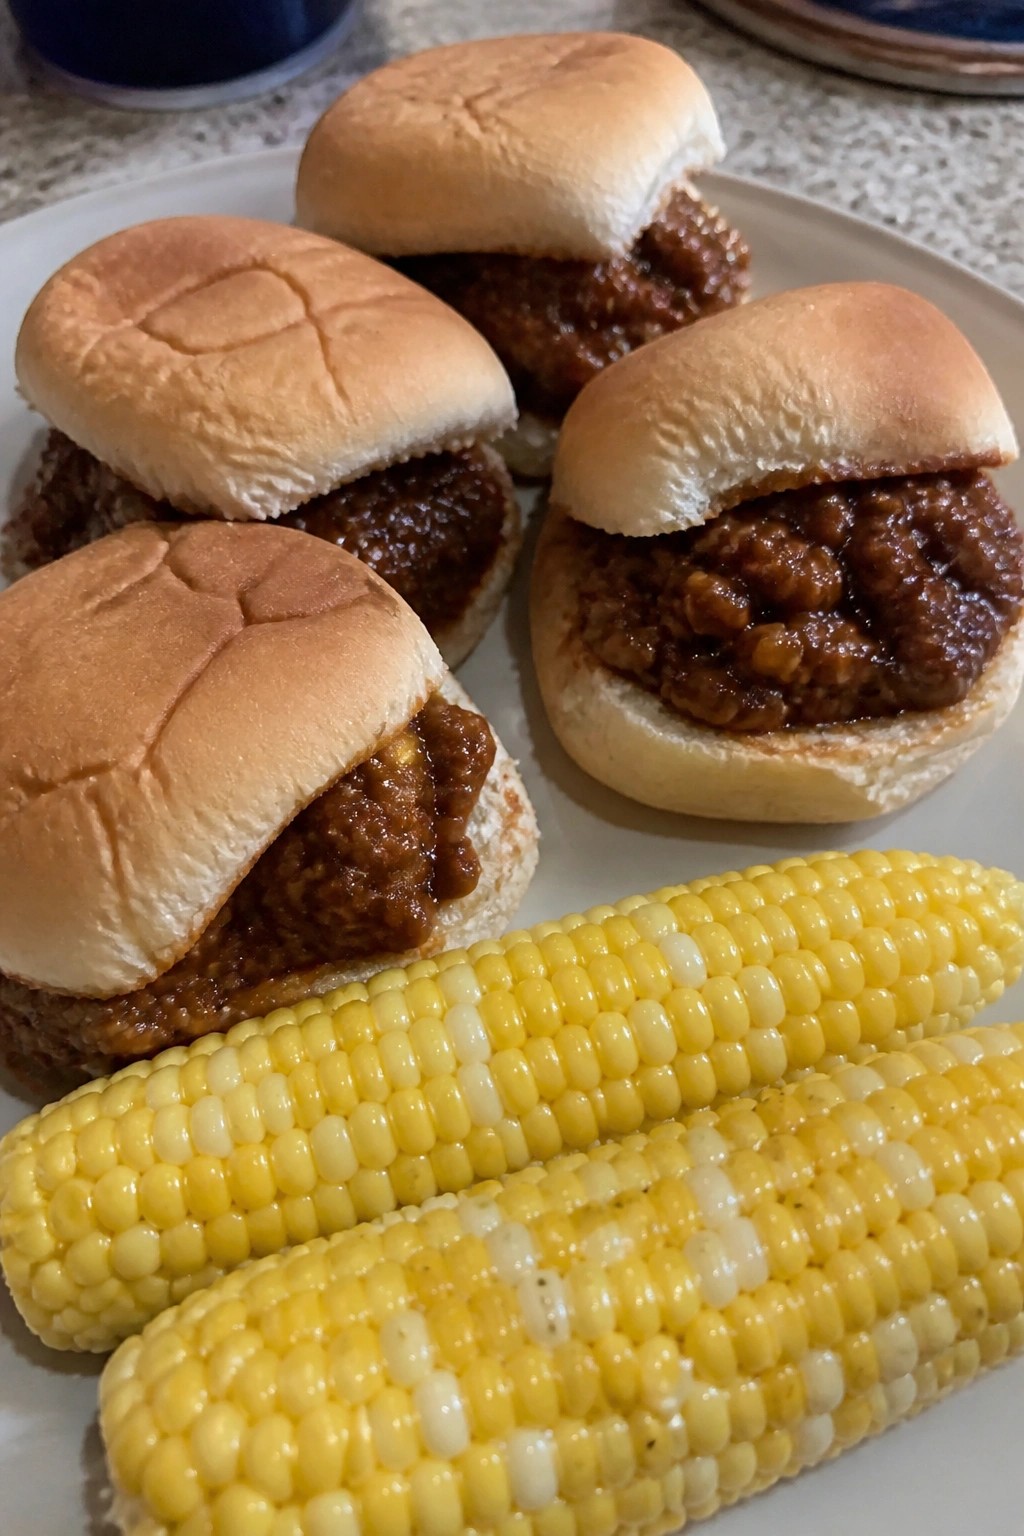
Sloppy Joe Sliders on Soft Buns with Corn on the Cob
This recipe turns the familiar sloppy joe into small, easy-to-hold sliders that fit right into a weeknight routine. The soft buns and lightly sweetened beef filling appeal to kids who like simple flavors, while the corn on the cob adds a fresh, no-fuss side that most little ones will actually eat.
It works well when you need dinner on the table quickly and want something that feels like a treat without extra steps. The beef stays tender and saucy inside the buns, and the corn brings a sweet, juicy contrast that rounds out the plate.

Equipment
- Large Skillet
- Large Pot
Ingredients
- 1 pound ground beef
- 1 small onion, finely chopped
- ¾ cup ketchup
- 2 tablespoons brown sugar
- 1 tablespoon Worcestershire sauce
- ½ teaspoon salt
- ¼ teaspoon black pepper
- 8 soft slider buns
- 4 ears corn on the cob
- 2 tablespoons butter
Instructions
- Place the ground beef in a large skillet over medium heat and cook until it is no longer pink, breaking it up with a spoon as it browns.
- Add the chopped onion to the skillet and cook for 3 to 4 minutes until the onion softens.
- Stir in the ketchup, brown sugar, Worcestershire sauce, salt, and black pepper. Lower the heat and let the mixture simmer for 5 minutes so the flavors blend and the sauce thickens slightly.
- While the beef simmers, bring a large pot of water to a boil. Add the corn and cook for 5 to 7 minutes until the kernels are tender.
- Drain the corn, then spread the butter over each ear and sprinkle lightly with salt if desired.
- Split the slider buns, spoon the beef mixture into each bun, and serve the sliders alongside the corn.
Notes
Cuisine: American
Equipment: Large Skillet, Large Pot
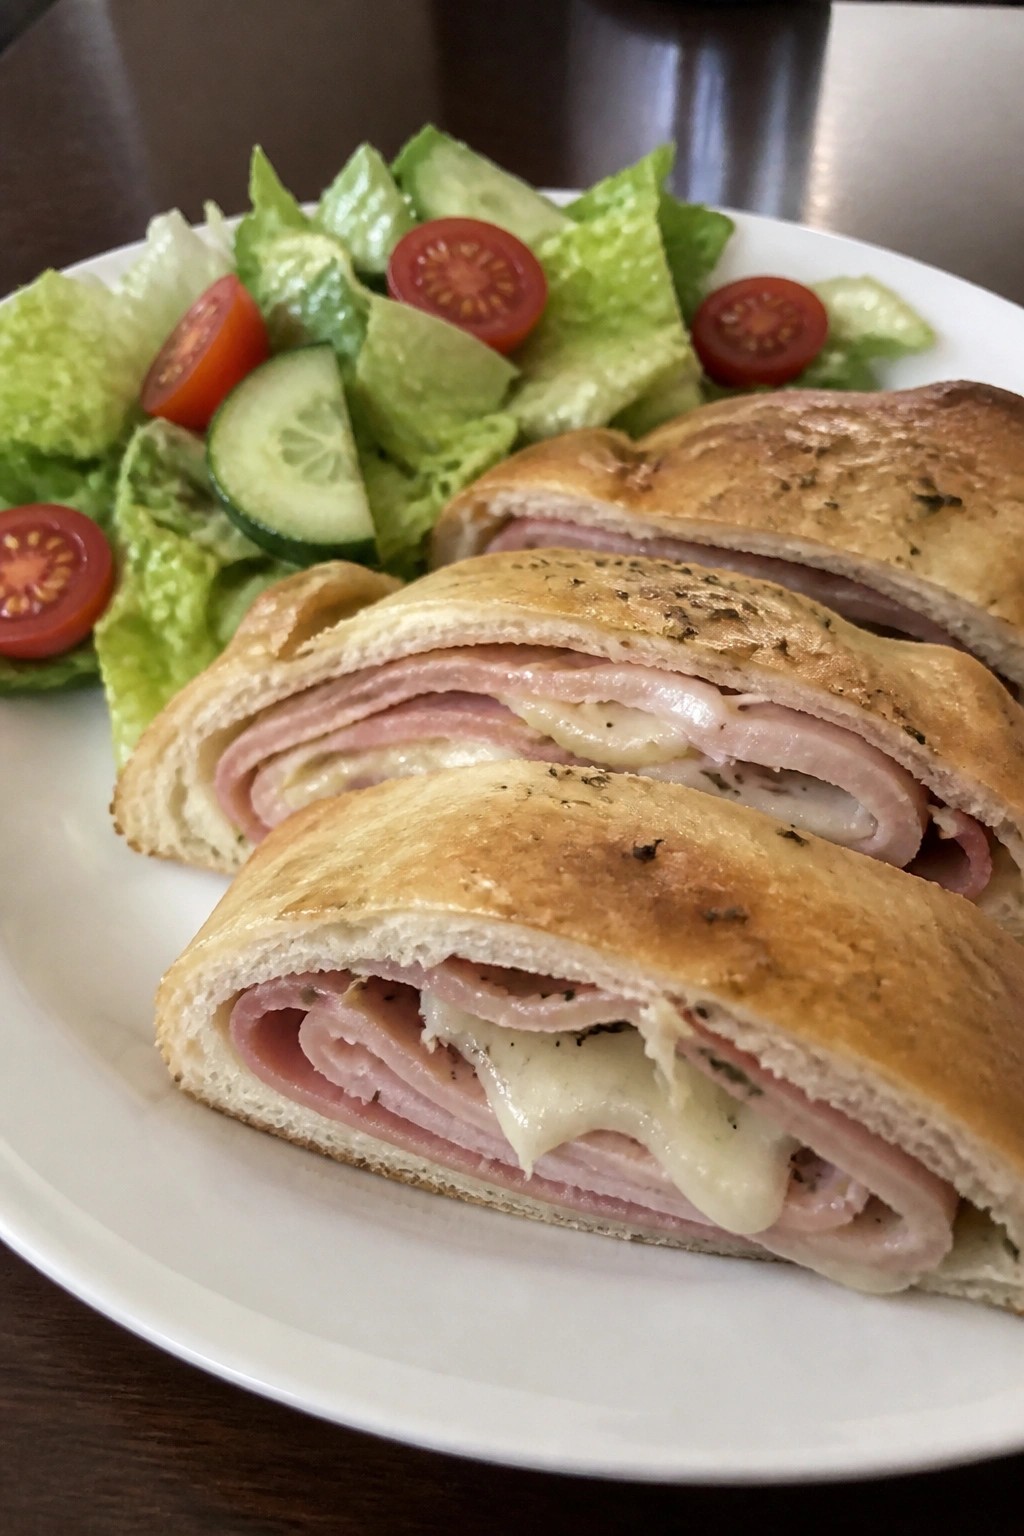
Ham and Cheese Stromboli Slices with Side Salad
This recipe turns classic ham and cheese into an easy rolled bake that slices neatly for little hands. Kids like the familiar flavors wrapped inside soft dough, while parents get a simple dinner that comes together on busy nights without much fuss.
The side salad keeps things fresh and balanced. It pairs well with the warm slices and gives everyone a chance to add what they like.

Equipment
- Baking sheet
- Rolling pin
- Mixing bowl
Ingredients
- 1 pound pizza dough
- 8 ounces sliced deli ham
- 8 ounces shredded mozzarella cheese
- 2 tablespoons butter, melted
- 1 teaspoon garlic powder
- 1 head romaine lettuce, chopped
- 1 cup cherry tomatoes, halved
- 1 cucumber, sliced
- 1/2 cup ranch dressing
Instructions
- Heat the oven to 400 degrees and line a baking sheet with parchment paper.
- Roll the pizza dough into a rectangle about 12 by 16 inches on a lightly floured surface.
- Layer the sliced ham evenly over the dough, then sprinkle the shredded mozzarella on top.
- Roll the dough tightly from the long side into a log and pinch the seam to seal.
- Place the roll seam side down on the baking sheet. Brush the top with melted butter and sprinkle with garlic powder.
- Bake for 20 to 25 minutes until the crust is golden brown. Let it rest for 5 minutes, then slice into 8 pieces.
- While the stromboli bakes, combine the chopped romaine, halved cherry tomatoes, and sliced cucumber in a large bowl. Toss with ranch dressing just before serving.
Notes
Cuisine: Italian
Equipment: Baking sheet, Rolling pin, Mixing bowl
BBQ Pulled Chicken Stuffed Baked Potatoes
This recipe turns baked potatoes into a filling dinner by loading them with tender shredded chicken coated in BBQ sauce and finishing with melted cheese. It works well on busy weeknights when you need a meal that comes together with little hands-on time and still feels like a treat.
Kids tend to like the sweet and tangy flavor of the BBQ chicken paired with the soft potato and gooey cheese. The components stay separate enough that picky eaters can pick what they want while still getting a balanced plate.


Equipment
- Oven
- Baking Sheet
- Mixing Bowl
Ingredients
- 4 large russet potatoes
- 2 tablespoons butter
- 1/2 teaspoon salt
- 2 cups shredded cooked chicken
- 3/4 cup BBQ sauce
- 1 cup shredded cheddar cheese
- Sour cream and chopped green onions for serving
Instructions
- Heat the oven to 400°F. Scrub the potatoes clean, prick each one several times with a fork, rub with butter, and sprinkle with salt. Place on a baking sheet and bake for 50 to 60 minutes until the centers are soft when pierced with a knife.
- While the potatoes bake, stir the shredded chicken and BBQ sauce together in a mixing bowl until the chicken is evenly coated.
- Remove the potatoes from the oven and let them cool for 5 minutes. Slice each potato open lengthwise and fluff the insides gently with a fork.
- Spoon the BBQ chicken mixture evenly into the potatoes. Top each one with shredded cheddar cheese.
- Return the potatoes to the oven for 8 to 10 minutes until the cheese is melted and bubbly. Serve right away with sour cream and green onions on the side.
Notes
Cuisine: American
Equipment: Oven, Baking Sheet, Mixing Bowl
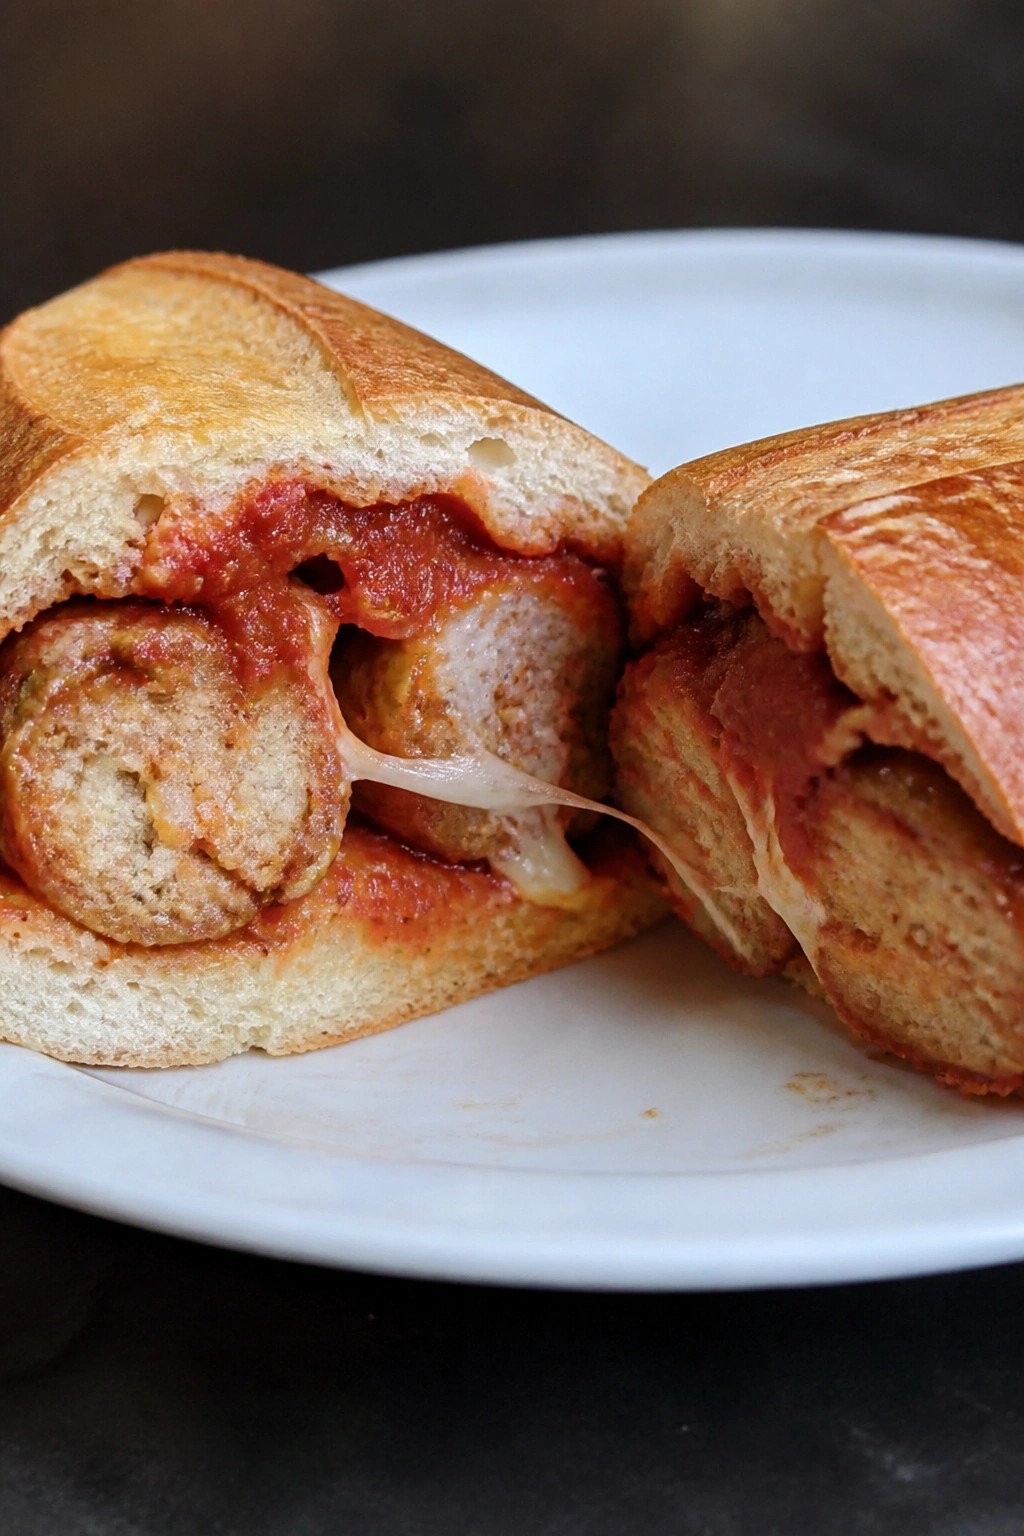
Turkey and Cheese Meatball Subs with Mild Marinara
These turkey and cheese meatball subs turn a simple dinner into something kids actually look forward to. The meatballs stay soft and mild, with cheese mixed right into the mix so every bite has a little melt. They work well on weeknights when you want a hands-on meal that still feels like a sandwich treat.
The mild marinara keeps the sauce gentle and familiar while the sub rolls hold everything together without extra fuss. It is a practical option for picky eaters who like familiar flavors and easy textures.

Equipment
- Mixing bowl
- Baking sheet
- Large skillet
Ingredients
- 1 pound ground turkey
- 1 cup shredded mozzarella cheese, divided
- ½ cup plain breadcrumbs
- 1 large egg
- 1 teaspoon garlic powder
- ½ teaspoon salt
- 2 cups mild marinara sauce
- 4 sub rolls
Instructions
- Preheat the oven to 400°F. Line a baking sheet with parchment paper.
- In a mixing bowl, combine the ground turkey, ½ cup of the mozzarella, breadcrumbs, egg, garlic powder, and salt. Mix gently until the ingredients are evenly distributed.
- Shape the mixture into 16 meatballs and place them on the prepared baking sheet. Bake for 15 minutes.
- While the meatballs bake, warm the marinara sauce in a large skillet over medium heat.
- Add the baked meatballs to the skillet and simmer for 5 minutes so they absorb some of the sauce.
- Split the sub rolls and place 4 meatballs in each roll. Spoon extra sauce over the meatballs and sprinkle the remaining mozzarella on top.
- Place the assembled subs on the baking sheet and return them to the oven for 3 to 4 minutes, just until the cheese melts.
Notes
Cuisine: American
Equipment: Mixing bowl, Baking sheet, Large skillet
Sausage and Pepper Sheet Pan Dinner with Garlic Bread
This sheet pan dinner keeps things simple with juicy sausages and sweet roasted peppers that cook together on one tray. Kids often enjoy the mild flavors and the chance to pull apart the garlic bread on the side. It works well for busy weeknights when you want minimal cleanup and reliable results.
The peppers turn soft and slightly sweet in the oven while the sausages stay savory. Garlic bread adds a warm, buttery element that pairs easily with the rest of the meal.


Equipment
- Sheet pan
- Oven
- Mixing bowl
Ingredients
- 1.5 pounds mild Italian sausages
- 3 bell peppers, sliced
- 1 large onion, sliced
- 2 tablespoons olive oil
- 1 teaspoon Italian seasoning
- 1/2 teaspoon salt
- 1/4 teaspoon black pepper
- 1 French bread loaf
- 4 tablespoons butter, softened
- 2 garlic cloves, minced
- 1 tablespoon fresh parsley, chopped
Instructions
- Preheat the oven to 400 degrees F. Line a large sheet pan with parchment paper or foil for easy cleanup.
- Place the sausages, sliced bell peppers, and onion on the sheet pan. Drizzle with olive oil and sprinkle with Italian seasoning, salt, and black pepper. Toss everything to coat evenly, then spread into a single layer. Roast for 25 minutes, turning the sausages halfway through.
- While the sheet pan cooks, mix the softened butter with minced garlic and chopped parsley in a small bowl. Slice the French bread loaf lengthwise and spread the garlic butter over the cut sides.
- After 25 minutes, remove the sheet pan from the oven. Place the garlic bread on a second baking sheet and add it to the oven. Bake both for another 8 to 10 minutes until the bread is golden and the sausages are fully cooked.
- Slice the sausages if desired and serve everything together from the pan.
Notes
Cuisine: American
Equipment: Sheet pan, Oven, Mixing bowl
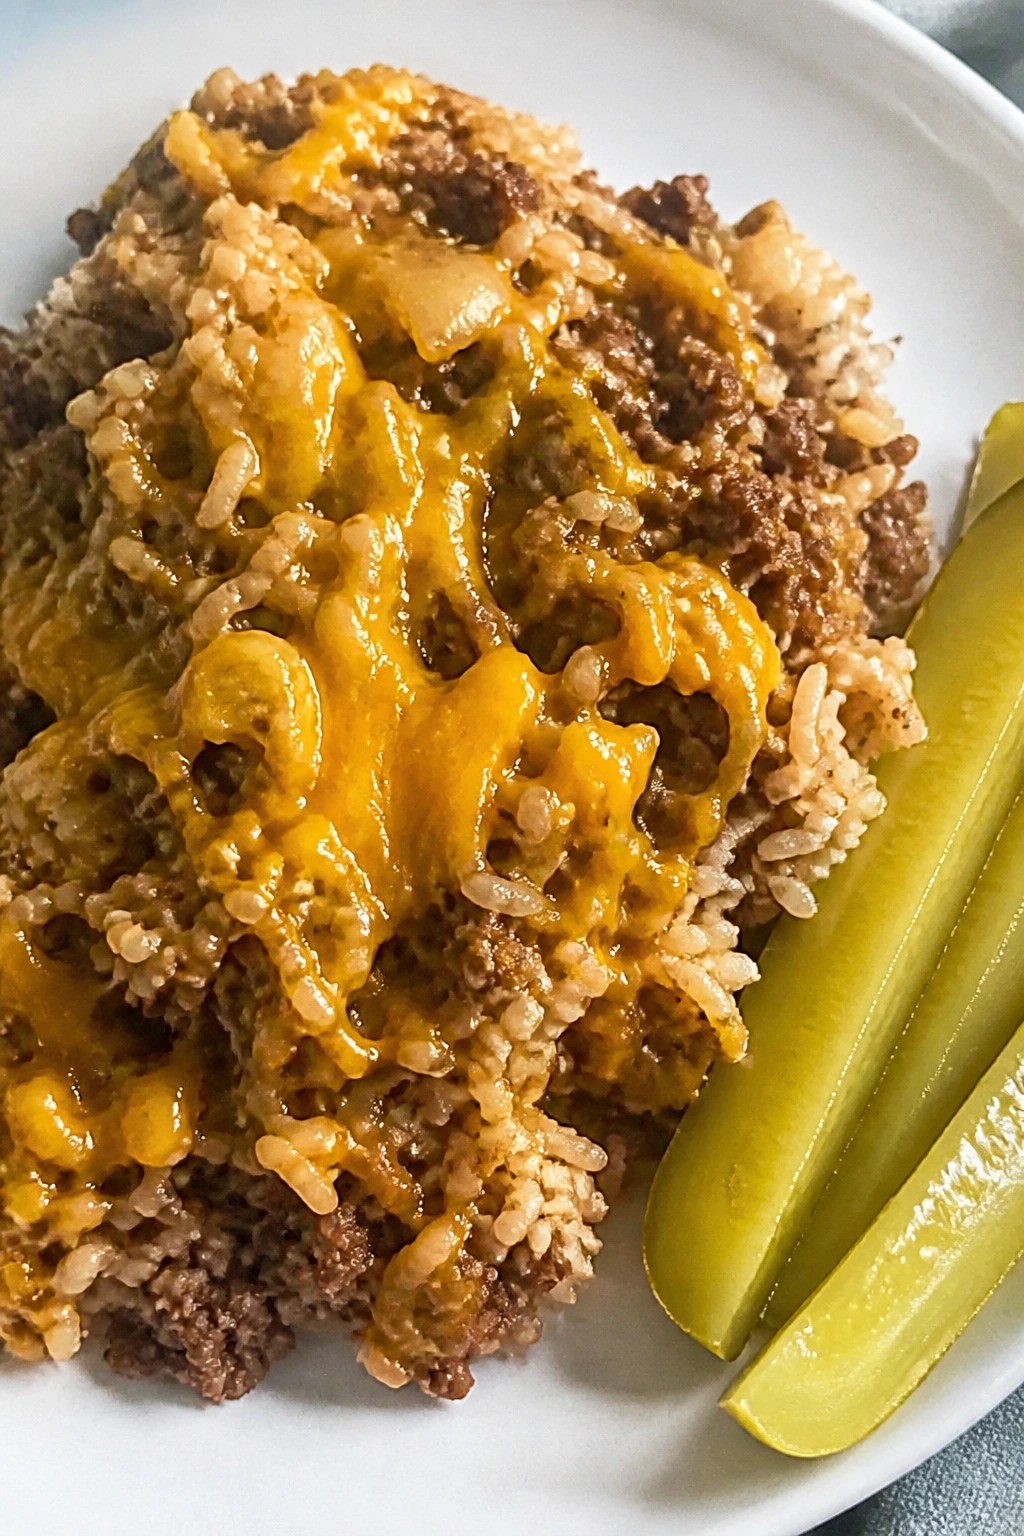
Cheeseburger Rice Skillet with Pickle Spears
This one-pan meal turns classic cheeseburger flavors into an easy skillet dinner that kids recognize and accept. The rice cooks right in the beef juices so every bite tastes like a burger without the bun. Serve pickle spears on the side for a familiar crunch that picky eaters enjoy.
It works well on busy weeknights when you need dinner on the table fast. The cheese melts over the top for creaminess while the pickles add brightness and texture.

Equipment
- Large Skillet
- Wooden Spoon
- Measuring Cups
Ingredients
- 1 pound ground beef
- 1 small onion, diced
- 1 cup uncooked long-grain white rice
- 2 cups beef broth
- 2 tablespoons ketchup
- 1 tablespoon Worcestershire sauce
- 1 teaspoon garlic powder
- 1/2 teaspoon salt
- 1/4 teaspoon black pepper
- 1 1/2 cups shredded cheddar cheese
- 8 pickle spears, for serving
Instructions
- Cook the ground beef in a large skillet over medium heat until it is no longer pink. Break it up with a spoon as it cooks.
- Add the diced onion and cook for 3 minutes until it softens.
- Stir in the uncooked rice, beef broth, ketchup, Worcestershire sauce, garlic powder, salt, and pepper.
- Bring the mixture to a boil, then reduce the heat to low. Cover the skillet and simmer for 18 minutes until the rice is tender and the liquid is absorbed.
- Remove the skillet from the heat. Sprinkle the shredded cheddar cheese evenly over the top. Cover again for 2 minutes so the cheese melts.
- Serve the skillet hot with pickle spears on the side.
Notes
Cuisine: American
Equipment: Large Skillet, Wooden Spoon, Measuring Cups