

Busy weeknights often leave little time for cooking a full meal from scratch. These recipes use basic ingredients and short prep times to help you get dinner done. Each one works well for feeding a family without extra stress or extra spending. You will find 15 practical options below that keep things simple and satisfying.
Helpful Tips Before You Start
A bit of prep makes these meals even faster on busy nights.
Keep Pantry Staples Ready
Stock pasta, rice, canned beans, and quick sauces. These items let you pull together a full meal without extra shopping.
Prep a Few Items Ahead
Chop vegetables or cook a batch of grains on the weekend. You can then assemble dinners in under 30 minutes.
Double and Freeze Portions
Make extra servings of sauces or proteins. Freeze them in small containers for nights when time is short.
Let Kids Handle Simple Steps
Have them stir ingredients or set the table. This keeps everyone involved and reduces your workload.
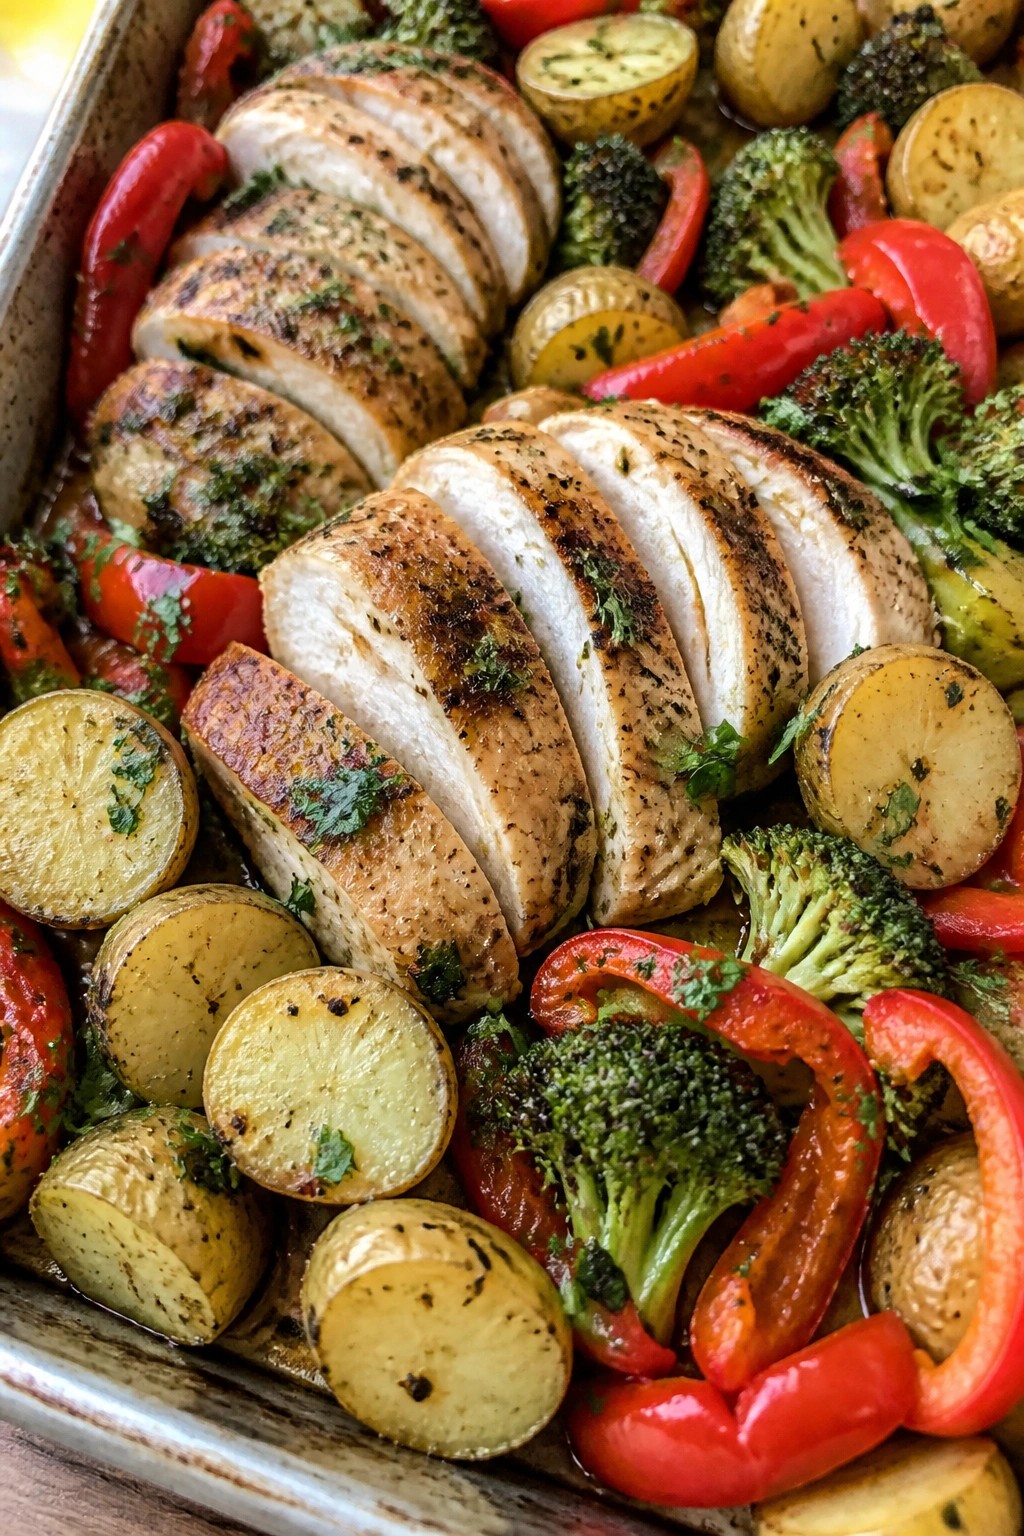
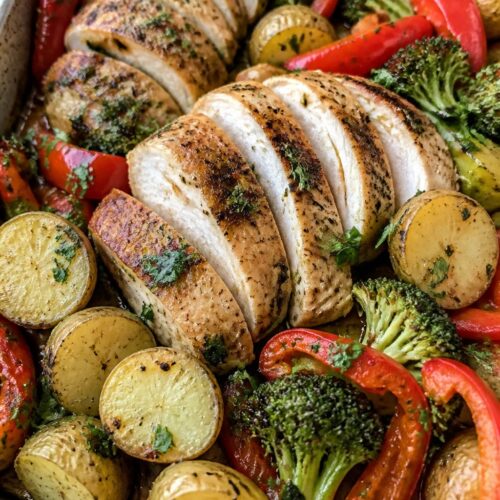
One-Pan Lemon Garlic Chicken with Roasted Vegetables
This one-pan meal brings tender chicken and crisp vegetables together with bright lemon and garlic flavors. It works well on busy weeknights when you want a full dinner without extra dishes or extra time.
The result is juicy chicken with roasted vegetables that pick up the same seasoning. Everything cooks on a single sheet pan for easy cleanup after a family meal.
Equipment
- Large sheet pan
- Mixing bowl
- Oven
Ingredients
- 4 boneless skinless chicken breasts
- 1 pound baby potatoes, halved
- 2 cups broccoli florets
- 1 red bell pepper, sliced
- 4 garlic cloves, minced
- 2 lemons
- 3 tablespoons olive oil
- 1 teaspoon dried oregano
- 1 teaspoon salt
- 1/2 teaspoon black pepper
- 2 tablespoons chopped fresh parsley
Instructions
- Preheat the oven to 425 degrees F. Line a large sheet pan with parchment paper or foil for easy cleanup.
- Place the chicken breasts in the center of the pan. Arrange the halved potatoes, broccoli florets, and sliced bell pepper around the chicken.
- In a small bowl, stir together the minced garlic, juice from one lemon, olive oil, oregano, salt, and black pepper. Drizzle this mixture over the chicken and vegetables. Toss the vegetables lightly to coat.
- Slice the second lemon and tuck the slices among the chicken and vegetables on the pan.
- Bake for 25 to 30 minutes until the chicken reaches 165 degrees F and the potatoes are tender when pierced with a fork.
- Remove the pan from the oven and sprinkle the chopped parsley over everything before serving.
Notes
Cuisine: Mediterranean
Equipment: Large sheet pan, Mixing bowl, Oven
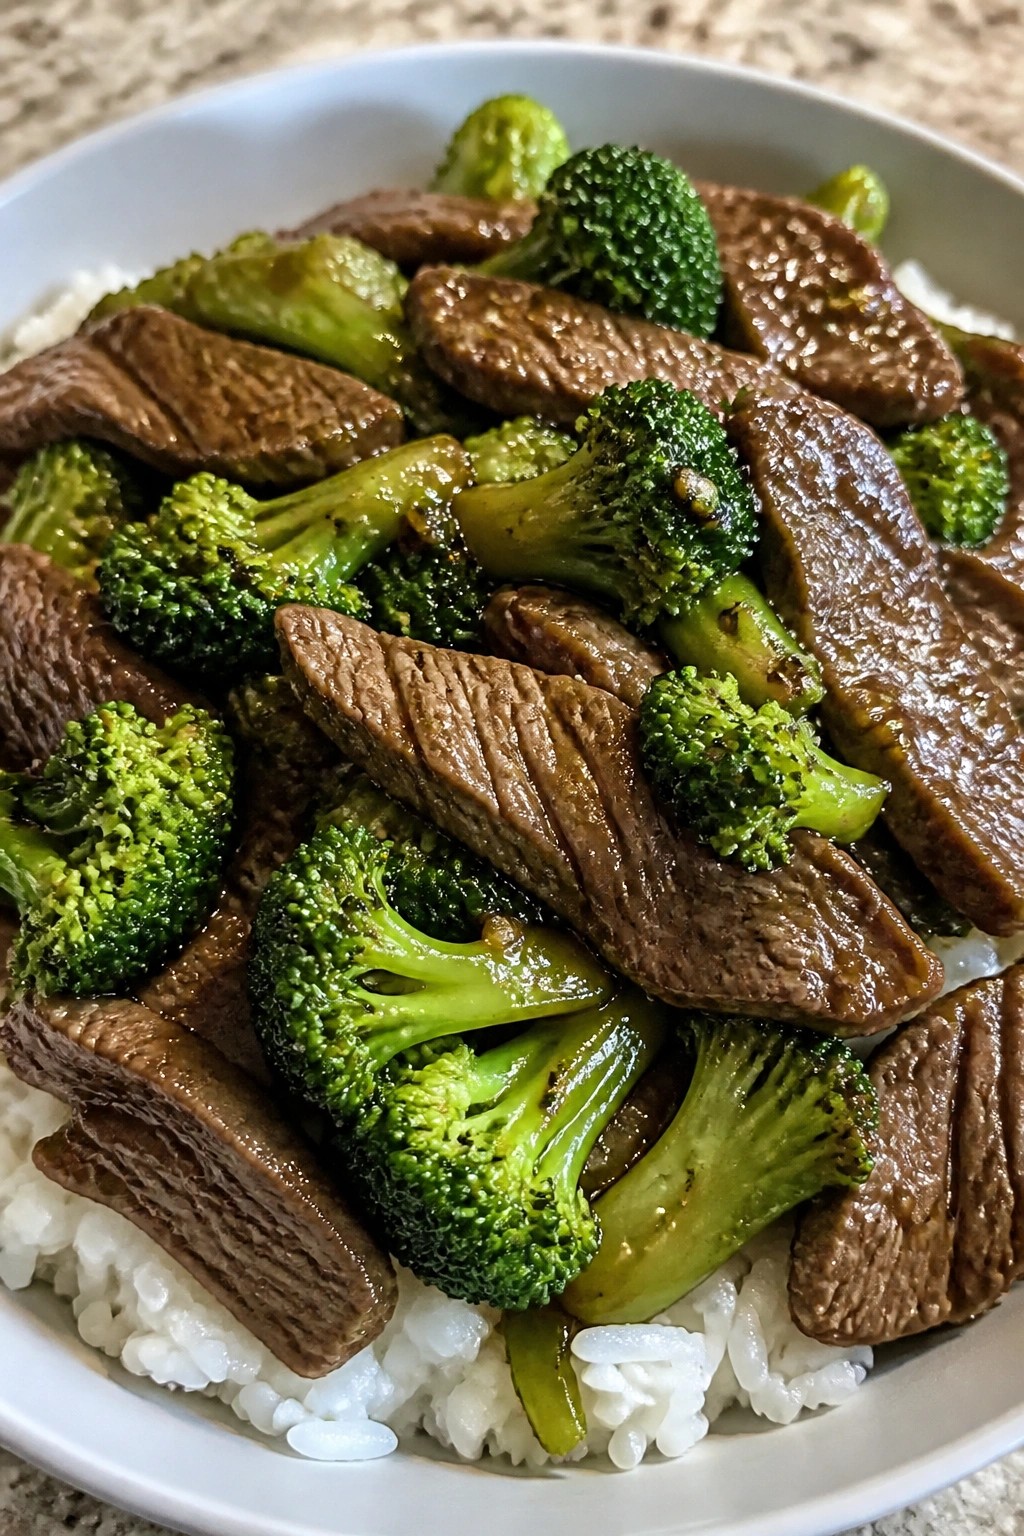
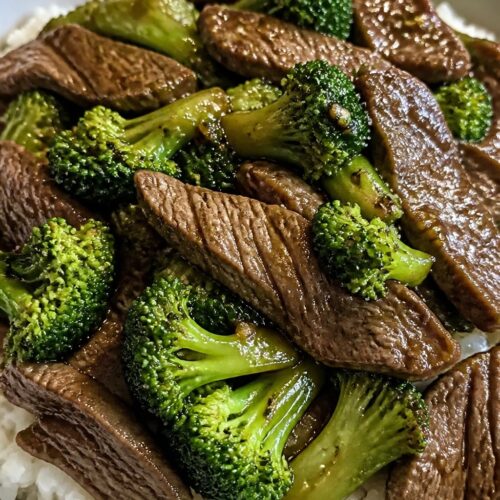
Beef and Broccoli Stir-Fry over Steamed Rice
This stir-fry brings tender slices of beef and bright broccoli together in a simple savory sauce. It works well on weeknights when you want a filling meal that comes together in one pan and pairs easily with rice.
The dish offers a balance of chewy rice, crisp-tender broccoli, and thinly sliced beef coated in a light glaze. Families enjoy it because it feels familiar yet fresh.
Equipment
- Large Skillet
- Mixing Bowl
- Knife
Ingredients
- 1 lb flank steak, thinly sliced
- 4 cups broccoli florets
- 3 tbsp soy sauce
- 2 tbsp oyster sauce
- 1 tbsp cornstarch
- 2 garlic cloves, minced
- 2 tbsp vegetable oil
- 4 cups cooked steamed rice
Instructions
- Mix the soy sauce, oyster sauce, and cornstarch in a small bowl until smooth. Set the sauce aside.
- Heat 1 tablespoon of vegetable oil in a large skillet over medium-high heat. Add the sliced flank steak and cook for 2 to 3 minutes until browned. Remove the beef from the skillet and set it aside.
- Add the remaining tablespoon of oil to the same skillet. Stir in the minced garlic and broccoli florets. Cook for 3 to 4 minutes, stirring often, until the broccoli turns bright green.
- Return the cooked beef to the skillet. Pour the prepared sauce over the mixture and stir well. Cook for another 2 minutes until the sauce thickens and coats everything evenly.
- Spoon the stir-fry over the cooked steamed rice and serve right away.
Notes
Cuisine: Asian
Equipment: Large Skillet, Mixing Bowl, Knife
Creamy Tomato Basil Turkey Sausage Pasta
This pasta dish brings together mild turkey sausage and a simple tomato cream sauce for a meal that feels special without much effort. It works well on busy weeknights when you want something warm and filling that still comes together fast.
The sauce turns out rich and smooth, with the sausage adding savory depth and the basil providing a fresh finish. The whole thing coats the pasta evenly and pleases both kids and adults.


Equipment
- Large Pot
- Large Skillet
- Colander
Ingredients
- 12 ounces pasta
- 1 pound ground turkey sausage
- 2 tablespoons olive oil
- 1 onion, diced
- 3 cloves garlic, minced
- 1 (14-ounce) can crushed tomatoes
- 1/2 cup heavy cream
- 1/4 cup chopped fresh basil
- 1/2 cup grated Parmesan cheese
- Salt and pepper to taste
Instructions
- Bring a large pot of salted water to a boil and cook the pasta according to package directions. Drain and set aside.
- Heat the olive oil in a large skillet over medium heat. Add the turkey sausage and cook, breaking it up with a spoon, until browned.
- Add the diced onion and minced garlic to the skillet. Cook for 3 to 4 minutes until the onion softens.
- Pour in the crushed tomatoes and simmer for 5 minutes. Season with salt and pepper.
- Stir the heavy cream into the sauce and let it warm through for 1 minute. Add the cooked pasta and toss to coat.
- Remove the skillet from heat and stir in the chopped basil and grated Parmesan cheese until combined.
Notes
Cuisine: Italian
Equipment: Large Pot, Large Skillet, Colander
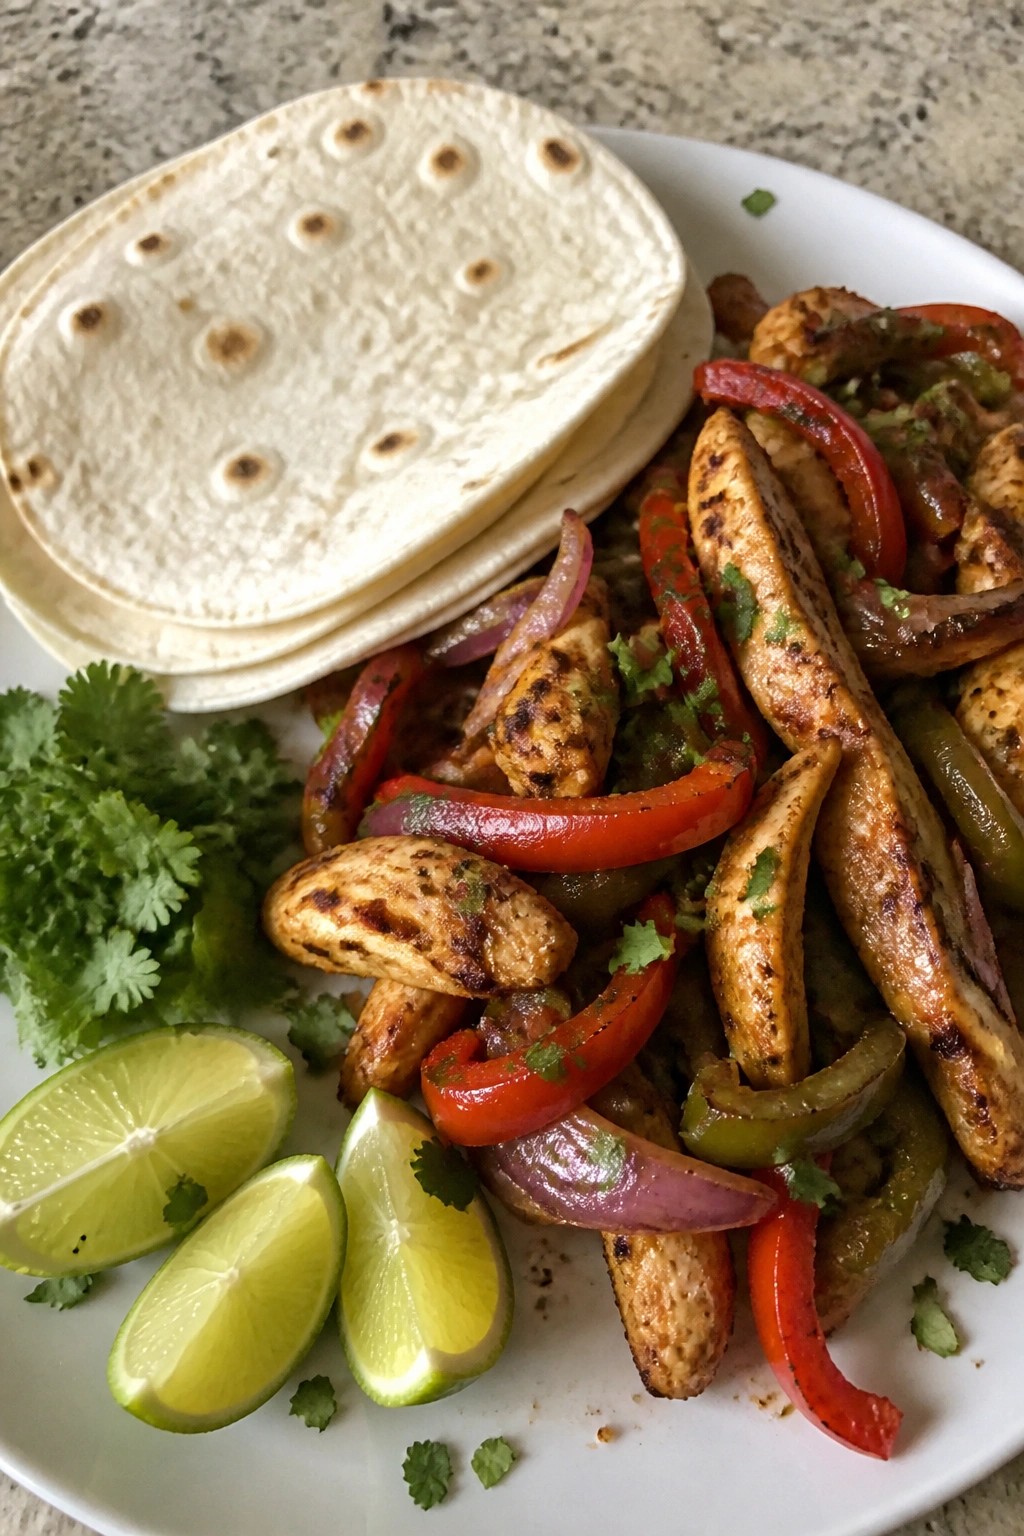
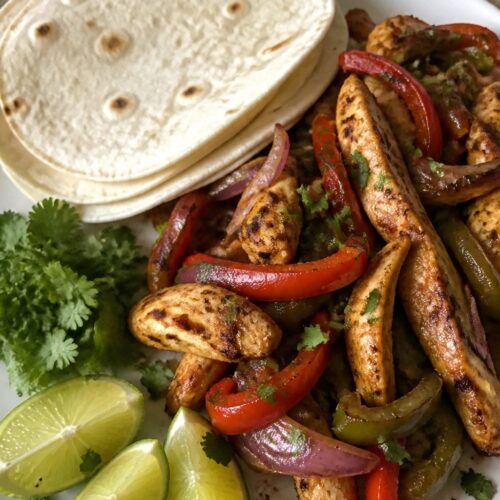
Sheet Pan Chicken Fajitas with Peppers and Warm Tortillas
This sheet pan meal brings fajita flavors to the table with almost no hands-on time. Chicken, peppers, and onions roast together for a fast weeknight dinner that feels like a treat without extra dishes.
The result is tender chicken with lightly charred vegetables and warm tortillas on the side. Families can assemble their own plates, which keeps everyone happy and portions flexible.
Equipment
- Large sheet pan
- Mixing bowl
- Oven
Ingredients
- 1.5 pounds boneless skinless chicken breasts, cut into strips
- 3 bell peppers, sliced
- 1 red onion, sliced
- 3 tablespoons olive oil
- 2 tablespoons fajita seasoning mix
- 1 teaspoon salt
- 8 flour tortillas
- Lime wedges and chopped cilantro for serving
Instructions
- Preheat the oven to 425°F and line a large sheet pan with parchment paper or foil for easy cleanup.
- Place the chicken strips, sliced bell peppers, and sliced red onion in a large mixing bowl.
- Drizzle the olive oil over the mixture, then sprinkle in the fajita seasoning mix and salt. Toss everything until evenly coated.
- Spread the chicken and vegetables in a single layer on the prepared sheet pan. Avoid crowding so the pieces roast instead of steam.
- Bake for 20 to 25 minutes until the chicken reaches 165°F and the vegetables are tender with some browned edges.
- While the sheet pan finishes, warm the flour tortillas in a dry skillet or wrapped in foil in the oven for the last 3 minutes.
- Remove the pan from the oven and serve the fajita mixture with the warm tortillas, lime wedges, and chopped cilantro.
Notes
Cuisine: Mexican
Equipment: Large sheet pan, Mixing bowl, Oven
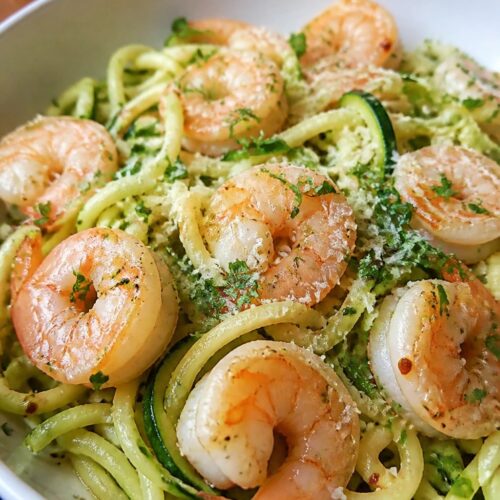
Quick Shrimp Scampi with Zucchini Noodles
This recipe turns a restaurant-style favorite into an easy weeknight option that fits right into a busy family schedule. It relies on simple ingredients that cook fast and deliver a bright, garlicky flavor with a light citrus note.
The zucchini noodles keep the dish fresh and lower in carbs while still feeling filling. Shrimp adds quick protein, and the whole meal comes together in one pan for minimal cleanup.

Equipment
- Large skillet
- Spiralizer
Ingredients
- 1 pound large shrimp, peeled and deveined
- 4 medium zucchini, spiralized
- 3 tablespoons butter
- 2 tablespoons olive oil
- 4 garlic cloves, minced
- 1/4 teaspoon red pepper flakes
- 1/4 cup white wine or chicken broth
- Juice and zest of 1 lemon
- Salt and black pepper to taste
- 2 tablespoons fresh parsley, chopped
- 1/4 cup grated Parmesan cheese
Instructions
- Pat the shrimp dry and season lightly with salt and black pepper. Set aside while you prepare the rest of the ingredients.
- Heat the butter and olive oil together in a large skillet over medium heat until the butter melts. Add the minced garlic and red pepper flakes and cook for about 30 seconds until fragrant.
- Add the shrimp to the skillet in a single layer. Cook for 2 minutes per side until they turn pink and opaque. Remove the shrimp to a plate and set aside.
- Pour the white wine or broth into the same skillet and stir to loosen any browned bits. Add the lemon juice and zest, then let the sauce simmer for 1 minute.
- Add the spiralized zucchini noodles to the skillet and toss gently for 1 to 2 minutes until just warmed through but still firm. Return the shrimp to the pan and stir to combine.
- Remove the skillet from the heat. Sprinkle with chopped parsley and grated Parmesan cheese before serving.
Notes
Cuisine: Italian
Equipment: Large skillet, Spiralizer
Turkey Quesadillas with Black Beans and Fresh Salsa
These turkey quesadillas come together fast on busy weeknights. Ground turkey and canned black beans form a hearty filling that pleases both kids and adults without much effort.
The crisp tortillas hold melted cheese and savory filling while the fresh salsa brings bright flavor and a bit of crunch on the side.


Equipment
- Large Skillet
- Mixing Bowl
- Knife
Ingredients
- 8 large flour tortillas
- 1 lb ground turkey
- 1 can (15 oz) black beans, rinsed and drained
- 2 cups shredded cheddar cheese
- 2 tomatoes, diced
- 1 small red onion, finely chopped
- 1/4 cup fresh cilantro, chopped
- 1 lime, juiced
- 1 tbsp olive oil
- 1 tsp cumin
- 1 tsp chili powder
- Salt and pepper to taste
Instructions
- Heat the olive oil in a large skillet over medium heat. Add the ground turkey and cook until it is no longer pink, breaking it up with a spoon as it browns.
- Stir in the cumin, chili powder, salt, and pepper. Add the black beans and cook for 2 minutes until everything is heated through. Remove the mixture from the skillet and set it aside.
- In a mixing bowl, combine the diced tomatoes, red onion, cilantro, lime juice, and a pinch of salt to make the salsa. Set the salsa aside while you assemble the quesadillas.
- Place one tortilla in the same skillet over medium heat. Sprinkle a layer of cheese on half the tortilla, add some turkey and bean mixture, then top with more cheese. Fold the tortilla in half and cook until the bottom is golden. Flip and cook the other side until the cheese melts. Repeat with the remaining tortillas and filling.
- Cut each quesadilla into wedges and serve with the fresh salsa on the side.
Notes
Cuisine: Mexican
Equipment: Large Skillet, Mixing Bowl, Knife
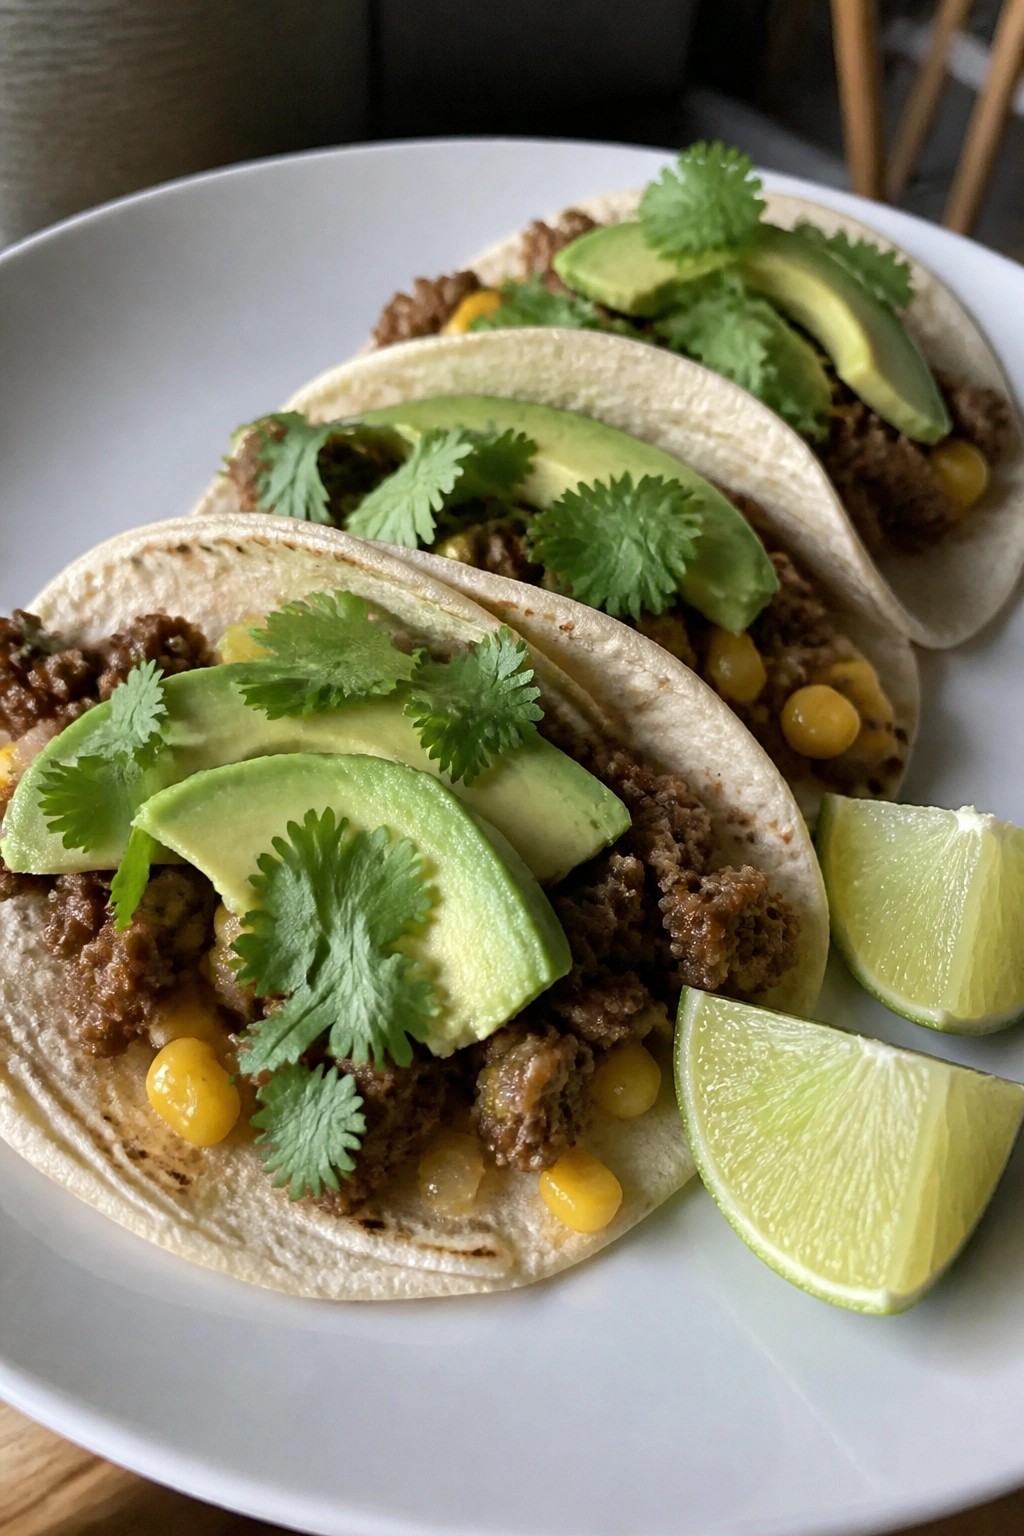
Skillet Beef Tacos with Corn and Avocado
This skillet meal brings together seasoned beef and sweet corn in one pan for a fast weeknight dinner. Families like it because the components cook together quickly and everyone can build their own tacos at the table. The result is savory beef with bursts of corn and cool, creamy avocado in every bite.
The dish works well when you need something hearty but fresh without extra dishes or long prep. Corn adds natural sweetness that balances the spices, while avocado provides a smooth contrast to the warm filling.

Equipment
- Large Skillet
- Cutting board
- Knife
Ingredients
- 1 pound ground beef
- 1 small onion, diced
- 2 cloves garlic, minced
- 1 cup corn kernels
- 2 tablespoons taco seasoning
- 1/2 teaspoon salt
- 1/4 teaspoon black pepper
- 8 small tortillas
- 2 ripe avocados, sliced
- Fresh cilantro and lime wedges for serving
Instructions
- Heat a large skillet over medium heat. Add the ground beef and cook until it starts to brown, breaking it up with a spoon.
- Stir in the diced onion and minced garlic. Cook for 3 to 4 minutes until the onion softens.
- Add the corn kernels, taco seasoning, salt, and black pepper. Stir everything together and cook for another 4 to 5 minutes until the beef is fully cooked and the corn is warmed through.
- While the filling finishes, warm the tortillas in a separate dry skillet or in the microwave.
- Spoon the beef and corn mixture into each tortilla. Top with avocado slices, cilantro, and a squeeze of lime.
Notes
Cuisine: Mexican
Equipment: Large Skillet, Cutting board, Knife
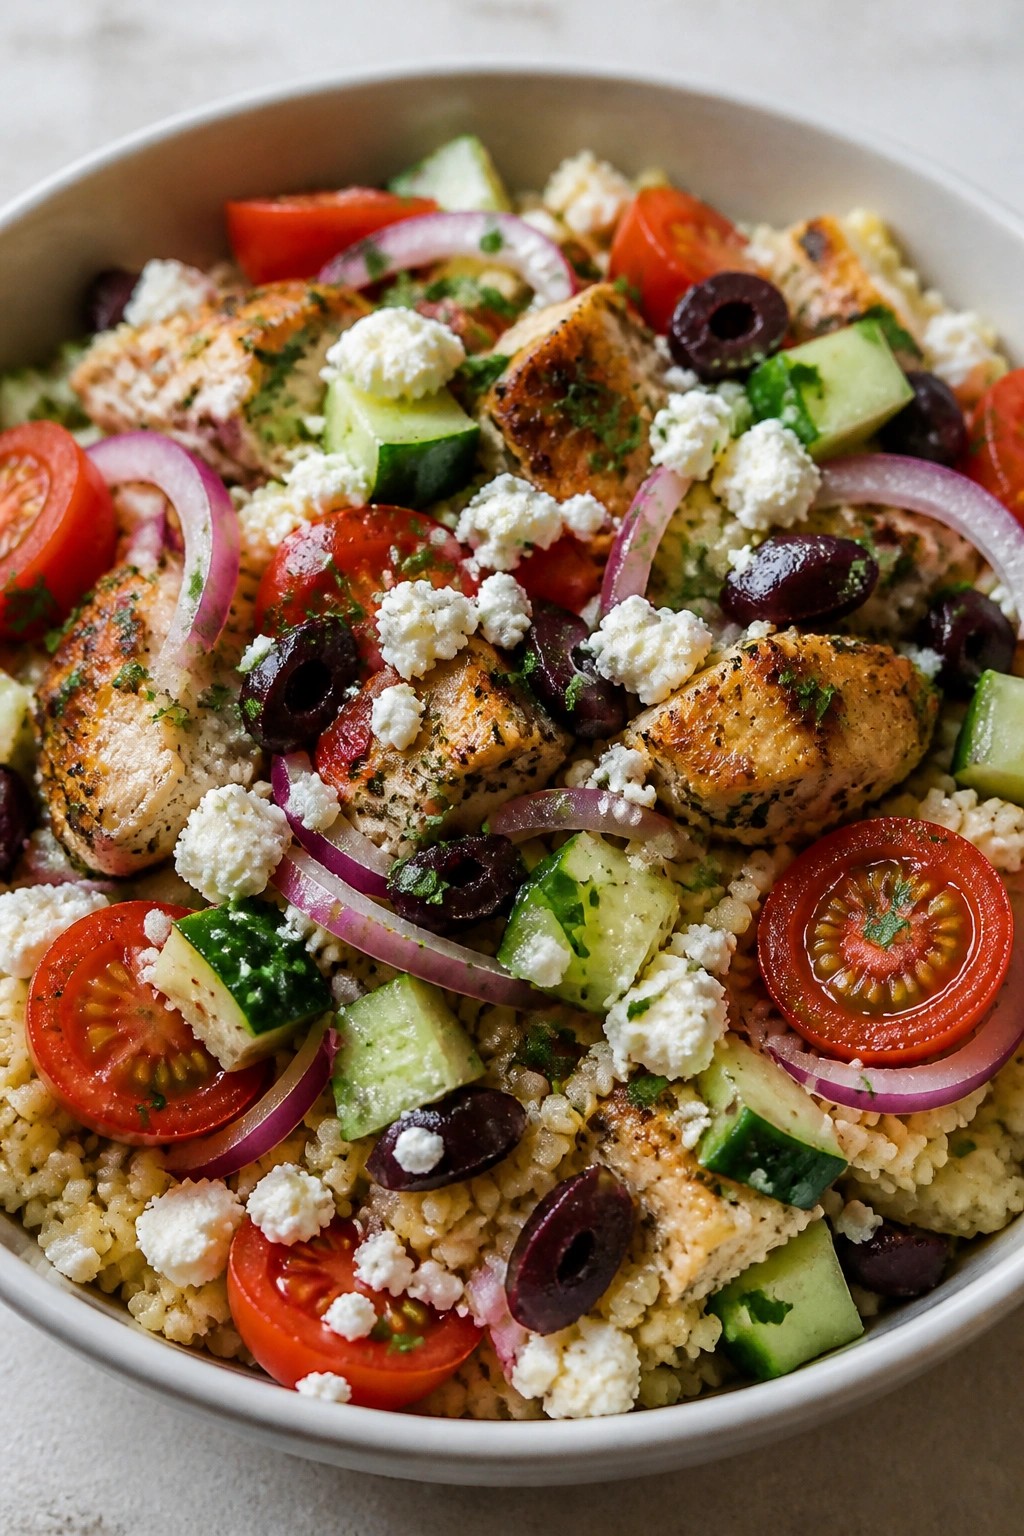
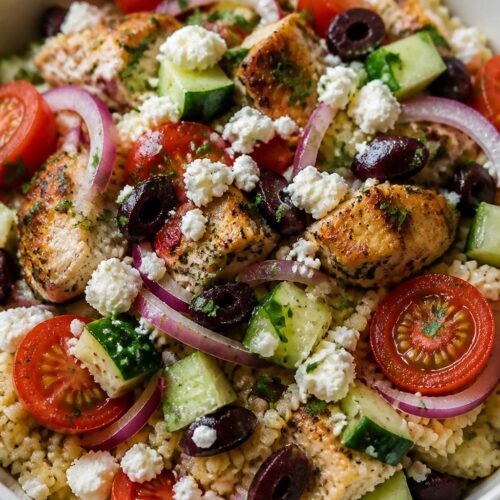
Mediterranean Chicken Couscous Bowls with Feta
This bowl brings together tender chicken, fluffy couscous, and crisp vegetables in one easy meal. It works well on busy weeknights when you want something fresh and filling without much effort. The flavors lean bright from lemon and herbs, with creamy feta adding a salty finish that ties everything together.
Equipment
- Large skillet
- Medium saucepan
- Mixing bowl
Ingredients
- 1 pound boneless skinless chicken breasts, cut into 1-inch pieces
- 2 tablespoons olive oil
- 1 teaspoon dried oregano
- Salt and black pepper
- 1 cup couscous
- 1 1/4 cups chicken broth
- 1 cucumber, diced
- 1 cup cherry tomatoes, halved
- 1/4 cup red onion, thinly sliced
- 1/2 cup kalamata olives, sliced
- 4 ounces feta cheese, crumbled
- 1 lemon, juiced
- 2 tablespoons fresh parsley, chopped
Instructions
- Season the chicken pieces with oregano, salt, and pepper. Heat 1 tablespoon of olive oil in a large skillet over medium heat, then cook the chicken until browned and cooked through, about 6 to 8 minutes. Remove from heat and set aside.
- In a medium saucepan, bring the chicken broth to a boil. Stir in the couscous, cover the pan, and remove it from heat. Let it sit for 5 minutes, then fluff with a fork.
- While the couscous rests, prepare the vegetables by dicing the cucumber, halving the tomatoes, slicing the red onion, and slicing the olives.
- Divide the couscous among four bowls. Top each with cooked chicken, cucumber, tomatoes, red onion, and olives. Sprinkle crumbled feta over the top.
- Drizzle the remaining tablespoon of olive oil and the lemon juice over each bowl. Finish with chopped parsley before serving.
Notes
Cuisine: Mediterranean
Equipment: Large skillet, Medium saucepan, Mixing bowl
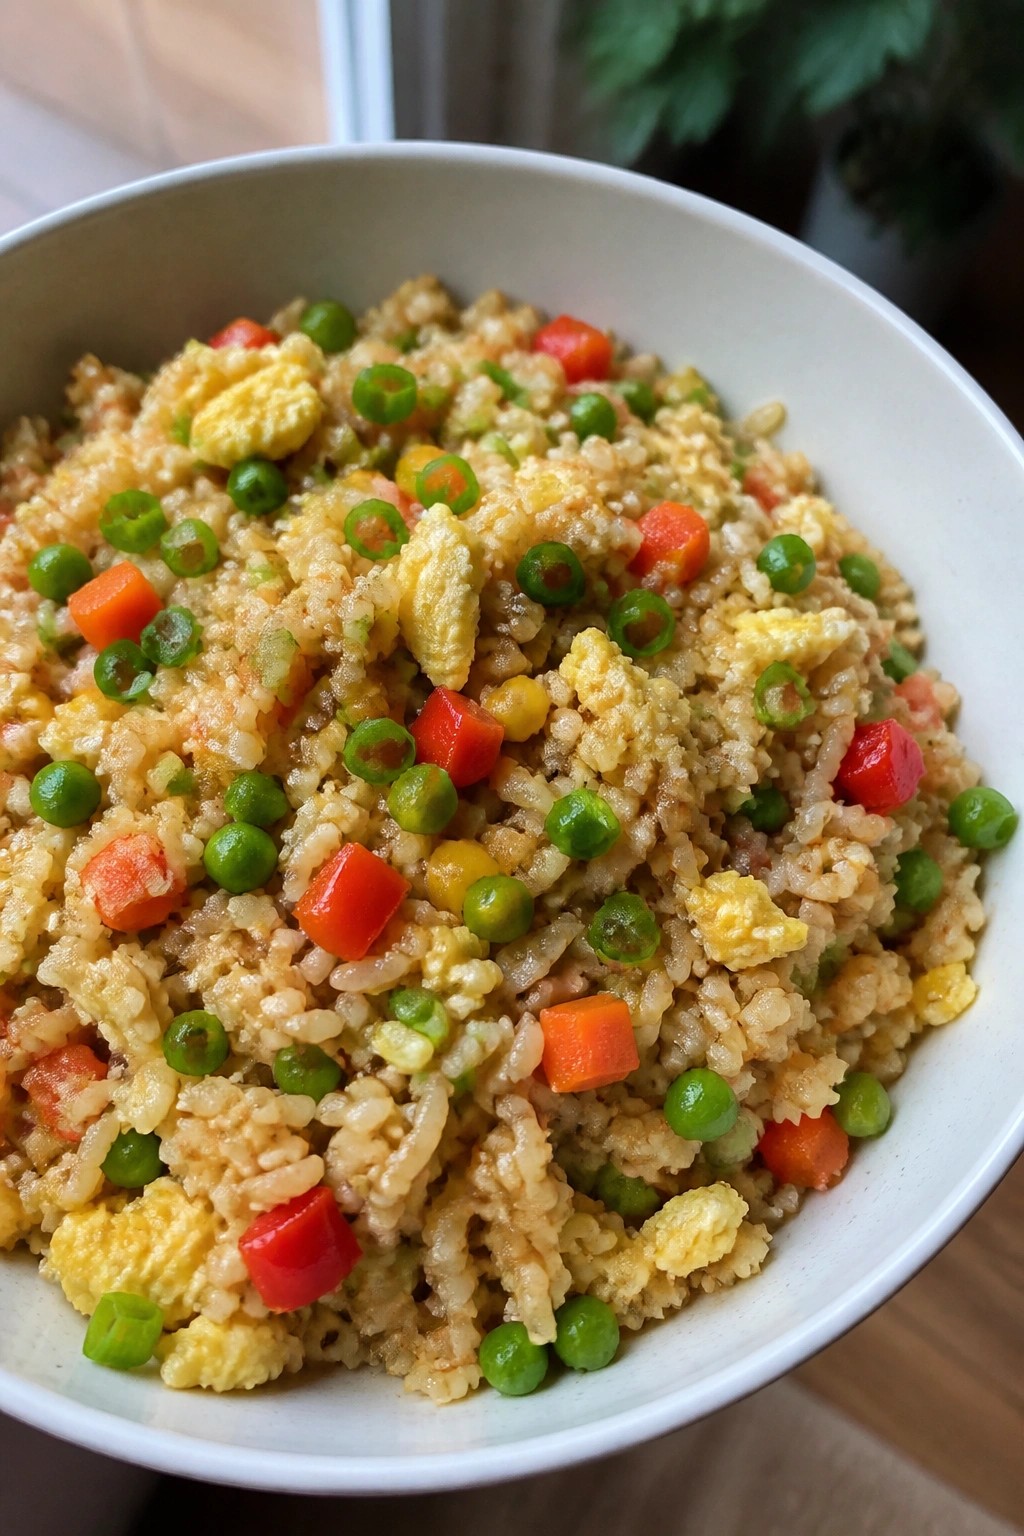
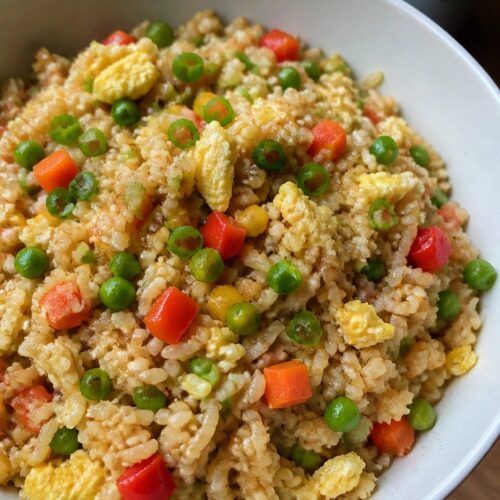
Veggie-Packed Egg Fried Rice with Soy Drizzle
This one-pan meal turns leftover rice into a fast dinner loaded with vegetables and protein. The eggs add staying power while the soy drizzle brings a light savory finish that appeals to both kids and adults.
It works well on weeknights when you need something ready in under 30 minutes. The mix of crisp-tender vegetables and fluffy rice gives good texture without any complicated steps.
Equipment
- Large Skillet
- Spatula
Ingredients
- 4 cups day-old cooked rice
- 4 large eggs
- 2 cups frozen mixed vegetables (carrots, peas, corn)
- 1 red bell pepper, diced
- 3 green onions, sliced
- 2 garlic cloves, minced
- 4 tablespoons soy sauce, divided
- 2 tablespoons vegetable oil
- 1 teaspoon sesame oil
Instructions
- Heat 1 tablespoon of vegetable oil in a large skillet over medium heat. Crack the eggs into the pan and scramble them until just set. Remove the eggs to a plate and set aside.
- Add the remaining tablespoon of vegetable oil to the same skillet. Stir in the garlic and cook for 30 seconds until fragrant.
- Add the frozen mixed vegetables and diced bell pepper. Cook for 3 to 4 minutes, stirring often, until the vegetables are warmed through.
- Add the day-old rice and break up any clumps. Pour in 3 tablespoons of soy sauce and the sesame oil. Stir-fry everything together for 3 minutes.
- Return the scrambled eggs to the skillet along with most of the sliced green onions. Toss to combine and heat through for 1 minute.
- Divide the fried rice among bowls. Drizzle the remaining tablespoon of soy sauce over each serving and finish with the rest of the green onions.
Notes
Cuisine: Asian
Equipment: Large Skillet, Spatula
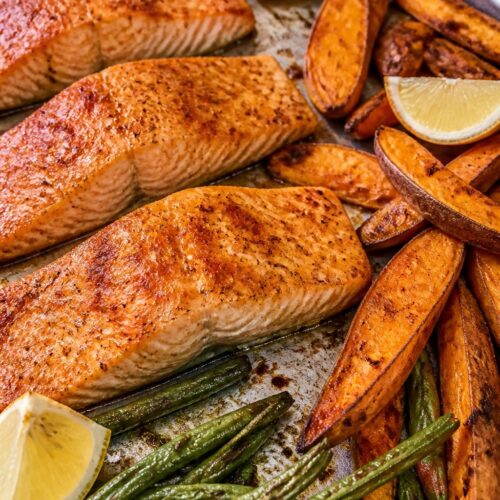
Baked Salmon with Sweet Potato Wedges and Green Beans
This sheet pan meal brings together tender salmon, crispy sweet potato wedges, and fresh green beans in one pan. It works well on busy weeknights when you need a complete dinner without extra pots or long cleanup.
The sweet potatoes develop slightly crisp edges while the salmon stays moist and the green beans keep a light bite. Simple seasonings let the natural flavors of the ingredients stand out.

Equipment
- Large baking sheet
- Mixing bowl
- Oven
Ingredients
- 4 salmon fillets (6 ounces each)
- 2 large sweet potatoes, cut into wedges
- 1 pound green beans, trimmed
- 3 tablespoons olive oil
- 1 teaspoon garlic powder
- 1 teaspoon smoked paprika
- Salt and black pepper to taste
- Lemon wedges, for serving
Instructions
- Preheat the oven to 425 degrees F and line a large baking sheet with parchment paper.
- Place the sweet potato wedges in a bowl and toss with 2 tablespoons olive oil, garlic powder, smoked paprika, salt, and pepper. Spread them in a single layer on the baking sheet.
- Bake the sweet potatoes for 15 minutes.
- Remove the pan from the oven and add the salmon fillets and green beans. Drizzle the remaining tablespoon of olive oil over the salmon and beans, then season them with salt and pepper.
- Return the pan to the oven and bake for 12 to 15 minutes more, until the salmon flakes easily with a fork and the sweet potatoes are tender.
- Serve the meal with lemon wedges on the side.
Notes
Cuisine: American
Equipment: Large baking sheet, Mixing bowl, Oven
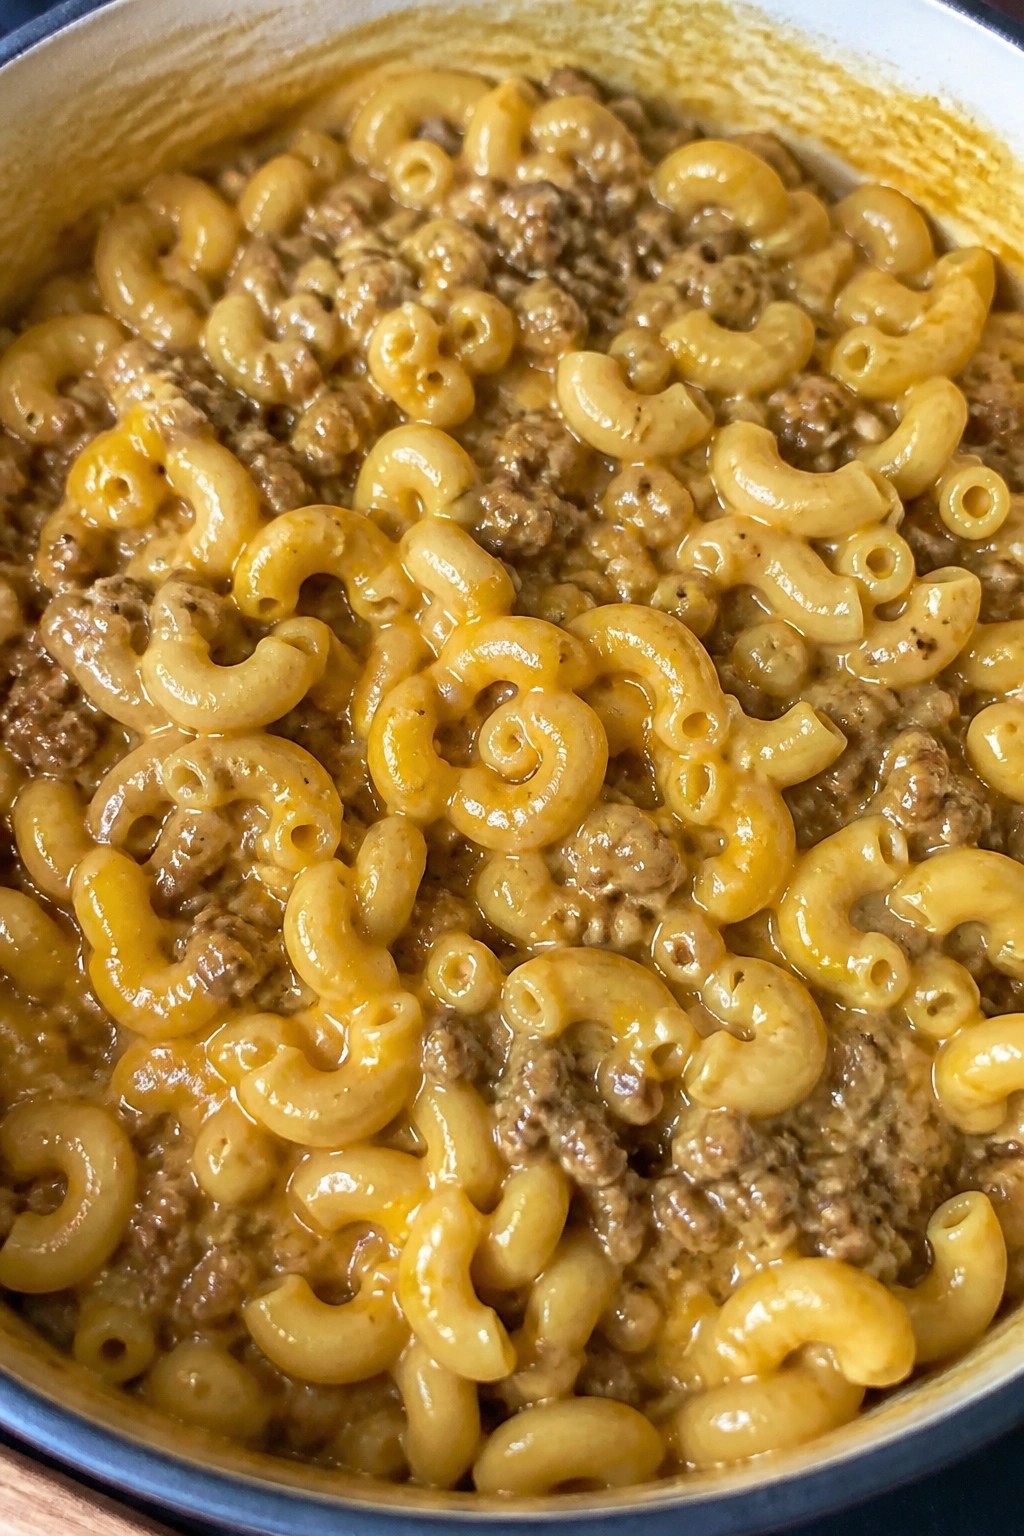
One-Pot Cheeseburger Macaroni Skillet
This one-pot meal brings the familiar taste of a cheeseburger into a simple skillet dinner. It works well on busy weeknights when you want something filling without extra dishes or a trip to a drive-thru. The result is tender pasta coated in a savory beef sauce with melted cheese throughout.
The texture stays creamy rather than dry because the pasta cooks right in the broth. Families enjoy the mix of seasoned beef and sharp cheddar that feels familiar and comforting.

Equipment
- Large skillet
- Wooden spoon
- Measuring cups
Ingredients
- 1 lb ground beef
- 1 small onion, diced
- 2 cloves garlic, minced
- 2 cups elbow macaroni
- 3 cups beef broth
- 1 cup tomato sauce
- 2 tbsp ketchup
- 1 tbsp yellow mustard
- 2 cups shredded cheddar cheese
- Salt and pepper to taste
- Sliced pickles for serving
Instructions
- Brown the ground beef in a large skillet over medium heat. Break it up as it cooks until no pink remains.
- Add the diced onion and minced garlic to the skillet. Cook for 2 minutes until the onion softens.
- Stir in the elbow macaroni, beef broth, tomato sauce, ketchup, and mustard. Bring the mixture to a boil.
- Reduce the heat to low, cover the skillet, and simmer for 12 minutes. Stir once halfway through to keep the pasta from sticking.
- Remove the skillet from the heat. Sprinkle the shredded cheddar cheese over the top and stir until it melts into the sauce. Season with salt and pepper.
- Serve the skillet hot with sliced pickles on the side.
Notes
Cuisine: American
Equipment: Large skillet, Wooden spoon, Measuring cups
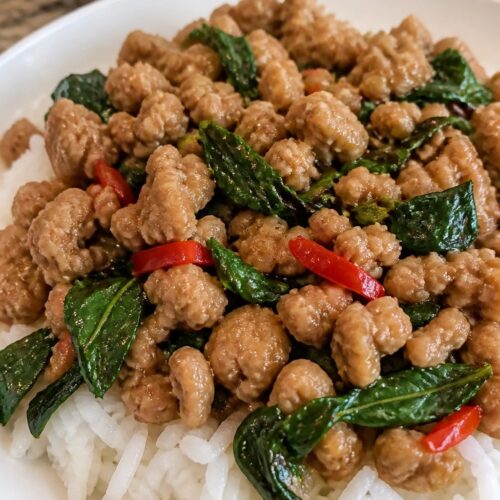
Thai Basil Chicken with Jasmine Rice
This stir-fry comes together fast on busy weeknights when you need dinner on the table without extra stops. Ground chicken cooks quickly and pairs with fragrant Thai basil for a savory, slightly spicy dish that feels fresh over a bowl of jasmine rice.
It works well for families who like bold flavors but still want something simple to prepare. The texture stays light with tender chicken and soft rice, while the basil adds a bright herbal note at the end.

Equipment
- Large skillet
- Saucepan
Ingredients
- 1 pound ground chicken
- 2 tablespoons vegetable oil
- 4 garlic cloves, minced
- 2 Thai chilies, thinly sliced
- 2 tablespoons oyster sauce
- 1 tablespoon soy sauce
- 1 tablespoon fish sauce
- 1 teaspoon sugar
- 1 cup fresh Thai basil leaves
- 4 cups cooked jasmine rice
Instructions
- Heat the vegetable oil in a large skillet over medium-high heat until it shimmers.
- Add the minced garlic and sliced Thai chilies, then stir for 30 seconds until fragrant.
- Add the ground chicken and break it up with a spoon. Cook until no pink remains, about 5 minutes.
- Stir in the oyster sauce, soy sauce, fish sauce, and sugar. Cook for another 2 minutes so the flavors coat the chicken evenly.
- Remove the skillet from the heat and stir in the Thai basil leaves until they just wilt.
- Divide the cooked jasmine rice among four bowls and top each with the chicken mixture.
Notes
Cuisine: Thai
Equipment: Large skillet, Saucepan
Caprese Chicken Pasta with Cherry Tomatoes
This pasta brings together seared chicken, burst cherry tomatoes, and creamy mozzarella in one skillet. It comes together quickly on busy evenings and gives everyone a fresh meal without extra stops.
The flavors stay bright and simple. Juicy tomatoes and melted cheese cling to the pasta while the chicken stays tender.


Equipment
- Large Pot
- Large Skillet
- Colander
Ingredients
- 8 ounces short pasta such as penne
- 1 pound boneless chicken breasts, cut into bite-size pieces
- 2 cups cherry tomatoes, halved
- 8 ounces fresh mozzarella, cut into cubes
- 1/4 cup fresh basil leaves, torn
- 3 garlic cloves, minced
- 2 tablespoons olive oil
- 1/2 teaspoon salt
- 1/4 teaspoon black pepper
Instructions
- Bring a large pot of salted water to a boil. Cook the pasta according to package directions until al dente, then drain and set aside.
- Heat 1 tablespoon of olive oil in a large skillet over medium-high heat. Add the chicken pieces, season with salt and pepper, and cook until browned and cooked through, about 6 to 8 minutes. Remove the chicken to a plate.
- Lower the heat to medium and add the remaining tablespoon of olive oil to the same skillet. Stir in the garlic and cook for 30 seconds until fragrant.
- Add the halved cherry tomatoes to the skillet. Cook for 4 to 5 minutes, stirring occasionally, until the tomatoes soften and release their juices.
- Return the cooked chicken to the skillet and add the drained pasta. Toss everything together to coat evenly.
- Remove the skillet from the heat. Stir in the mozzarella cubes and torn basil until the cheese just begins to soften.
Notes
Cuisine: Italian
Equipment: Large Pot, Large Skillet, Colander
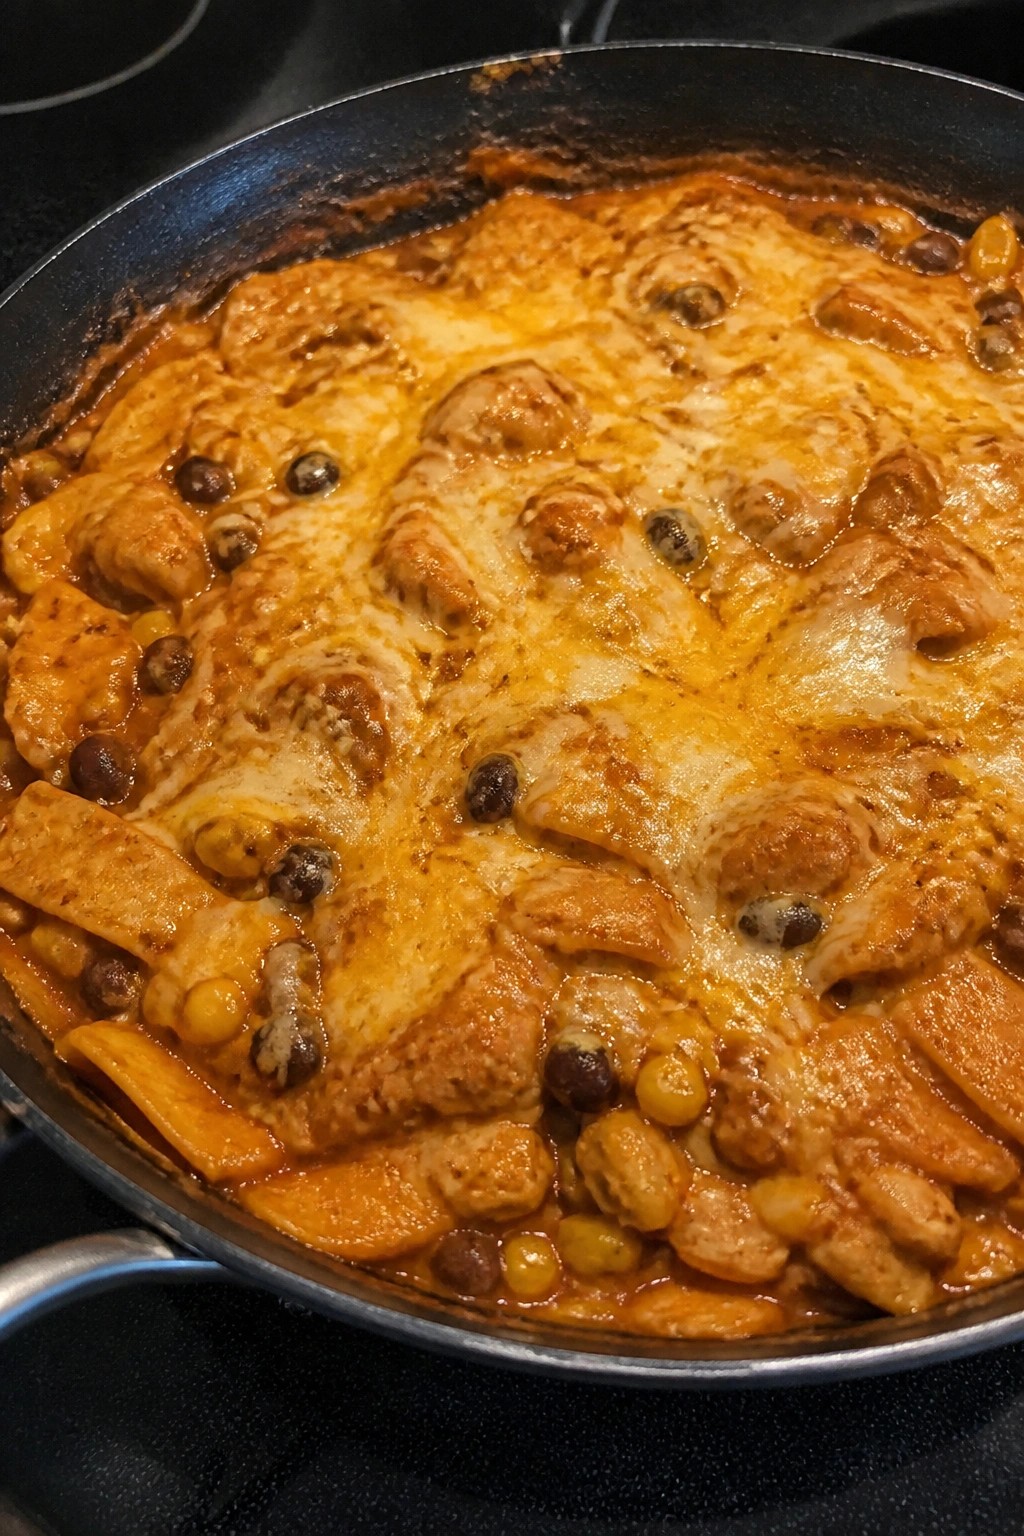
Chicken Enchilada Skillet with Corn Tortillas
This one-pan meal brings the flavors of chicken enchiladas to the table in under 30 minutes. It works well on busy weeknights when you want a hearty dinner without multiple pots or extra cleanup. The corn tortillas soften in the sauce while the chicken stays tender and the cheese melts into a light crust on top.
The result is a mildly spiced, saucy dish with soft tortilla pieces and creamy pockets of cheese. Families enjoy it because it feels like a complete meal with protein, vegetables, and tortillas all in one skillet.

Equipment
- Large Skillet
- Cutting Board
- Knife
Ingredients
- 1 tablespoon olive oil
- 1 pound boneless skinless chicken breasts, cut into 1-inch pieces
- 1 teaspoon ground cumin
- 1 teaspoon chili powder
- 1/2 teaspoon salt
- 1 small onion, diced
- 2 cloves garlic, minced
- 1 can (15 ounces) red enchilada sauce
- 1 can (15 ounces) black beans, drained and rinsed
- 1 cup frozen corn
- 6 corn tortillas, cut into 1-inch strips
- 1 1/2 cups shredded Mexican cheese blend
Instructions
- Heat the olive oil in a large skillet over medium heat. Add the chicken pieces, cumin, chili powder, and salt. Cook for 5 to 6 minutes, stirring occasionally, until the chicken is no longer pink on the outside.
- Add the diced onion and minced garlic to the skillet. Cook for 2 minutes until the onion begins to soften.
- Pour in the enchilada sauce, then add the black beans and frozen corn. Stir to combine and bring the mixture to a gentle simmer.
- Stir in the corn tortilla strips until they are coated in sauce. Let everything simmer for 3 minutes so the tortillas soften.
- Sprinkle the shredded cheese evenly over the top. Cover the skillet and cook for 2 to 3 minutes until the cheese melts.
Notes
Cuisine: Mexican
Equipment: Large Skillet, Cutting Board, Knife
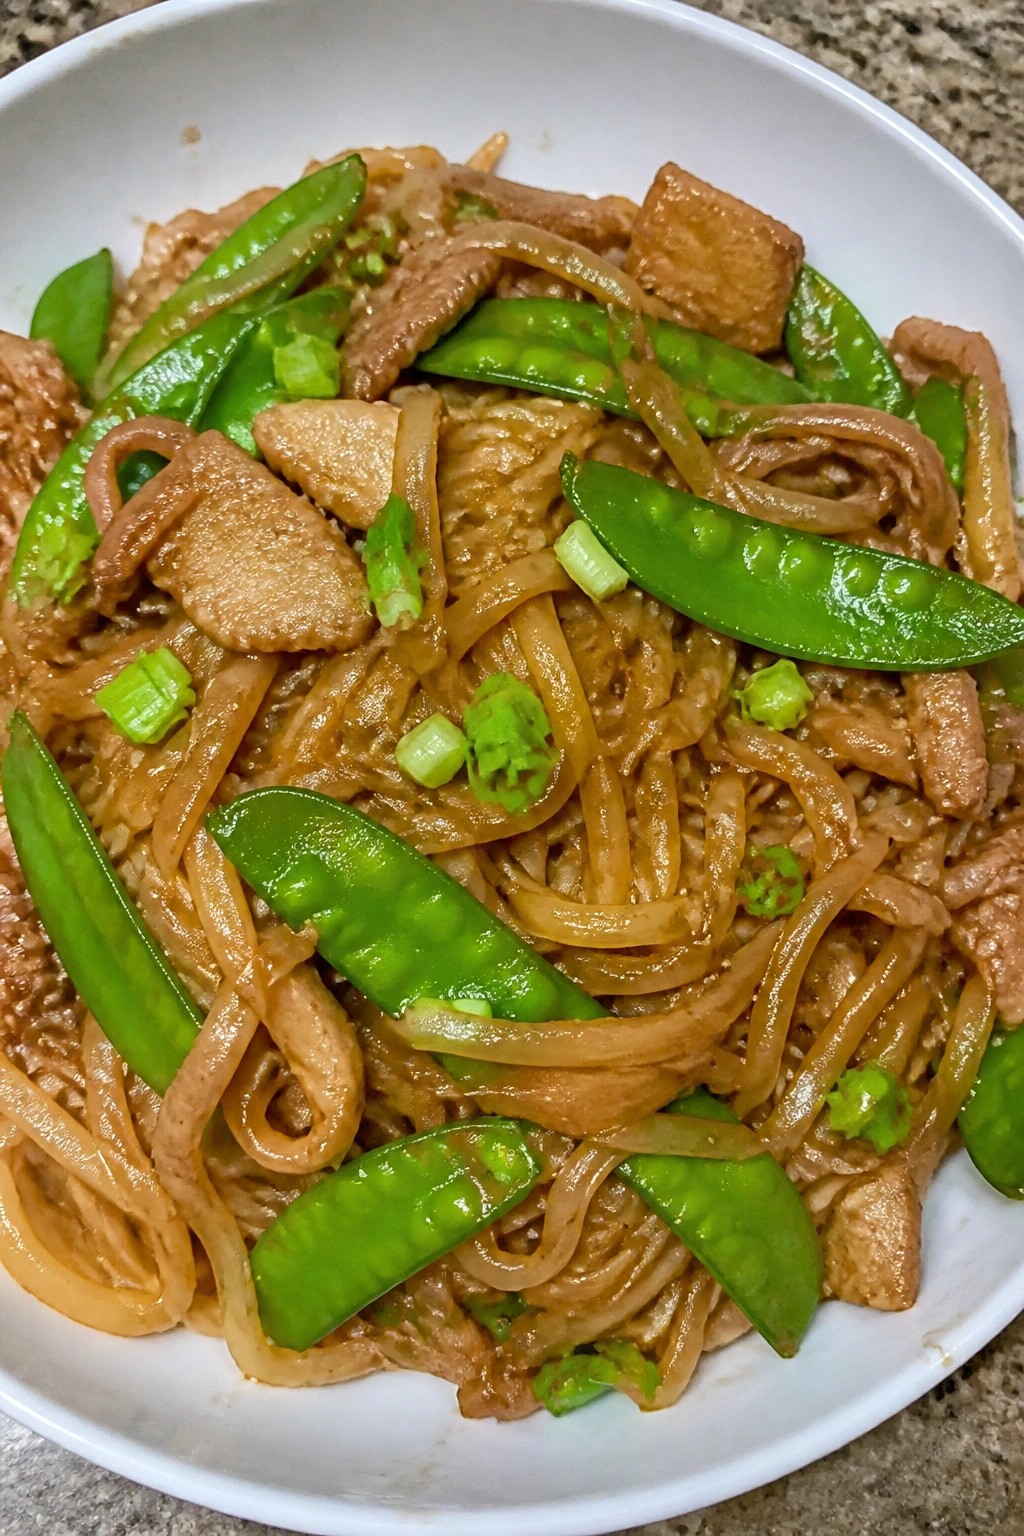
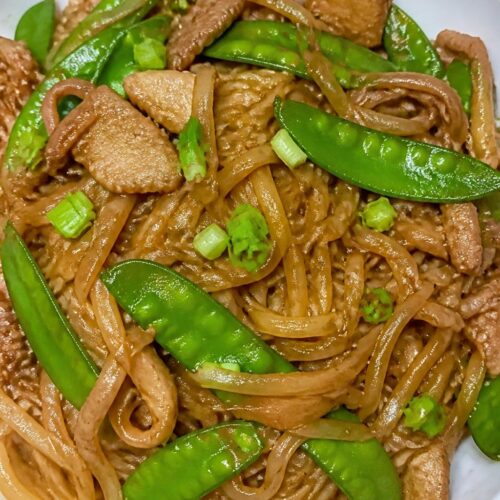
Pork Snow Pea Stir-Fry with Rice Noodles
This stir-fry brings tender pork and crisp snow peas together with chewy rice noodles in a simple savory sauce. It comes together fast on busy weeknights when you want a complete meal without extra cleanup or extra stops.
The dish balances soft noodles with crunchy vegetables and slices of pork that soak up the sauce. Families enjoy it because everyone can add their own amount of green onions at the table.
Equipment
- Large skillet
- Large pot
- Colander
Ingredients
- 8 oz rice noodles
- 1 lb pork loin, thinly sliced
- 2 cups snow peas
- 3 garlic cloves, minced
- 1 tbsp fresh ginger, minced
- 1/4 cup soy sauce
- 2 tbsp hoisin sauce
- 2 tbsp vegetable oil
- 1 tsp sesame oil
- 4 green onions, sliced
Instructions
- Bring a large pot of water to a boil and cook the rice noodles according to package directions. Drain and set aside.
- Heat 1 tablespoon of vegetable oil in a large skillet over medium-high heat. Add the sliced pork and cook until it is no longer pink, about 4 minutes.
- Add the minced garlic and ginger to the skillet. Stir for 30 seconds until fragrant.
- Add the snow peas and cook for 2 minutes, stirring often, until they turn bright green but stay crisp.
- Stir in the soy sauce, hoisin sauce, and sesame oil. Add the drained noodles and toss everything together until the noodles are coated and heated through.
- Remove the skillet from the heat and sprinkle the sliced green onions over the top before serving.
Notes
Cuisine: Asian
Equipment: Large skillet, Large pot, Colander