

After a long day it can be tough to put together a dinner that feels light but still fills everyone up. These recipes use simple ingredients and keep portions satisfying without extra heaviness. I collected 11 options that work for weeknights when time and energy are short. Each one is straightforward to prepare and easy to tweak for what your family likes. They focus on real meals that come together without much fuss.
Helpful Tips Before You Start
These ideas help light recipes stay satisfying for the whole family without extra time or effort.
Add a Protein Source
Include chicken, fish, beans, or tofu in each recipe. Protein keeps everyone full longer after a busy day.
Bulk Up with Vegetables
Add extra non-starchy vegetables like broccoli, zucchini, or spinach. They increase volume and nutrients while keeping portions light.
Prepare Key Items Ahead
Chop vegetables or cook grains during the day. This cuts evening prep time and makes assembly faster.
Use Bold Seasoning
Finish dishes with fresh herbs, garlic, lemon, or spices. Strong flavors prevent lighter meals from tasting bland.
Include a Small Grain Portion
Serve recipes with a modest scoop of quinoa, brown rice, or whole wheat pasta. The fiber adds staying power without heaviness.
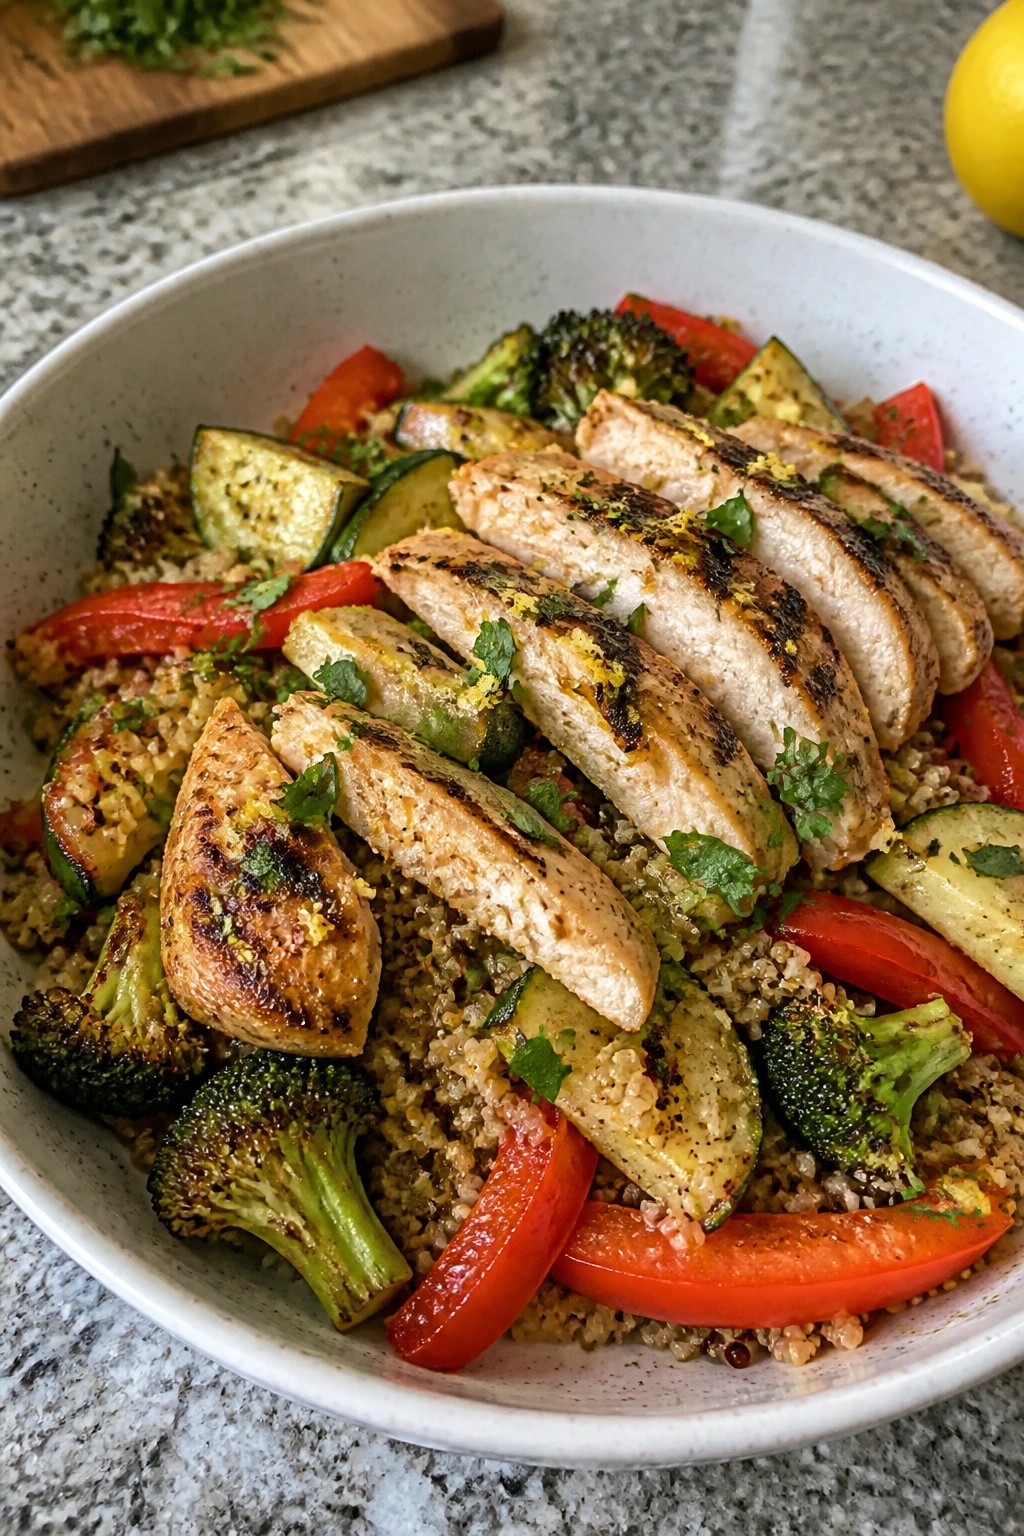
Lemon Garlic Grilled Chicken Quinoa Bowls with Roasted Vegetables
This bowl combines tender grilled chicken with fluffy quinoa and a mix of roasted vegetables for a meal that feels satisfying without weighing you down. The lemon garlic marinade brings bright flavor to the chicken while the roasted vegetables add natural sweetness and a bit of texture. It works well on busy weeknights when you want something wholesome that still comes together without much fuss.
The finished dish gives you protein from the chicken, steady energy from the quinoa, and plenty of vegetables in one bowl. Families often enjoy it because everyone can assemble their own portion and adjust the lemon or herbs at the table.

Equipment
- Grill or grill pan
- Baking sheet
- Saucepan
- Mixing bowl
Ingredients
- 4 boneless skinless chicken breasts
- 1 cup quinoa, rinsed
- 2 cups broccoli florets
- 1 red bell pepper, sliced
- 1 zucchini, sliced into half-moons
- 3 garlic cloves, minced
- 2 lemons, juiced and zested
- 3 tablespoons olive oil
- 1 teaspoon salt
- 1/2 teaspoon black pepper
- 2 tablespoons fresh parsley, chopped
Instructions
- Preheat the oven to 425°F. Toss the broccoli, bell pepper, and zucchini with 1 tablespoon olive oil, half the minced garlic, and a pinch of salt and pepper on a baking sheet. Roast for 20 minutes until the edges start to brown.
- While the vegetables roast, stir together the lemon juice, lemon zest, remaining garlic, 2 tablespoons olive oil, salt, and pepper in a bowl. Add the chicken breasts and turn to coat evenly. Let them sit while you start the quinoa.
- Bring 2 cups of water to a boil in a saucepan. Add the rinsed quinoa, cover, and simmer on low for 15 minutes until the water is absorbed. Remove from heat and let it rest covered for 5 minutes, then fluff with a fork.
- Heat a grill or grill pan over medium-high heat. Grill the chicken for 5 to 6 minutes per side until it reaches an internal temperature of 165°F. Let the chicken rest for 3 minutes, then slice it.
- Divide the quinoa among four bowls. Top each with roasted vegetables and sliced chicken. Sprinkle with fresh parsley before serving.
Notes
Cuisine: Mediterranean
Equipment: Grill or grill pan, Baking sheet, Saucepan, Mixing bowl
Baked Salmon with Asparagus and Cherry Tomato Couscous
This recipe brings together flaky salmon, tender asparagus, and a bright couscous salad in one pan meal. It comes together with minimal hands-on time, making it a good choice for busy evenings when you want something nourishing without much fuss.
The flavors stay light but satisfying. Lemon and garlic keep the fish fresh, while the couscous absorbs just enough seasoning to feel complete. Families often appreciate how the components feel balanced on the plate without weighing anyone down.


Equipment
- Baking sheet
- Saucepan
- Mixing bowl
Ingredients
- 4 (6-ounce) salmon fillets
- 1 pound asparagus, trimmed
- 2 cups cherry tomatoes, halved
- 1 1/2 cups couscous
- 2 tablespoons olive oil, divided
- 2 cloves garlic, minced
- 1 lemon, juiced and zested
- Salt and black pepper to taste
- 2 cups vegetable broth
- 1/4 cup chopped fresh parsley
Instructions
- Heat the oven to 400 degrees F. Line a baking sheet with parchment paper.
- Place the salmon fillets and asparagus on the sheet. Drizzle with 1 tablespoon olive oil, half the lemon juice, half the garlic, salt, and pepper. Toss the asparagus to coat.
- Bake for 12 to 15 minutes until the salmon flakes easily and the asparagus is tender.
- While the salmon bakes, bring the vegetable broth to a boil in a saucepan. Stir in the couscous, cover, and remove from heat. Let it sit for 5 minutes.
- Fluff the couscous with a fork. Stir in the cherry tomatoes, remaining olive oil, remaining garlic, lemon zest, remaining lemon juice, salt, pepper, and parsley.
- Divide the couscous among four plates and top each with one salmon fillet and some asparagus.
Notes
Cuisine: Mediterranean
Equipment: Baking sheet, Saucepan, Mixing bowl
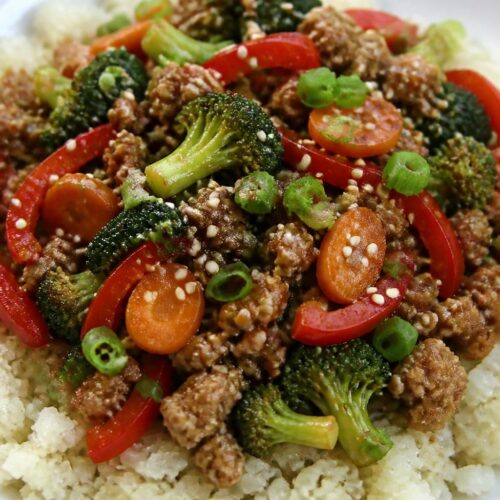
Turkey Vegetable Stir-Fry over Cauliflower Rice
This recipe keeps dinner light with lean turkey and cauliflower rice while still delivering plenty of vegetables and protein to satisfy everyone at the table. It comes together in one pan, making it a practical choice for evenings when energy is low but you still want a balanced meal.
The flavors stay bright from garlic, ginger, and a simple soy-based sauce, and the cauliflower rice soaks up the juices without weighing the dish down.

Equipment
- Large Skillet
- Food Processor
Ingredients
- 1 pound ground turkey
- 2 tablespoons sesame oil
- 3 cloves garlic, minced
- 1 tablespoon fresh ginger, grated
- 2 cups broccoli florets
- 1 red bell pepper, sliced
- 2 carrots, thinly sliced
- 4 cups cauliflower rice
- 3 tablespoons low-sodium soy sauce
- 1 tablespoon rice vinegar
- 2 green onions, sliced
- 1 tablespoon sesame seeds
Instructions
- Heat 1 tablespoon of sesame oil in a large skillet over medium-high heat. Add the ground turkey and cook, breaking it up with a spoon, until it is no longer pink.
- Add the garlic and ginger to the turkey and stir for 30 seconds until fragrant.
- Push the turkey to one side of the skillet. Add the remaining tablespoon of sesame oil along with the broccoli, bell pepper, and carrots. Cook the vegetables for 4 to 5 minutes, stirring occasionally, until they begin to soften.
- Stir the turkey and vegetables together. Add the cauliflower rice, soy sauce, and rice vinegar. Cook for another 3 to 4 minutes, stirring often, until the cauliflower rice is heated through.
- Remove the skillet from the heat. Sprinkle the green onions and sesame seeds over the top before serving.
Notes
Cuisine: Asian
Equipment: Large Skillet, Food Processor
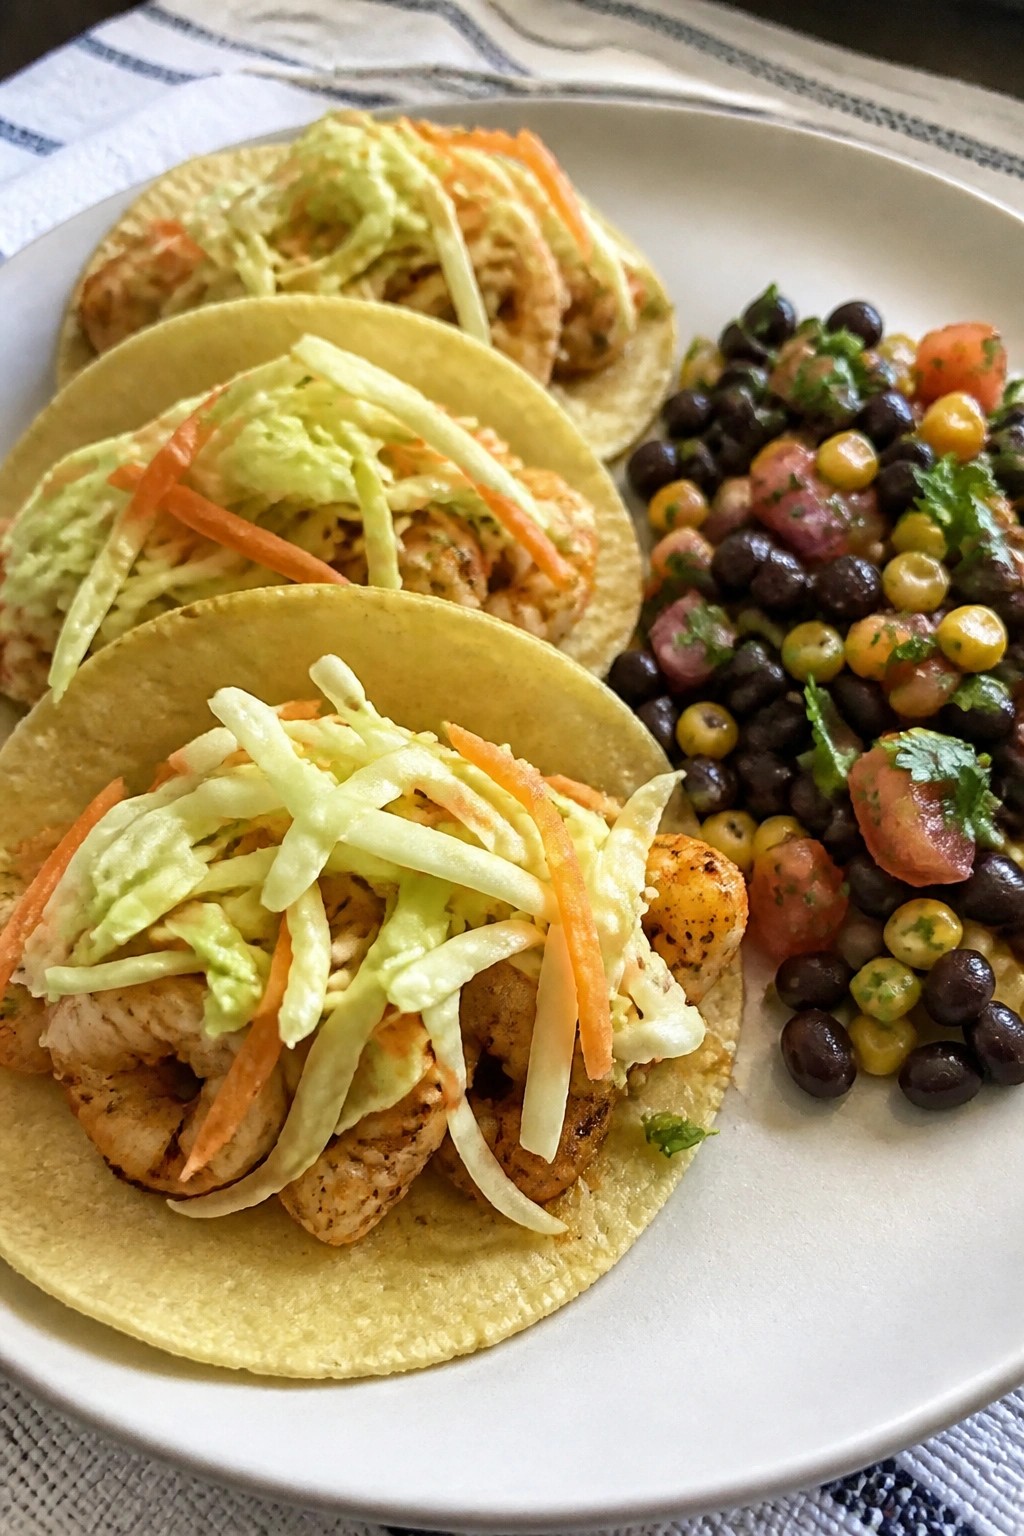
Shrimp Tacos with Cabbage Slaw and Black Bean Salad
These shrimp tacos bring together quick-cooked seafood with a crisp cabbage slaw and a simple black bean salad on the side. The combination stays light enough for weeknights yet supplies enough protein and fiber to keep everyone satisfied after a busy day. Bright lime and warm spices give the dish a fresh, balanced taste without feeling heavy.
The slaw adds crunch while the beans provide a creamy, earthy contrast. Corn tortillas keep the meal simple and family-friendly. Everything comes together in one skillet and a couple of bowls, so cleanup stays minimal.

Equipment
- Large skillet
- Mixing bowls
- Measuring spoons
Ingredients
- 1 lb large shrimp, peeled and deveined
- 8 small corn tortillas
- 3 cups shredded green cabbage
- 1 cup shredded carrots
- 1/4 cup plain Greek yogurt
- 3 tbsp lime juice, divided
- 1 can (15 oz) black beans, drained and rinsed
- 1 cup corn kernels
- 1 medium tomato, diced
- 1/4 cup diced red onion
- 2 tbsp olive oil
- 1 tsp ground cumin
- 1 tsp chili powder
- 1/2 tsp salt
- 1/4 tsp black pepper
- 2 tbsp chopped fresh cilantro
Instructions
- In a large bowl, toss the shrimp with cumin, chili powder, salt, pepper, and 1 tablespoon of lime juice until evenly coated.
- Heat 1 tablespoon of olive oil in a large skillet over medium heat. Add the shrimp and cook for 2 to 3 minutes per side until pink and opaque. Remove from heat and set aside.
- In a separate bowl, combine the shredded cabbage, shredded carrots, Greek yogurt, and the remaining 2 tablespoons of lime juice. Stir until the vegetables are lightly coated.
- In another bowl, mix the black beans, corn kernels, diced tomato, diced red onion, and the remaining 1 tablespoon of olive oil. Season with a pinch of salt and pepper and stir gently.
- Warm the corn tortillas in a dry skillet or microwave for 20 to 30 seconds until soft.
- Fill each tortilla with a few shrimp and a spoonful of cabbage slaw. Serve the black bean salad on the side and sprinkle chopped cilantro over everything before eating.
Notes
Cuisine: Mexican
Equipment: Large skillet, Mixing bowls, Measuring spoons
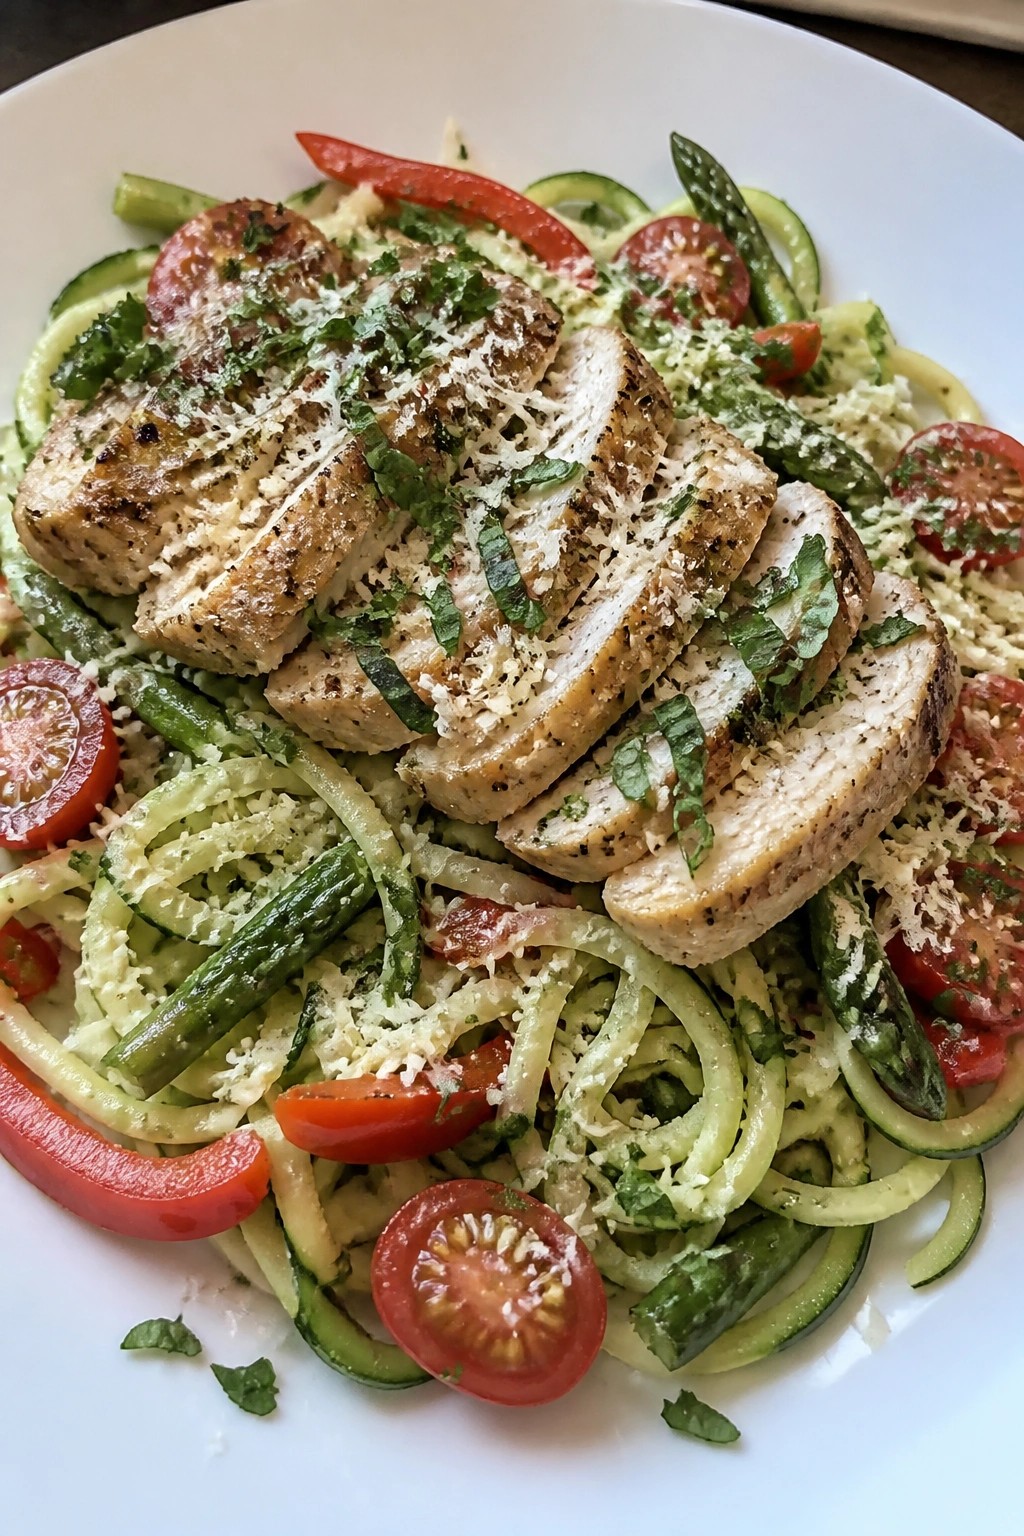
Zucchini Noodle Primavera with Grilled Chicken and Fresh Herbs
This recipe turns fresh zucchini into light noodles tossed with colorful spring vegetables and topped with juicy grilled chicken. It comes together quickly for busy weeknights when you want something satisfying without feeling heavy.
The grilled chicken adds protein that keeps everyone full, while the fresh herbs bring bright flavor. It has a nice mix of tender vegetables and crisp zucchini strands.

Equipment
- Spiralizer
- Grill pan
- Large skillet
Ingredients
- 4 medium zucchini
- 1.5 pounds boneless skinless chicken breasts
- 3 tablespoons olive oil, divided
- 3 garlic cloves, minced
- 1 red bell pepper, thinly sliced
- 1 bunch asparagus, trimmed and cut into 2-inch pieces
- 1 cup cherry tomatoes, halved
- 1/4 cup fresh basil, chopped
- 2 tablespoons fresh parsley, chopped
- 1/2 cup grated Parmesan cheese
- Salt and black pepper to taste
Instructions
- Use a spiralizer to turn the zucchini into noodles. Place the noodles in a colander, sprinkle lightly with salt, and let them sit for 10 minutes to release excess moisture. Pat dry with a clean towel.
- Season the chicken breasts with salt and black pepper on both sides. Heat 1 tablespoon olive oil in a grill pan over medium-high heat. Grill the chicken for 6 to 7 minutes per side until cooked through. Remove from heat and let rest for 5 minutes before slicing.
- While the chicken rests, heat the remaining 2 tablespoons olive oil in a large skillet over medium heat. Add the minced garlic and cook for 30 seconds until fragrant.
- Add the sliced bell pepper and asparagus pieces to the skillet. Cook for 4 to 5 minutes, stirring occasionally, until the vegetables begin to soften.
- Add the zucchini noodles and cherry tomatoes to the skillet. Cook for 2 to 3 minutes, tossing gently, just until the noodles are warmed through but still firm.
- Remove the skillet from heat. Stir in the chopped basil, chopped parsley, and grated Parmesan cheese. Toss to combine evenly.
- Divide the zucchini noodle mixture among four plates. Top each serving with sliced grilled chicken.
Notes
Cuisine: Italian
Equipment: Spiralizer, Grill pan, Large skillet
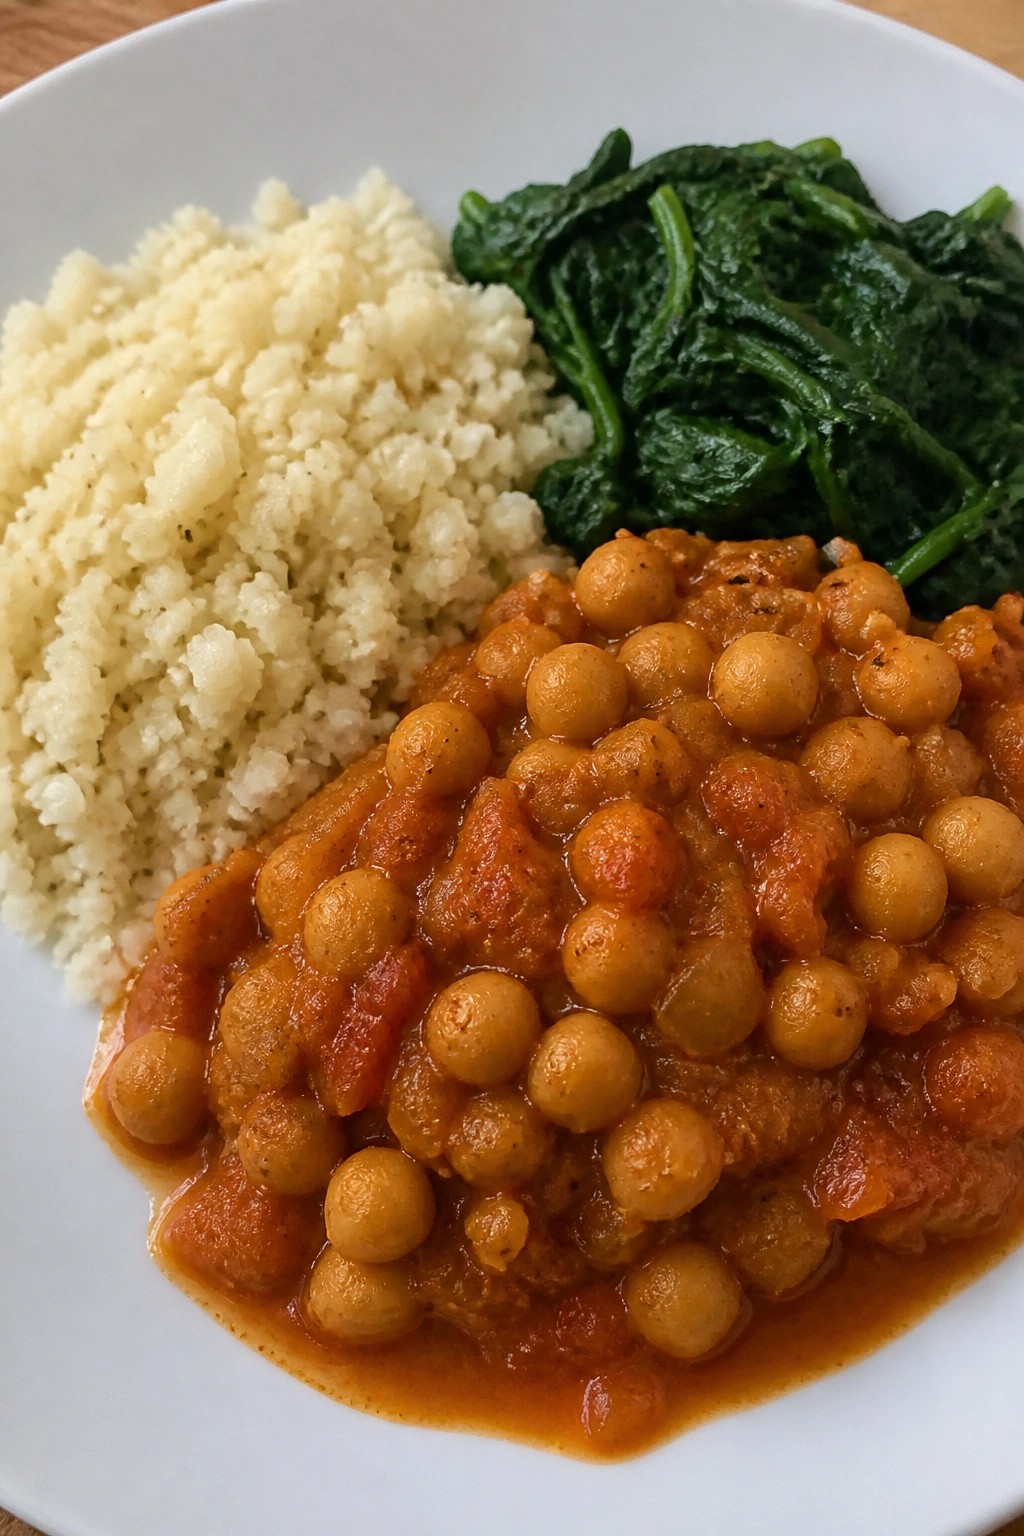
Spiced Chickpea Curry with Cauliflower Rice and Steamed Greens
This curry brings warm spices and tender chickpeas together in a light broth that still leaves everyone satisfied. It works well on busy weeknights when you want a plant-based meal that feels complete without being heavy. The cauliflower rice keeps the plate fresh while the steamed greens add a simple, clean finish.

Equipment
- Large skillet
- Food processor
- Steamer basket
Ingredients
- 2 tablespoons olive oil
- 1 medium onion, diced
- 3 garlic cloves, minced
- 1 tablespoon fresh ginger, grated
- 2 teaspoons ground cumin
- 1 teaspoon turmeric
- 1 teaspoon garam masala
- 1/2 teaspoon chili powder
- 2 cans (15 oz each) chickpeas, drained and rinsed
- 1 can (14 oz) diced tomatoes
- 1 cup vegetable broth
- 1 medium head cauliflower, cut into florets
- 4 cups fresh spinach
- Salt and black pepper to taste
- Fresh cilantro, chopped (optional)
Instructions
- Heat the olive oil in a large skillet over medium heat. Add the onion and cook for 4 minutes until softened.
- Stir in the garlic and ginger and cook for 1 minute until fragrant.
- Add the cumin, turmeric, garam masala, and chili powder. Cook for 30 seconds to toast the spices.
- Pour in the chickpeas, diced tomatoes, and vegetable broth. Season with salt and pepper. Simmer for 12 minutes, stirring occasionally, until the sauce thickens slightly.
- While the curry simmers, pulse the cauliflower florets in a food processor until they resemble rice. Place in a microwave-safe bowl, cover, and microwave for 4 minutes.
- Steam the spinach in a separate pot or steamer basket for 3 minutes until just wilted. Drain any excess water.
- Divide the cauliflower rice among four bowls. Spoon the chickpea curry over the rice and add the steamed spinach on the side. Top with chopped cilantro if using.
Notes
Cuisine: Indian
Equipment: Large skillet, Food processor, Steamer basket
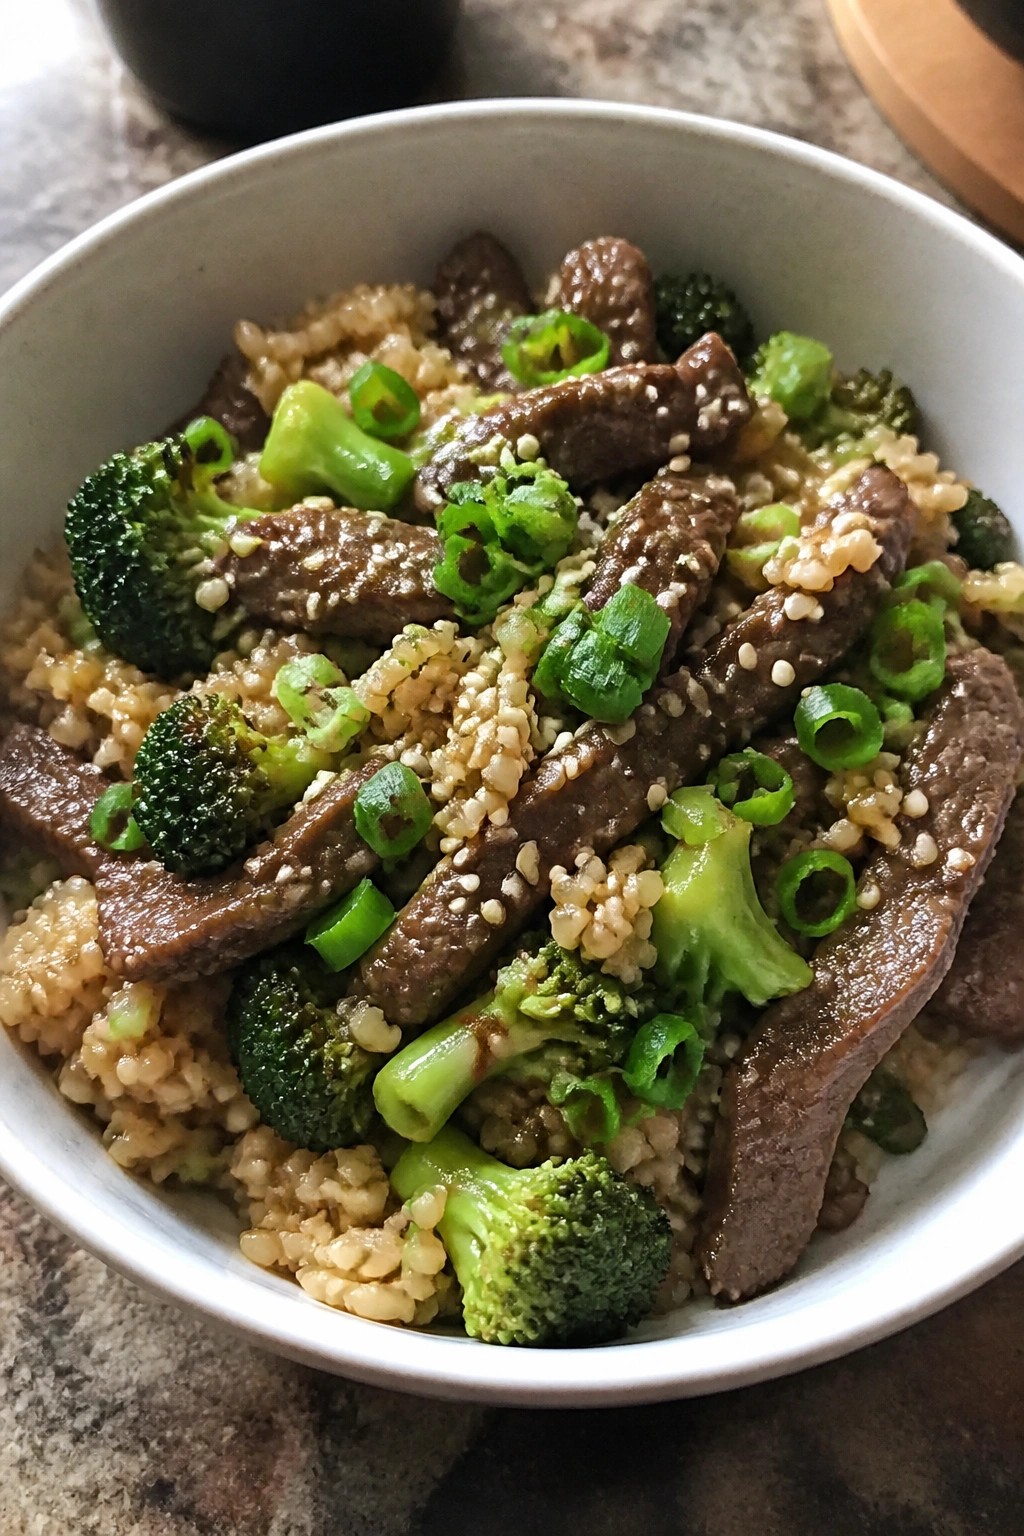
Lean Beef and Broccoli Bowl with Brown Rice
This lean beef and broccoli bowl with brown rice gives you a balanced plate without extra richness. It works well on weeknights when you want something that fills everyone up yet stays light.
The dish combines tender strips of beef with crisp broccoli and chewy brown rice. A light garlic-ginger sauce keeps the flavors savory without weighing the meal down.

Equipment
- Large skillet
- Medium saucepan
- Knife
Ingredients
- 1 pound lean sirloin steak, thinly sliced
- 4 cups broccoli florets
- 1 cup uncooked brown rice
- 2 tablespoons low-sodium soy sauce
- 1 tablespoon olive oil
- 3 garlic cloves, minced
- 1 teaspoon grated fresh ginger
- ½ cup water
- 2 green onions, sliced
- 1 teaspoon sesame seeds
Instructions
- Cook the brown rice according to package directions and set it aside.
- Heat the olive oil in a large skillet over medium-high heat.
- Add the sliced beef and cook for 3 to 4 minutes until browned but still tender. Remove the beef to a plate.
- Add the garlic and ginger to the same skillet and stir for 30 seconds.
- Add the broccoli florets and water. Cover and steam for 3 minutes until the broccoli is bright green and crisp-tender.
- Return the beef to the skillet. Stir in the soy sauce and cook for 1 minute to combine.
- Divide the cooked brown rice among four bowls. Top each bowl with the beef and broccoli mixture.
- Sprinkle the green onions and sesame seeds over each serving.
Notes
Cuisine: Asian
Equipment: Large skillet, Medium saucepan, Knife
Herb-Crusted Pork Tenderloin with Brussels Sprouts and Sweet Potato Mash
This recipe pairs lean pork with a simple herb crust and two vegetable sides that keep the meal balanced. It works well on weeknights when you want something satisfying but not heavy after a long day.
The pork stays tender inside with a light, savory coating. Roasted Brussels sprouts add a bit of crisp edge, and the sweet potato mash brings creaminess without extra richness.


Equipment
- Baking sheet
- Oven
- Medium pot
- Potato masher
Ingredients
- 1 lb pork tenderloin
- 3 tbsp olive oil, divided
- 2 garlic cloves, minced
- 1 tbsp fresh rosemary, chopped
- 1 tbsp fresh thyme, chopped
- 1 lb Brussels sprouts, halved
- 2 large sweet potatoes, peeled and cut into 1-inch cubes
- 1/2 tsp salt
- 1/4 tsp black pepper
Instructions
- Preheat the oven to 425°F. Line a baking sheet with parchment paper.
- In a small bowl, mix 2 tablespoons olive oil, garlic, rosemary, thyme, salt, and pepper. Rub the mixture evenly over the pork tenderloin.
- Place the pork on one side of the baking sheet. Toss the Brussels sprouts with the remaining tablespoon of olive oil and spread them on the other side.
- Roast for 20 to 25 minutes, until the pork reaches an internal temperature of 145°F and the Brussels sprouts are browned at the edges.
- While the pork and Brussels sprouts roast, place the sweet potato cubes in a medium pot and cover with water. Bring to a boil, then reduce to a simmer and cook for 12 to 15 minutes until fork-tender.
- Drain the sweet potatoes, return them to the pot, and mash until smooth. Season lightly with salt and pepper if needed.
- Let the pork rest for 5 minutes, then slice it. Serve slices with the roasted Brussels sprouts and sweet potato mash.
Notes
Cuisine: American
Equipment: Baking sheet, Oven, Medium pot, Potato masher
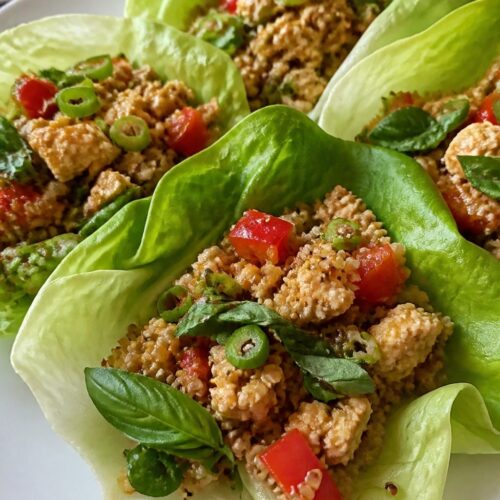
Thai Basil Tofu Lettuce Wraps with Quinoa
These wraps bring fresh Thai flavors to the table without feeling heavy. The quinoa adds staying power while the lettuce keeps everything light and crisp. It works well on busy evenings when you want a meal that comes together in one skillet plus a pot.
The tofu takes on a savory garlic-ginger coating, and the Thai basil gives each bite a bright herbal note. Family members can build their own wraps at the table, which makes it practical for different preferences.

Equipment
- Large skillet
- Medium saucepan
Ingredients
- 1 cup quinoa, rinsed
- 1 14-ounce package extra-firm tofu, pressed and crumbled
- 2 tablespoons sesame oil
- 4 cloves garlic, minced
- 1 tablespoon grated fresh ginger
- 1 red bell pepper, diced
- 3 tablespoons low-sodium soy sauce
- 1 tablespoon lime juice
- 1 cup fresh Thai basil leaves
- 1 large head butter lettuce, leaves separated
- 2 green onions, thinly sliced
Instructions
- Place the rinsed quinoa in a medium saucepan with 2 cups water. Bring to a boil, then reduce heat, cover, and simmer for 15 minutes until the water is absorbed. Remove from heat and let it rest covered.
- Heat the sesame oil in a large skillet over medium heat. Add the crumbled tofu and cook for 6 to 8 minutes, stirring occasionally, until the edges turn golden.
- Add the minced garlic, grated ginger, and diced red bell pepper to the skillet. Stir and cook for 3 minutes until the pepper softens slightly.
- Pour in the soy sauce and lime juice. Stir everything together and cook for 2 more minutes so the tofu absorbs the sauce.
- Turn off the heat and fold in the Thai basil leaves until they just wilt. Stir the cooked quinoa into the skillet or keep it separate for serving.
- Spoon the tofu-quinoa mixture into individual butter lettuce leaves and top with sliced green onions.
Notes
Cuisine: Thai
Equipment: Large skillet, Medium saucepan
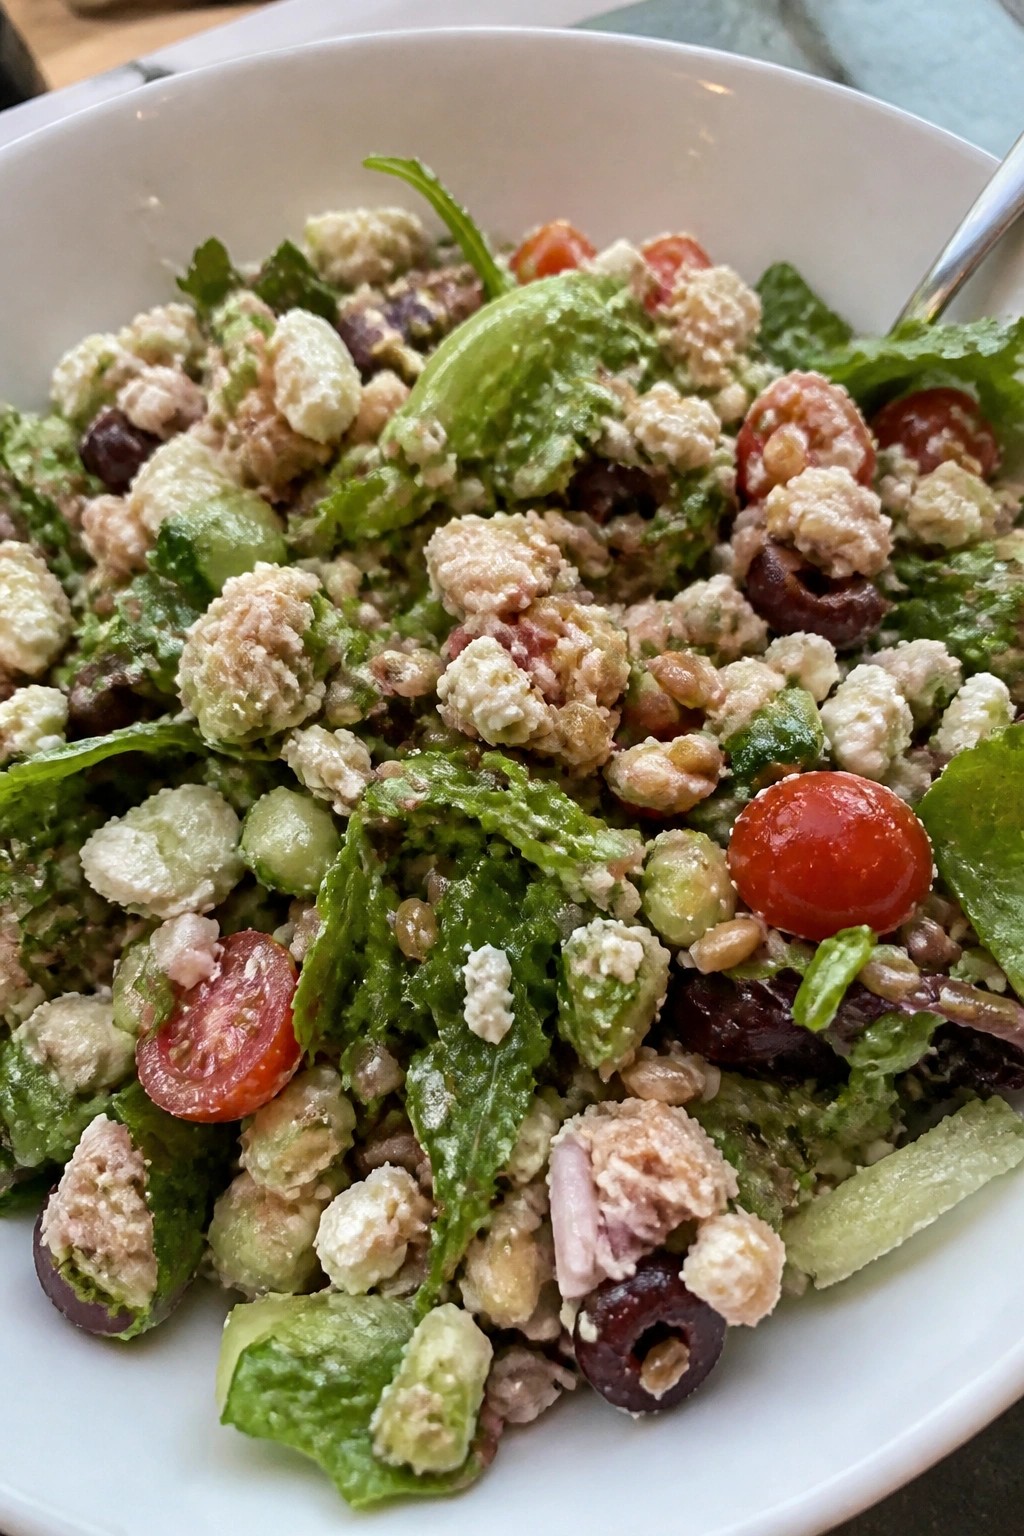
Mediterranean Tuna Salad with Farro and Mixed Greens
This salad brings together chewy farro, flaky tuna, and crisp greens for a meal that feels fresh without leaving anyone hungry. It works well on weeknights when you want something quick to assemble after a busy day. The flavors lean bright from lemon and herbs, with a little brininess from olives and feta that keeps each bite interesting.

Equipment
- Medium pot
- Mixing bowl
- Whisk
Ingredients
- 1 cup uncooked farro
- 2 cans (5 oz each) tuna, drained
- 8 cups mixed greens
- 1 cup cherry tomatoes, halved
- 1 cucumber, diced
- ½ cup kalamata olives, pitted and sliced
- ⅓ cup crumbled feta cheese
- ¼ cup finely chopped red onion
- 3 tablespoons olive oil
- 2 tablespoons lemon juice
- 1 teaspoon dried oregano
- Salt and black pepper to taste
Instructions
- Rinse the farro under cold water. Place it in a medium pot with 3 cups of water and a pinch of salt. Bring to a boil, then reduce heat and simmer for 25 to 30 minutes until tender but still chewy. Drain any excess water and let the farro cool slightly.
- In a small bowl, whisk together the olive oil, lemon juice, oregano, salt, and pepper to make the dressing.
- Flake the drained tuna into a large mixing bowl. Add the cooked farro, cherry tomatoes, cucumber, olives, and red onion.
- Pour the dressing over the mixture and toss gently to coat everything evenly.
- Add the mixed greens and feta cheese. Toss once more just before serving so the greens stay crisp.
Notes
Cuisine: Mediterranean
Equipment: Medium pot, Mixing bowl, Whisk
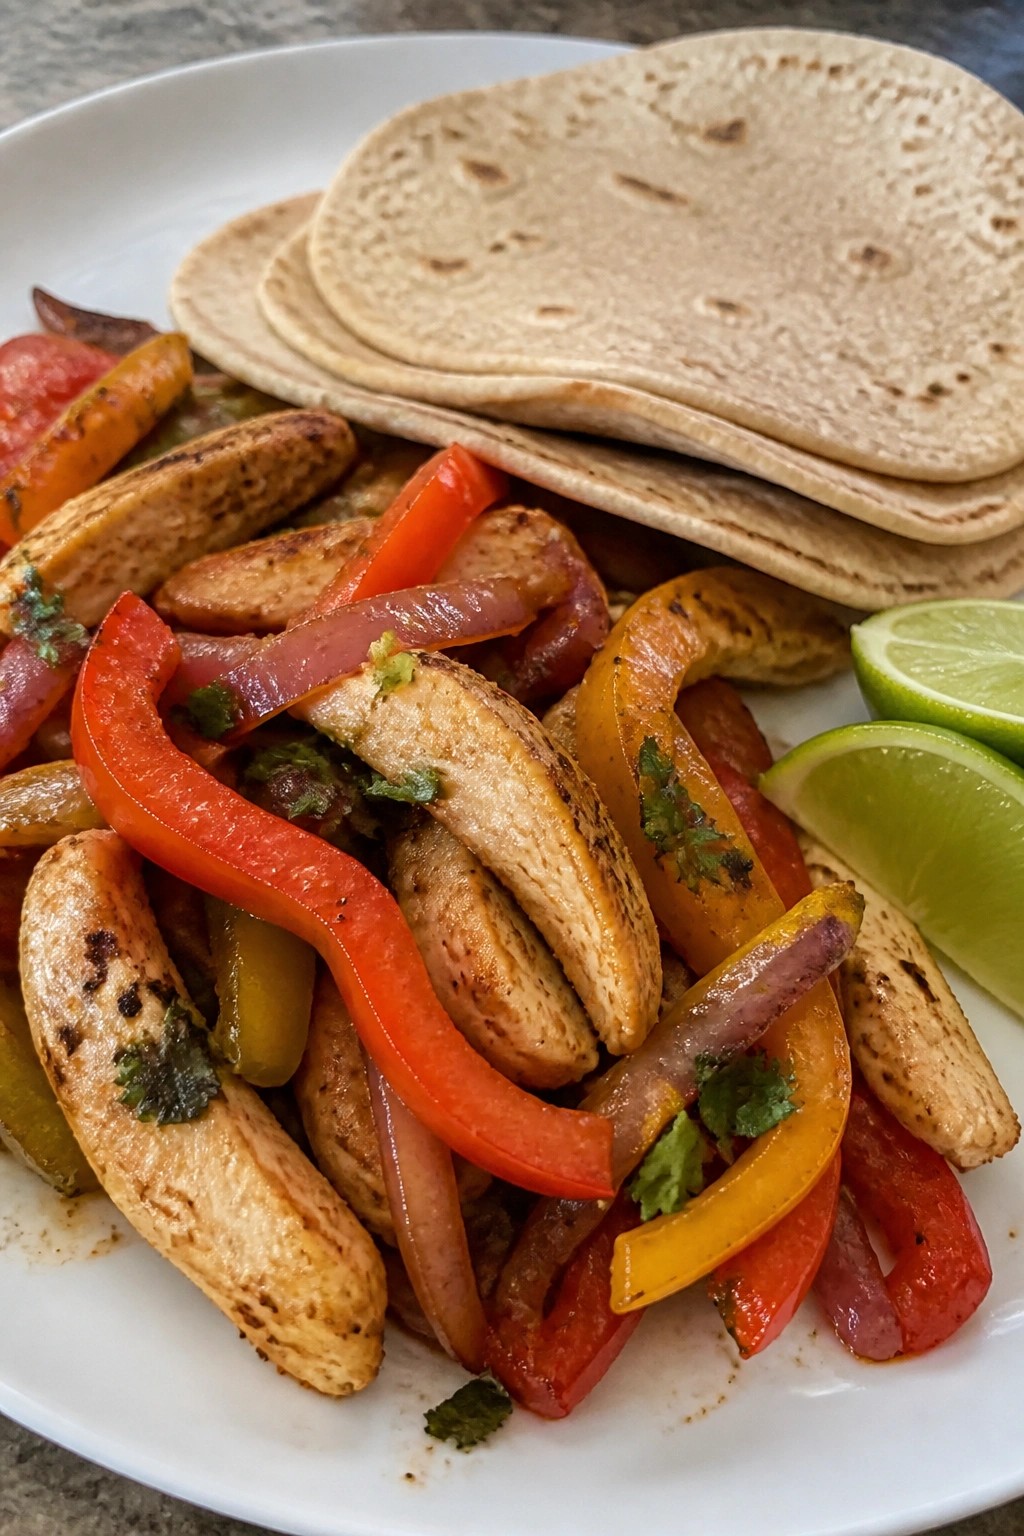
Sheet Pan Fajita Chicken with Peppers, Onions, and Whole Wheat Tortillas
This sheet pan meal brings together tender chicken strips and colorful vegetables in one pan. It comes together quickly and leaves little cleanup, which makes it practical for busy evenings when everyone needs a satisfying dinner without extra effort.
The flavors stay bright with a simple spice blend and a squeeze of lime at the end. Whole wheat tortillas keep the meal light while still giving the family a familiar fajita-style dinner that feels complete.

Equipment
- Baking sheet
- Mixing bowl
- Oven
Ingredients
- 1.5 pounds boneless skinless chicken breasts, sliced into strips
- 3 bell peppers (mixed colors), sliced
- 1 large red onion, sliced
- 2 tablespoons olive oil
- 2 teaspoons chili powder
- 1 teaspoon ground cumin
- 1 teaspoon smoked paprika
- 1 teaspoon garlic powder
- 1/2 teaspoon salt
- 1/4 teaspoon black pepper
- Juice of 1 lime
- 8 whole wheat tortillas
- Fresh cilantro, chopped (optional)
Instructions
- Preheat the oven to 425 degrees and line a large baking sheet with parchment paper or foil.
- Place the sliced chicken, bell peppers, and red onion in a large mixing bowl.
- Drizzle the olive oil over the chicken and vegetables, then sprinkle in the chili powder, cumin, smoked paprika, garlic powder, salt, and black pepper.
- Toss everything until the chicken and vegetables are evenly coated with the oil and spices.
- Spread the mixture in a single layer on the prepared baking sheet.
- Bake for 20 to 25 minutes, stirring once halfway through, until the chicken is cooked through and the vegetables are tender.
- Remove the pan from the oven and drizzle the lime juice over the hot chicken and vegetables.
- Warm the whole wheat tortillas and serve them alongside the sheet pan mixture, adding chopped cilantro if desired.
Notes
Cuisine: Mexican
Equipment: Baking sheet, Mixing bowl, Oven