


Halloween is coming up and baking cakes for kids can be a nice way to get in the spirit. These ideas focus on simple designs that still turn out looking cute. You will find recipes that use ingredients you probably already have. Each one is straightforward to put together with kids around. They work well for parties or just a fun afternoon at home.
Helpful Tips Before You Start
These tips will help you create cakes that look cute and hold up well with kids around.
Let Kids Help with Simple Steps
Have them stir the batter or pick out candy decorations. Small tasks keep them engaged without adding stress to the process.
Stick to Bold and Easy Designs
Use large cookie cutters for shapes and bright frosting colors. Avoid tiny details that can frustrate young helpers or fall apart quickly.
Bake Sturdy Bases First
Choose recipes or mixes that stay moist and firm under layers of icing. This makes stacking and decorating smoother on busy days.
Check for Common Allergies
Review ingredients for nuts, dairy, or gluten before shopping. Keep a few safe swaps ready so every child can enjoy a slice.
Test One Design Ahead of Time
Make a single cupcake version of your top idea the day before. It shows what works and saves time on the full batch.
Pumpkin Patch Ghost Cake
This cake brings a fun twist to Halloween with its pumpkin flavor and playful ghost decorations. It works well for small family gatherings or kids’ parties where you want something festive without too much effort. The cake stays moist from the pumpkin, and the frosting adds a sweet finish that pairs nicely with the chewy marshmallow ghosts.
Kids love spotting the little ghosts peeking out from the pumpkin patch on top. The overall taste is warm and spiced, with a soft crumb that makes it easy to slice and serve.


Equipment
- Mixing Bowl
- 8-inch Cake Pan
- Oven
Ingredients
- 1 box yellow cake mix (15.25 oz)
- 1 cup pumpkin puree
- 3 large eggs
- 1/2 cup vegetable oil
- 1 teaspoon pumpkin pie spice
- 2 cups vanilla frosting
- 8 large marshmallows
- Black decorating gel
- 12 candy pumpkins
Instructions
- Preheat the oven to 350°F and grease an 8-inch round cake pan.
- In a mixing bowl, combine the yellow cake mix, pumpkin puree, eggs, vegetable oil, and pumpkin pie spice. Stir until the batter is smooth and no dry streaks remain.
- Pour the batter into the prepared pan and bake for 25 to 30 minutes, or until a toothpick inserted in the center comes out clean. Remove from the oven and let the cake cool completely in the pan.
- Spread the vanilla frosting evenly over the top and sides of the cooled cake.
- Set the marshmallows upright on the frosted cake to form the ghosts. Use the black decorating gel to draw simple faces on each marshmallow.
- Arrange the candy pumpkins around the marshmallows to finish the pumpkin patch look.
Notes
Cuisine: American
Equipment: Mixing Bowl, 8-inch Cake Pan, Oven
Cute Spiderweb Chocolate Cake
This cute spiderweb chocolate cake brings a playful Halloween touch to any kids party. The moist chocolate cake gets topped with creamy chocolate frosting and finished with a simple white spiderweb that looks fun without being scary. Kids enjoy spotting the web design while adults appreciate how easy it is to pull together for an afternoon gathering.
The cake has a soft, tender crumb and balanced chocolate flavor that pairs nicely with the sweet frosting. It works well for small family celebrations or school events where you want something themed but not overly complicated.


Equipment
- Mixing Bowl
- 6-inch Cake Pan
- Piping Bag
Ingredients
- ¾ cup all-purpose flour
- ½ cup granulated sugar
- ¼ cup unsweetened cocoa powder
- ½ teaspoon baking soda
- ¼ teaspoon salt
- ½ cup milk
- ¼ cup vegetable oil
- 1 large egg
- 1 teaspoon vanilla extract
- 1 cup chocolate buttercream frosting
- ¼ cup vanilla frosting
Instructions
- Preheat the oven to 350°F and grease a 6-inch round cake pan.
- In a mixing bowl, whisk together the flour, sugar, cocoa powder, baking soda, and salt.
- Add the milk, vegetable oil, egg, and vanilla extract to the dry ingredients. Stir until the batter is smooth and no lumps remain.
- Pour the batter into the prepared pan and bake for 25 to 28 minutes, until a toothpick inserted in the center comes out clean.
- Let the cake cool in the pan for 10 minutes, then turn it out onto a wire rack to cool completely.
- Spread the chocolate buttercream frosting evenly over the top and sides of the cooled cake.
- Spoon the vanilla frosting into a piping bag fitted with a small round tip. Pipe several concentric circles on top of the cake.
- Drag a toothpick from the center outward through the circles at even intervals to create the spiderweb pattern.
Notes
Cuisine: American
Equipment: Mixing Bowl, 6-inch Cake Pan, Piping Bag
Monster Mash Funfetti Cake
This cake adds a playful Halloween touch with its bright funfetti layers and green monster frosting. It suits kids parties or family gatherings where a simple yet themed dessert works well. The cake stays moist with a light vanilla flavor and pops of color from the sprinkles throughout.


Equipment
- Mixing bowl
- Cake pan
- Oven
- Whisk
Ingredients
- 1 box funfetti cake mix
- 3 large eggs
- 1/2 cup vegetable oil
- 1 cup water
- Green food coloring
- 2 cups vanilla frosting
- 1/4 cup rainbow sprinkles
- 12 candy monster eyes
Instructions
- Preheat the oven to 350 degrees and grease a small square cake pan.
- In a mixing bowl combine the funfetti cake mix with the eggs, vegetable oil, and water. Stir until smooth.
- Add a few drops of green food coloring to the batter and mix until the color looks even.
- Pour the batter into the prepared pan and bake for 25 to 30 minutes until a toothpick comes out clean.
- Let the cake cool completely before removing it from the pan.
- In a separate bowl tint the vanilla frosting with green food coloring until it reaches the desired shade.
- Spread the green frosting evenly over the top of the cooled cake.
- Scatter the rainbow sprinkles across the frosting and press the candy monster eyes into place.
Notes
Cuisine: American
Equipment: Mixing bowl, Cake pan, Oven, Whisk
Witch Hat Layer Cake
This chocolate layer cake brings a playful Halloween touch that kids enjoy spotting on the table. The dark layers stack with orange frosting to create a simple witch hat shape that feels festive without extra fuss. It works well for small family parties or after-school treats when you want something quick to assemble.
The flavor stays rich from cocoa with a sweet, creamy frosting that balances each bite. Kids like the bright color contrast and the added cone top that makes it look like a real hat.


Equipment
- Mixing bowls
- Cake pans
- Oven
- Whisk
- Spatula
Ingredients
- 1 cup all-purpose flour
- ¾ cup sugar
- ½ cup cocoa powder
- 1 tsp baking powder
- ½ tsp salt
- ½ cup milk
- ¼ cup oil
- 1 egg
- 1 tsp vanilla
- 1½ cups powdered sugar
- ½ cup butter, softened
- 2 tbsp milk
- Orange food coloring
- 1 sugar cone
- Chocolate sprinkles
Instructions
- Preheat the oven to 350°F and grease two small round cake pans.
- In a bowl, whisk the flour, sugar, cocoa powder, baking powder, and salt.
- Add the milk, oil, egg, and vanilla to the dry mix and stir until smooth.
- Pour the batter evenly into the prepared pans and bake for 20 minutes until a toothpick comes out clean.
- Cool the cakes in the pans for 10 minutes, then remove and let them cool fully on a rack.
- Beat the powdered sugar, butter, and milk in a bowl until creamy, then divide the frosting and tint one half orange with food coloring.
- Place one cake layer on a plate and spread orange frosting on top.
- Add the second layer and cover the whole cake with the remaining orange frosting.
- Set the sugar cone point-up in the center of the cake to form the hat tip.
- Scatter chocolate sprinkles around the base and on the cone for the brim detail.
Notes
Cuisine: American
Equipment: Mixing bowls, Cake pans, Oven, Whisk, Spatula
Frankenstein Green Velvet Cake
This Frankenstein Green Velvet Cake adds a playful touch to any Halloween gathering with kids. The bold green hue and simple monster face turn a classic cake into an activity the whole family can enjoy.
The cake stays moist with a light chocolate flavor that pairs nicely with smooth cream cheese frosting. It works well for small parties or after-school treats when you want something festive without too much fuss.


Equipment
- Mixing Bowls
- Loaf Pan
- Electric Mixer
Ingredients
- 1 1/4 cups all-purpose flour
- 3/4 cup granulated sugar
- 1 tablespoon unsweetened cocoa powder
- 1/2 teaspoon baking soda
- 1/4 teaspoon salt
- 1/2 cup buttermilk
- 1/3 cup vegetable oil
- 1 large egg
- 1 teaspoon vanilla extract
- 2 tablespoons green gel food coloring
- 4 ounces cream cheese, softened
- 2 tablespoons unsalted butter, softened
- 1 cup powdered sugar
- Black decorating icing
- 2 small chocolate chips
Instructions
- Preheat the oven to 350 degrees and grease a small loaf pan or 8-inch square pan.
- In a medium bowl, whisk together the flour, granulated sugar, cocoa powder, baking soda, and salt.
- In another bowl, mix the buttermilk, vegetable oil, egg, vanilla extract, and green gel food coloring until the color is even.
- Pour the wet mixture into the dry ingredients and stir until just combined with no large lumps.
- Spread the batter into the prepared pan and bake for 25 to 30 minutes, or until a toothpick comes out clean.
- Let the cake cool completely in the pan before removing it.
- Beat the cream cheese and butter together until smooth, then gradually add the powdered sugar to make the frosting.
- Spread the frosting over the cooled cake. Use black decorating icing to draw hair and a mouth, then press the chocolate chips in place as bolts on the sides.
Notes
Cuisine: American
Equipment: Mixing Bowls, Loaf Pan, Electric Mixer
Mummy Vanilla Cream Cheese Cake
This cake gives kids a playful mummy look with simple frosting stripes over a soft vanilla base. It works well for small Halloween gatherings because the portions stay manageable and the cream cheese adds a light tang that balances the sweetness. The texture stays moist with a gentle vanilla flavor throughout.


Equipment
- Mixing Bowl
- Loaf Pan or Mini Cake Molds
- Oven
- Piping Bag
Ingredients
- 1 cup all-purpose flour
- 1/2 cup granulated sugar
- 1 teaspoon baking powder
- 1/4 cup unsalted butter, softened
- 1 large egg
- 1/2 cup milk
- 2 teaspoons vanilla extract
- 8 ounces cream cheese, softened
- 1 cup powdered sugar
- 12 candy eyes
Instructions
- Preheat the oven to 350 degrees and grease a small loaf pan or divide batter into four mini cake molds.
- Whisk the flour, granulated sugar, and baking powder in a mixing bowl.
- Add the softened butter, egg, milk, and 1 teaspoon vanilla extract. Stir until the batter is smooth.
- Pour the batter into the prepared pan or molds and bake for 20 to 25 minutes until a toothpick comes out clean. Let the cakes cool completely.
- Beat the cream cheese with the powdered sugar and remaining teaspoon of vanilla extract until the mixture is creamy and spreadable.
- Spread a thin base layer of cream cheese frosting over each cooled cake.
- Spoon the remaining frosting into a piping bag or zip-top bag with a small corner cut. Pipe short, overlapping strips across the cakes to create the mummy bandage effect.
- Press two candy eyes onto each cake while the frosting is still soft.
Notes
Cuisine: American
Equipment: Mixing Bowl, Loaf Pan or Mini Cake Molds, Oven, Piping Bag
Black Cat Chocolate Cake
This black cat chocolate cake brings a playful Halloween touch to any kids party. The round shape and simple add-ons create a friendly cat face that feels festive without extra fuss.
The cake has a moist chocolate crumb and creamy frosting that balances sweetness with rich cocoa notes. Kids enjoy helping place the ears and whiskers at the end.


Equipment
- Mixing Bowls
- Cake Pan
- Electric Mixer
- Oven
Ingredients
- 1 cup all-purpose flour
- 3/4 cup granulated sugar
- 1/2 cup black cocoa powder
- 1 teaspoon baking powder
- 1/2 teaspoon baking soda
- 1/4 teaspoon salt
- 1 large egg
- 1/2 cup milk
- 1/4 cup vegetable oil
- 1 teaspoon vanilla extract
- Black food coloring
- 1/2 cup unsalted butter
- 2 cups powdered sugar
- 2 tablespoons milk
- 4 Oreo cookies
- Candy eyes
- Black licorice strings
Instructions
- Preheat the oven to 350 degrees and grease an 8-inch round cake pan.
- In a large bowl whisk together the flour, granulated sugar, black cocoa powder, baking powder, baking soda, and salt.
- In another bowl beat the egg with the milk, vegetable oil, and vanilla extract. Stir in a few drops of black food coloring until the color looks deep.
- Pour the wet mixture into the dry ingredients and stir until just combined. Pour the batter into the prepared pan and bake for 25 to 30 minutes until a toothpick comes out clean. Let the cake cool completely in the pan.
- Beat the butter until smooth. Add the powdered sugar, remaining black cocoa powder, and 2 tablespoons milk a little at a time. Mix in black food coloring until the frosting is dark. Spread the frosting over the cooled cake.
- Press two Oreo cookies into the top edge of the cake for ears. Place candy eyes in the center and lay short pieces of black licorice below them for whiskers.
Notes
Cuisine: American
Equipment: Mixing Bowls, Cake Pan, Electric Mixer, Oven
Candy Corn Swirl Layer Cake
This cake brings candy corn colors right into the layers with a gentle swirl. Kids love spotting the bright yellow and orange stripes that show through the white frosting when the cake is sliced. It suits small Halloween parties or weekend baking projects with children.
The vanilla flavor stays mild and familiar while the butter keeps the crumb soft. Candy corn pieces scattered on top add a chewy texture that ties the whole theme together.


Equipment
- Mixing Bowls
- Cake Pans
- Electric Mixer
- Wire Rack
Ingredients
- 1½ cups all-purpose flour
- 1 cup sugar
- ½ cup butter, softened
- 2 eggs
- ½ cup milk
- 2 tsp vanilla extract
- Yellow food coloring
- Orange food coloring
- ½ cup butter, softened
- 2 cups powdered sugar
- Candy corn
Instructions
- Preheat the oven to 350°F and grease two 6-inch round cake pans.
- In a mixing bowl, beat the first ½ cup butter with the sugar until light. Add the eggs one at a time, then mix in the milk and vanilla extract.
- Stir in the flour until the batter is smooth. Divide the batter evenly into three bowls.
- Leave one bowl plain, tint the second bowl yellow, and tint the third bowl orange.
- Spoon the three colors into each pan in alternating layers, then gently swirl once with a knife.
- Bake for 22-25 minutes until a toothpick comes out clean. Cool the layers completely on a wire rack.
- Beat the remaining ½ cup butter with the powdered sugar until creamy to make the frosting.
- Spread frosting over the cooled layers, stack them, and finish with more frosting on top. Arrange candy corn pieces across the surface.
Notes
Cuisine: American
Equipment: Mixing Bowls, Cake Pans, Electric Mixer, Wire Rack
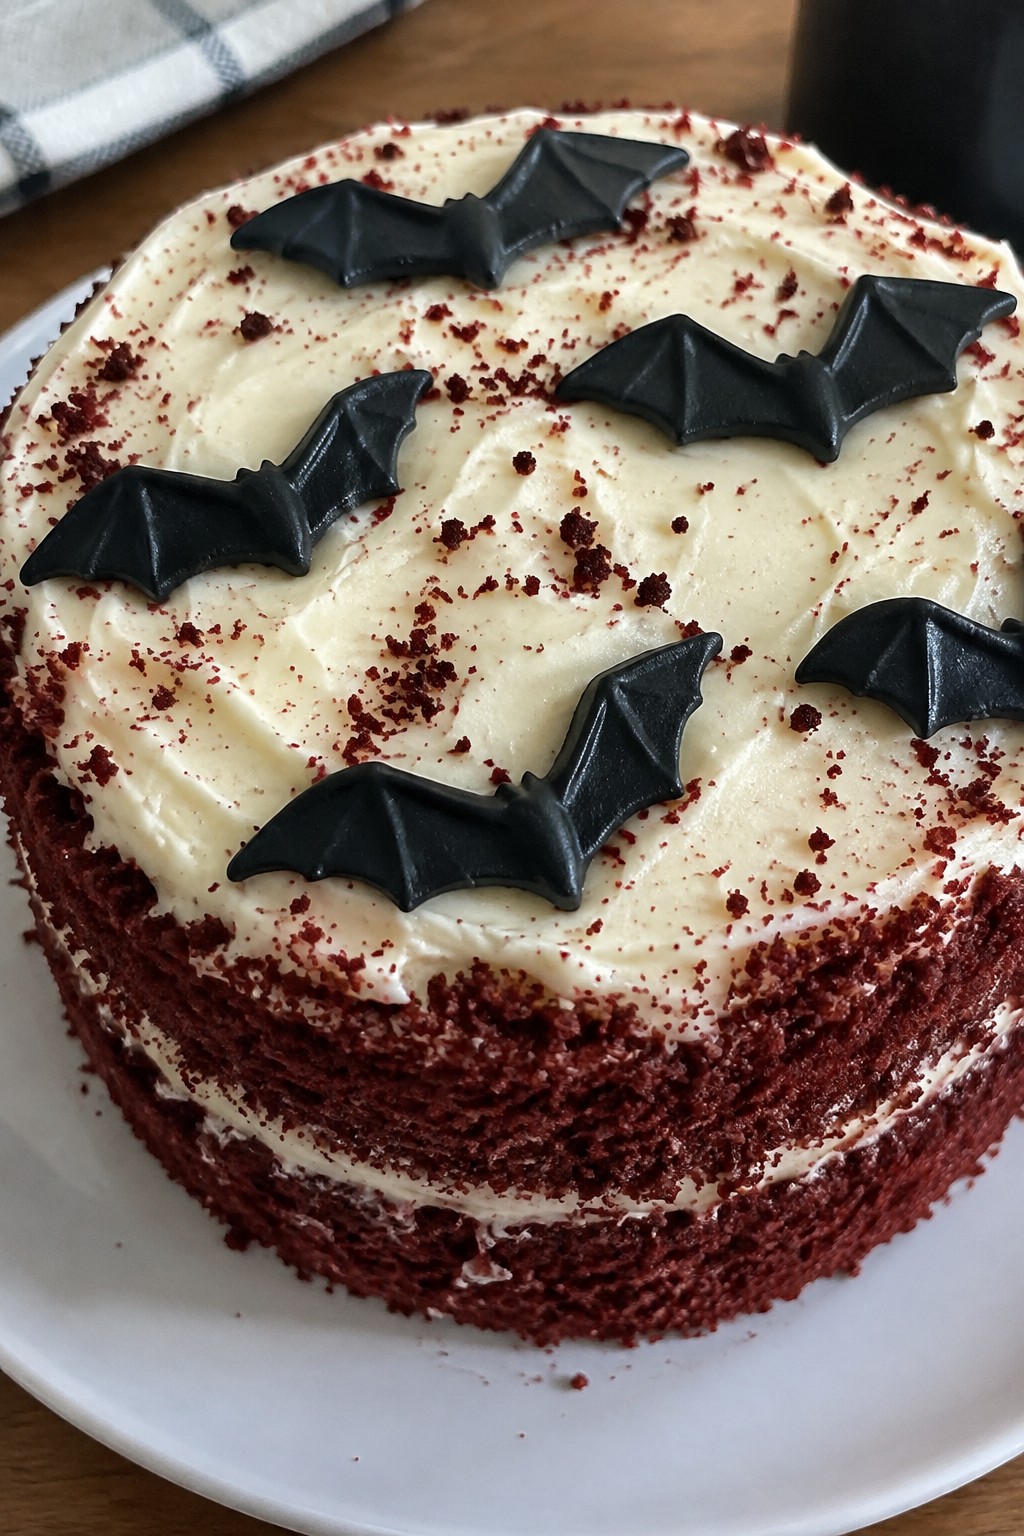
Bat Wing Red Velvet Cake
This Bat Wing Red Velvet Cake gives kids a fun way to enjoy a classic red velvet flavor at Halloween parties. The cake stays moist with a light cocoa taste while the cream cheese frosting adds a gentle tang that balances the sweetness.
It works well for small family gatherings or classroom events where you want something festive but simple to put together. The black bat wing accents on top keep the look playful and kid-friendly.

Equipment
- Mixing Bowls
- 8-inch Cake Pan
- Electric Mixer
- Piping Bag
Ingredients
- 1 1/4 cups all-purpose flour
- 2 tablespoons unsweetened cocoa powder
- 3/4 cup granulated sugar
- 1/2 teaspoon baking soda
- 1/4 teaspoon salt
- 1/2 cup buttermilk
- 1/4 cup vegetable oil
- 1 large egg
- 1 teaspoon vanilla extract
- 1 tablespoon red food coloring
- 1 teaspoon white vinegar
- 4 ounces cream cheese, softened
- 2 tablespoons unsalted butter, softened
- 1 cup powdered sugar
- 1/2 cup black candy melts
Instructions
- Preheat the oven to 350 degrees F and line a small 8-inch round cake pan with parchment paper.
- In a medium bowl, whisk together the flour, cocoa powder, sugar, baking soda, and salt until evenly combined.
- In a separate bowl, mix the buttermilk, oil, egg, vanilla, red food coloring, and vinegar until smooth.
- Pour the wet mixture into the dry ingredients and stir gently until just combined with no large lumps.
- Transfer the batter to the prepared pan and bake for 25 to 28 minutes, or until a toothpick inserted in the center comes out clean.
- Let the cake cool completely in the pan before removing it.
- While the cake cools, beat the cream cheese and butter together until creamy, then gradually add the powdered sugar and mix until smooth.
- Spread the cream cheese frosting evenly over the cooled cake.
- Melt the black candy melts according to package directions, then spoon into a small piping bag and pipe simple bat wing shapes on parchment paper.
- Let the wings set for a few minutes, then gently press them into the frosting to finish the cake.
Notes
Cuisine: American
Equipment: Mixing Bowls, 8-inch Cake Pan, Electric Mixer, Piping Bag
Skeleton Bone Sugar Cookie Cake
This skeleton bone sugar cookie cake turns a simple vanilla sugar cookie base into a lighthearted Halloween treat. The dough bakes into a soft, chewy cake that holds its shape well for decorating. Kids enjoy spotting the white chocolate bones on top, and the whole thing comes together without much fuss.
It works well for small gatherings or an afternoon baking project with children. The flavor stays mild and sweet, with a tender crumb that contrasts nicely against the firm white chocolate accents.


Equipment
- Mixing Bowl
- 8-inch Cake Pan
- Piping Bag
Ingredients
- 1 cup all-purpose flour
- 1/2 cup unsalted butter, softened
- 1/2 cup granulated sugar
- 1 large egg
- 1 teaspoon vanilla extract
- 1/2 teaspoon baking powder
- 1/4 teaspoon salt
- 1/2 cup white chocolate chips
- 2 tablespoons heavy cream
Instructions
- Preheat the oven to 350 degrees and grease a small 8-inch round cake pan. In a mixing bowl, cream the butter and sugar until light. Add the egg and vanilla, then stir until combined.
- In a separate bowl, whisk together the flour, baking powder, and salt. Gradually add the dry ingredients to the wet mixture and mix until a soft dough forms.
- Press the dough evenly into the prepared pan. Bake for 18 to 20 minutes until the edges turn lightly golden. Remove from the oven and let the cake cool completely in the pan.
- Place the white chocolate chips and heavy cream in a small microwave-safe bowl. Heat in 20-second bursts, stirring between each, until smooth and melted.
- Spoon the melted mixture into a piping bag or zip-top bag with one corner snipped off. Pipe simple bone shapes across the cooled cake surface. Let the chocolate set for 10 minutes before slicing.
Notes
Cuisine: American
Equipment: Mixing Bowl, 8-inch Cake Pan, Piping Bag
Haunted Forest Carrot Cake
This carrot cake brings a simple forest theme to the table with green-tinted frosting and pretzel trees on top. The moist spiced base pairs well with the sweet cream cheese layer, making it a fun choice for kids at Halloween parties or school events.


Equipment
- Mixing Bowl
- 6-inch Cake Pan
- Oven
- Hand Mixer
Ingredients
- 1 cup all-purpose flour
- 1/2 cup granulated sugar
- 1/2 teaspoon baking soda
- 1/2 teaspoon ground cinnamon
- 1/4 teaspoon salt
- 1/3 cup vegetable oil
- 2 large eggs
- 1 teaspoon vanilla extract
- 1 1/4 cups shredded carrots, divided
- 4 ounces cream cheese, softened
- 2 tablespoons unsalted butter, softened
- 1 cup powdered sugar
- 4 drops green food coloring
- 8 pretzel sticks
- 1/4 cup crushed chocolate sandwich cookies
Instructions
- Preheat the oven to 350 degrees F and line a 6-inch round cake pan with parchment paper.
- In a mixing bowl, whisk together the flour, granulated sugar, baking soda, cinnamon, and salt.
- Add the oil, eggs, and vanilla extract to the dry ingredients and stir until just combined.
- Fold in 1 cup of the shredded carrots until evenly distributed.
- Pour the batter into the prepared pan and bake for 25 to 30 minutes, or until a toothpick inserted in the center comes out clean.
- Let the cake cool completely in the pan before removing it.
- In a separate bowl, beat the cream cheese and butter until smooth, then mix in the powdered sugar and green food coloring.
- Spread the green frosting over the cooled cake.
- Press the pretzel sticks into the frosting to form trees and scatter the crushed cookies around the base.
- Sprinkle the remaining 1/4 cup shredded carrots around the trees for extra forest detail.
Notes
Cuisine: American
Equipment: Mixing Bowl, 6-inch Cake Pan, Oven, Hand Mixer
Owl Eye Pumpkin Spice Cake
This owl eye pumpkin spice cake gives kids a playful treat with a fall flavor they already enjoy. The moist cake carries warm spices and pumpkin in every bite while the big round eyes on top turn it into a simple Halloween surprise.
It suits small parties or after-school snacks when you want something cute but not complicated. The cream cheese frosting adds a light tang that balances the spice.


Equipment
- Mixing Bowl
- 6-inch Cake Pan
- Oven
- Cooling Rack
Ingredients
- 1 cup pumpkin puree
- 3/4 cup granulated sugar
- 1 large egg
- 1/4 cup vegetable oil
- 1 cup all-purpose flour
- 1 teaspoon baking powder
- 1 teaspoon pumpkin pie spice
- 1/2 cup cream cheese frosting
- 2 round vanilla wafers
- 4 brown chocolate chips
Instructions
- Heat the oven to 350 degrees and grease a small 6-inch round cake pan.
- In a mixing bowl stir together the flour, sugar, baking powder, and pumpkin pie spice.
- Add the pumpkin puree, egg, and vegetable oil to the dry mixture and stir until smooth.
- Pour the batter into the prepared pan and bake for 25 minutes or until a toothpick comes out clean.
- Let the cake cool in the pan for 10 minutes then move it to a rack to finish cooling.
- Spread the cream cheese frosting evenly over the cooled cake.
- Place the two vanilla wafers side by side near the top to form the owl eyes.
- Press two chocolate chips into the center of each wafer to finish the eyes.
Notes
Cuisine: American
Equipment: Mixing Bowl, 6-inch Cake Pan, Oven, Cooling Rack
Graveyard Dirt Chocolate Cake
This chocolate cake brings a playful graveyard scene to the table with moist layers and a crunchy cookie topping that looks like fresh dirt. Kids enjoy the mix of rich cocoa flavor and the surprise gummy worms hidden inside. It works well for Halloween parties or an afternoon baking project with children.


Equipment
- Mixing Bowl
- Baking Pan
- Whisk
Ingredients
- 1 cup all-purpose flour
- 1/2 cup unsweetened cocoa powder
- 3/4 cup granulated sugar
- 1 teaspoon baking soda
- 1/2 teaspoon salt
- 1/2 cup vegetable oil
- 1 cup warm water
- 1 teaspoon vanilla extract
- 1 tablespoon white vinegar
- 12 chocolate sandwich cookies
- 8 gummy worms
- 4 rectangular cookies
Instructions
- Preheat the oven to 350 degrees F and line an 8×8 baking pan with parchment paper.
- In a large mixing bowl, whisk together the flour, cocoa powder, sugar, baking soda, and salt.
- Add the vegetable oil, warm water, vanilla extract, and white vinegar to the dry ingredients. Stir until the batter is smooth.
- Pour the batter into the prepared pan and bake for 25 to 30 minutes, until a toothpick inserted in the center comes out clean. Let the cake cool completely.
- Place the chocolate sandwich cookies in a zip-top bag and crush them with a rolling pin until they resemble coarse dirt.
- Spread the crushed cookies evenly over the cooled cake. Press the gummy worms into the cookie layer so some appear to be coming out of the dirt.
- Stand the rectangular cookies upright in the cookie topping to create tombstones.
Notes
Cuisine: American
Equipment: Mixing Bowl, Baking Pan, Whisk
