


Halloween treats do not need to be complicated to make kids happy. These desserts use ingredients you probably keep on hand and steps that fit into a regular afternoon. You can pick ones that match how much time you have. Each idea turns out cute enough for little hands to help with. They give you solid options without extra shopping or stress.
Helpful Tips Before You Start
These desserts work best with a little prep and kid input.
Let Kids Help Decorate
Give them simple tasks like placing candy eyes or adding sprinkles. This keeps them busy and makes the treats feel more special.
Measure Ingredients First
Set out all candies, frosting colors, and tools before you begin. It cuts down on mess and lets the process move quickly.
Pick Sturdy Bases
Use firm cookies or brownies that can handle extra toppings. Softer cakes often fall apart once kids add details.
Make a Few Designs Only
Repeat two or three cute ideas instead of trying every variation. Kids stay interested longer when the steps stay the same.
Chill Finished Treats
Place completed desserts in the fridge until serving time. This helps shapes hold and keeps chocolate from softening.
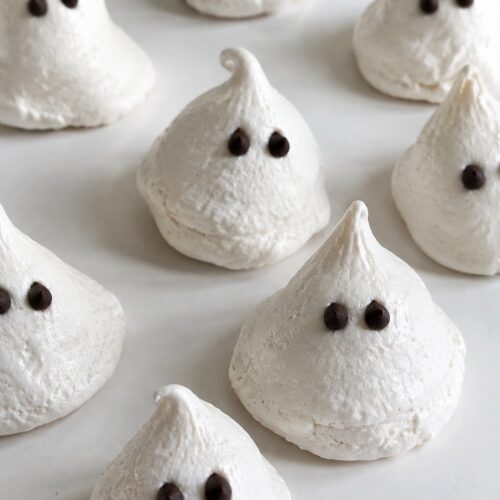
Ghostly Meringue Kisses with Chocolate Eyes
These light meringue treats come together with just a few pantry staples and turn into fun ghost shapes that kids enjoy spotting on a dessert table. They work well for Halloween parties or after-school snacks because the crisp outside gives way to a soft center, and the chocolate adds a little richness without overpowering the sweetness.

Equipment
- Mixing bowl
- Electric mixer
- Piping bag
- Baking sheet
- Parchment paper
Ingredients
- 2 large egg whites
- 1/2 cup granulated sugar
- 1/4 teaspoon cream of tartar
- 1/2 teaspoon vanilla extract
- 1/4 cup chocolate chips
Instructions
- Preheat the oven to 200°F and line a baking sheet with parchment paper.
- Place the egg whites and cream of tartar in a clean mixing bowl. Beat on medium speed until soft peaks form.
- Add the sugar a little at a time while beating on high speed until the mixture reaches stiff, glossy peaks.
- Mix in the vanilla extract on low speed until just combined.
- Spoon the meringue into a piping bag fitted with a round tip. Pipe small ghost shapes onto the prepared baking sheet, leaving space between each one.
- Bake for 1 hour and 30 minutes until the meringues feel dry and lift easily from the paper. Turn off the oven and leave the meringues inside to cool completely.
- Melt the chocolate chips in a small microwave-safe bowl, stirring every 20 seconds until smooth. Use a toothpick or small spoon to dot eyes onto each cooled ghost.
Notes
Cuisine: American
Equipment: Mixing bowl, Electric mixer, Piping bag, Baking sheet, Parchment paper
Pumpkin Patch Dirt Cups with Gummy Worms
These cups turn a simple chocolate pudding into a fun pumpkin patch scene that kids enjoy making and eating. The layers of creamy pudding and crunchy cookie crumbs give a nice contrast, while the candy pumpkins and gummy worms add a playful Halloween detail. They suit after-school snacks or small parties during October.
The recipe stays easy because it requires no baking. Kids can help crush cookies and arrange the toppings once the pudding sets.


Equipment
- Mixing Bowl
- Whisk
- 4 Serving Cups
Ingredients
- 1 box (3.9 oz) instant chocolate pudding mix
- 2 cups cold milk
- 12 chocolate sandwich cookies
- 8 gummy worms
- 8 candy pumpkins
Instructions
- Pour the pudding mix and cold milk into a mixing bowl. Whisk until smooth and let the mixture sit for five minutes to thicken.
- Place the chocolate sandwich cookies in a zip-top bag and crush them into fine crumbs with a rolling pin or your hands.
- Spoon a layer of pudding into each of four small cups. Add a layer of cookie crumbs on top. Repeat with another pudding layer and finish with a final layer of crumbs.
- Press two gummy worms into the top of each cup so they look like they are coming out of the dirt. Place two candy pumpkins on the surface of each cup to create the pumpkin patch look.
Notes
Cuisine: American
Equipment: Mixing Bowl, Whisk, 4 Serving Cups
Spiderweb Swirl Fudge Brownies
These brownies bring a fun Halloween touch to dessert time with their fudgy centers and simple white chocolate web on top. Kids enjoy helping with the swirl step, and the result looks festive without much extra work. The texture stays dense and rich, with a mild chocolate flavor balanced by the sweet web.


Equipment
- Small Saucepan
- Mixing Bowl
- 6×6 Inch Baking Pan
Ingredients
- 4 tablespoons unsalted butter
- 2 ounces semisweet chocolate, chopped
- 1/2 cup granulated sugar
- 1 large egg
- 1/2 teaspoon vanilla extract
- 1/4 cup all-purpose flour
- 1 tablespoon unsweetened cocoa powder
- 1/8 teaspoon salt
- 3 tablespoons white chocolate chips
Instructions
- Preheat the oven to 350 degrees F and line a small 6×6 inch baking pan with parchment paper.
- In a small saucepan over low heat, melt the butter and semisweet chocolate together, stirring until smooth. Remove from heat.
- Stir the sugar into the melted chocolate mixture until fully combined. Add the egg and vanilla extract, mixing well.
- Whisk in the flour, cocoa powder, and salt until no dry streaks remain. Pour the batter into the prepared pan and spread evenly.
- Bake for 20 to 22 minutes until a toothpick comes out with a few moist crumbs. Let the brownies cool completely in the pan.
- Melt the white chocolate chips in the microwave in 20-second bursts, stirring between each until smooth. Spoon the melted white chocolate into a small zip-top bag, snip a tiny corner, and pipe concentric circles over the cooled brownies. Drag a toothpick from the center outward to create the web pattern. Cut into four squares once set.
Notes
Cuisine: American
Equipment: Small Saucepan, Mixing Bowl, 6×6 Inch Baking Pan
Monster Green Slime Cupcakes
These Monster Green Slime Cupcakes add a playful touch to any Halloween gathering. Kids enjoy the bright color and the silly candy eyes that turn each treat into a little monster.
The soft vanilla cupcakes hold a thick layer of green frosting that gives the slime effect. The result is sweet, creamy, and easy to serve at a party table.


Equipment
- Mixing Bowl
- Electric Mixer
- Spatula
Ingredients
- 4 vanilla cupcakes, baked and cooled
- 1/2 cup unsalted butter, softened
- 2 cups powdered sugar
- 1 tablespoon milk
- Green food coloring
- 8 candy eyeballs
- 2 tablespoons green sanding sugar
Instructions
- Place the softened butter in a mixing bowl and beat it until smooth.
- Add the powdered sugar a little at a time while beating on low speed.
- Pour in the milk and continue beating until the frosting reaches a thick, spreadable texture.
- Add several drops of green food coloring and mix until the frosting turns a bright, even green.
- Spread or pipe a thick layer of the green frosting over each cupcake so it looks like dripping slime.
- Press two candy eyeballs into the frosting on each cupcake.
- Sprinkle green sanding sugar over the top of the frosting for extra sparkle.
Notes
Cuisine: American
Equipment: Mixing Bowl, Electric Mixer, Spatula
Witch Hat Chocolate-Dipped Oreos
These witch hat treats turn plain Oreos into a fun Halloween snack that kids can help assemble. They work well for classroom parties or an easy after-school project because they need only a few steps and set up quickly. The result is a crunchy cookie base with a smooth chocolate shell and a pointed chocolate top.
This recipe serves 4 people. – 8 Oreo cookies – 8 ounces dark chocolate melting wafers – 8 milk chocolate kisses, unwrapped – 2 tablespoons orange sprinkles
### Instructions 1. Line a baking sheet with parchment paper and set it aside. 2. Place the dark chocolate melting wafers in a microwave-safe bowl and heat in 30-second bursts, stirring after each, until fully melted and smooth. 3. Dip each Oreo into the melted chocolate, turning to coat both sides, then lift it out and let excess chocolate drip back into the bowl. 4. Set the coated Oreo on the prepared baking sheet and immediately press one unwrapped milk chocolate kiss onto the center while the chocolate is still soft. 5. Sprinkle a few orange sprinkles around the base of the kiss before the chocolate sets. 6. Repeat with the remaining cookies, then let the chocolate harden at room temperature for 20 minutes.
### Extra Tips Work in small batches when dipping so the chocolate stays fluid. If the kitchen is warm, place the finished cookies in the refrigerator for 10 minutes to speed setting without dulling the chocolate. Store any leftovers in an airtight container at room temperature for up to two days.
Course: Dessert Cuisine: American Equipment: Microwave-safe bowl, Baking sheet, Parchment paper, Spoon

Serves 4 people.
Instructions
- Line a baking sheet with parchment paper and set it aside.
- Place the dark chocolate melting wafers in a microwave-safe bowl and heat in 30-second bursts, stirring after each, until fully melted and smooth.
- Dip each Oreo into the melted chocolate, turning to coat both sides, then lift it out and let excess chocolate drip back into the bowl.
- Set the coated Oreo on the prepared baking sheet and immediately press one unwrapped milk chocolate kiss onto the center while the chocolate is still soft.
- Sprinkle a few orange sprinkles around the base of the kiss before the chocolate sets.
- Repeat with the remaining cookies, then let the chocolate harden at room temperature for 20 minutes.
Extra Tips
Work in small batches when dipping so the chocolate stays fluid. If the kitchen is warm, place the finished cookies in the refrigerator for 10 minutes to speed setting without dulling the chocolate. Store any leftovers in an airtight container at room temperature for up to two days.Course: Dessert Cuisine: American Equipment: Microwave-safe bowl, Baking sheet, Parchment paper, Spoon
Candy Corn Layered Parfaits
These parfaits bring the classic candy corn look to the table in a creamy, kid-friendly form. The layers stack up in clear glasses to show off the yellow, orange, and white stripes that make the treat instantly recognizable at Halloween parties or after-school snacks. The texture stays light and smooth, with a mild vanilla taste that appeals to young palates without being overly sweet.


Equipment
- Mixing bowls
- Whisk
- Parfait glasses
Ingredients
- 1 (3.4 oz) package instant vanilla pudding mix
- 2 cups cold milk
- 8 drops yellow food coloring
- 6 drops orange food coloring
- 1 cup whipped cream
- 12 candy corn pieces
Instructions
- Whisk the pudding mix and cold milk together in a large bowl for two minutes until smooth and thickened.
- Divide the pudding into three separate bowls. Add the yellow food coloring to the first bowl and stir until the color is even. Add the orange food coloring to the second bowl and stir until uniform. Leave the third bowl plain.
- Spoon the yellow pudding into the bottom of four clear glasses, using about one-third of the mixture in each glass.
- Add the orange pudding on top of the yellow layer in each glass, again using about one-third of the mixture.
- Top each glass with the plain pudding layer, then finish with a dollop of whipped cream and three candy corn pieces per glass.
Notes
Cuisine: American
Equipment: Mixing bowls, Whisk, Parfait glasses
Bat Wing Vanilla Bean Cake Pops
These cake pops bring a simple Halloween touch to any kids table. The vanilla bean flavor keeps them light and familiar while the dark chocolate coating and almond wings add a playful bat shape that holds up well at parties or school events.
The texture stays soft inside with a crisp shell on the outside. They work best when made a day ahead so the coating sets fully before serving.


Equipment
- Mixing Bowl
- Baking Sheet
- Microwave
Ingredients
- 2 cups crumbled vanilla bean cake
- 1/4 cup cream cheese frosting
- 1 cup dark chocolate chips
- 1/2 teaspoon vanilla bean seeds
- 4 lollipop sticks
- 8 whole almonds
Instructions
- Mix the crumbled vanilla bean cake with the cream cheese frosting and vanilla bean seeds in a bowl until the mixture holds together when pressed.
- Scoop the mixture into four equal portions and roll each into a smooth ball.
- Melt the dark chocolate chips in the microwave in 20-second bursts, stirring between each until smooth.
- Dip the tip of each lollipop stick into the melted chocolate, then insert it into a cake ball.
- Dip each cake pop fully into the melted chocolate and let excess drip off.
- Press two almonds into the sides of each coated cake pop to form wings while the chocolate is still soft.
- Place the finished cake pops on a parchment-lined baking sheet and let the chocolate set at room temperature.
Notes
Cuisine: American
Equipment: Mixing Bowl, Baking Sheet, Microwave
Mummy Wrapped Marshmallow Pops
These marshmallow pops make a simple Halloween treat that kids can help assemble. The white coating forms bandage-like stripes around each marshmallow, and the candy eyes give the pops a playful finished look. They work well for school parties or a quick weekend activity because they need only a few steps and set up fast.
The flavor is mild and sweet from the marshmallow and white chocolate, with a soft, chewy center and a crisp outer shell.


Equipment
- Microwave-safe bowl
- Baking sheet
- Parchment paper
- Lollipop sticks
Ingredients
- 4 large marshmallows
- 4 lollipop sticks
- 1 cup white candy melts
- 8 candy eyeballs
- 2 tablespoons dark chocolate chips
Instructions
- Push one lollipop stick into the center of each marshmallow.
- Place the white candy melts in a microwave-safe bowl and heat in 20-second bursts, stirring between each, until fully melted and smooth.
- Dip each marshmallow into the melted white candy melts, turning to coat all sides, then let the excess drip off.
- Set the coated marshmallows on a parchment-lined baking sheet and chill for 5 minutes until the coating begins to firm.
- Melt the dark chocolate chips in the same way as the candy melts. Spoon the melted chocolate into a small zip-top bag, snip a tiny corner, and pipe thin lines across each pop to create the wrapped effect.
- Press two candy eyeballs onto each pop while the coating is still soft.
- Chill the pops for another 10 minutes until everything is set.
Notes
Cuisine: American
Equipment: Microwave-safe bowl, Baking sheet, Parchment paper, Lollipop sticks
Frankenstein Brownie Bars with Candy Eyes
These brownie bars turn a basic chocolate bake into a fun Halloween project that kids can help decorate. They work well for classroom parties or a weekend activity because the steps stay simple and the results look playful without much fuss. The bars stay fudgy in the center with a slight chew at the edges, while the green tint and candy eyes give each one a clear Frankenstein face.


Equipment
- Mixing Bowl
- Loaf Pan
- Oven
- Parchment Paper
Ingredients
- ½ cup unsalted butter, melted
- 1 cup granulated sugar
- 2 large eggs
- ½ cup all-purpose flour
- ⅓ cup unsweetened cocoa powder
- ¼ teaspoon salt
- Green gel food coloring
- ¼ cup chocolate frosting
- 8 candy eyes
- Black gel icing
Instructions
- Preheat the oven to 350°F and line a small 8×4 inch loaf pan with parchment paper.
- In a mixing bowl, stir the melted butter and sugar together until smooth.
- Add the eggs and mix until fully combined.
- Stir in the flour, cocoa powder, and salt until no dry streaks remain.
- Add green gel food coloring a drop at a time and mix until the batter reaches a bright green shade.
- Pour the batter into the prepared pan and spread it evenly.
- Bake for 22-25 minutes until a toothpick comes out with a few moist crumbs.
- Let the brownies cool completely in the pan, then lift them out and cut into 4 rectangular bars.
- Spread a thin layer of chocolate frosting on top of each bar.
- Press two candy eyes into the frosting on each bar while it is still soft.
- Use black gel icing to draw a jagged mouth and a few stitch lines below the eyes.
Notes
Cuisine: American
Equipment: Mixing Bowl, Loaf Pan, Oven, Parchment Paper
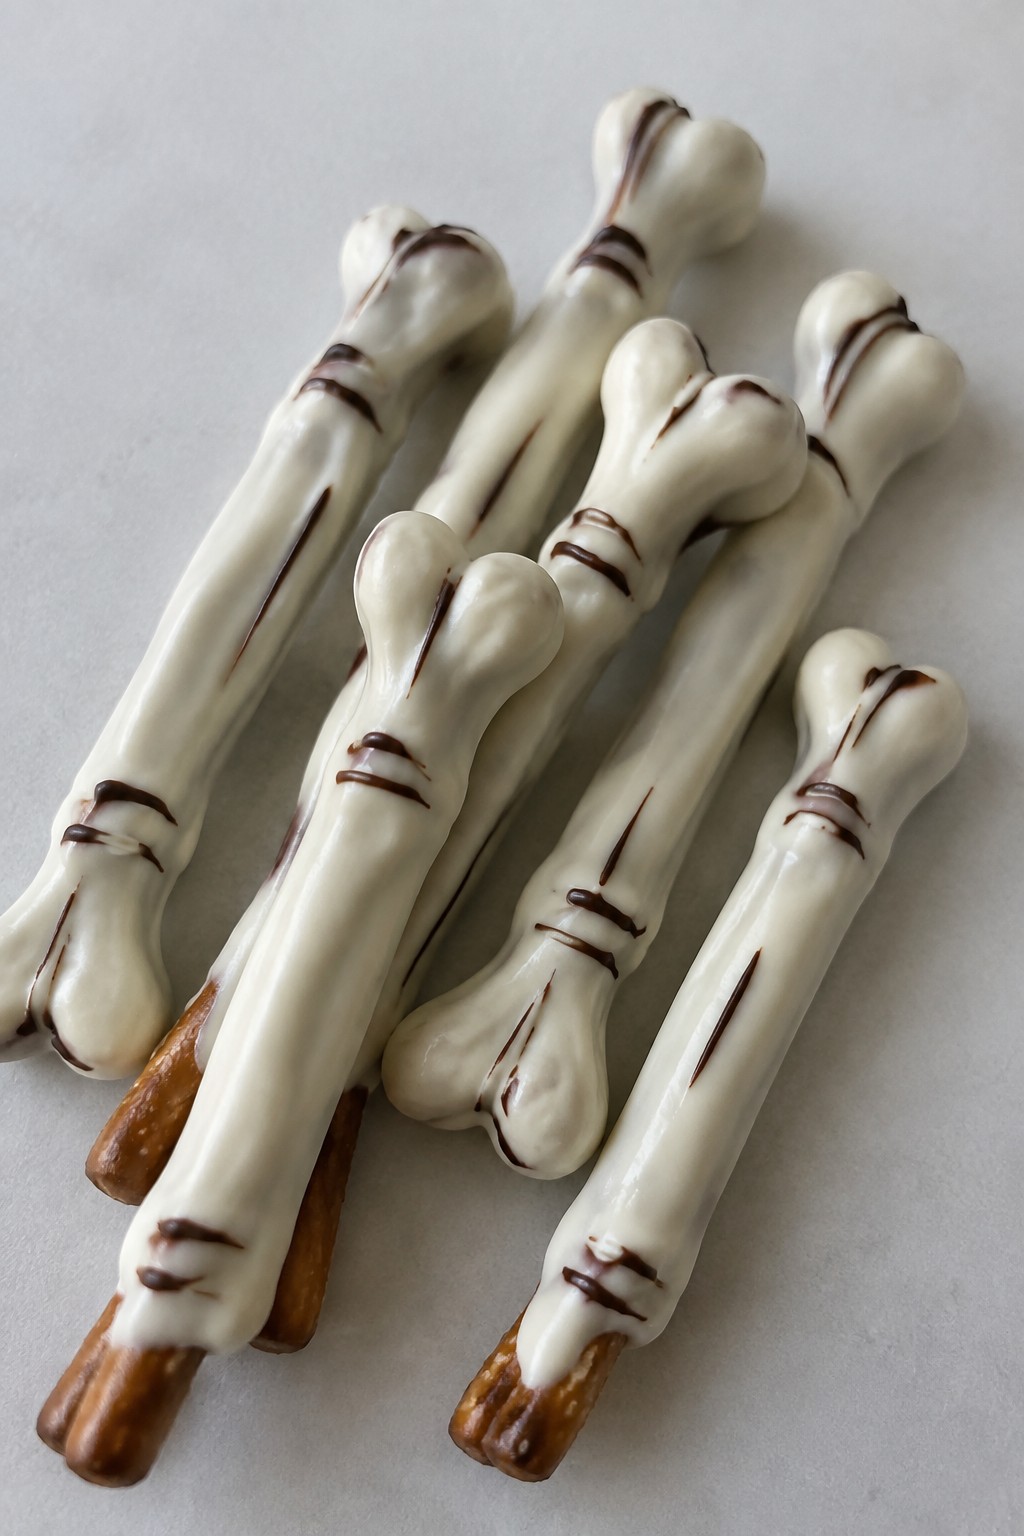
Skeleton Bone White Chocolate Pretzels
These pretzels get coated in white chocolate and shaped to look like skeleton bones. Kids enjoy helping dip and decorate them, and they make a simple addition to a Halloween dessert table. The result is a crunchy center with a sweet white chocolate shell and a bit of dark chocolate detail for contrast.
The treat works well for parties or after-school snacks in October. It stays light enough that children can eat a couple without feeling overwhelmed by sweetness.

Equipment
- Microwave-safe bowl
- Baking sheet
- Parchment paper
- Piping bag
Ingredients
- 12 pretzel rods
- 2 cups white chocolate melting wafers
- 1/4 cup dark chocolate melting wafers
Instructions
- Line a baking sheet with parchment paper and set it aside.
- Place the white chocolate melting wafers in a microwave-safe bowl. Heat in 30-second intervals, stirring after each, until fully melted and smooth.
- Dip each pretzel rod into the melted white chocolate, leaving about one inch uncovered at one end. Let excess chocolate drip off, then lay the coated pretzel on the prepared baking sheet.
- Melt the dark chocolate melting wafers in a separate bowl using the same microwave method. Spoon the melted dark chocolate into a piping bag or zip-top bag with a small corner cut off.
- Pipe small lines and dots on the white chocolate coating to create simple bone shapes at both ends of each pretzel. Let the chocolate set at room temperature until firm.
Notes
Cuisine: American
Equipment: Microwave-safe bowl, Baking sheet, Parchment paper, Piping bag
Black Cat Macaron Sandwiches
These Black Cat Macaron Sandwiches add a fun Halloween element to dessert time. The black shells feature simple cat faces that appeal to kids, while the crisp exterior gives way to a soft center.
They suit after-school snacks or small Halloween gatherings. The almond flavor comes through clearly and balances the rich chocolate filling.


Equipment
- Mixing Bowls
- Piping Bags
- Baking Sheets
Ingredients
- 3/4 cup almond flour
- 3/4 cup powdered sugar
- 2 egg whites
- 1/4 cup granulated sugar
- Black gel food coloring
- 4 ounces dark chocolate
- 1/4 cup heavy cream
- Candy eyes
Instructions
- Sift the almond flour and powdered sugar together into a bowl and set aside.
- In a separate bowl, whip the egg whites until foamy, then add the granulated sugar a little at a time while continuing to whip until stiff peaks form. Add black gel food coloring and mix until the color is even.
- Fold the sifted dry ingredients into the meringue in stages until the batter flows smoothly off the spatula. Transfer to a piping bag and pipe round shells onto a lined baking sheet. Let the shells rest until a skin forms on top.
- Bake until the shells lift cleanly from the paper. While the shells cool, heat the heavy cream and pour it over the dark chocolate to make a ganache, stirring until smooth.
- Once the shells are cool, pipe ganache onto half of them and sandwich with the remaining shells. Press candy eyes onto the tops to create cat faces.
Notes
Cuisine: French
Equipment: Mixing Bowls, Piping Bags, Baking Sheets
Haunted House Gingerbread Cookies
These gingerbread cookies turn into small haunted houses with simple icing details and candy accents. Kids enjoy helping with the decorating step, and the cookies work well for a classroom party or an afternoon baking session at home. The dough bakes into a firm yet slightly chewy cookie that holds its shape.
The flavor comes from warm ginger and cinnamon balanced by a sweet icing finish. Black icing outlines the house features while green candy and chocolate chips add quick spooky touches without extra work.


Equipment
- Mixing Bowl
- Baking Sheet
- Piping Bag
Ingredients
- 1 1/2 cups all-purpose flour
- 1 teaspoon ground ginger
- 1/2 teaspoon ground cinnamon
- 1/4 teaspoon baking soda
- 1/4 teaspoon salt
- 1/4 cup unsalted butter, softened
- 1/4 cup brown sugar
- 3 tablespoons molasses
- 1 large egg
- 1 cup powdered sugar
- 2 tablespoons milk
- Black gel food coloring
- 12 green candy melts
- 2 tablespoons mini chocolate chips
Instructions
- Mix the flour, ginger, cinnamon, baking soda, and salt in a bowl. Set the bowl aside.
- Beat the butter and brown sugar until smooth. Add the molasses and egg, then mix until combined. Slowly add the dry mixture and stir until a dough forms. Wrap the dough and chill it for 30 minutes.
- Heat the oven to 350 degrees. Roll the dough to 1/4-inch thickness on a lightly floured surface. Cut four house shapes with a knife or house-shaped cutter and place them on a baking sheet. Bake for 10 minutes. Let the cookies cool completely on the sheet.
- Stir the powdered sugar and milk together until smooth. Add black gel food coloring until the icing reaches a deep black shade. Spoon the icing into a piping bag and pipe outlines of windows, doors, and roof lines on each cookie. Press green candy melts along the roof edges and add mini chocolate chips for extra detail. Let the icing set before serving.
Notes
Cuisine: American
Equipment: Mixing Bowl, Baking Sheet, Piping Bag
Pumpkin Caramel Rice Krispie Squares
These treats combine the classic crispy texture of Rice Krispie squares with warm pumpkin spice and a layer of caramel. Kids enjoy the fall flavors during Halloween gatherings or school parties. The squares come together quickly and hold up well for little hands.
The pumpkin adds moisture and color while the caramel brings a chewy sweetness on top. This version stays simple but feels special enough for the season.


Equipment
- Large saucepan
- 8×8 inch pan
- Mixing spoon
Ingredients
- 2 tablespoons butter
- 3 cups mini marshmallows
- 1/4 cup pumpkin puree
- 1/2 teaspoon pumpkin pie spice
- 4 cups Rice Krispies cereal
- 1/4 cup caramel sauce
Instructions
- Melt the butter in a large saucepan over low heat. Add the mini marshmallows and stir until fully melted and smooth.
- Stir in the pumpkin puree and pumpkin pie spice until the mixture is evenly orange and spiced. Remove the pan from heat.
- Add the Rice Krispies cereal and fold gently until every piece is coated. Press the mixture into a greased 8×8 inch pan using a sheet of parchment paper or buttered hands.
- Drizzle the caramel sauce evenly over the top. Let the squares cool at room temperature for 30 minutes before cutting into four large pieces.
Notes
Cuisine: American
Equipment: Large saucepan, 8×8 inch pan, Mixing spoon
Vampire Bite Strawberry Cheesecake Bites
These bites use fresh strawberries as the base, filled with a simple cheesecake mixture that gives a creamy contrast to the juicy fruit. Kids enjoy the fun vampire theme, and the recipe comes together quickly for parties or after-school treats. The result is a light, tangy-sweet snack with a soft texture from the filling and a slight crunch from the strawberry seeds.


Equipment
- Mixing bowl
- Hand mixer
- Knife
- Toothpick
Ingredients
- 12 large strawberries
- 8 ounces cream cheese, softened
- 1/4 cup powdered sugar
- 1 teaspoon vanilla extract
- 2 tablespoons heavy whipping cream
- 3 tablespoons strawberry jam
Instructions
- Wash the strawberries and pat them dry. Slice a small V-shaped notch near the top of each strawberry to create a bite mark opening.
- In a mixing bowl, beat the cream cheese until smooth. Add the powdered sugar and vanilla extract, then mix until combined.
- Pour in the heavy whipping cream and beat the mixture for one minute until it becomes light and fluffy.
- Spoon the cheesecake filling into the V-shaped openings of each strawberry.
- Warm the strawberry jam slightly in a small bowl, then use a toothpick to dab small amounts inside and around the bite marks to look like blood.
Notes
Cuisine: American
Equipment: Mixing bowl, Hand mixer, Knife, Toothpick
Ghost Banana Yogurt Popsicles
These ghost banana yogurt popsicles give kids a fun way to enjoy fruit during Halloween without loads of sugar. The frozen bananas stay creamy under a layer of yogurt, and the simple chocolate faces turn each pop into a friendly ghost. They work well for after-school snacks or as a light party treat that still feels festive.


Equipment
- Mixing bowl
- Baking sheet
- Popsicle sticks
- Freezer
Ingredients
- 2 large bananas
- 1 cup plain Greek yogurt
- 2 tablespoons maple syrup
- 1 teaspoon vanilla extract
- 1/4 cup mini chocolate chips
- 4 popsicle sticks
Instructions
- Peel both bananas and cut each one in half crosswise. Push a popsicle stick into the cut end of every banana half.
- Stir the Greek yogurt, maple syrup, and vanilla extract together in a medium bowl until the mixture is smooth.
- Dip each banana half into the yogurt mixture so it is evenly coated on all sides.
- Set the coated bananas on a tray. Press mini chocolate chips into the yogurt to create two eyes and a small mouth on each pop.
- Place the tray in the freezer and leave the popsicles until the yogurt is firm and the bananas are frozen solid.
Notes
Cuisine: American
Equipment: Mixing bowl, Baking sheet, Popsicle sticks, Freezer
