


Halloween parties can get heavy on sweets, so having some savory options ready helps round out the spread. These recipes focus on easy appetizers and finger foods that use basic ingredients you likely have on hand. You will see ideas for dips, snacks, and small bites that serve a group without extra stress. Each one keeps prep straightforward and works for both kids and adults at the table. They pair well with your existing sweet treats to create a balanced menu.
Helpful Tips Before You Start
These tips will help you create a savory spread that holds its own against all the sweets.
Prep Components Ahead
Chop vegetables, cook grains, and mix sauces the day before. This keeps assembly quick when guests arrive.
Use Bold Flavors
Add extra garlic, smoked paprika, or fresh herbs to each recipe. Strong seasoning helps savory dishes compete with sweet ones.
Shape Food for the Theme
Use cookie cutters on flatbreads or slice sandwiches into bats and pumpkins. Simple shapes add Halloween fun without extra sugar.
Balance Hot and Cold Items
Include at least one warm dish and one chilled option. This variety keeps the table appealing as the party goes on.
Offer Small Portions
Serve most items in bite size pieces. Guests can try several savory bites while still leaving room for dessert.
Spooky Sausage Mummy Dogs with Dijon Dip
These sausage mummy dogs bring a fun, hands-on element to a Halloween spread. The flaky dough wraps around juicy sausages and bakes up crisp while the tangy Dijon dip cuts through the richness. They work well as a savory option when the table leans heavy on sweets.
The finished dogs have a playful bandage look with a straightforward savory flavor. The dip adds a sharp, creamy note that balances the warm pastry and meat.


Equipment
- Baking sheet
- Mixing bowl
- Knife
Ingredients
- 8 hot dogs
- 1 can (8 oz) crescent roll dough
- 1/4 cup Dijon mustard
- 3 tablespoons mayonnaise
- 1 teaspoon honey
Instructions
- Preheat the oven to 375°F and line a baking sheet with parchment paper.
- Unroll the crescent roll dough on a clean surface and cut it into thin strips about 1/2 inch wide.
- Wrap the dough strips around each hot dog in a crisscross pattern, leaving small gaps near the top for the face.
- Place the wrapped hot dogs on the prepared baking sheet and bake for 12 to 15 minutes until the dough is golden.
- While the mummy dogs bake, stir together the Dijon mustard, mayonnaise, and honey in a small bowl until smooth.
- Remove the mummy dogs from the oven and let them cool for 2 minutes. Use a small dab of plain Dijon mustard to add eyes if desired, then serve with the prepared dip on the side.
Notes
Cuisine: American
Equipment: Baking sheet, Mixing bowl, Knife
Ghostly Caprese Skewer Platter
This Ghostly Caprese Skewer Platter gives the classic combination of mozzarella, tomato, and basil a simple Halloween twist. Small mozzarella balls receive quick faces so they look like tiny ghosts on the skewers. The result is a fresh, savory option that stands out on a party table filled with sweets.
The skewers stay light and easy to eat while still delivering the familiar flavors of a Caprese salad. They work well as an appetizer guests can grab without plates or utensils.


Equipment
- Wooden skewers
- Serving platter
Ingredients
- 12 bocconcini mozzarella balls
- 12 cherry tomatoes
- 12 fresh basil leaves
- 12 wooden skewers
- 1/4 cup balsamic glaze
- 2 tablespoons olive oil
- 24 thin slices black olives
Instructions
- Thread one cherry tomato onto each wooden skewer, followed by one basil leaf and one bocconcini mozzarella ball.
- Repeat the process until all twelve skewers are complete.
- Arrange the finished skewers in a single layer on a serving platter.
- Add two small pieces of black olive to each mozzarella ball to create eyes.
- Drizzle the olive oil and balsamic glaze lightly over the skewers just before serving.
Notes
Cuisine: Italian
Equipment: Wooden skewers, Serving platter
Witch’s Cauldron Seven-Layer Taco Dip
This seven-layer taco dip gives you a savory option that stands out at any Halloween party spread. It works especially well when guests need something hearty to offset all the sweets on the table. The layers combine creamy beans, seasoned meat, and fresh toppings for a mix of textures and bold taco flavor.


Equipment
- Skillet
- Mixing Bowl
- Serving Bowl
Ingredients
- 1 can (16 oz) refried beans
- 8 oz ground beef
- 1 packet taco seasoning
- 1 cup shredded cheddar cheese
- 1 cup sour cream
- 1 avocado, mashed
- 1/2 cup salsa
- 1/4 cup sliced black olives
- 2 green onions, chopped
Instructions
- Cook the ground beef in a skillet over medium heat until browned, then drain any excess fat and stir in the taco seasoning with a splash of water. Simmer for two minutes and set aside to cool slightly.
- Spread the refried beans evenly across the bottom of a medium serving bowl to form the first layer.
- Add the seasoned beef on top of the beans as the second layer, smoothing it out with a spoon.
- Sprinkle the shredded cheddar cheese over the beef to create the third layer.
- Spread the sour cream over the cheese for the fourth layer.
- Add the mashed avocado as the fifth layer, followed by the salsa as the sixth layer.
- Finish with the sliced black olives and chopped green onions scattered across the top as the seventh layer and garnish.
Notes
Cuisine: Mexican
Equipment: Skillet, Mixing Bowl, Serving Bowl
Bat-Shaped Buffalo Chicken Sliders
These sliders add a spicy, savory option to a Halloween table full of sweets. Shredded chicken tossed in buffalo sauce sits between soft buns cut into bat shapes, with melted cheese for extra richness. They suit a party spread where guests want something filling before or after dessert. The result gives tender chicken, a bit of crunch from the bun edges, and a creamy finish from the dressing.


Equipment
- Skillet
- Baking sheet
- Bat-shaped cookie cutter
Ingredients
- 1 pound boneless skinless chicken breasts
- ¾ cup buffalo wing sauce
- 3 tablespoons butter
- 8 slider buns
- 1 cup shredded cheddar cheese
- ½ cup blue cheese dressing
- 2 celery stalks, thinly sliced
Instructions
- Place the chicken breasts in a skillet over medium heat with 1 tablespoon of the butter. Cook until the chicken reaches an internal temperature of 165°F, about 6 minutes per side.
- Remove the chicken from the skillet and shred it with two forks. Return the shredded chicken to the skillet and add the buffalo wing sauce plus the remaining 2 tablespoons of butter. Stir until the chicken is evenly coated and heated through.
- Preheat the oven to 350°F. Use a bat-shaped cookie cutter to cut each slider bun into a bat shape, saving the scraps for another use if desired.
- Place the bottom halves of the shaped buns on a baking sheet. Spoon the buffalo chicken mixture evenly over each bottom bun.
- Sprinkle the shredded cheddar cheese over the chicken. Add the top halves of the buns.
- Bake for 8 minutes until the cheese melts and the buns are lightly toasted.
- Remove from the oven and drizzle each slider with blue cheese dressing. Top with the sliced celery before serving.
Notes
Cuisine: American
Equipment: Skillet, Baking sheet, Bat-shaped cookie cutter
Graveyard Herb-Crusted Meatball Skewers
These meatballs bring a savory, herb-packed bite that stands out at any Halloween spread. The crunchy crust and juicy centers make them easy to grab and eat while guests mingle. They work well as a main savory option when the table is full of sweets.
The dish keeps things simple with everyday ingredients turned into a party-friendly format. Skewers let you arrange them upright on a platter for a quick graveyard look without extra fuss.


Equipment
- Large mixing bowl
- Baking sheet
- Wooden skewers
Ingredients
- 1 pound ground beef
- 1 cup panko breadcrumbs
- 1/2 cup grated Parmesan cheese
- 2 tablespoons chopped fresh parsley
- 1 tablespoon chopped fresh thyme
- 2 cloves garlic, minced
- 1 large egg
- 1/2 teaspoon salt
- 1/4 teaspoon black pepper
- 2 tablespoons olive oil
- 8 wooden skewers
Instructions
- Preheat the oven to 400 degrees F and line a baking sheet with parchment paper.
- In a large bowl, combine the ground beef, egg, minced garlic, salt, and pepper. Mix until just blended.
- In a separate shallow dish, stir together the panko breadcrumbs, Parmesan cheese, parsley, and thyme.
- Shape the meat mixture into 16 small meatballs, about 1 inch across. Roll each meatball in the breadcrumb mixture until fully coated.
- Place the coated meatballs on the prepared baking sheet and drizzle lightly with olive oil.
- Bake for 18 to 20 minutes until the meatballs are cooked through and the crust is golden.
- Let the meatballs cool for 5 minutes, then thread two meatballs onto each skewer.
Notes
Cuisine: Italian
Equipment: Large mixing bowl, Baking sheet, Wooden skewers
Pumpkin-Filled Jalapeño Popper Bites
These Pumpkin-Filled Jalapeño Popper Bites add a creamy, spiced element to a Halloween spread. The pumpkin keeps the filling hearty and savory while the jalapeños bring just enough heat to cut through richer party foods.
They suit casual gatherings where guests want something warm and handheld between sweet treats. The result is a soft, cheesy center inside a tender pepper shell.


Equipment
- Baking sheet
- Mixing bowl
- Parchment paper
Ingredients
- 8 medium jalapeño peppers
- ½ cup canned pumpkin puree
- 4 ounces cream cheese, softened
- ½ cup shredded cheddar cheese
- 1 teaspoon garlic powder
- ½ teaspoon smoked paprika
- ¼ teaspoon salt
- 2 tablespoons chopped fresh cilantro
Instructions
- Preheat the oven to 400°F and line a baking sheet with parchment paper.
- Slice each jalapeño in half lengthwise and scoop out the seeds and membranes.
- In a mixing bowl, stir together the pumpkin puree, cream cheese, half the cheddar cheese, garlic powder, smoked paprika, and salt until smooth.
- Spoon the filling evenly into each jalapeño half.
- Place the filled halves on the prepared baking sheet and sprinkle the remaining cheddar cheese over the tops.
- Bake for 15 to 18 minutes, until the cheese melts and the peppers soften.
- Remove from the oven and scatter the chopped cilantro over the bites before serving.
Notes
Cuisine: American
Equipment: Baking sheet, Mixing bowl, Parchment paper
Spiderweb Black Bean and Corn Quesadillas
These quesadillas turn a simple bean and corn filling into a Halloween-ready dish. The savory mix of black beans, sweet corn, and spices creates a hearty bite that stands out next to candy and desserts at any party.
The sour cream spiderweb on top gives them a festive look without extra work. Crispy tortillas hold melted cheese and the warm filling for a satisfying contrast in texture.


Equipment
- Large skillet
- Mixing bowl
- Zip-top bag
Ingredients
- 8 large flour tortillas
- 1 (15-ounce) can black beans, drained and rinsed
- 1 cup corn kernels
- 2 cups shredded Monterey Jack cheese
- 1 teaspoon ground cumin
- 1/2 teaspoon chili powder
- 1 garlic clove, minced
- 1/2 cup sour cream
- 2 tablespoons olive oil
- Salt to taste
- 2 tablespoons chopped fresh cilantro
Instructions
- In a mixing bowl, combine the black beans, corn, cumin, chili powder, minced garlic, and a pinch of salt. Mash lightly with a fork to help the mixture hold together.
- Lay out four tortillas on a clean surface. Sprinkle one-quarter of the cheese over each tortilla, then divide the bean and corn mixture evenly on top of the cheese. Add the remaining cheese and top with the remaining tortillas.
- Heat 1 tablespoon of olive oil in a large skillet over medium heat. Cook one quesadilla at a time for 2 to 3 minutes per side until the tortilla is golden and the cheese melts. Add the remaining oil as needed for the rest of the batch.
- Let the cooked quesadillas rest for 1 minute. Spoon the sour cream into a small zip-top bag, snip off one corner, and pipe concentric circles on each quesadilla. Drag a knife from the center outward in several lines to form a spiderweb pattern.
- Sprinkle the chopped cilantro over the tops before slicing each quesadilla into wedges.
Notes
Cuisine: Mexican
Equipment: Large skillet, Mixing bowl, Zip-top bag
Monster-Stuffed Mushroom Caps
These stuffed mushrooms add a savory option to a Halloween party table. The green spinach filling gives the caps a monster-like appearance while the creamy base keeps them satisfying and balanced against sweeter treats.
They work well as an early course when guests arrive. Tender mushroom caps hold a hearty mix that feels substantial without being heavy.


Equipment
- Baking sheet
- Mixing bowl
Ingredients
- 16 large white mushrooms, stems removed
- 1 tablespoon olive oil
- 8 ounces cream cheese, softened
- 1 cup fresh spinach, chopped
- 2 garlic cloves, minced
- 1/2 cup grated Parmesan cheese
- 1/4 cup breadcrumbs
- 1/4 teaspoon salt
- 1/4 teaspoon black pepper
- 2 tablespoons chopped fresh parsley
Instructions
- Preheat the oven to 375°F. Arrange the mushroom caps on a baking sheet and drizzle them evenly with the olive oil.
- In a mixing bowl, combine the cream cheese, spinach, garlic, Parmesan cheese, breadcrumbs, salt, and black pepper until the mixture is smooth and evenly blended.
- Spoon the filling into each mushroom cap, pressing gently so it stays in place.
- Bake the mushrooms for 20 minutes until the tops turn lightly golden and the filling is hot throughout.
- Remove from the oven and sprinkle the chopped parsley over the tops before serving.
Notes
Cuisine: American
Equipment: Baking sheet, Mixing bowl
Bloody Beet Hummus with Pita Wedges
This beet hummus brings a deep red color to the table that fits right in with Halloween spreads. The earthy sweetness of the beets pairs with the creamy chickpea base to create a dip that feels festive without being overly rich. It works well as a make-ahead option for parties where you want something savory to offset all the candy and desserts.
The texture stays smooth and thick enough for scooping, while the pita wedges add a light crunch. Guests can dip and enjoy without needing utensils or plates.


Equipment
- Food Processor
- Oven
- Baking Sheet
- Knife
Ingredients
- 2 medium beets
- 1 (15-ounce) can chickpeas, drained and rinsed
- 3 tablespoons tahini
- 2 tablespoons lemon juice
- 1 garlic clove
- 1/4 cup olive oil
- 1/2 teaspoon salt
- 4 pita breads
Instructions
- Preheat the oven to 400 degrees. Wrap the beets in foil and roast them for 45 minutes until tender. Let them cool, then peel and chop into chunks.
- Add the roasted beets, chickpeas, tahini, lemon juice, garlic, olive oil, and salt to a food processor.
- Blend the mixture until completely smooth, stopping to scrape down the sides as needed.
- Cut each pita bread into 8 wedges.
- Arrange the hummus in a serving bowl and place the pita wedges alongside for dipping.
Notes
Cuisine: Mediterranean
Equipment: Food Processor, Oven, Baking Sheet, Knife
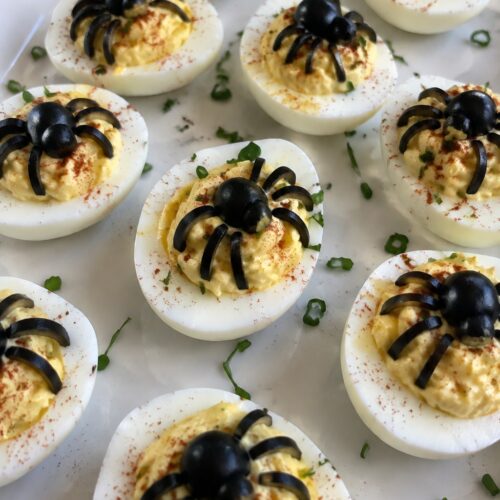
Creepy Crawly Deviled Egg Tray
These deviled eggs bring a simple savory option to a Halloween spread. The creamy filling has a light tang from mustard and a touch of paprika for warmth. They fit well as a starter that guests can pick up while mingling.
The spider details come from basic olive slices, so the recipe stays easy to prepare in advance. It balances richer sweets on the table with something cool and protein-rich.

Equipment
- Large pot
- Mixing bowl
- Knife
Ingredients
- 6 large eggs
- 3 tablespoons mayonnaise
- 1 teaspoon Dijon mustard
- 1/2 teaspoon salt
- 1/4 teaspoon black pepper
- 1/2 teaspoon paprika
- 10 pitted black olives
- 1 tablespoon chopped fresh chives
Instructions
- Place the eggs in a large pot and cover with cold water. Bring the water to a boil over medium heat, then reduce to a simmer and cook for 10 minutes.
- Drain the eggs and rinse them under cold running water until cool enough to handle. Peel off the shells and slice each egg in half lengthwise.
- Remove the yolks and place them in a mixing bowl. Add the mayonnaise, Dijon mustard, salt, black pepper, and paprika. Mash and stir until the mixture is smooth.
- Spoon or pipe the yolk mixture back into the hollows of the egg whites.
- Cut four olives in half lengthwise to form spider bodies. Slice the remaining olives into thin strips for legs. Arrange one olive half and several strips on top of each filled egg to create a spider shape.
- Scatter the chopped chives over the tray for extra color and a mild onion note.
Notes
Cuisine: American
Equipment: Large pot, Mixing bowl, Knife
Vampire Garlic Pull-Apart Bread with Marinara
This garlic pull-apart bread makes a strong savory option for a Halloween party table. The bread pulls into soft pieces that soak up plenty of garlic butter, and the marinara adds a simple dip that keeps things balanced next to sweet treats.
It works well as a shared starter or side when guests want something warm and easy to grab. The crust turns crisp while the inside stays tender with melted cheese throughout.


Equipment
- Baking sheet
- Mixing bowl
- Serrated knife
Ingredients
- 1 round loaf of crusty bread
- 1/2 cup unsalted butter, softened
- 5 garlic cloves, minced
- 1/4 cup grated Parmesan cheese
- 2 tablespoons fresh parsley, chopped
- 1/2 teaspoon salt
- 1 cup marinara sauce
Instructions
- Preheat the oven to 350 degrees F. Line a baking sheet with foil.
- In a mixing bowl, combine the softened butter, minced garlic, Parmesan cheese, parsley, and salt until evenly mixed.
- Place the loaf on the baking sheet. Use a serrated knife to score the bread in a grid pattern, cutting down almost to the bottom but not through.
- Spread the garlic butter mixture into the cuts, working it between the sections as evenly as possible.
- Wrap the loaf loosely in foil and bake for 15 minutes. Unwrap and bake 5 more minutes until the top is lightly golden.
- Warm the marinara sauce in a small saucepan over low heat. Serve it in a bowl alongside the bread for dipping.
Notes
Cuisine: American
Equipment: Baking sheet, Mixing bowl, Serrated knife
