


Planning food for a kids Halloween party gets easier when you stick to things they already like.
These 13 ideas focus on simple recipes that look festive but still get eaten.
Most use ingredients you can find at any grocery store and come together without much fuss.
You will see options for snacks, small bites, and a few sweet treats.
Each one has been made with real kids in mind so you know what to expect.
Helpful Tips Before You Start
These ideas will help the foods appeal to kids without any fuss.
Let Kids Help Assemble
Set out simple toppings like cheese slices or fruit pieces. Let them build their own snacks so they feel involved.
Use Foods They Already Like
Base recipes on familiar items such as pizza dough, yogurt, or sandwiches. Kids eat more when the main flavors stay the same.
Keep Shapes Simple
Use cookie cutters for basic forms like pumpkins or bats. Skip anything too detailed that might look odd to them.
Make Extras of the Plain Version
Offer an undecorated batch alongside the themed one. This gives kids a safe choice if they hesitate.
Prep Components Ahead
Cut vegetables or mix dips the day before. Less last-minute work means the party stays relaxed.
Mummy Hot Dogs in Crescent Rolls
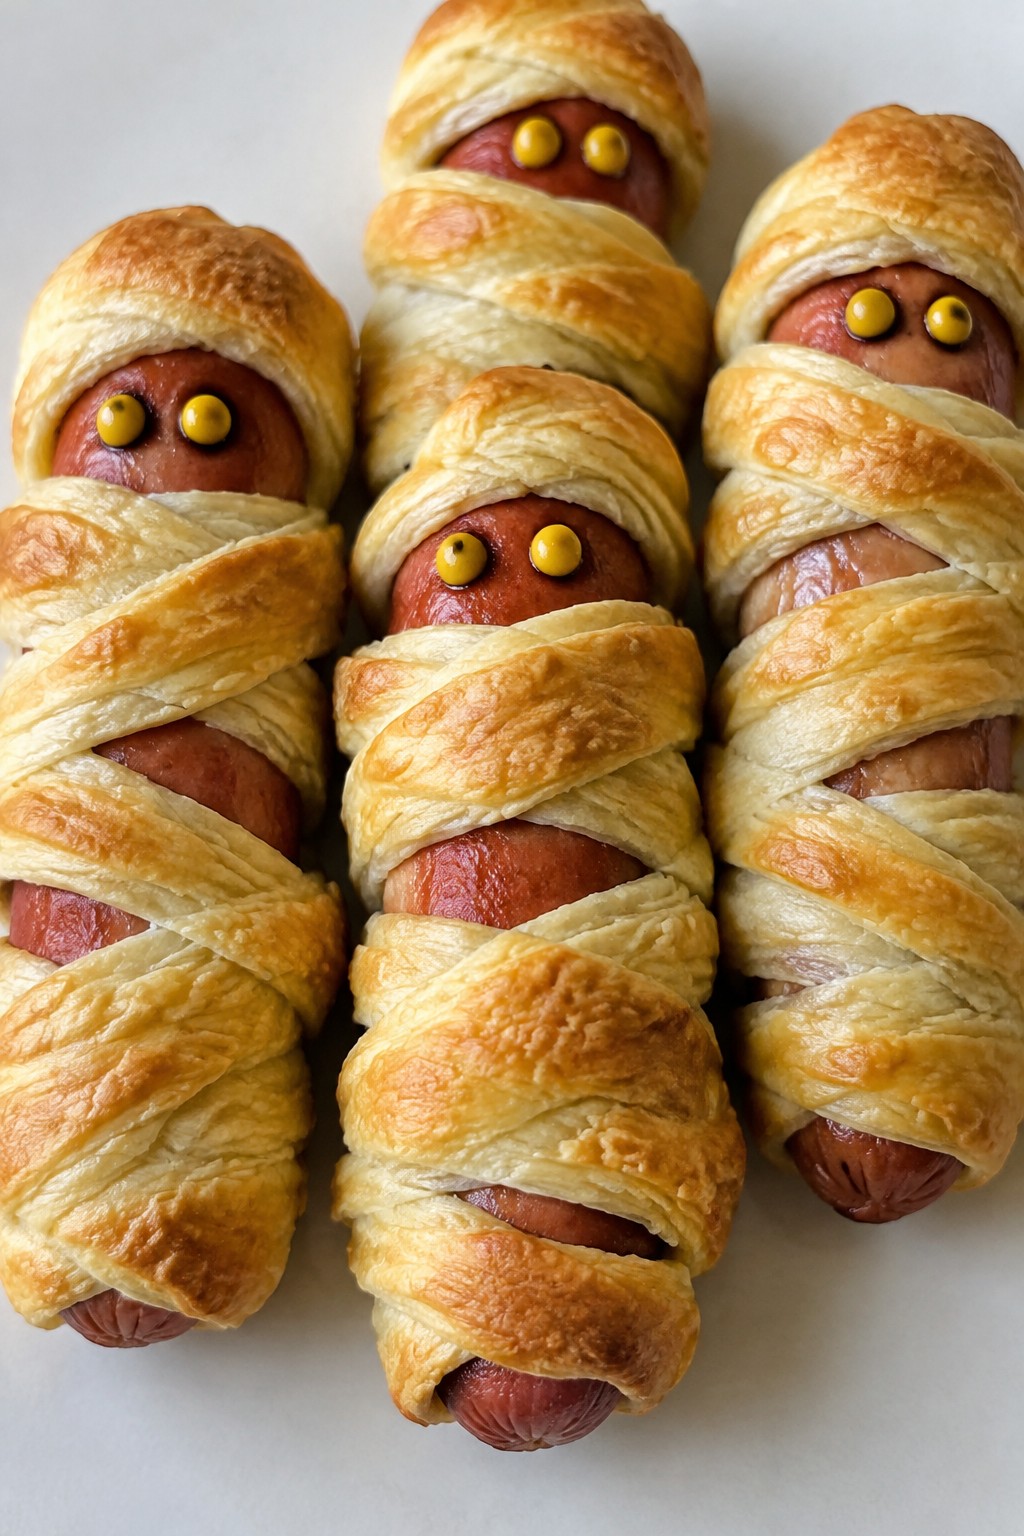
These mummy hot dogs wrap classic kid favorites in flaky crescent dough for a fun Halloween touch. Kids enjoy pulling apart the baked layers and eating the savory hot dog inside. The simple shape makes them easy to serve at parties without much fuss.
The finished result has a golden, slightly crisp exterior with a juicy center. They work well as a main bite at a kids table or as part of a larger spread.

Equipment
- Baking sheet
- Oven
- Cutting board
- Knife
Ingredients
- 4 all-beef hot dogs
- 1 tube refrigerated crescent rolls
- Yellow mustard
Instructions
- Preheat the oven to 375 degrees and line a baking sheet with parchment paper.
- Unroll the crescent dough on a cutting board and press the seams together to form one sheet. Cut the sheet into thin strips about half an inch wide.
- Wrap the strips around each hot dog in a crisscross pattern, leaving small gaps near the top for the eyes. Place the wrapped hot dogs on the baking sheet.
- Bake for 12 to 15 minutes until the dough turns golden brown.
- Remove from the oven and let cool for two minutes. Add small dots of yellow mustard in the gaps to create eyes.
Notes
Cuisine: American
Equipment: Baking sheet, Oven, Cutting board, Knife
Ghostly Pepperoni Pizza Bagels
These bagels bring a simple Halloween touch to a food kids already enjoy. The ghost shapes on top make them fun for a party without adding extra steps or unusual flavors. Each bite delivers a crisp bagel base, tangy sauce, melted cheese, and savory pepperoni.
They work well as a quick lunch or party snack when you need something that holds up on a table and still gets eaten.


Equipment
- Baking sheet
- Oven
- Knife
Ingredients
- 4 plain bagels, halved
- ¾ cup pizza sauce
- 8 slices mozzarella cheese
- 20 slices pepperoni
- 8 slices black olives
Instructions
- Preheat the oven to 400°F and line a baking sheet with parchment paper.
- Spread 1 to 2 tablespoons of pizza sauce on each bagel half.
- Place 2 to 3 slices of pepperoni on top of the sauce on each half.
- Use a small knife or ghost-shaped cutter to cut ghost shapes from the mozzarella slices. Lay one ghost on each bagel half.
- Add two olive slices to each ghost as eyes.
- Bake for 8 to 10 minutes until the cheese softens and the bagel edges turn golden.
Notes
Cuisine: American
Equipment: Baking sheet, Oven, Knife
Jack-o’-Lantern Stuffed Bell Peppers
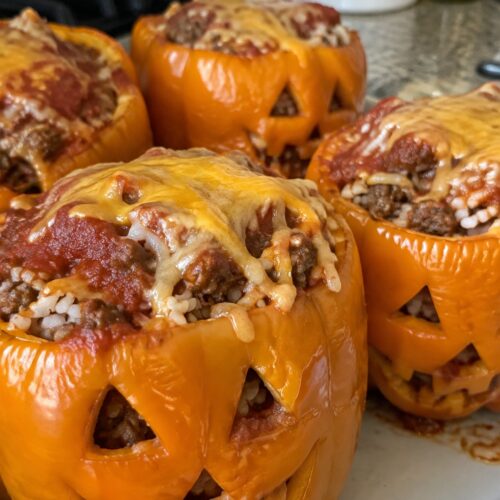
These stuffed peppers turn a simple dinner into a fun Halloween activity that kids can help with. Carving faces into the peppers gives them a playful look that fits right in at a party table, while the cheesy beef and rice filling keeps things familiar and easy to eat.
The result is a mildly seasoned dish with tender peppers and a hearty, cheesy center. It works well as a make-ahead option for busy party prep and gives kids something they recognize without any scary flavors.

Equipment
- Baking Dish
- Large Skillet
- Sharp Knife
Ingredients
- 4 large orange bell peppers
- 1 pound ground beef
- 2 cups cooked white rice
- 1 cup shredded cheddar cheese
- 1/2 cup marinara sauce
- 1 teaspoon garlic powder
- 1/2 teaspoon salt
- 1/4 teaspoon black pepper
Instructions
- Preheat the oven to 375 degrees. Cut the tops off the bell peppers and scoop out the seeds and membranes. Use a small knife to carve simple jack-o’-lantern faces on the front of each pepper.
- Place the carved peppers in a baking dish. Set the tops aside for later if desired.
- Heat a large skillet over medium heat. Add the ground beef and cook until browned, breaking it up with a spoon as it cooks. Drain any excess fat.
- Stir the cooked rice, marinara sauce, garlic powder, salt, and black pepper into the skillet with the beef. Cook for 2 to 3 minutes until everything is heated through and well mixed.
- Remove the skillet from the heat and stir in 3/4 cup of the shredded cheddar cheese until melted and combined.
- Spoon the filling evenly into the carved peppers. Sprinkle the remaining 1/4 cup cheese over the tops.
- Bake for 20 to 25 minutes until the peppers are tender and the cheese is melted and lightly golden.
Notes
Cuisine: American
Equipment: Baking Dish, Large Skillet, Sharp Knife
Spiderweb Seven Layer Dip with Tortilla Chips
This seven layer dip turns a classic party favorite into a fun Halloween centerpiece. Kids enjoy scooping it up with tortilla chips while the spiderweb design adds a playful touch without changing the flavors they already know. The layers stay mild and creamy so even picky eaters will keep coming back for more.
The dip works well for an afternoon party or after-school snack because it can be put together ahead of time and served cold. Creamy beans, smooth guacamole, and cool sour cream create a soft texture that pairs easily with crunchy chips.


Equipment
- Shallow serving dish
- zip-top bag
- spoon
- toothpick
Ingredients
- 1 can (15 oz) refried beans
- 1 cup guacamole
- 1 cup sour cream, divided
- 1 cup shredded cheddar cheese
- 1/2 cup mild salsa
- 1/4 cup sliced black olives
- 2 green onions, sliced
- Tortilla chips for serving
Instructions
- Spread the refried beans evenly across the bottom of a shallow serving dish to create the first layer.
- Spoon the guacamole over the beans and smooth it into an even layer.
- Mix 3/4 cup of the sour cream with the shredded cheddar cheese, then spread this mixture over the guacamole.
- Pour the salsa over the cheese layer and spread it gently to cover.
- Place the remaining 1/4 cup sour cream into a small zip-top bag, snip off one corner, and pipe concentric circles on top of the salsa.
- Use a toothpick to drag lines from the center outward through the circles to form a spiderweb pattern.
- Scatter the sliced black olives and green onions over the web as a final topping.
- Serve right away with tortilla chips on the side.
Notes
Cuisine: American
Equipment: Shallow serving dish, zip-top bag, spoon, toothpick
Bat Wing Barbecue Chicken Sliders
These sliders give kids a familiar barbecue chicken sandwich with a light Halloween twist. The chicken cooks until tender, then gets coated in sauce and tucked into small buns. The result is sweet, smoky, and easy to hold while wearing a costume.
They fit well at a party table because they stay warm in a slow cooker and require no forks. The soft texture and mild flavor appeal to most children without being too messy or spicy.


Equipment
- Skillet
- Cutting board
- Forks
Ingredients
- 1 pound boneless, skinless chicken breasts
- 1 cup barbecue sauce
- 1 tablespoon olive oil
- 1 teaspoon garlic powder
- ½ teaspoon salt
- 8 slider buns
- ½ cup shredded cheddar cheese
Instructions
- Cut the chicken breasts into large chunks and place them in a skillet with the olive oil over medium heat.
- Sprinkle the garlic powder and salt over the chicken, then cook for 6 to 8 minutes, turning once, until the pieces are no longer pink in the center.
- Remove the chicken from the skillet and shred it with two forks on a cutting board.
- Return the shredded chicken to the skillet and pour in the barbecue sauce. Stir over low heat for 3 to 4 minutes until the sauce coats every piece evenly.
- Split the slider buns and place the bottom halves on a serving plate. Spoon the chicken mixture onto each bun.
- Sprinkle shredded cheddar cheese over the hot chicken so it melts slightly, then add the top buns.
Notes
Cuisine: American
Equipment: Skillet, Cutting board, Forks
Frankenstein Green Deviled Eggs
These green deviled eggs give a simple twist to a classic party snack. The spinach blends right into the filling to create a bright color that fits right into a Halloween spread. Kids tend to enjoy them because the flavor stays mild and creamy without any strong bites.
The eggs work well as a make-ahead option for an afternoon party or school event. Each bite has a smooth texture from the yolk mixture and a bit of crunch from the olive pieces on top.


Equipment
- Large pot
- Blender
- Mixing bowl
Ingredients
- 6 large eggs
- 1/2 cup fresh spinach leaves
- 1/4 cup mayonnaise
- 1 tablespoon Dijon mustard
- 1/4 teaspoon salt
- 1/4 teaspoon black pepper
- 6 black olives, sliced
- 1 small piece red bell pepper
Instructions
- Place the eggs in a large pot and cover them with water. Bring the water to a boil, then turn off the heat and let the eggs sit covered for 12 minutes.
- Drain the hot water and run the eggs under cold water until they are cool enough to handle. Peel the shells and slice each egg in half lengthwise.
- Remove the yolks and place them in a blender or food processor with the spinach, mayonnaise, mustard, salt, and black pepper. Blend until the mixture turns smooth and green.
- Spoon or pipe the green filling back into the egg white halves.
- Add two olive slices to each egg half to form eyes and cut a small strip of red bell pepper to create a mouth on each one.
Notes
Cuisine: American
Equipment: Large pot, Blender, Mixing bowl
Pumpkin Mac and Cheese Bites
These bites turn classic mac and cheese into small, handheld portions with a touch of pumpkin for color and mild sweetness. Kids enjoy the creamy inside and the light crunch from the breadcrumb coating. They work well for Halloween parties because they are easy to grab and eat while moving around.
The pumpkin blends into the cheese sauce without changing the familiar flavor too much. Baking them in a muffin tin keeps the shape consistent and makes cleanup simple.


Equipment
- Large pot
- Saucepan
- Muffin tin
- Mixing bowls
Ingredients
- 8 ounces elbow macaroni
- 3 tablespoons butter
- 3 tablespoons all-purpose flour
- 1 1/2 cups milk
- 1 cup canned pumpkin puree
- 2 cups shredded cheddar cheese
- 2 large eggs
- 1/2 cup panko breadcrumbs
- 1/2 teaspoon salt
- 1/4 teaspoon black pepper
Instructions
- Preheat the oven to 375 degrees and grease a 12-cup muffin tin.
- Cook the elbow macaroni in a large pot of boiling water until al dente, then drain and set aside.
- In a saucepan, melt the butter over medium heat. Whisk in the flour and cook for one minute.
- Slowly whisk in the milk until smooth, then stir in the pumpkin puree, salt, and pepper. Cook until the sauce thickens slightly.
- Remove the sauce from heat and stir in the shredded cheddar cheese until melted.
- In a large bowl, beat the eggs, then mix in the cooked macaroni and cheese sauce until everything is coated.
- Spoon the mixture evenly into the prepared muffin tin, filling each cup to the top. Sprinkle panko breadcrumbs over each bite.
- Bake for 20 to 25 minutes until the tops are golden and the bites feel set. Cool for five minutes before removing from the tin.
Notes
Cuisine: American
Equipment: Large pot, Saucepan, Muffin tin, Mixing bowls
Candy Corn Yogurt Parfaits
These parfaits use simple yogurt layers to copy the look of candy corn without any extra baking. They come together fast and give kids a familiar creamy treat with a sweet topping they recognize from Halloween. The result is a cool, smooth texture with chewy candy pieces that keeps little eaters interested.
The mild vanilla flavor stays mild enough that most children accept it, while the colored layers add visual appeal for a party table. Clear cups show off the stripes and make the snack feel special without extra work.


Equipment
- Mixing bowls
- spoons
- clear cups
Ingredients
- 2 cups vanilla yogurt
- Yellow food coloring
- Orange food coloring
- 1/2 cup candy corn
Instructions
- Divide the vanilla yogurt evenly into three small bowls.
- Add yellow food coloring to the first bowl and stir until the color is even. Add orange food coloring to the second bowl and stir until the color is even. Leave the third bowl plain.
- Spoon the yellow yogurt into the bottom of four clear cups or small glasses.
- Add a layer of the orange yogurt on top of the yellow layer in each cup.
- Finish with a layer of the plain yogurt.
- Sprinkle candy corn over the top of each parfait just before serving.
Notes
Cuisine: American
Equipment: Mixing bowls, spoons, clear cups
Witch Finger Sugar Cookies with Almond Nails
These cookies give kids a fun way to join in the Halloween fun without any scary flavors. The buttery dough holds its shape well during baking, and the almond pieces add a light crunch at the tip of each finger. They work well for classroom parties or small at-home gatherings where you want something simple that still feels themed.
The finished cookies taste like classic sugar cookies with a mild sweetness and soft texture. Green coloring turns the dough into a playful witch green that stands out on a snack table.


Equipment
- Mixing Bowl
- Baking Sheet
- Parchment Paper
Ingredients
- 1 cup all-purpose flour
- 1/2 cup unsalted butter, softened
- 1/4 cup granulated sugar
- 1 large egg
- 1 teaspoon vanilla extract
- 1/2 teaspoon baking powder
- 1/4 teaspoon salt
- 4 drops green food coloring
- 12 whole almonds
Instructions
- Preheat the oven to 350 degrees and line a baking sheet with parchment paper.
- In a mixing bowl, beat the softened butter and sugar together until smooth.
- Add the egg and vanilla extract, then mix until combined.
- Stir in the flour, baking powder, and salt until a soft dough forms.
- Mix in the green food coloring until the color is even throughout the dough.
- Scoop out small portions of dough and roll each into a thin log about 3 inches long to form a finger shape.
- Place the logs on the prepared baking sheet and press one almond firmly into the end of each log to create a nail.
- Use a knife to lightly score two lines across the middle of each log for knuckles.
- Bake for 10 to 12 minutes until the edges are lightly golden.
- Cool the cookies on the baking sheet for 5 minutes before moving them to a wire rack.
Notes
Cuisine: American
Equipment: Mixing Bowl, Baking Sheet, Parchment Paper
Graveyard Chocolate Pudding Cups
These chocolate pudding cups turn a simple dessert into a fun graveyard scene that kids enjoy making and eating. The rich pudding pairs with crunchy cookie crumbs for a treat that feels special without being complicated. They work well at Halloween parties or as an easy after-school project when you want something themed but still kid-approved.
The flavor is straightforward chocolate with a slightly sandy cookie layer on top. Each cup gets its own cookie tombstone so the whole batch looks like a mini graveyard once assembled.


Equipment
- Mixing bowl
- Whisk
- Zip-top bag
- Rolling pin
Ingredients
- 1 package (3.9 ounces) instant chocolate pudding mix
- 2 cups cold milk
- 20 chocolate sandwich cookies
- 4 rectangular chocolate cookies
- Black decorating icing
- 4 clear plastic cups
Instructions
- Pour the instant chocolate pudding mix and cold milk into a mixing bowl. Whisk for two minutes until the pudding thickens and no lumps remain.
- Place 16 chocolate sandwich cookies in a zip-top bag and crush them with a rolling pin until they form fine crumbs. Set the remaining four cookies aside for later.
- Spoon the finished pudding evenly into the four clear plastic cups, filling each one about three-quarters full.
- Sprinkle the crushed cookie crumbs over the top of the pudding in each cup to create the dirt layer.
- Press one rectangular chocolate cookie upright into the crumbs at the back of each cup to act as a tombstone.
- Use the black decorating icing to write simple letters such as RIP on the front of each rectangular cookie.
Notes
Cuisine: American
Equipment: Mixing bowl, Whisk, Zip-top bag, Rolling pin
Monster Veggie Skewers with Ranch Dip
These skewers turn basic vegetables into playful bites that kids actually reach for at parties. The bright colors and simple assembly make them feel like a game, while the ranch dip gives a familiar creamy flavor that helps picky eaters try new veggies.
They fit well at Halloween events because they require no cooking and can be made ahead. Crisp textures and mild taste keep the focus on fun rather than strong flavors.


Equipment
- Cutting board
- Sharp knife
- Wooden skewers
- Serving platter
Ingredients
- 8 wooden skewers
- 1 pint cherry tomatoes
- 1 large cucumber, cut into 8 thick rounds
- 2 bell peppers, cut into 8 chunks total
- 8 broccoli florets
- 1 cup ranch dressing
Instructions
- Lay out the prepared vegetables on a cutting board so each skewer gets one of each item.
- Thread a cherry tomato onto a skewer, followed by a cucumber round, a bell pepper chunk, and a broccoli floret.
- Repeat the same order on the remaining skewers until all eight are filled.
- Arrange the skewers on a platter with the ranch dressing in a small bowl for dipping.
Notes
Cuisine: American
Equipment: Cutting board, Sharp knife, Wooden skewers, Serving platter
Skeleton Bone Breadsticks with Marinara
These skeleton bone breadsticks give a playful Halloween twist to a simple snack that kids already enjoy. The bone shape makes them stand out on a party table, and the mild garlic and cheese flavor keeps them approachable for young eaters. They pair naturally with marinara for dipping, which adds a bit of fun without any extra effort.
The breadsticks turn out soft inside with a lightly crisp edge from the oven. They work well as a quick addition to a kid-focused spread and hold up fine even after sitting out for a while.


Equipment
- Baking sheet
- Parchment paper
- Small saucepan
Ingredients
- 1 (16-ounce) package refrigerated pizza dough
- 2 tablespoons olive oil
- 1 teaspoon garlic powder
- 1/4 cup grated Parmesan cheese
- 1 cup marinara sauce
Instructions
- Preheat the oven to 400 degrees and line a baking sheet with parchment paper.
- Unroll the pizza dough on a lightly floured surface and divide it into 8 equal pieces.
- Roll each piece into a long rope about 6 inches in length, then press the ends slightly wider to form a bone shape.
- Place the shaped dough on the prepared baking sheet and brush each piece lightly with olive oil.
- Sprinkle the garlic powder evenly over the breadsticks, followed by the grated Parmesan cheese.
- Bake for 12 to 15 minutes until the breadsticks are golden on the edges.
- Warm the marinara sauce in a small saucepan or microwave and serve it alongside the breadsticks for dipping.
Notes
Cuisine: American
Equipment: Baking sheet, Parchment paper, Small saucepan
Spooky Caramel Popcorn Snack Mix
This snack mix brings together caramel-coated popcorn with crunchy and chewy add-ins that appeal to kids. It works well as a grab-and-go option at Halloween parties or movie nights because it travels easily and stays fresh for hours.
The finished mix has a sweet caramel taste with salty notes from the pretzels and bursts of color from the candies. The popcorn stays light and crisp while the other pieces add different textures in every handful.


Equipment
- Large bowl
- Medium saucepan
- Baking sheet
Ingredients
- 8 cups popped popcorn
- ½ cup butter
- 1 cup packed brown sugar
- ¼ cup light corn syrup
- ½ teaspoon vanilla extract
- ¼ teaspoon baking soda
- 1 cup pretzel twists
- ½ cup candy corn
- ½ cup mini marshmallows
- ¼ cup Halloween sprinkles
Instructions
- Preheat the oven to 250°F and line a baking sheet with parchment paper. Place the popped popcorn in a large bowl and set it aside.
- In a medium saucepan, melt the butter over medium heat. Stir in the brown sugar and corn syrup until the mixture comes to a boil. Let it boil for 4 minutes without stirring.
- Remove the pan from the heat and stir in the vanilla extract and baking soda. The mixture will bubble up slightly.
- Pour the caramel over the popcorn in the bowl and toss gently with a spatula until the popcorn is evenly coated.
- Spread the coated popcorn onto the prepared baking sheet in a single layer. Bake for 20 minutes, stirring once halfway through.
- Remove the baking sheet from the oven and let the popcorn cool for 10 minutes. Stir in the pretzel twists, candy corn, mini marshmallows, and Halloween sprinkles until evenly distributed.
Notes
Cuisine: American
Equipment: Large bowl, Medium saucepan, Baking sheet
